If you can see the camera name appeared in the video conference software yet failing to see the camera video. It’s likely that the camera is occupied by other software (other video conference software, camera setting tool, streaming software such as OBS, etc). Please turn off ALL other software that could be occupying the camera to trouble shoot this issue. For example, it’s not rare that one fails to open the camera in Zoom because it was still occupied by a MicroSoft Teams meeting.
According to USB-IF specifications, each type of USB cable cannot exceed a certain length, as shown below. Video signal can diminish if goes beyond the specification.
USB2.0- Cable length limit 5M/16.4ft
USB3.0/3.1 Gen 1- Cable length limit 2M/6.6ft
USB3.1 Gen 2- Cable length limit 1M/3.3ft
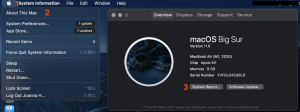
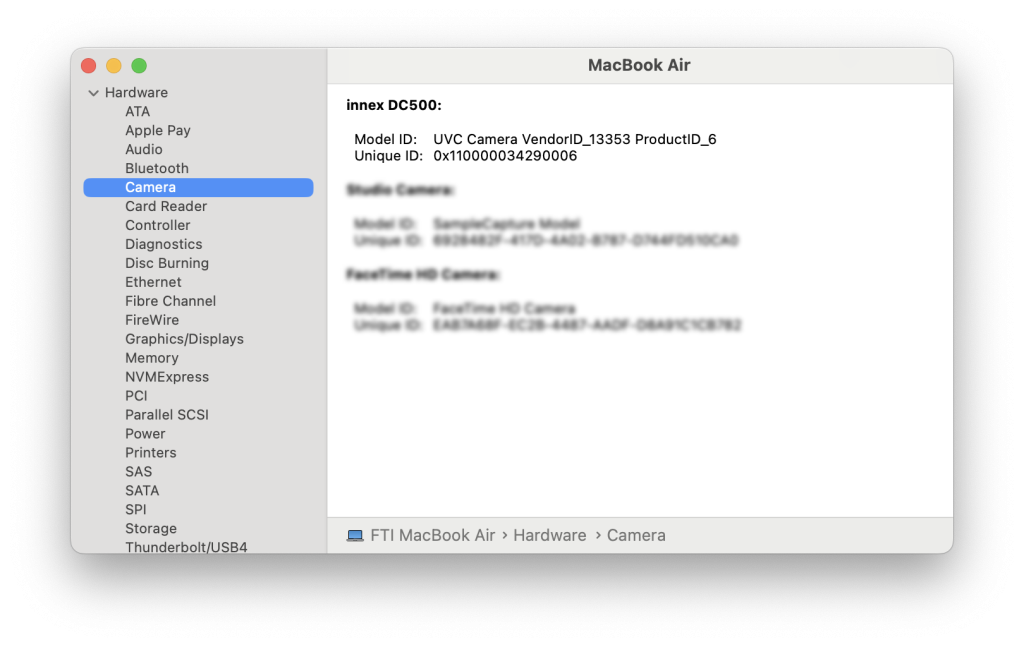
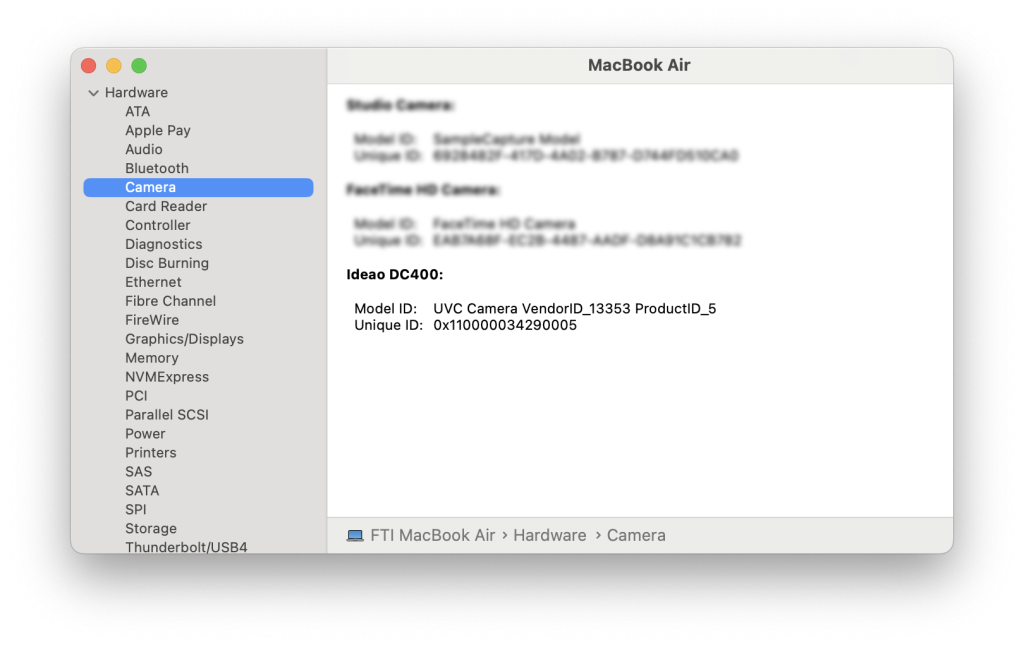
- Make sure your Mac recognize the camera. Go to “About this mac” > System Report
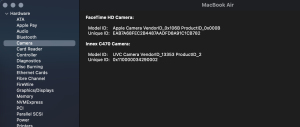
- Go to Hardware > Camera. When the mac recognizes the camera, you will see its model name and related information. If the camera is not recognized by Mac, re-connect again.
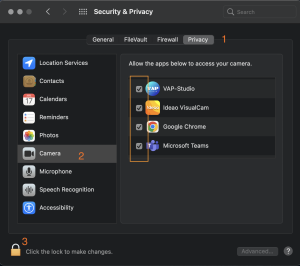
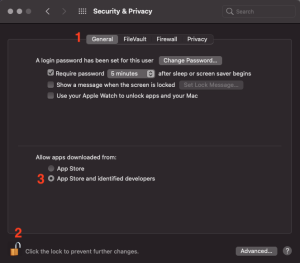
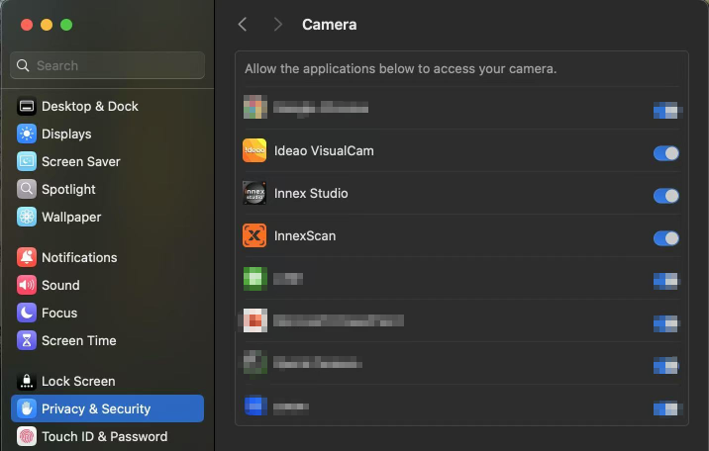
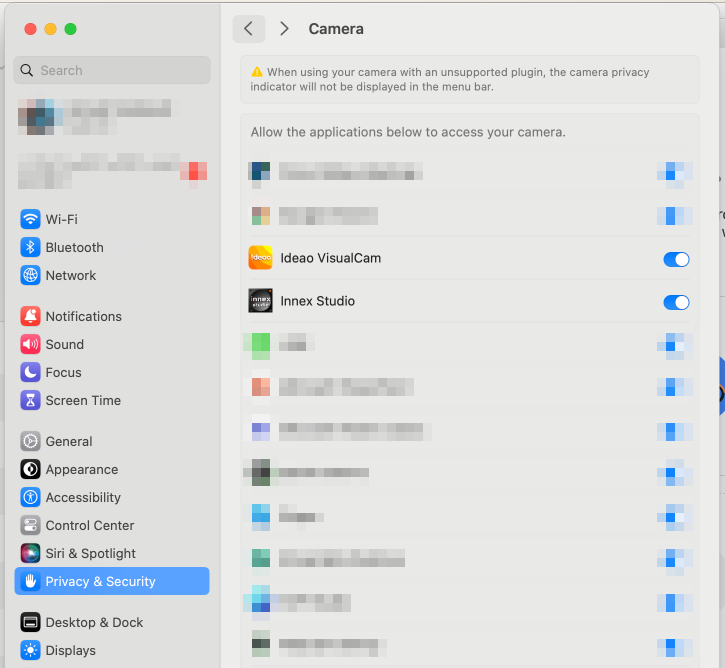
- Go to “System Preferences” > “Security & Privacy”, follow the steps below and check if the software is on the list. Allow the app to access your camera.
Yes, Innex Cube’s AI technology is based on human figure detection, so its AI-tracking works on faces with masks.
Innex Cube does not require any additional software or app for using AI feature. Every function can be operated by the remote control.
Only when you want to upgrade the Cube (update firmware), you will need to download Innex Studio software to do so.
Yes, there are two ways to help.
- Setup an AI disabled area: Ignore Zone, in order to prevent unnecessary distractions by people passing by the meeting room door. Ignore zone can be set at the settings menu with remote control.
- After all the participants are seated, enter the OSD menu and select “Track Once” to fix the shooting position. However, if someone move out of the windows under “Track Once”, the AI will not re-detect their position.
Up to 8 people can be auto-tracked at once. If two people are sitting close to each other, Innex Cube might merge them together in order to have better outcome result.
We recommend sitting at least 2.3ft (70cm) away from the camera for optimal image stitching results. Beyond this distance, the stitching line is hardly noticeable. If you observe incorrect image stitching, please check three things:
- Ensure you are not sitting too close to the camera.
- Confirm that the USB port you are using is a 3.0 port to provide adequate power to the Innex Cube.
- Ensure you upgrade the Cube to the latest firmware.
Yes, you can download our software Innex Studio to update Innex Cube’s firmware.
Download Innex Studio and install to your computer. Innex Studio has two version: for Windows and for Mac. https://funtechinnovation.com/downloads/
2. 2. Connect Innex Cube to your computer and start Innex Studio. Please make sure that your computer is connected to the Internet and Cube is not used in other software such as Zoom, or Teams.
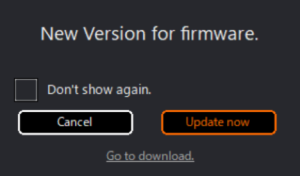
3. If the firmware update is available, a pop-up window “New Version for firmware” will appear on the screen. Click “Update now”.
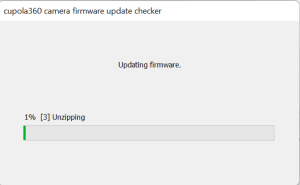
4. Firmware update will start. Wait until the status becomes 100% to complete the firmware update.
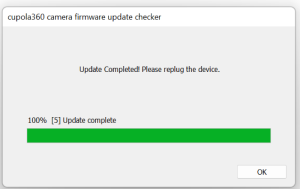
 5. After firmware update has been done, click “OK”. Unplug and plug the Innex Cube USB cable to restart Innex Cube.
- If the PC blocks access to USB mass storage devices, the firmware update, which requires writing the firmware to the camera’s internal storage, will also be blocked. Please unblock the computer’s access to USB mass storage devices or contact your company’s IT administrator to have it unblocked.
Some UC (Unified Communications) software includes its own auto‑framing feature. When this feature is enabled, it may conflict with the Innex Cube’s built‑in AI functions, causing unexpected layout changes or unstable auto‑layout behavior. To avoid this issue, please make sure to disable the auto‑framing feature in your UC software in advance.
Yes, the facial detection and tracking works on faces with masks.
Yes, Innex Studio is required to unleash all the AI capabilities from C831. It can be downloaded at funtechinnovation.com/downloads/
Innex Studio is a software that works specifically with C831. It has sophisticated AI features such as simultaneous facial tracking (up to 8 people), auto-framing, and whiteboard studio mode. The software also performs firmware update for C831. Innex Studio is available for both Windows and Mac – it can be downloaded at funtechinnovation.com/downloads/
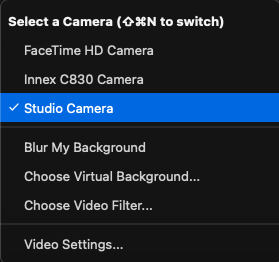
Please keep the Innex Studio software ON during the video call. In the camera setting, select “Studio Camera” as your camera, instead of selecting “Innex C831 Camera”.

Select the video mode you want in Innex Studio, the preview you see in Innex Studio will be shared in the video conference software.
For more information, check our Youtube video here.
This situation should only happen on Windows computers. Navigate to “Settings” -> “Bluetooth & devices,” then find “AutoPlay,” or simply type “AutoPlay” in the search bar. Turn off “Use AutoPlay for all media and devices,” or select “Take no action” from the drop-down menu of “Removable drive.”
- If the PC blocks access to USB mass storage devices, the firmware update, which requires writing the firmware to the camera’s internal storage, will also be blocked. Please unblock the computer’s access to USB mass storage devices or contact your company’s IT administrator to have it unblocked.
Some UC (Unified Communications) software includes its own auto‑framing feature. When this feature is enabled, it may conflict with the Innex C831’s built‑in AI functions, causing unexpected layout changes or unstable auto‑layout behavior. To avoid this issue, please make sure to disable the auto‑framing feature in your UC software in advance.
Yes, the facial detection and tracking works on faces with masks.
Yes, Innex Studio is required to unleash all the AI capabilities from C830. It can be downloaded at funtechinnovation.com/downloads/
Innex Studio is a software that works specifically with C830. It has sophisticated AI features such as simultaneous facial tracking (up to 8 people), auto-framing, and whiteboard studio mode. The software also performs firmware update for C830. Innex Studio is available for both Windows and Mac – it can be downloaded at funtechinnovation.com/downloads/
Please keep the Innex Studio software ON during the video call. In the camera setting, select “Studio Camera” as your camera, instead of selecting “Innex C830 Camera”.
Select the video mode you want in Innex Studio, the preview you see in Innex Studio will be shared in the video conference software.
For more information, check our Youtube video here.
This situation should only happen on Windows computers. Navigate to “Settings” -> “Bluetooth & devices,” then find “AutoPlay,” or simply type “AutoPlay” in the search bar. Turn off “Use AutoPlay for all media and devices,” or select “Take no action” from the drop-down menu of “Removable drive.”
- If the PC blocks access to USB mass storage devices, the firmware update, which requires writing the firmware to the camera’s internal storage, will also be blocked. Please unblock the computer’s access to USB mass storage devices or contact your company’s IT administrator to have it unblocked.
Some UC (Unified Communications) software includes its own auto‑framing feature. When this feature is enabled, it may conflict with the camera’s built‑in AI functions, causing unexpected layout changes or unstable auto‑layout behavior. To avoid this issue, please make sure to disable the auto‑framing feature in your UC software in advance.
Auto-framing of C570 is designed to work on subject that is at an optimal range of 1-5M(3.2-16.4ft) from the camera. When only 1 person appears in the shot at a close range (within 1 meter), the auto-framing will be less stable than how it would normally be.
Potential disturbance in the background may also interfere – people walking by, heads seen through glass, or faces seen from reflection of the meeting room display can all make auto-framing seem unstable. If it is not possible to avoid the above mentioned disturbances, it might be better to disable auto-framing. You may diable auto-framing with remote control or the button on C570.
You may disable or enable the auto-framing using the remote control or the button on the C570. When it is in AI mode, press “AI/M” button on the remote control or the button on the camera.
If you wish to permanently turn off AI mode when you start up the camera, use the remote control, go to “settings” -> “Mode” -> “Autoframing” and select “Manual”.
Yes. If you don’t want the camera to automatically framing in and out, you can disable auto-framing. Yet the 120° view angle is too wide, you can manually adjust digital zoom with the remote control or the button on the camera. Select your region of interest with arrow keys on the remote control.
Yes, the auto-framing works on faces with masks.
The auto-framing zoom in ratio depends on its output resolution. The zoom in ratio is 3X if the resolution is equal to or below 720p, or 2X if the resolution is equal to or above 1080p. Most video conference software will request the camera to output video resolution at 720p or below so it is likely that the zoom in ratio will be 3X during video conference.
No, unlike many other camera models that boasted auto-framing, the Innex C570 has the AI based auto-framing feature built-in.
Before performing a firmware update, please check the firmware currently installed on your camera.
To check the current firmware version:
1. Open Settings using the remote control.
2. Go to System from the side menu.
3. Check FW Version.: If it shows V684, you already have the latest version, and no update is needed.
To update the firmware, follow these steps:
1. Download the latest firmware from this line.
2. Unzip the downloaded file.
3. Connect the C570 to your PC.
4. Double-click USBDownloadToolV2.4.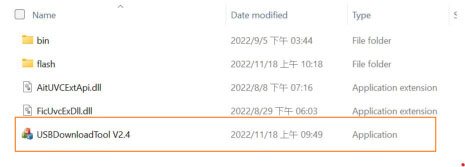
5. In the pop-up window, make sure Innex C570 VID_3429&PID_0004 is selected.
6. Click Update Firmware to start the update.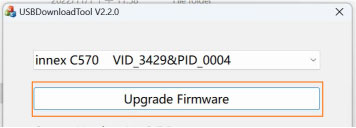
7. Wait until the update is complete and a confirmation message appears.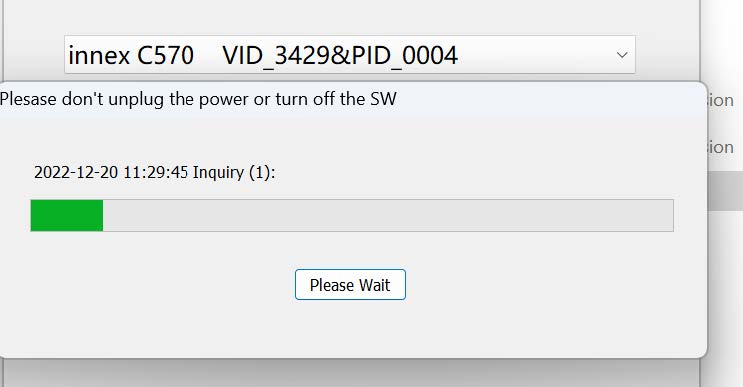
8. Click OK.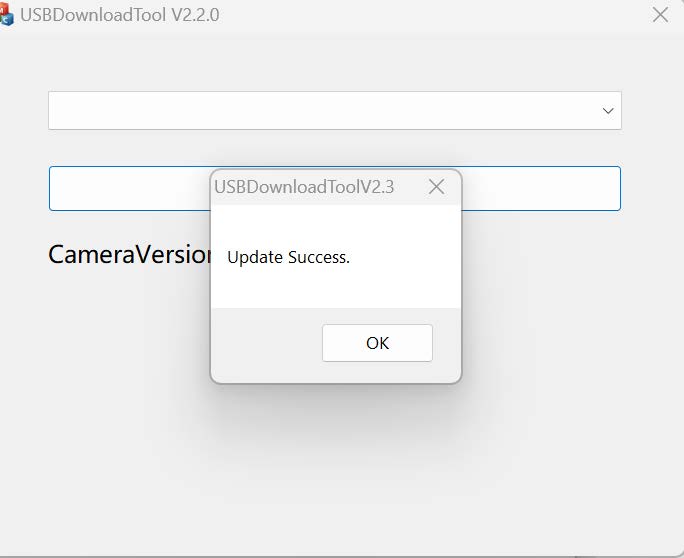
9. Return to Settings and confirm that the FW Version shows the latest version.
If the operating system is not Windows, the C570 retains the flicker setting. However, on Windows, the default Camera app can override the camera’s settings.
For example, even if you set the C570’s Powerline Frequency to 50Hz, if the Windows Camera app is set to 60Hz, the setting will revert to 60Hz every time the camera is restarted, even when using the camera with other apps.
To maintain the correct Powerline Frequency, please update the setting directly in the Windows Camera app.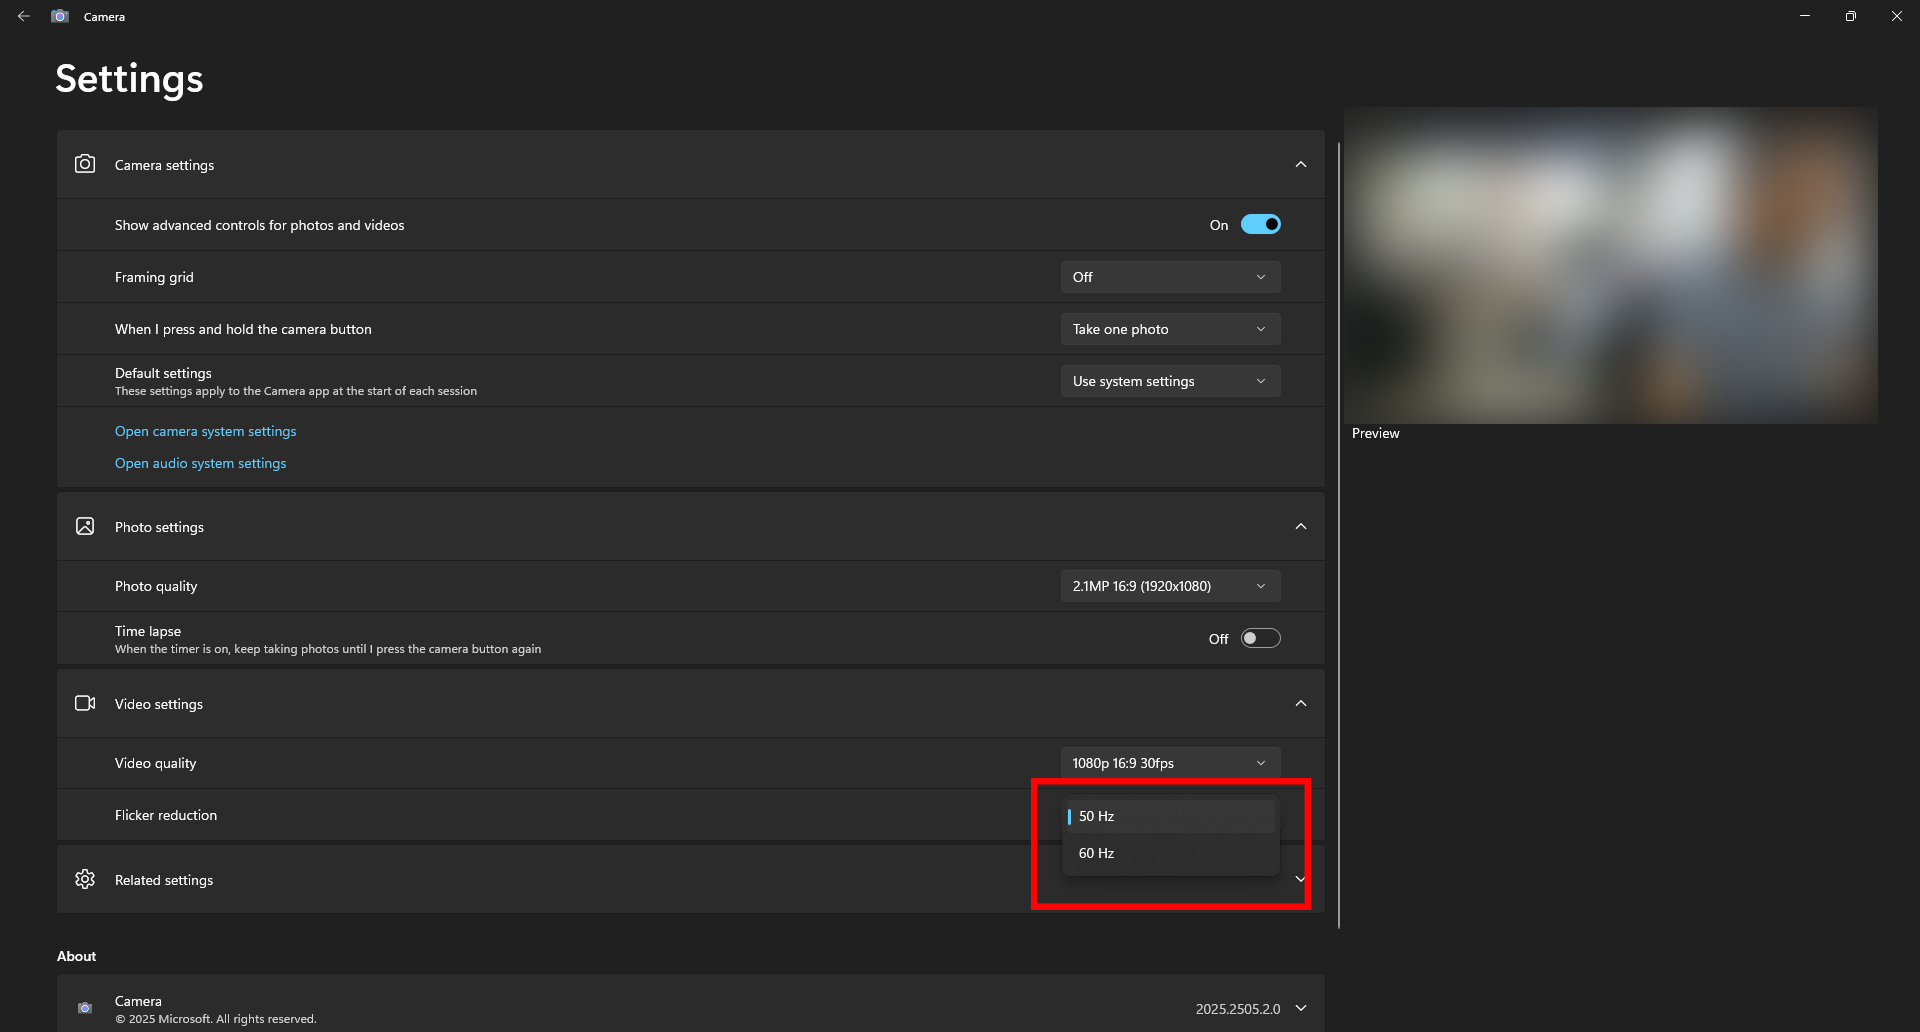
If you are using the Windows default Camera app, it overrides the camera’s settings and starts with the default view without ePTZ. You can long-press the “OK” button on the remote to jump to the Preset. For other apps and operating systems, the camera should start with the Preset view.
If the microphone audio sounds distant while using the C570 with an Android device, the unit may not be running the latest firmware version.
Please check whether your C570 has been updated to the latest firmware. You can download the latest firmware here.
To check the current firmware version:
1. Open Settings using the remote control.
2. Go to System from the side menu.
3. Check FW Version.: If it shows V684 or later, you already have the latest version, and no update is needed.
For detailed instructions on updating the firmware, please refer to “How to update the firmware?”.
Some UC (Unified Communications) software includes its own auto‑framing feature. When this feature is enabled, it may conflict with the Innex C570’s built‑in AI functions, causing unexpected layout changes or unstable auto‑layout behavior. To avoid this issue, please make sure to disable the auto‑framing feature in your UC software in advance.
Auto-framing of C470 is designed to work on subject that is at an optimal range of 1-5M(3.2-16.4ft) from the camera. When only 1 person appears in the shot at a close range (within 1 meter), the auto-framing will be less stable than how it would normally be.
Potential disturbance in the background may also interfere – people walking by, heads seen through glass, or faces seen from reflection of the meeting room display can all make auto-framing seem unstable. If it is not possible to avoid the above mentioned disturbances, it might be better to disable auto-framing. Please check the video (01’28”) to learn how to disable auto-framing.
Software download https://funtechinnovation.com/downloads/
You may disable or enable the auto-framing using the Innex Camera software https://funtechinnovation.com/downloads/
Turn on the software and plug in the C470 camera into your computer. Go to the video tab -> Click on auto-framing -> Close and open the auto-framing button to disable or enable auto-framing. Please check the video (01’28) to disable auto-framing.
If it’s better to disable auto-framing in your environment, yet the 120° view angle is too wide, you can manually set the desired field of view (FOV) and region of interest (ROI) by adjusting with digital pan-tilt-zoom (EPTZ) that is available in Innex Camera (VAP Studio). Check under FAQ ->Innex ->Innex Camera->How do I use the digital pan tilt zoom ( EPTZ) feature?
Please use Innex Camera (VAP Studio) to update C470 to the newest firmware version which is listed at C470 download section. https://funtechinnovation.com/downloads/
To perform a firmware update, please follow the following steps:
- Connect your C470 to your computer.
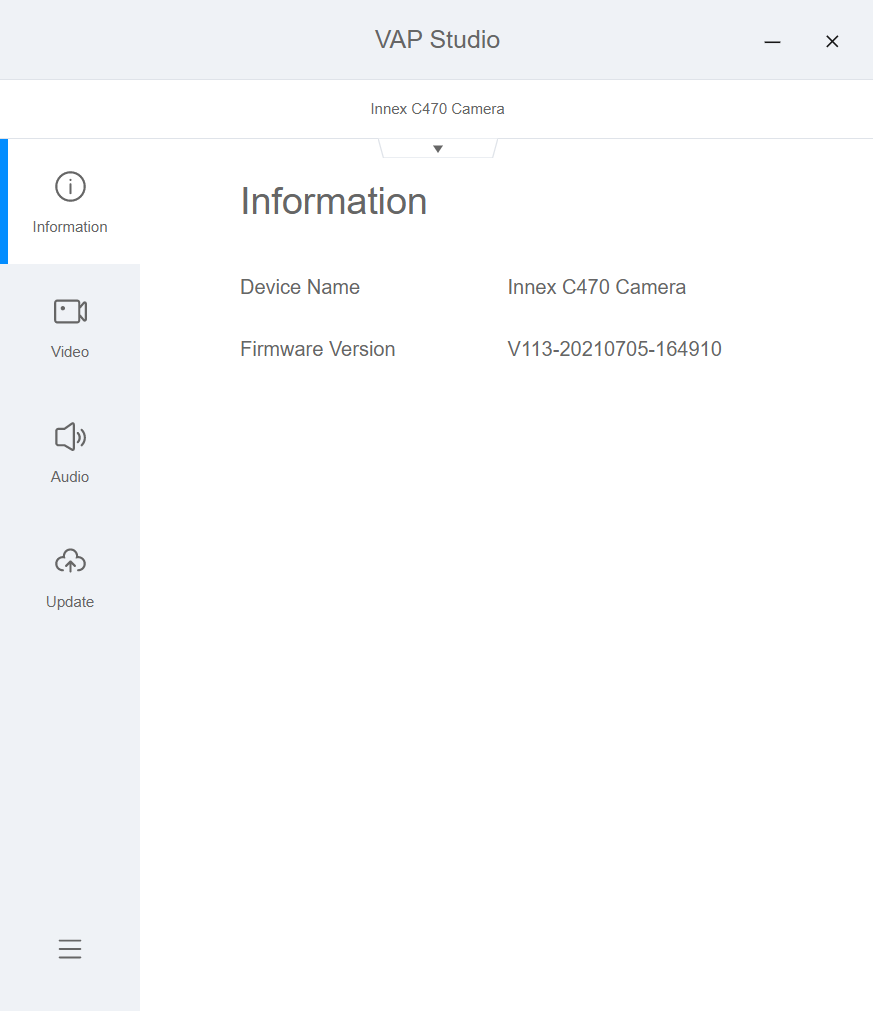
- Start VAP-Studio by clicking VAP-Studio Icon.
- Check the current FW version of your C470 under the information tab.
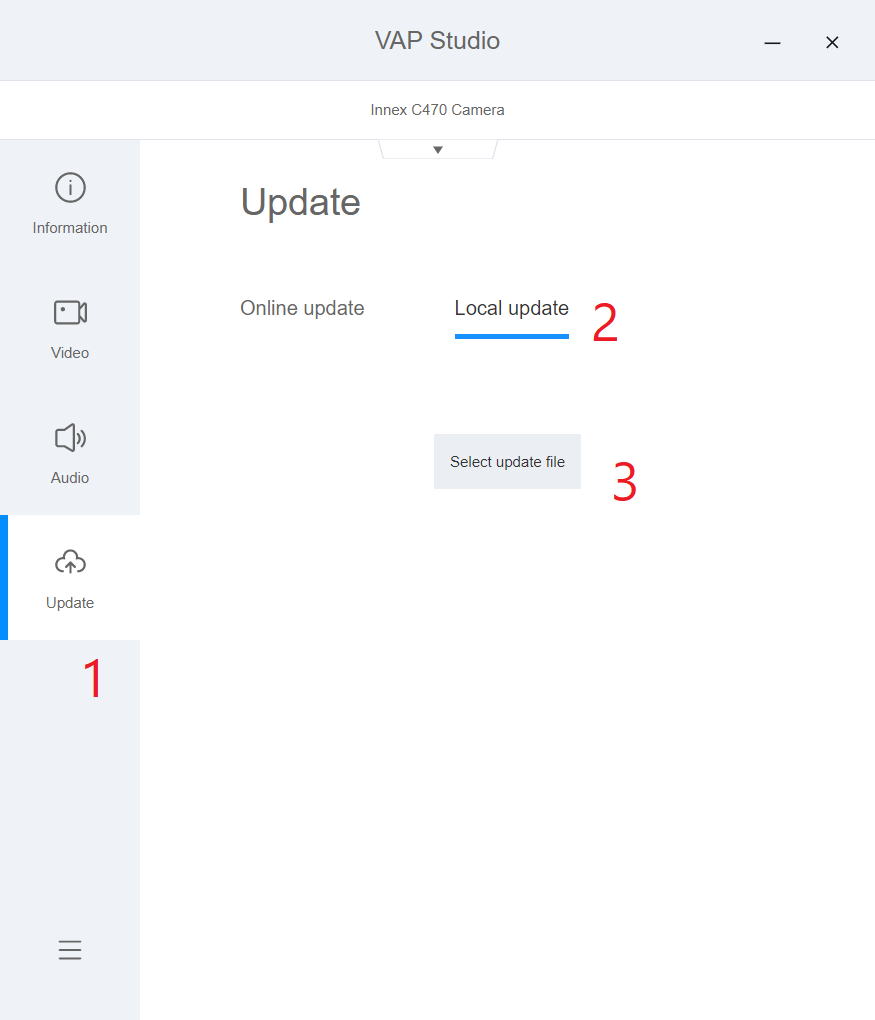
- If FW update is required, click the update tab, and click local update, and select the newest firmware version (.bin) from the folder it was downloaded to. The update process will start and C470 will restart after the firmware update.
Yes, the auto-framing works on faces with masks.
The auto-framing zoom in ratio depends on its output resolution. The zoom in ratio is 3X if the resolution is equal to or below 720p, or 2X if the resolution is equal to or above 1080p. Most video conference software will request the camera to output video resolution at 720p or below so it is likely that the zoom in ratio will be 3X during video conference.
No, unlike many other camera models that boasted auto-framing, the Innex C470 has the AI based auto-framing feature built-in camera.
- Go to C220 download section on https://funtechinnovation.com/downloads/ to download the Innex Camera (VAP Studio).
- Connect your C220 to your computer.
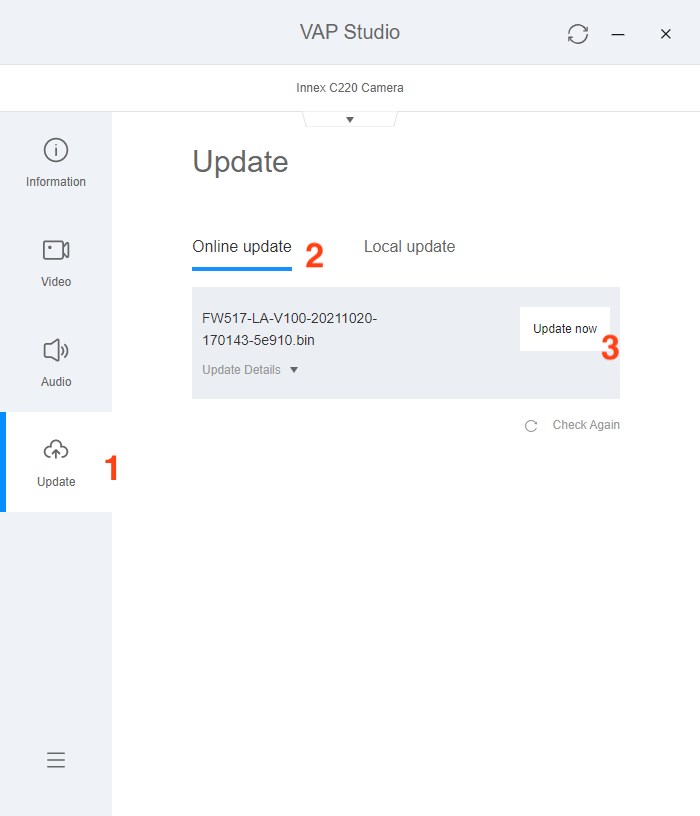
- Start VAP Studio by clicking VAP Studio Icon.
- Click the update tab (1), and click online update (2), then click update now (3).
Please note that the status indicated as “Driver is unavailable” does not mean there is any issue with C220’s audio.
If your C220 has firmware prior to the 2021 Sept. 27th release, it might be shown as “Driver is unavailable” in Audio under Bluetooth & other devices setting. 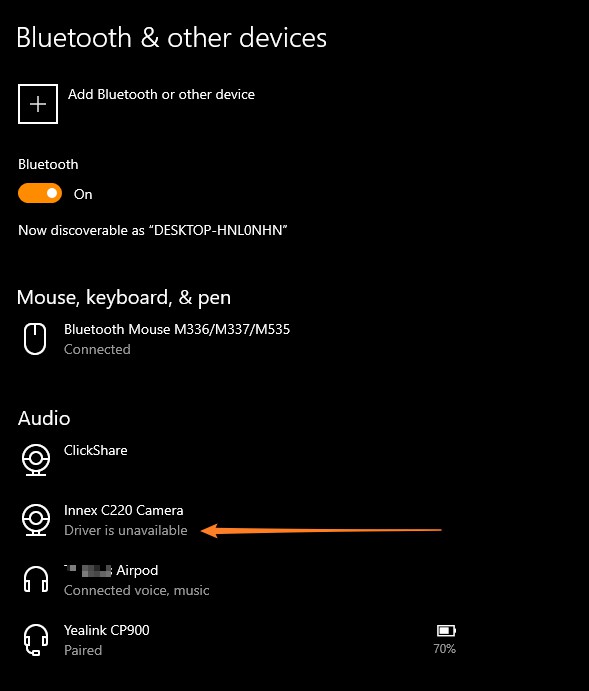 Simply update C220 with firmware released on or later than 2021 Sept. 27th to get rid of this status.
Yes, the facial detection and tracking works on faces with masks.
Yes, Innex Studio is required to unleash all the AI capabilities from C830. It can be downloaded at funtechinnovation.com/downloads/
Innex Studio is a software that works specifically with C830. It has sophisticated AI features such as simultaneous facial tracking (up to 8 people), auto-framing, and whiteboard studio mode. The software also performs firmware update for C830. Innex Studio is available for both Windows and Mac – it can be downloaded at funtechinnovation.com/downloads/
Please keep the Innex Studio software ON during the video call. In the camera setting, select “Studio Camera” as your camera, instead of selecting “Innex C830 Camera”.
Select the video mode you want in Innex Studio, the preview you see in Innex Studio will be shared in the video conference software.
For more information, check our Youtube video here.
If your software version is 1.3515.1 or older and you’re using Mac OS 14.1 or later, the Studio Camera may not appear in the camera list. It is required to update the Innex Studio first.
If your Mac is connected to internet and launch Innex Studio, the message “New Version For Innex Studio” pops up. Press “Update now”, follow the instruction and complete the software update.

You may also download the latest version Innex Studio from the link below and manually update it.
https://drive.google.com/drive/folders/1r7kUWcbT6G7Bhi94UZ1eXsRvgOL5udcN?usp=sharing
After update is completed, the dialog appears saying “System Extension Blocked”.

Press “Open System Settings” and Allow “System software from application “Innex Studio” was blocked for loading.

After Allowing, go back to Innex Studio and the message “System restart required….” appears. Press OK and restart the Innex Studio.

If you do not press “OK” when the message is displayed, you can change the setting manually later. Go to “Settings” on macOS, select “General” > “Login Items & Extensions,” scroll down, click the “!” next to “Camera Extensions” under “Extensions,” and turn on “Innex Studio.”
After completing those processes, Studio Camera should appear in the camera list. If it still does not appear, please restart the Mac.
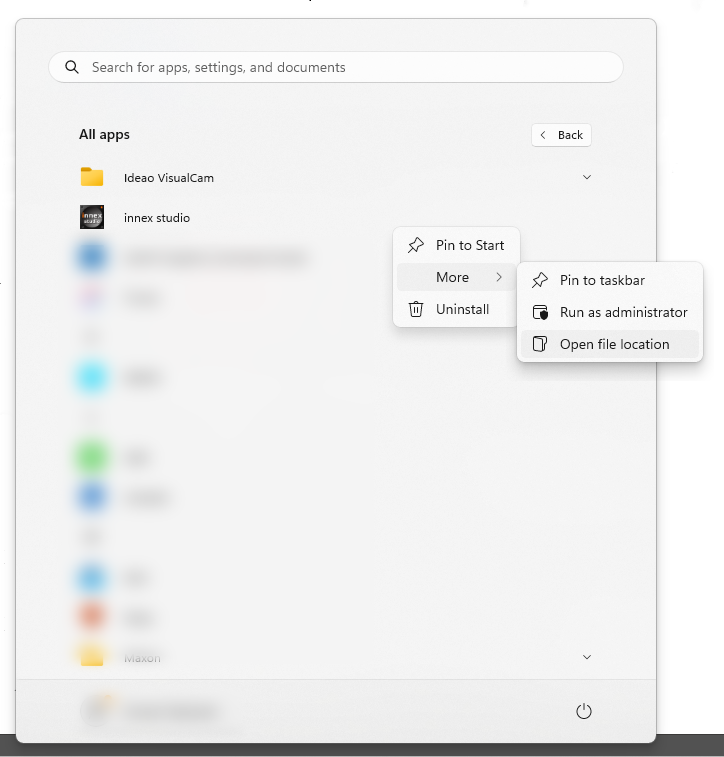
Please follow the steps below to run the software automatically at startup in Windows.
- Select the Start button and scroll to find the app.
- Right-click the app, select More, and then select Open file location. This opens the location where the shortcut to the app is saved.
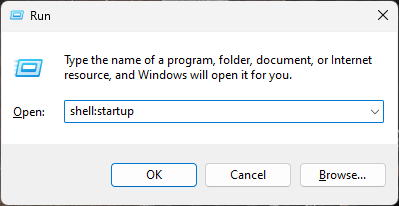
- With the file location open, press the Windows logo key+ R, type shell:startup, then select OK. This opens the Startup
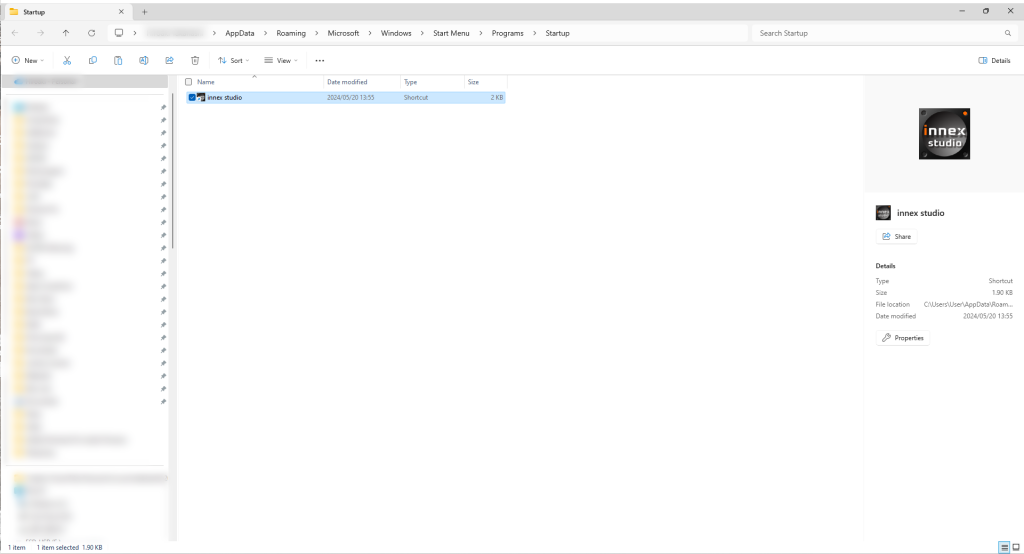
- Copy and paste the shortcut to the app from the file location to the Startup folder.
- Go to Windows settings > Apps > Startup.
- Select the toggle to set it to On.
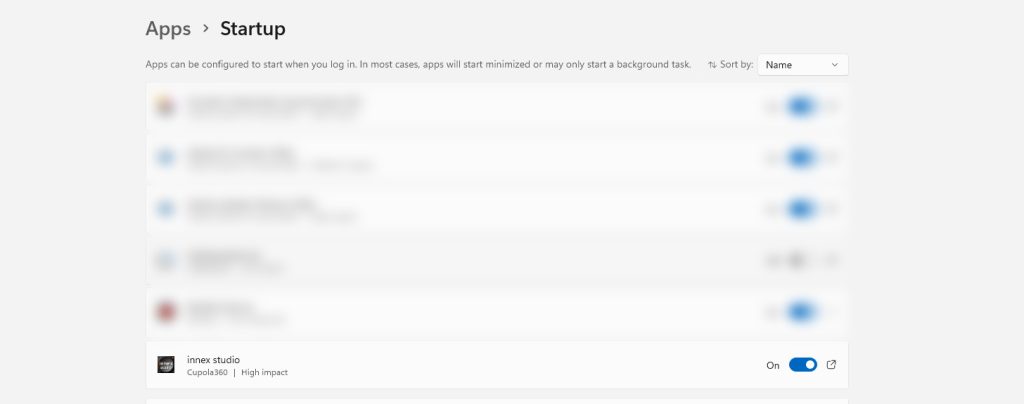
- Restart the PC and make sure the app runs automatically.
Innex Camera is a camera setting software that handles camera firmware update, image setting, EPTZ and auto-framing setting. It works with Innex C220 and C470. Innex Camera is available for both Windows and Mac – it can be downloaded at https://funtechinnovation.com/software/innex-camera-vap-studio/
- Please update your VAP Studio to the latest version to fix this issue.
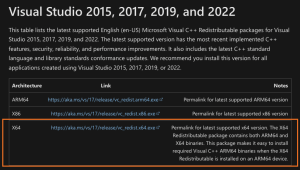
If you are using Windows computer, please download Microsoft Visual C++ Redistributable (Visual Studio 2015, 2017, 2019, and 2022 x64) from the link here: https://learn.microsoft.com/en-us/cpp/windows/latest-supported-vc-redist?view=msvc-170
and run the VAP Studio software again. Our software is created using Microsoft Visual Studio, so it must be installed in your computer in order to run VAP Studio properly.
- If you still experience the same problem after updating to a version released on or later than 2021 Sep. 27th, please contact technical support by leaving us a message https://funtechinnovation.com/faq/
To adjust image quality for C470 and C220 to better match your environment and preference, you can download and use the Innex Camera (VAP Studio) https://funtechinnovation.com/downloads/
- Connect your camera to your computer.
- Start VAP Studio by clicking on the VAP Studio icon.
- Click the video tab (1), (2) Click on Image and adjust each value by adjusting the slider. (3) If a reset is required, simply click on reset to reset the value to default(4).
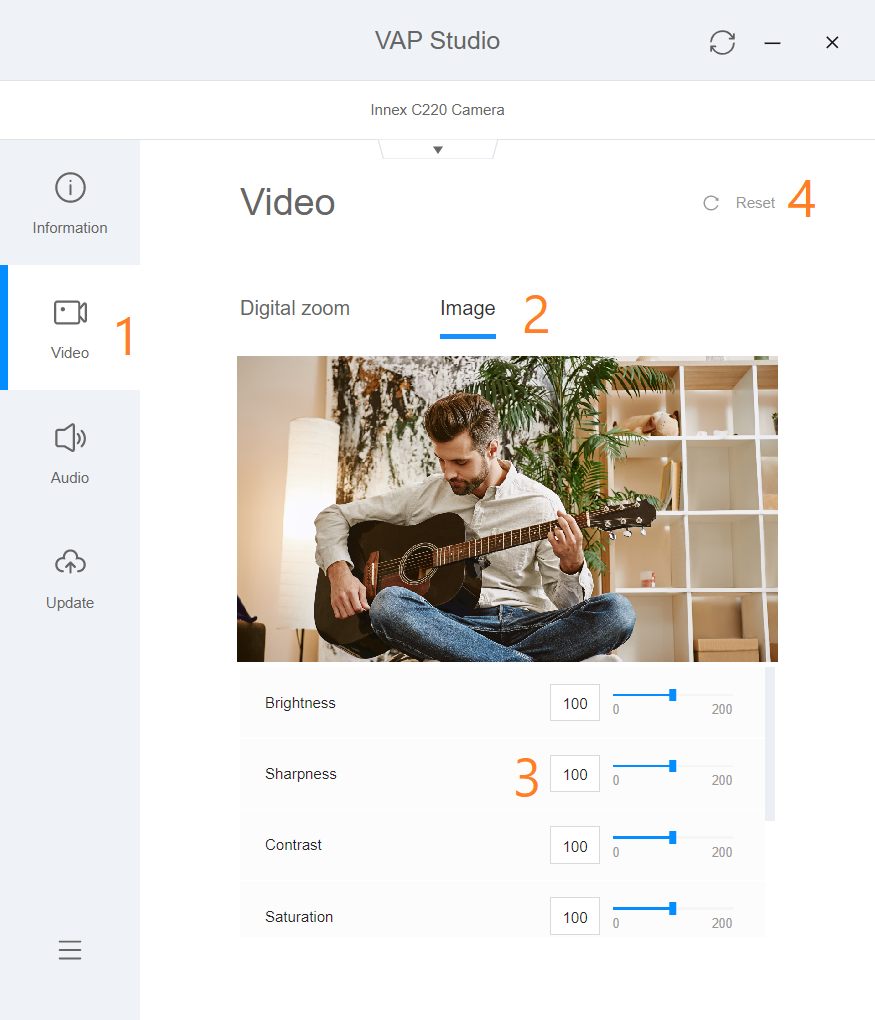
- The image setting adjustment will be saved into the camera and the camera will retain the adjustment even after it’s disconnected from the pc.
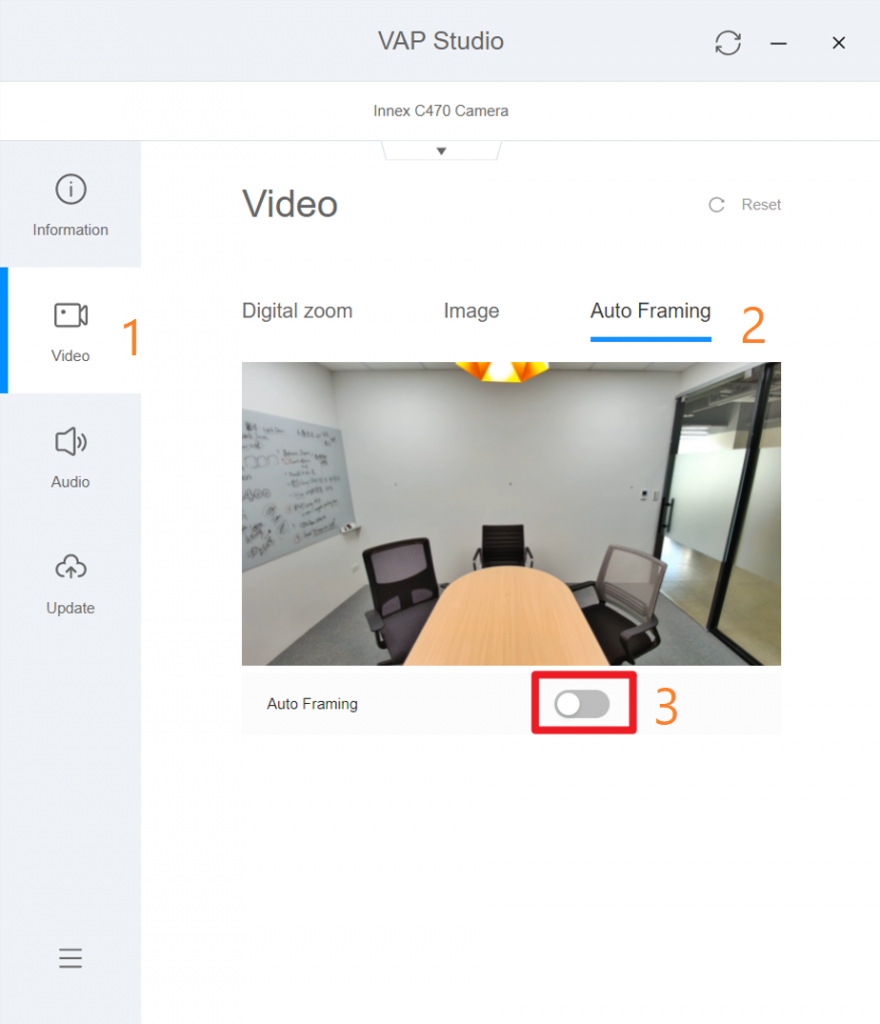
To adjust camera FOV (field of view) and ROI (region of interest) for to better match your environment and preference, you can download and use the Innex Camera (VAP Studio) at https://funtechinnovation.com/downloads/
(Please note that this feature is currently available only with C470)
- Connect your camera to your computer.
- Start VAP Studio by clicking on the VAP Studio icon.
- Disable auto-framing: (1) Click the video tab, (2) Click on Auto Framing tab, (3) Click on auto-framing button so it is slid to the left.
- Adjust with EPTZ: (1) Click on Video, (2) Click on Digital Zoom, (3) Zoom in/out using the plus and minus icon, (4) Pan and tilt using the direction control, (5) Reset to default position (if necessary), (6) Take a photo to validate current FOV and ROI (if necessary), (7) Open folder location to access the photo (if necessary).
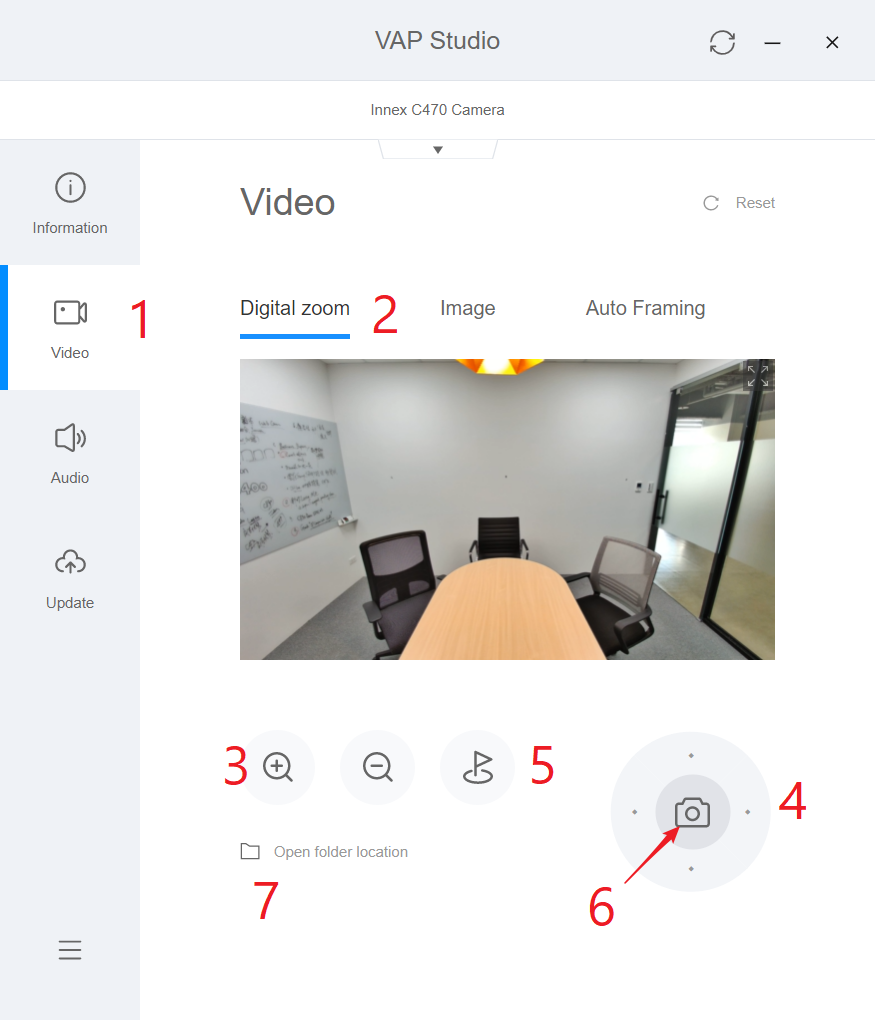
- The camera remembers your preferences after reboot so you only need to set it once.
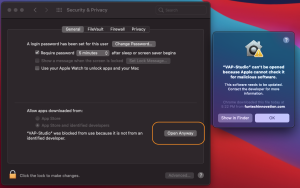
Mac might block the software that is not from the APP Store. Please follow below steps to launch the software
1. Go to System & Preference – Security & Privacy
2. (1) Click General (2) Click the lock to make changes (3) Select App Store and identified developers. And leave this window first.
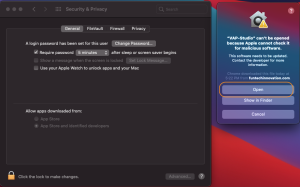
3. Launch the VAP Studio. You’ll see the same pop-up message. Then click (1)”Open Anyway”, (2) Open.
Please follow the steps below to run the software automatically at startup in Windows.
- Select the Start button and scroll to find the app.
- Right-click the app, select More, and then select Open file location. This opens the location where the shortcut to the app is saved.
- With the file location open, press the Windows logo key+ R, type shell:startup, then select OK. This opens the Startup
- Copy and paste the shortcut to the app from the file location to the Startup
- Go to Windows settings > Apps > Startup.
- Select the toggle to set it to On.
- Restart the PC and make sure the app runs automatically.
If your Innex DS200 is not being recognized, try the following steps:
1. Check system compatibility. Ensure your device and operating system support the Innex DS200. Supported OS:
.Microsoft Windows 10, 11
.MacOS 11 or later”
2. Try a different USB port on the computer.
3. If the power supply from the USB port is not sufficient, plug the included power adapter into the DC-in port on the Innex DS200 and connect it to a power outlet.
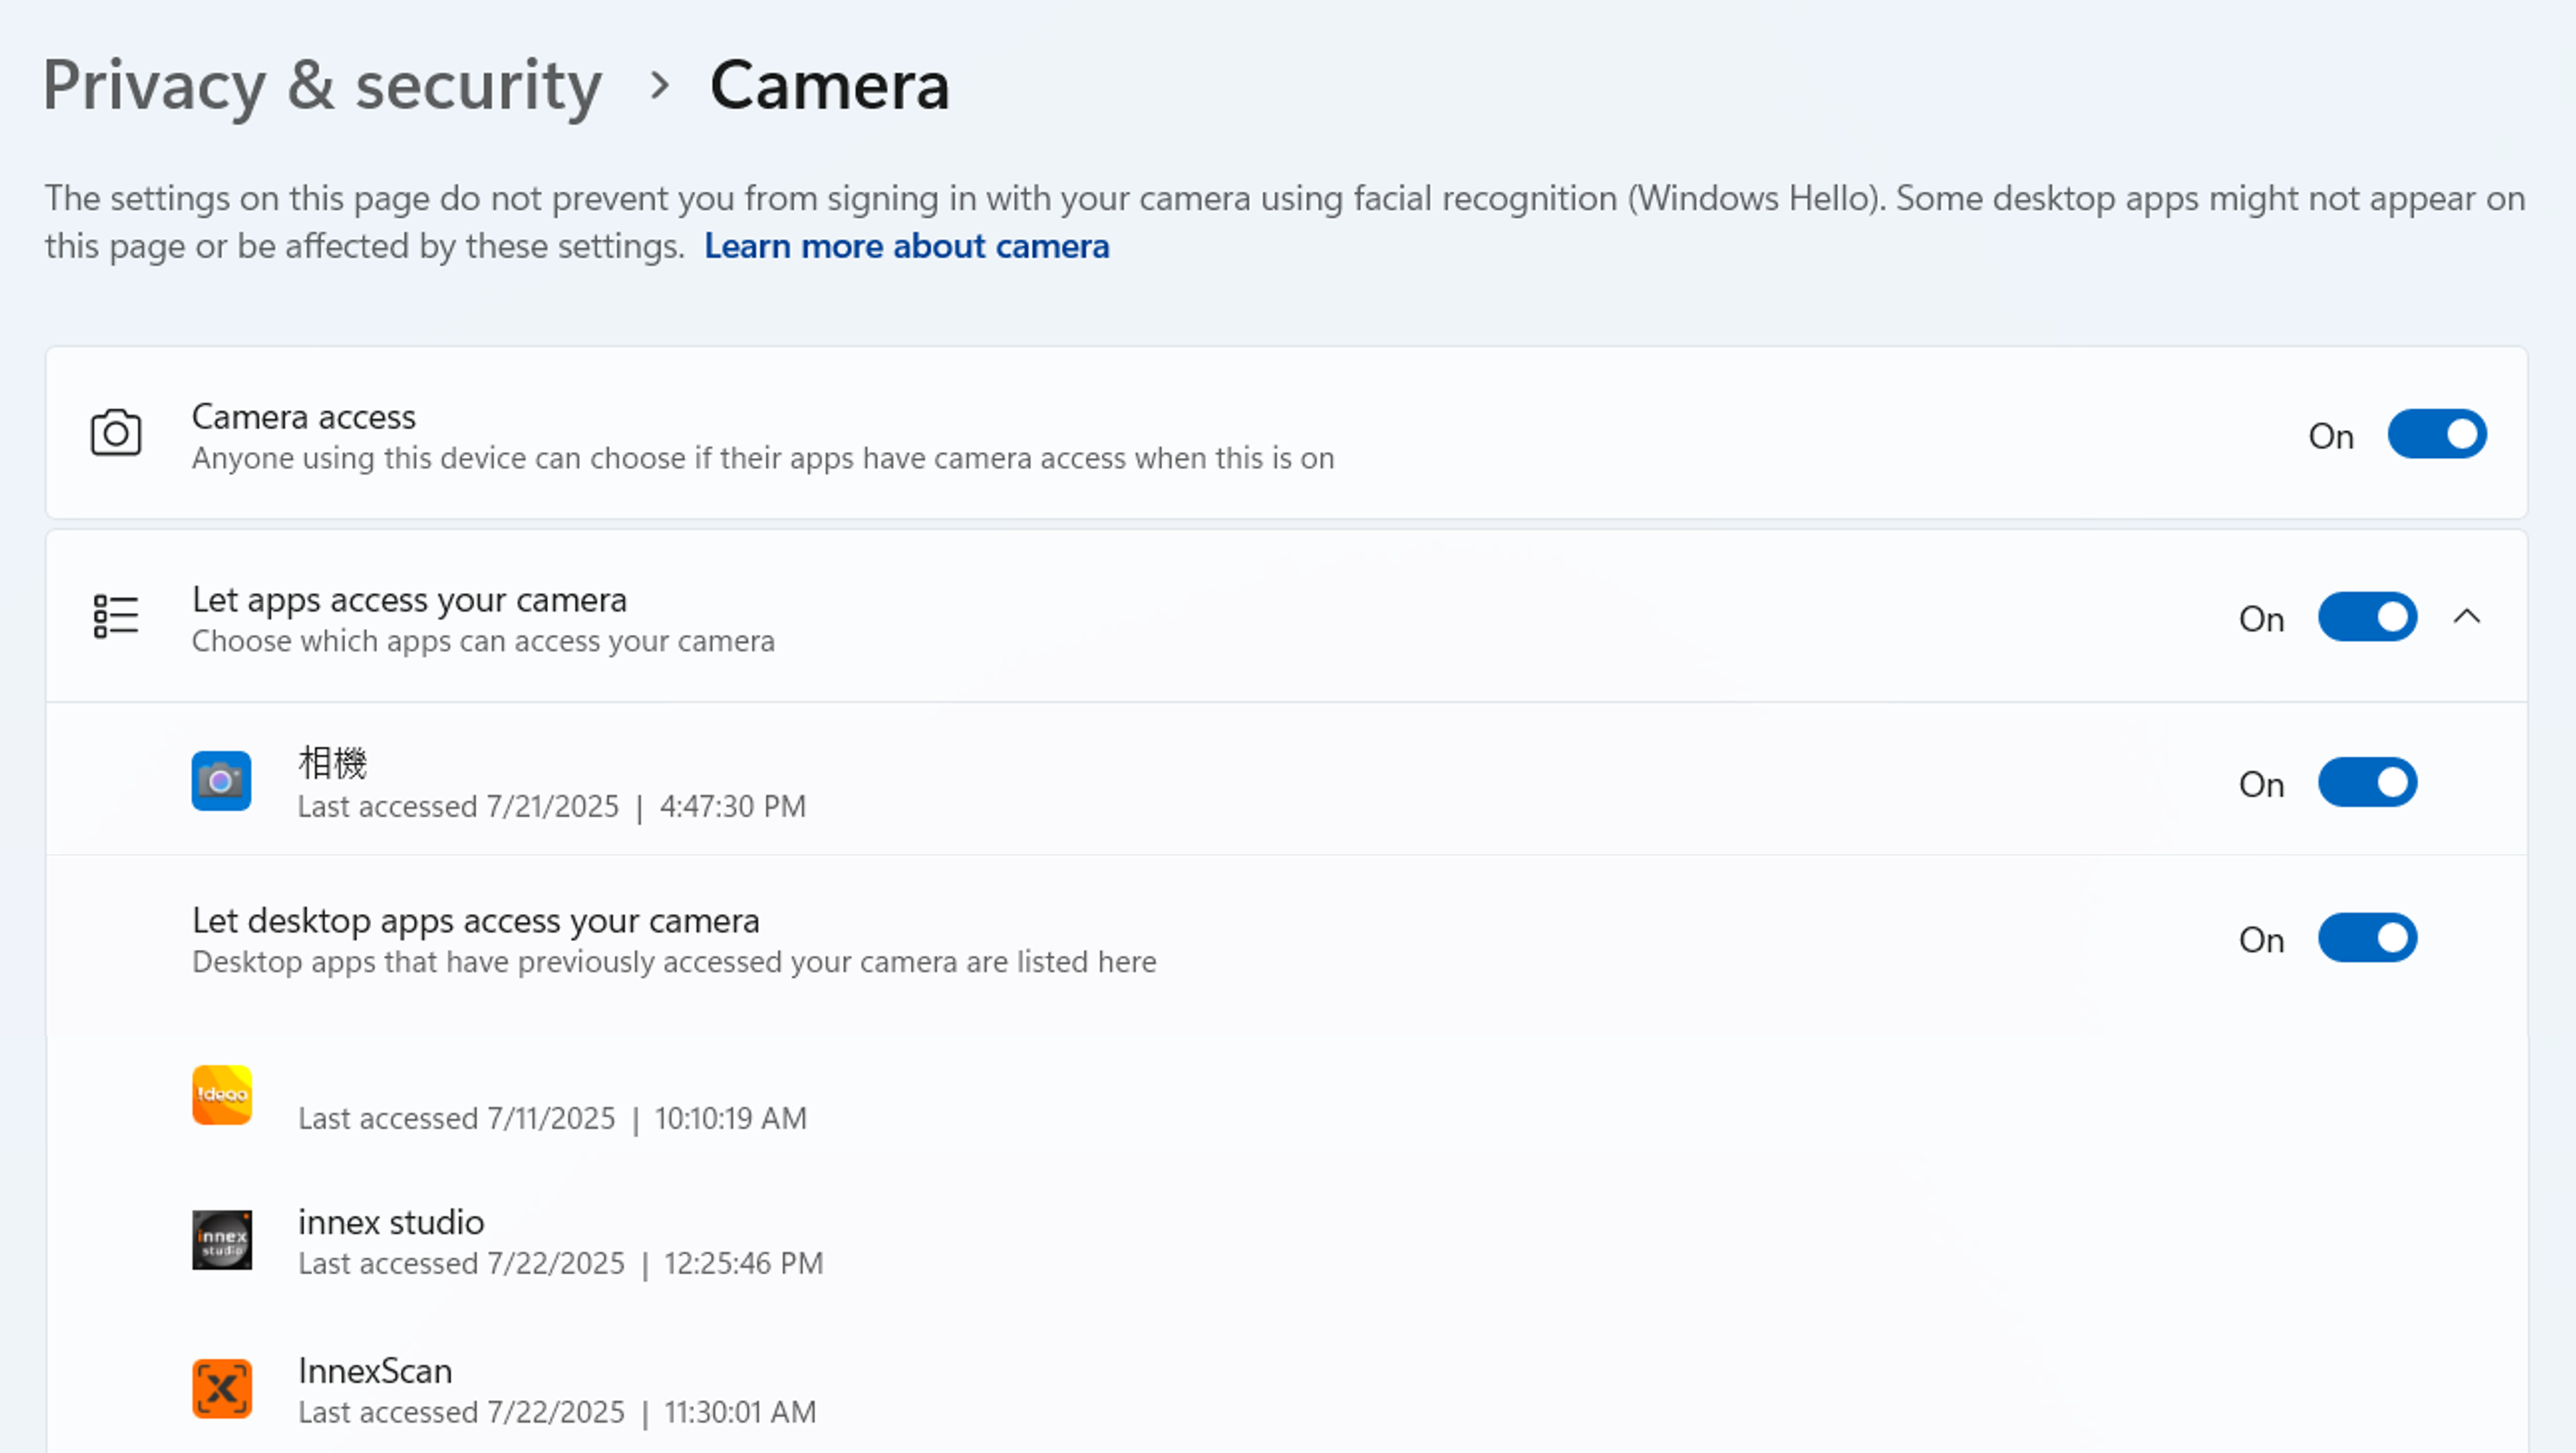
4. Ensure that in the Privacy & Security settings, the device allows the app to access the camera and microphone.
5. Ensure that anti-virus software is not blocking InnexScan. You may go to manage app settings of the anti-virus software to allow InnexScan to run on your computer. Below are the examples.
Avast: https://support.avast.com/en-ph/article/Use-Antivirus-blocked-allowed-apps
Kaspersky: https://support.kaspersky.com/KART/3.0/en-US/130083.htm
6. Ensure that no other app, aside from the one you want to use to capture images from the camera, is occupying the camera. Please turn off all other software that could be using the camera to troubleshoot this issue. For example, it’s not uncommon to have trouble opening the camera in Zoom if it is still being used by InnexScan.
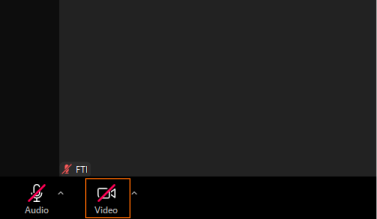
If you are using video conferencing software and cannot get an image from the camera, please ensure that the camera is not muted. Normally, the video icon is located in the bottom left corner, and if it is muted, the icon will be crossed out with a red line. Tap the icon to unmuted the camera.
7. If multiple cameras are connected to your device and the image from another camera is displayed in the app, please take the following actions:
In InnexScan
・Click the Device setting in the lower left corner, then select DS200.
For Video Conferencing software
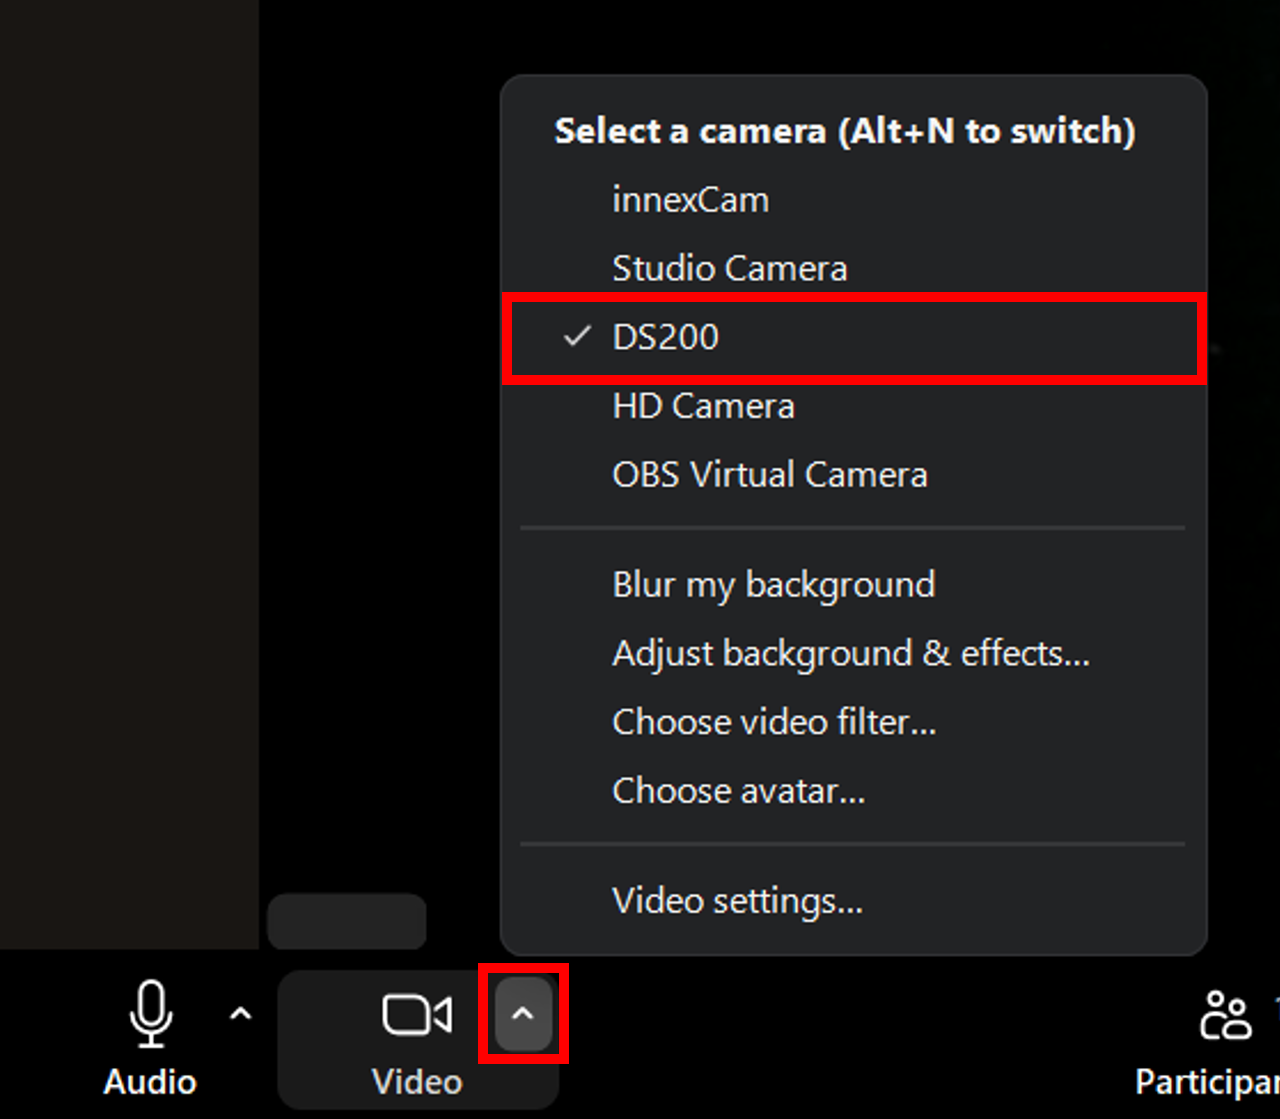
・Click the “^” icon next to the Video icon (Normally the icon is at the left bottom corner.) and show the list of the cameras.
・Choose DS200
8. If the above steps do not resolve the issue, try the following:
.Connect the Innex DS200 before launching the software.
.Use another equivalent cable to connect the Innex DS200 to your device and check if it can be recognized.
.Try a different computer and ensure Innex DS200 can be detected by the device.
.Contact support for further assistance.
1. Ensure the “Multiple page” option is selected in the Document mode.
2. Scan each page and a new thumbnail will appear in the preview panel after each scan.
3. Click “Export” once all pages are scanned. The file will be saved in the output folder panel.
The Book Mode in the InnexScan allows you to easily capture both the front and back cover of a book. Follow these steps:
1. Ensure Book Mode is enabled in the InnexScan.
2. Scan the front cover
.In the preview thumbnails panel, click front cover to select it.
.Place the front cover of the book and click Scan.
.The front cover will be captured and displayed in the preview.
3. Scan the back cover
.In the preview thumbnails panel, click back cover to select it.
.Place the back cover and click Scan.
.The back cover will be captured and addec to the preview.
4. Export the complete file
Once both covers and the inner pages are scanned, click Export to save the full document. The file will include the front and back covers along with the scanned content.
Note: While the front cover or back cover is selected, certain toolbar settings may be temporarily disabled.
To display the second camera’s image in your scan:
Go to Settings > Sub-Camera Settings, ensure “Merge” is selected, and choose the desired position for the second camera’s image.
Windows:
Make sure Document mode is selected and set the scan option to “Single Page”.
Mac:
Supported in ID Document and Video modes. For ID Document mode, set Cropping to “Automatic”.
To scan barcodes and generate an Excel file that contains the scanned data along with corresponding JPG images, follow these steps:
1. Launch the InnexScan and go to the Barcode tab.
2. Select Excel + JPG for the Output Format, and configure other settings based on your preferences.
3. Click the Scan button, the software will process each barcode according to the settings you’ve configured.
4. After scanning:
.Each barcode will be saved as an individual JPG image in the Output Folder.
.An Excel file will be generated, listing the scanned barcode values with clickable links to their corresponding images.
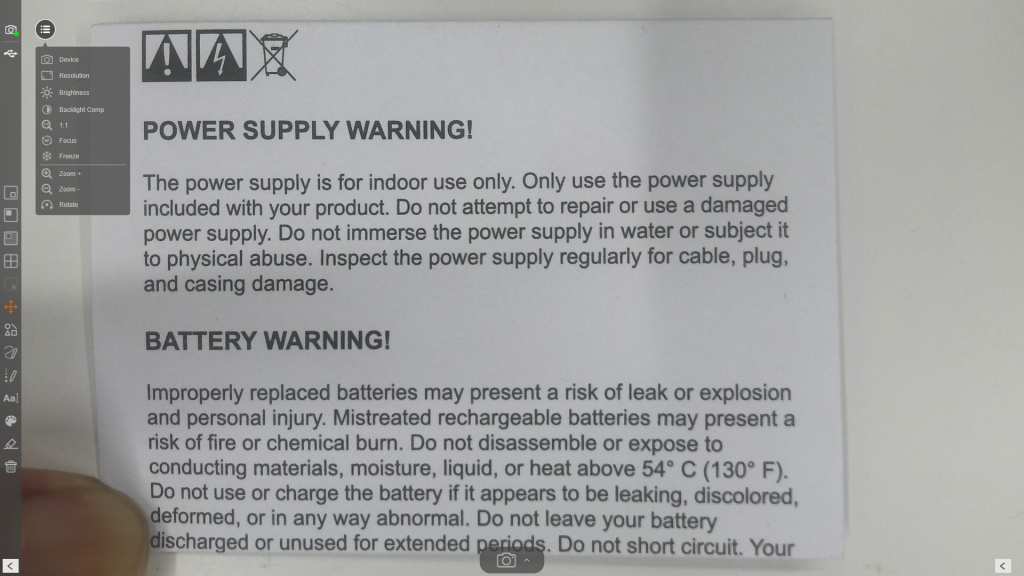
Preparing for finger removal
1. Ensure the Finger Hiding option is selected in the InnexScan.
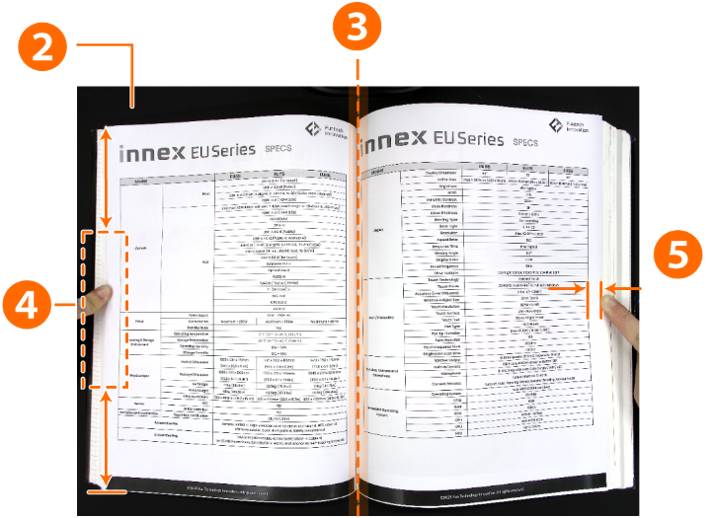
2. Place an opened book face up on the black scan mat.
3. The center of the book must be aligned with the vertical orange line on the screen.
4. Position your fingers in the middle of the edges of the opened book to hold the pages down securely.
5. Ensure to maintain a minimum distance of 10 mm between your fingers and any text or images.
Note: If the fingers are too close to text or images, the software may not detect and remove them accurately.

Guidelines for finger positioning
.Keep your finger straight and centered along the edge of the open book.
.Avoid placing fingers near the top or bottom of the page.
.If using more than one finger, keep them close together at the center edge. Do not spread your fingers apart, as the may affect detection accuracy.
Known limitations
1. Maintain black edges around the book. Ensure visible black areas surround the book in the scan. This helps the software distinguish the book’s edges from your fingers.
2. Keep top and bottom edges symmetrical. Keep the book’s top and bottom edges level and symmetrical to improve finger detection accuracy.
3. Ensure adequate margins. Place fingers in blank margins, at least 10 mm from any text or images. Overlapping content may prevent proper removal.
4. Avoid pages with colored drawings or illustrations. The Finger Hiding feature may have difficulty detecting fingers on pages with colored drawings or complex illustrations. For optimal performance, use this feature primarily with text-heavy or black-and-white pages.
If you don’t see the Book Mode option in the InnexScan interface, try the following steps:
1. Check external shutter button connection. Book Mode is enabled only when the software detects the external hand button or foot pedal is connected.
2. Restart the Software. If the Book Mode still does not appear, relaunch the InnexScan to refresh the interface.
Supported formats are as below:
.Image Files: BMP, JPG, PNG, TIFF
.PDF Files: PDF (Image), PDF (Searchable), PDF (Text)
.Document Files: Text, Word, Excel, EPUB
.Audio Files (Text-to-Speech): MP3, WAV
*Available on Windows version only.
.Video Files: AVI (Windows); MP4, QuickTimeMovie (MacOS)
Note: Available export formats may vary depending on the selected scan mode.
1. Click the Device setting in the lower left corner of the software.
2. Select the device you want to use from the list.
Note: InnexScan is designed specifically for use with the Innex DS200. It may not function properly with third-party devices or unsupported hardware.
The Innex DS200 is equipped with a Class 2 laser guide to assist with precise document positioning. For your safety, please refrain from looking into the direct or reflected beam as it can cause eye injury.
If you plan to export your scanned document to a text-based format such as PDF (Text), PDF (Searchable), or Word, make sure to select the language that matches the content before scanning.
Please check the following in sequence.
・Ensure that the device/OS supports the camera. The supported operating systems are listed below.
<DC500>
Window 11, 10
macOS 10.10 or above
Chrome OS
<Ideao VisualCam>
Windows 11/10
macOS 10.15 or above
<IdeaoCam (Chrome Extension)>
Windows, macOS, Chrome OS
・Ensure that you use the stock cable or an equivalent cable. Using a longer or uncertified cable may result in the DC500 not being recognized by your device.
・Ensure that the camera is not connected to your device via a USB hub with other devices, as this may lead to insufficient power supply and the DC500 not being recognized by your device. Try unplugging other devices or directly connecting the DC500 to your device to see if it is recognized.
・Connect the DC500 to a different USB port to see if it is recognized.
・Sometimes, a broken cable can cause this issue. If you have equivalent cables, try connecting using these cables to see if the device recognizes the DC500.
・If the DC500 is still not recognized by your device after trying several cables, please connect it to another device (If you have any) to see if it is recognized.
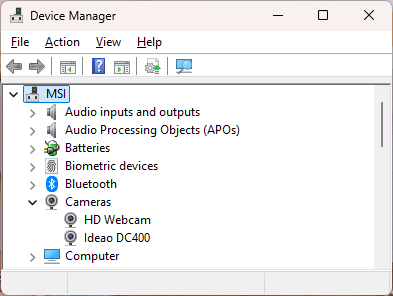
・Open Device Manager in Windows or System Report on Mac to check if the DC500 is recognized by the device as a camera. For devices running Chrome OS, open the settings, select ‘Device’ or ‘Bluetooth,’ and check if the DC500 appears in the list. If trying all above already and your device does not recognize the DC500, please contact our support.

 If the device recognizes the camera, but can not get the image, please see “My device recognizes the camera, but can not get the image from DC500 in some software.”
Please check the following in sequence.
・Ensure that in the Privacy & Security settings, the device allows the app to access the camera and microphone.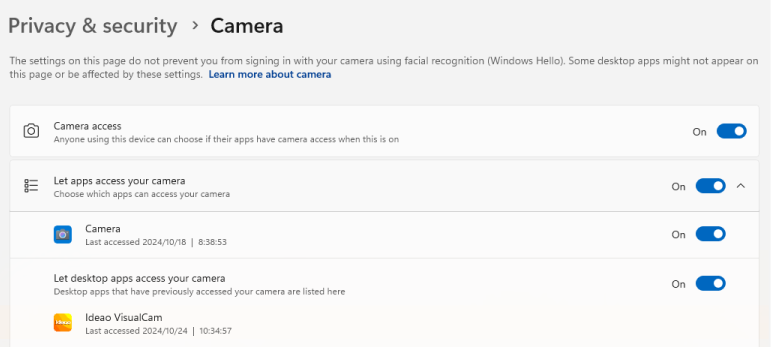
 ・Ensure that anti-virus software is not blocking Ideao VisualCam. You may go to manage app settings of the anti-virus software to allow Ideao VisualCam to run on your computer. Below are the examples.
Avast: https://support.avast.com/en-ph/article/Use-Antivirus-blocked-allowed-apps
Kaspersky: https://support.kaspersky.com/KART/3.0/en-US/130083.htm
Ensure that no other app, aside from the one you want to use to capture images from the camera, is occupying the camera. Please turn off all other software that could be using the camera to troubleshoot this issue. For example, it’s not uncommon to have trouble opening the camera in Zoom if it is still being used by Ideao VisualCam.
If you are using video conferencing software and cannot get an image from the camera, please ensure that the camera is not muted. Normally, the video icon is located in the bottom left corner, and if it is muted, the icon will be crossed out with a red line. Tap the icon to unmuted the camera.
If multiple cameras are connected to your device and the image from another camera is displayed in the app, please take the following actions:
For Ideao VisualCam
・Click the menu icon in the top left corner of the screen (the circular icon with three horizontal lines).
・Click “Device” from the menu
・Choose Innex DC500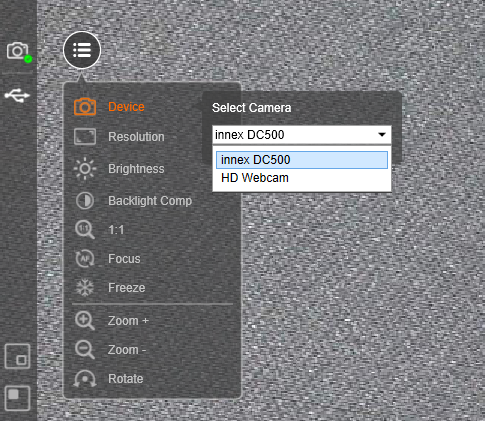 For Video Conferencing software
・Click the “^” icon next to the Video icon (Normally the icon is at the left bottom corner.) and show the list of the cameras.
・Choose Innex DC500
Please check below in sequence.
・Go to the ‘Privacy and Security’ settings, then click ‘Microphone’ and ensure the app is allowed to access microphones.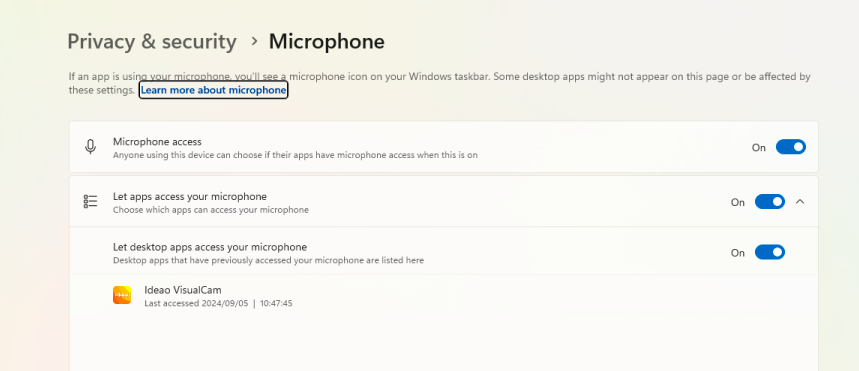
 ・If you are using in the video conferencing software, a lot of cases, the video source and audio source are separated. Therefore, even the video is switched to Innex DC500, it does not mean DC500 is also selected as a microphone. Click the “^” icon next to “Audio” icon and choose Innex DC500 as a microphone.
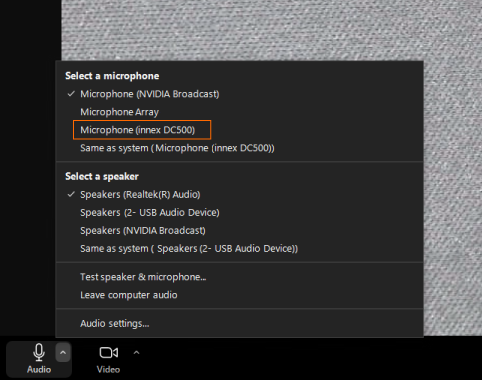 Please check the sound input settings in Windows or the microphone settings in the video conferencing software to ensure that the microphone volume is not set to zero or significantly low
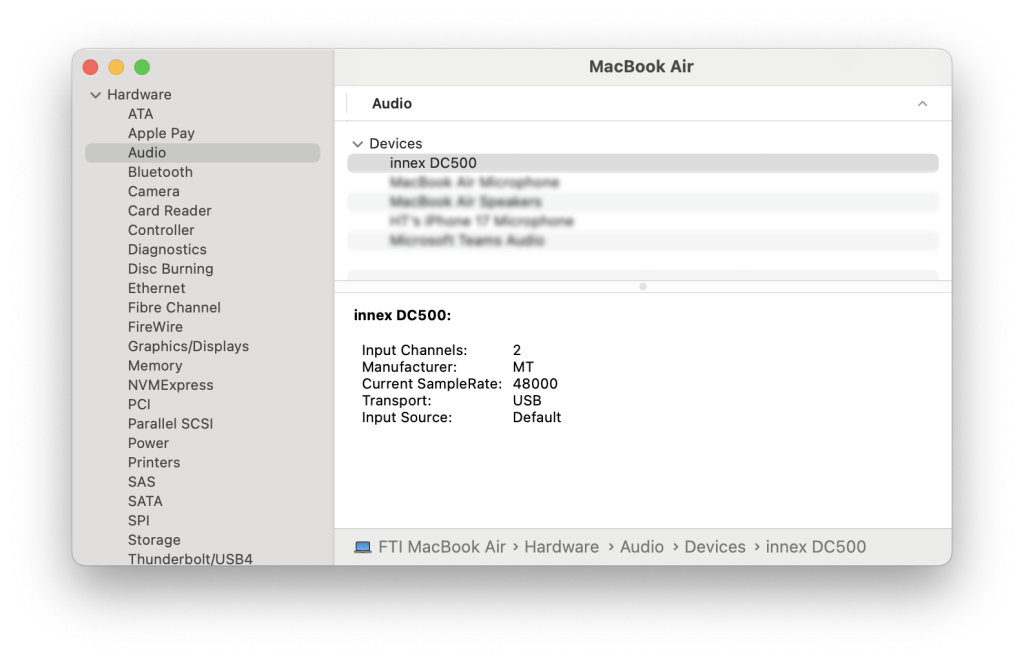
・Open Device Manager in Windows or System Report on Mac to check if the DC500 is recognized by the device as a USB audio device. For devices running Chrome OS, open the settings, select ‘Device’ or ‘Bluetooth,’ and check if the DC500 appears in the list. If trying all above already and your device does not recognize the DC500, please contact our support.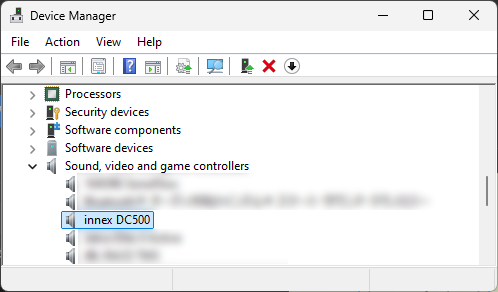
For using with iPad, please be aware of the points below.
1. Not all iPads support external cameras. Only those with a USB Type-C port are compatible.
2. The iPadOS version must be 17 or later.
3. Not all apps currently support external cameras.
4. The user experience may differ when using the camera with an iPad compared to a PC or Mac.
5. The resolution and frame rate may vary depending on the iPad and the app.
6. Some apps may not have a function to switch cameras. When a camera is connected, the image source may automatically switch to the external camera. You may need to physically disconnect the camera to switch back to the built-in camera.
7. For video conferencing apps that do not support external camera input, you may need to use third-party apps to display the camera image and then share your screen in the video conferencing app.
Please check following in sequence:
・Ensure the plastic cover is removed from the lens.
・Ensure that the distance between the camera lens and the object is at least 10 cm (3.9 inches). Otherwise, the image will not be properly focused.
・Press the ‘AF’ button on the top to manually trigger autofocus to see if the image gets properly focused. (Watch tutorial)
The brightness of the image is affected by the background color. For example, if the background is dark and the object you’re capturing is bright, the camera tends to adjust the white balance based on the dominant background color. As a result, the image may appear brighter. In Ideao VisualCam, you can click the ‘Backlight’ icon to adjust the white balance using the slider. For the software that does not have a white balance adjustment function, ensure that the contrast between the background and the object is not too extreme.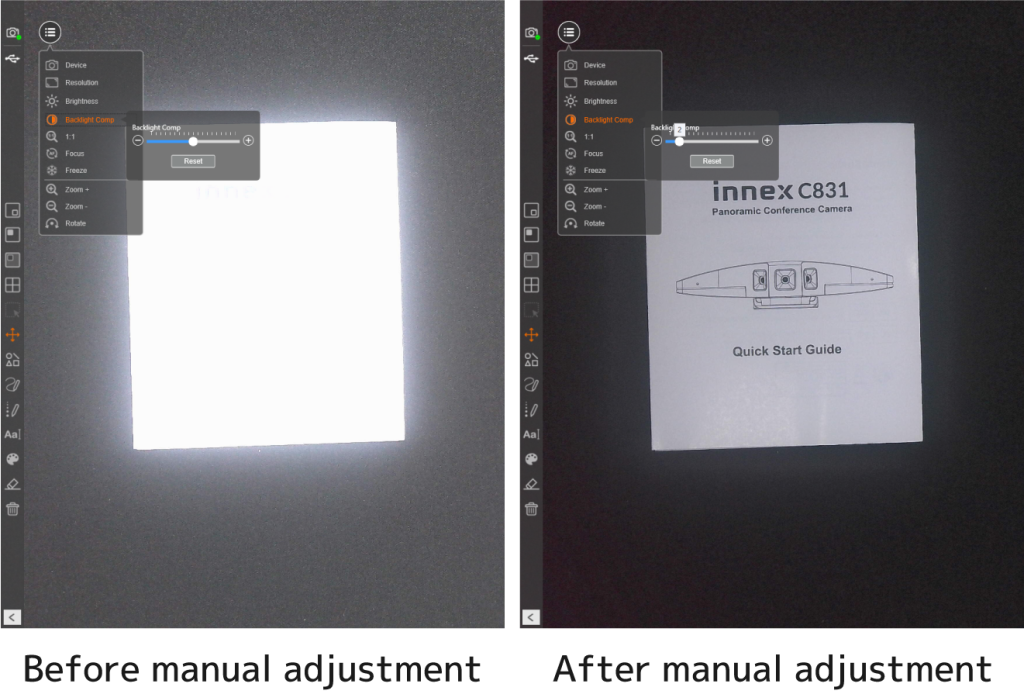
Please check following in sequence:
・The proprietary software Ideao VisualCam supports 4K resolution. However, in some software, especially video conferencing software, the maximum resolution may not reach 4K. Please check the maximum resolution supported by the software you are using.
・The default resolution in some software may not be as high as 4K. Please ensure that the resolution is not set to a low value in the software. ・Using digital zoom results in a rough image, as it crops a portion of the original image and enlarges it digitally. Rather than using digital zoom, we recommend placing the camera physically closer to the object, ensuring the image remains clear without sacrificing resolution. (Please ensure the distance between the camera lens and the object is at least 10cm/3.9inch for the object to remain in focus)
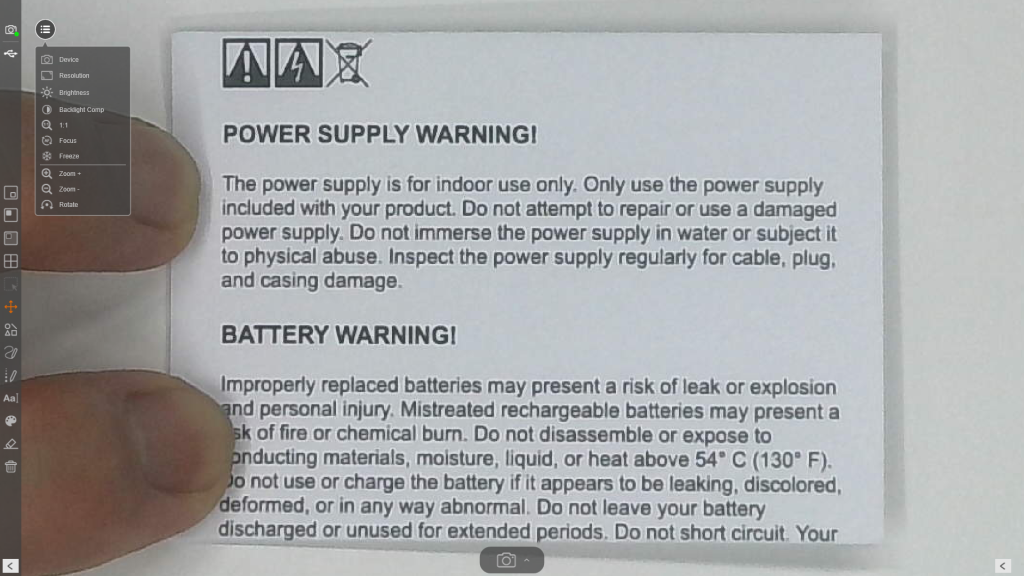
Please check following in sequence:
・Please ensure that the camera is not placed near devices generating a strong magnetic field.
・Ensure that the power frequency matches the standard in your region. To check or change the current power frequency, launch Ideao VisualCam and navigate to the ‘Device’ section.
・Fully extend the arm of the DC400/500.
・Ensure the camera lens is positioned directly above the center of the paper and is placed horizontally.
・Press the menu button located on the left side of the screen (the icon with three horizontal lines).
・Select “Resolution” and set it to 3840 x 2880.
・If the entire A3 paper is not being captured, adjust the camera’s position accordingly.
Most video conferencing software, such as Google Meet, Zoom, Microsoft Teams, and Webex, mirrors your camera feed by default. However, this does not affect the receiver’s view; anyone watching your video sees the non-mirrored version.
If you still want to view an unmirrored image on your side, please follow the steps below.
Common solution for all the video conferencing software
1. Launch Ideao VisualCam, display the image from Innex DC500 camera.
2. During your video call, do not select DC500
3. Select “Share screen”/”Present Now” (it varies depending on the software you use) , and share your Ideao VisualCam screen.
Google Meet: (Watch Tutorial)
1.There’re several Google Chrome extension to mirror your video. We recommend you to download “VideoMirror”.
2.Start a Google Meet call and select your Innex DC500 camera, and then hit the extension icon. The videos will be mirrored.
* Please note VideoMirror is a 3rd party app, FTI does not provide customer support towards this app.
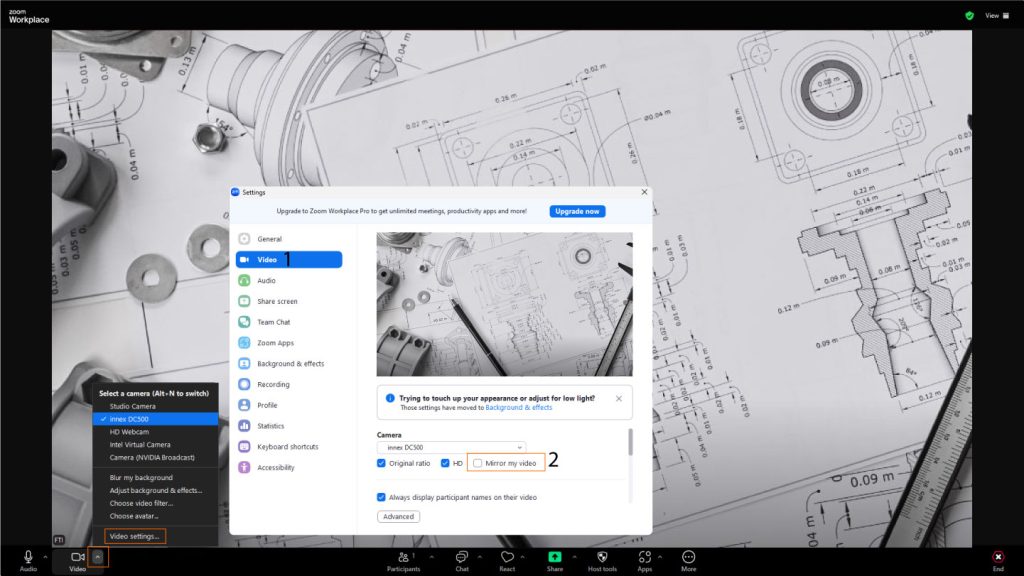
Zoom: (Watch tutorial) or other video conferencing software
1.Go to “Video Settings” in Zoom
2.Un-tick the box “Mirror my video”
There are several ways to display images from multiple cameras in video conferencing software as below.
Webcam + Share screen:
1. Select the webcam for showing your face in the video conferencing software.
2. Launch Ideao VisualCam and display the image from DC500 there.
3. Click “Share” in the video conferencing software
4. Select ‘Ideao VisualCam’ as the source and click ‘Share’ to start sharing.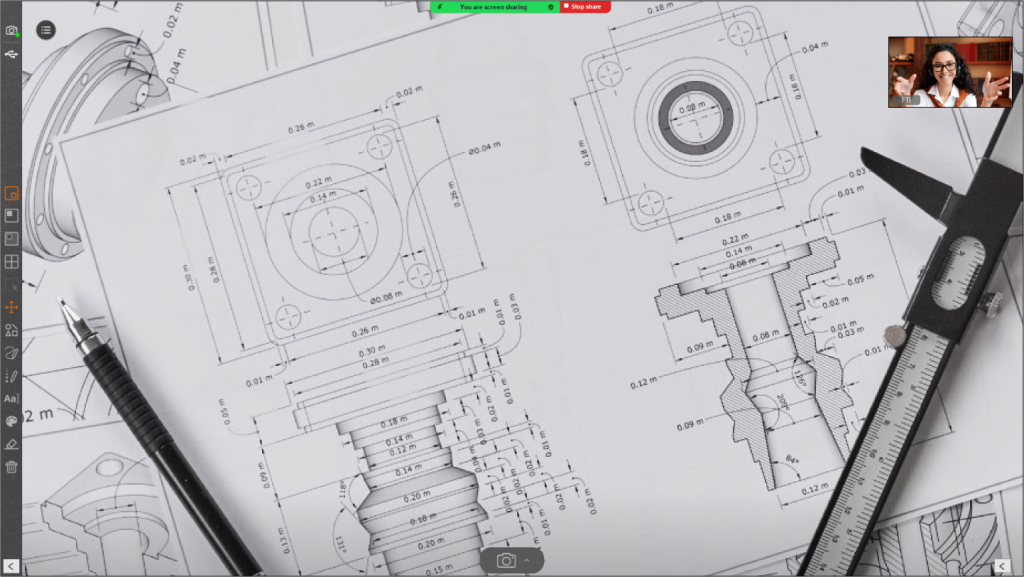
Ideao VisualCam split screen mode
1. Do not turn on camera in Video Conferencing software
2. Launch Ideao VisualCam and display the image from DC500 there
3. Click “Split Screen” at the left top corner of the screen.
4. Click any part of the right side of the screen to show the “Menu” icon.
5. Click the menu icon and click “Switch to camera”
6. Click “Device” and select the camera you want to display the image from.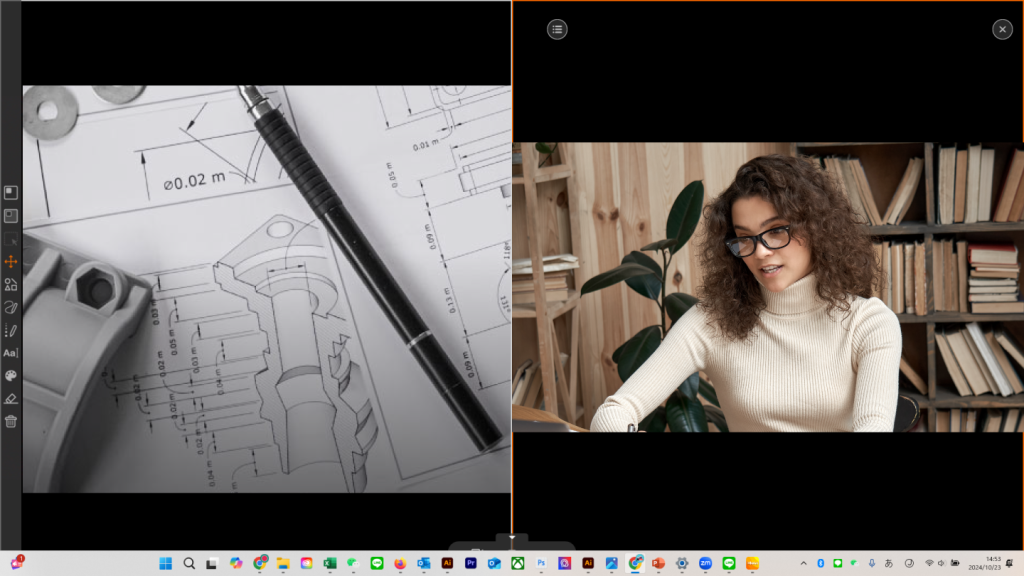
Ideao VisualCam PIP mode
1. Do not turn on camera in Video Conferencing software
2. Launch Ideao VisualCam and display the image from DC500 there
3. Click PIP icon in the tool bar on the left side to display the image from the camera.
Embed the live image from DC500 in a PowerPoint presentation
1. While creating the presentation contents, select “Cameo” from “Insert tab”.
2. Choose the camera style, click “Preview,” and select the DC500 as the camera source.
3. Start the presentation, and the live view from the DC500 will appear while also displaying your face in the video conferencing software.
Please check the following in sequence.
・Ensure that the device/OS supports the camera. The supported operating systems are listed below.
<DC400>
Window 11, 10
macOS 10.10 or above
Chrome OS
<Ideao VisualCam>
Windows 11/10
macOS 10.15 or above
<IdeaoCam (Chrome Extension)>
Windows, macOS, Chrome OS
・Ensure that you use the stock cable or an equivalent cable. Using a longer or uncertified cable may result in the DC400 not being recognized by your device.
・Ensure that the camera is not connected to your device via a USB hub with other devices, as this may lead to insufficient power supply and the DC400 not being recognized by your device. Try unplugging other devices or directly connecting the DC400 to your device to see if it is recognized.
・Connect the DC400 to a different USB port to see if it is recognized.
・Sometimes, a broken cable can cause this issue. If you have equivalent cables, try connecting using these cables to see if the device recognizes the DC400.
・If the DC400 is still not recognized by your device after trying several cables, please connect it to another device (If you have any) to see if it is recognized.
・Open Device Manager in Windows or System Report on Mac to check if the DC400 is recognized by the device as a camera. For devices running Chrome OS, open the settings, select ‘Device’ or ‘Bluetooth,’ and check if the DC400 appears in the list. If trying all above already and your device does not recognize the DC400, please contact our support.
 If the device recognizes the camera, but can not get the image, please see “My device recognizes the camera, but can not get the image from DC400 in some software.”
Please check the following in sequence.
・Ensure that in the Privacy & Security settings, the device allows the app to access the camera and microphone.・Ensure that anti-virus software is not blocking Ideao VisualCam. You may go to manage app settings of the anti-virus software to allow Ideao VisualCam to run on your computer. Below are the examples.
Avast: https://support.avast.com/en-ph/article/Use-Antivirus-blocked-allowed-apps
Kaspersky: https://support.kaspersky.com/KART/3.0/en-US/130083.htm
Ensure that no other app, aside from the one you want to use to capture images from the camera, is occupying the camera. Please turn off all other software that could be using the camera to troubleshoot this issue. For example, it’s not uncommon to have trouble opening the camera in Zoom if it is still being used by Ideao VisualCam.
If you are using video conferencing software and cannot get an image from the camera, please ensure that the camera is not muted. Normally, the video icon is located in the bottom left corner, and if it is muted, the icon will be crossed out with a red line. Tap the icon to unmuted the camera.
If multiple cameras are connected to your device and the image from another camera is displayed in the app, please take the following actions:
For Ideao VisualCam
・Click the menu icon in the top left corner of the screen (the circular icon with three horizontal lines).
・Click “Device” from the menu
・Choose Ideao DC400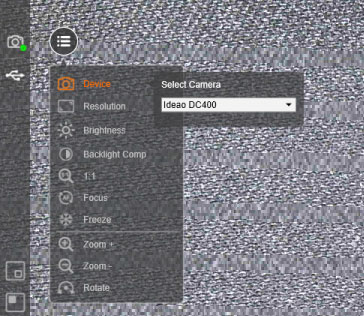 For Video Conferencing software
・Click the “^” icon next to the Video icon (Normally the icon is at the left bottom corner.) and show the list of the cameras.
・Choose Ideao DC400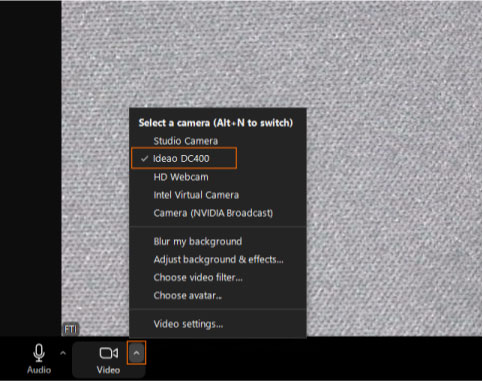
Please check below in sequence.
・Go to the ‘Privacy and Security’ settings, then click ‘Microphone’ and ensure the app is allowed to access microphones.・If you are using in the video conferencing software, a lot of cases, the video source and audio source are separated. Therefore, even the video is switched to Ideao DC400, it does not mean DC400 is also selected as a microphone. Click the “^” icon next to “Audio” icon and choose Ideao DC400 as a microphone. Please check the sound input settings in Windows or the microphone settings in the video conferencing software to ensure that the microphone volume is not set to zero or significantly low
・Open Device Manager in Windows or System Report on Mac to check if the DC400 is recognized by the device as a USB audio device. For devices running Chrome OS, open the settings, select ‘Device’ or ‘Bluetooth,’ and check if the DC400 appears in the list. If trying all above already and your device does not recognize the DC400, please contact our support.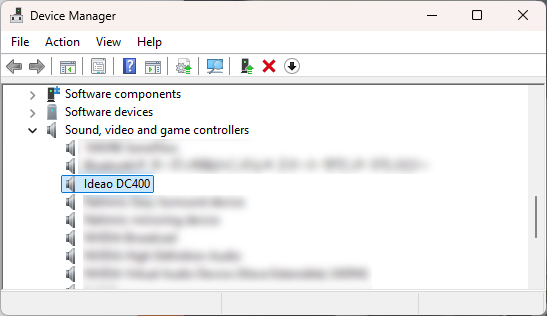

For using with iPad, please be aware of the points below.
1. Not all iPads support external cameras. Only those with a USB Type-C port are compatible.
2. The iPadOS version must be 17 or later.
3. Not all apps currently support external cameras.
4. The user experience may differ when using the camera with an iPad compared to a PC or Mac.
5. The resolution and frame rate may vary depending on the iPad and the app.
6. Some apps may not have a function to switch cameras. When a camera is connected, the image source may automatically switch to the external camera. You may need to physically disconnect the camera to switch back to the built-in camera.
7. For video conferencing apps that do not support external camera input, you may need to use third-party apps to display the camera image and then share your screen in the video conferencing app.
Please check following in sequence:
・Ensure the plastic cover is removed from the lens.
・Ensure that the distance between the camera lens and the object is at least 10 cm (3.9 inches). Otherwise, the image will not be properly focused.
・Press the ‘AF’ button on the top to manually trigger autofocus to see if the image gets properly focused. (Watch tutorial)
The brightness of the image is affected by the background color. For example, if the background is dark and the object you’re capturing is bright, the camera tends to adjust the white balance based on the dominant background color. As a result, the image may appear brighter. In Ideao VisualCam, you can click the ‘Backlight’ icon to adjust the white balance using the slider. For the software that does not have a white balance adjustment function, ensure that the contrast between the background and the object is not too extreme.
Please check following in sequence:
・The proprietary software Ideao VisualCam supports 4K resolution. However, in some software, especially video conferencing software, the maximum resolution may not reach 4K. Please check the maximum resolution supported by the software you are using.
・The default resolution in some software may not be as high as 4K. Please ensure that the resolution is not set to a low value in the software.・Using digital zoom results in a rough image, as it crops a portion of the original image and enlarges it digitally. Rather than using digital zoom, we recommend placing the camera physically closer to the object, ensuring the image remains clear without sacrificing resolution. (Please ensure the distance between the camera lens and the object is at least 10cm/3.9inch for the object to remain in focus)
Please check following in sequence:
・Please ensure that the camera is not placed near devices generating a strong magnetic field.
・Ensure that the power frequency matches the standard in your region. To check or change the current power frequency, launch Ideao VisualCam and navigate to the ‘Device’ section.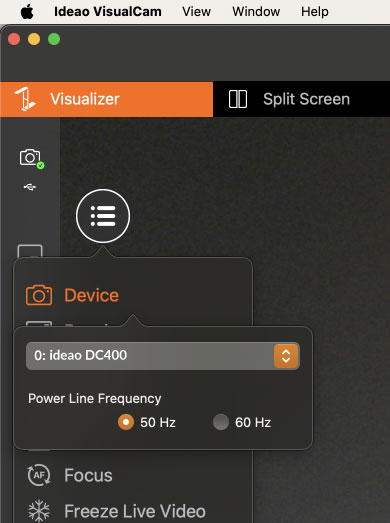
・Fully extend the arm of the DC400/500.
・Ensure the camera lens is positioned directly above the center of the paper and is placed horizontally.
・Press the menu button located on the left side of the screen (the icon with three horizontal lines).
・Select “Resolution” and set it to 3840 x 2880.
・If the entire A3 paper is not being captured, adjust the camera’s position accordingly.
This is to prevent the lens from autofocusing itself when hands are moving around the document which can create jumpy video.
・Ensure that the distance between the camera lens and the object is at least 10 cm (3.9 inches). Otherwise, the image will not be properly focused.
・Press the ‘AF’ button on the top to manually trigger autofocus to see if the image gets properly focused. (Watch tutorial)
Ideao DC400 is an autofocus document camera. But yes- it is possible to disable its autofocus by software, and make it manual focus.
For Windows PC:
- Camera App: If you are working with Windows embedded camera app to take snapshot and record video. You can switch to manual focus by following the steps below:
- Go to settings, turn on “Pro mode”.
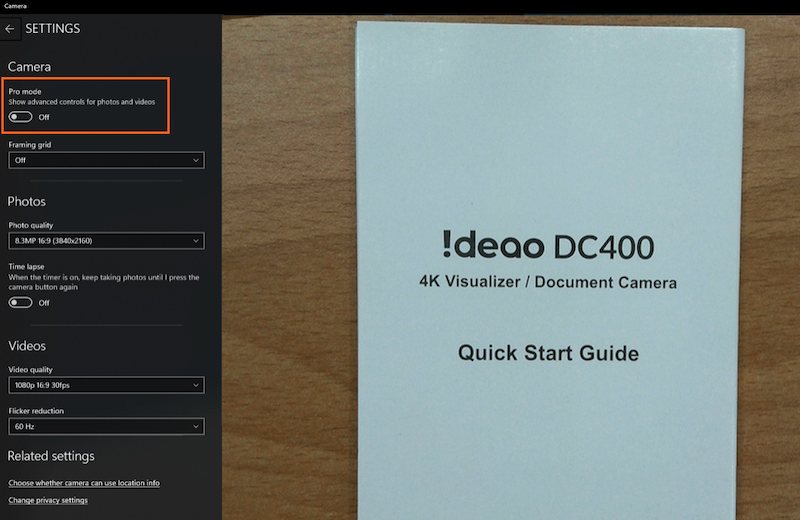
- In order to change to manual focus, click on the circle icon, and shift the slider a little bit. The icon will change from “Auto” to “M”
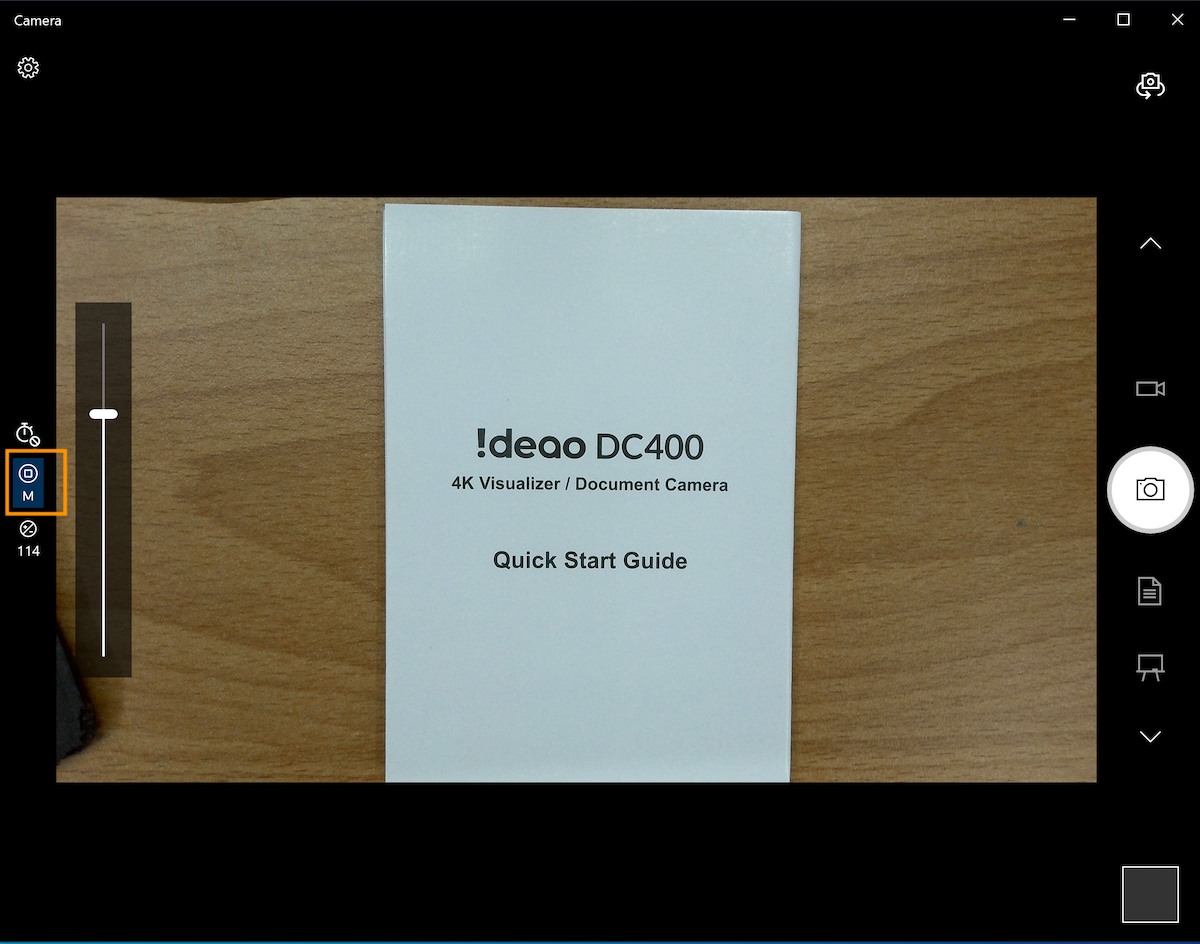
- Press the AF button on the DC400 to trigger autofocus once.
- The focus distance will be fixed. Whenever you change the shooting distance, press AF button on top of the DC400 to re-focus.
- If you want to enable its autofocus back, shift the slider down to “Auto”.
- Go to settings, turn on “Pro mode”.
- AMCap: You can also use the third-party software AMCap to disable autofocus.
- Download and Install the software from the link https://amcap.en.softonic.com/download
- Connect DC400 to your computer, and open AMCap.
- Select DC400 from device. Go to Video > Properties > Camera Control, uncheck the autofocus box. Then click “Apply”
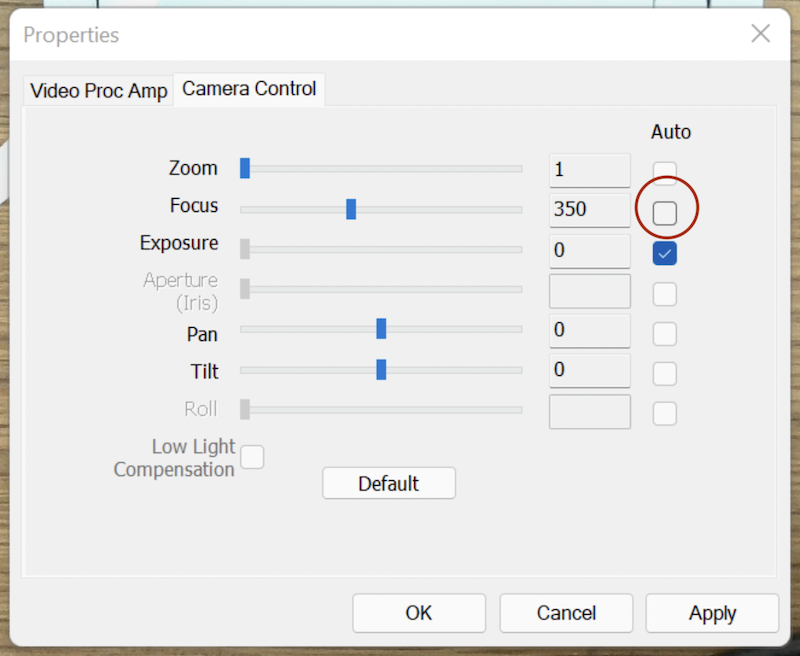
3. Autofocus is now disabled.
4. When you open the camera in app like ideaocam, you will still see the DC400 adjusting focus itself- this is its normal behavior. Once the focus is set, it will not re-focus until you trigger the AF button.
For Mac:
- Webcam Setting: Go to App Store, search for “Webcam Setting”, or click https://apps.apple.com/app/webcam-setting/id1610840452?mt=12
- Connect Ideao DC400 and select the camera
- Go to Advanced tab
- Uncheck Autofocus
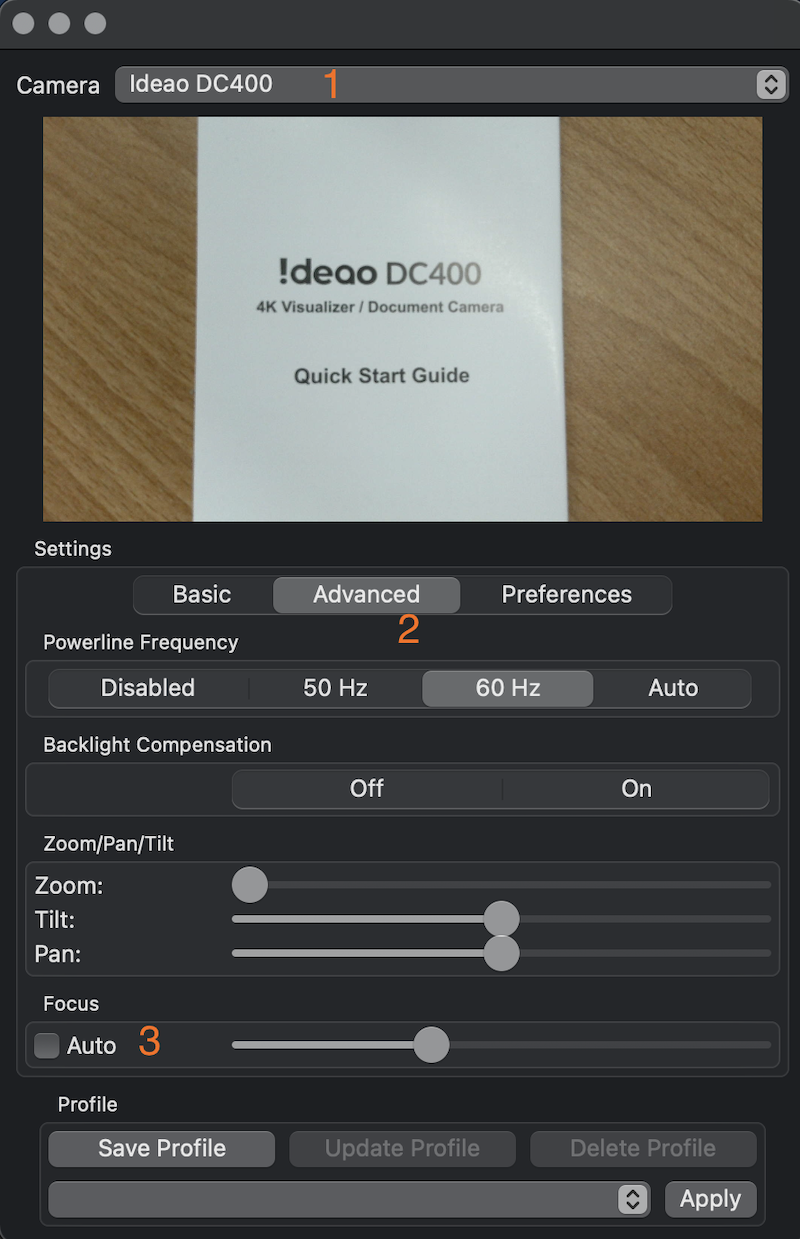
- You will still see the DC400 adjusting focus itself when you first turn on its video. Once the focus is set, it will not re-focus until you trigger the AF button.
* AMCap and Webcam Settings are not developed by FTI. FTI does not take responsibility maintaining the softwares or promise in their functionality and availability.
Most video conferencing software, such as Google Meet, Zoom, Microsoft Teams, and Webex, mirrors your camera feed by default. However, this does not affect the receiver’s view; anyone watching your video sees the non-mirrored version.
If you still want to view an unmirrored image on your side, please follow the steps below.
Common solution for all the video conferencing software
1. Launch Ideao VisualCam, display the image from Ideao DC400 camera.
2. During your video call, do not select DC400
3. Select “Share screen”/”Present Now” (it varies depending on the software you use) , and share your Ideao VisualCam screen.
Google Meet: (Watch Tutorial)
1.There’re several Google Chrome extension to mirror your video. We recommend you to download “VideoMirror”.
2.Start a Google Meet call and select your IDEAO DC400 camera, and then hit the extension icon. The videos will be mirrored.
* Please note VideoMirror is a 3rd party app, FTI does not provide customer support towards this app.
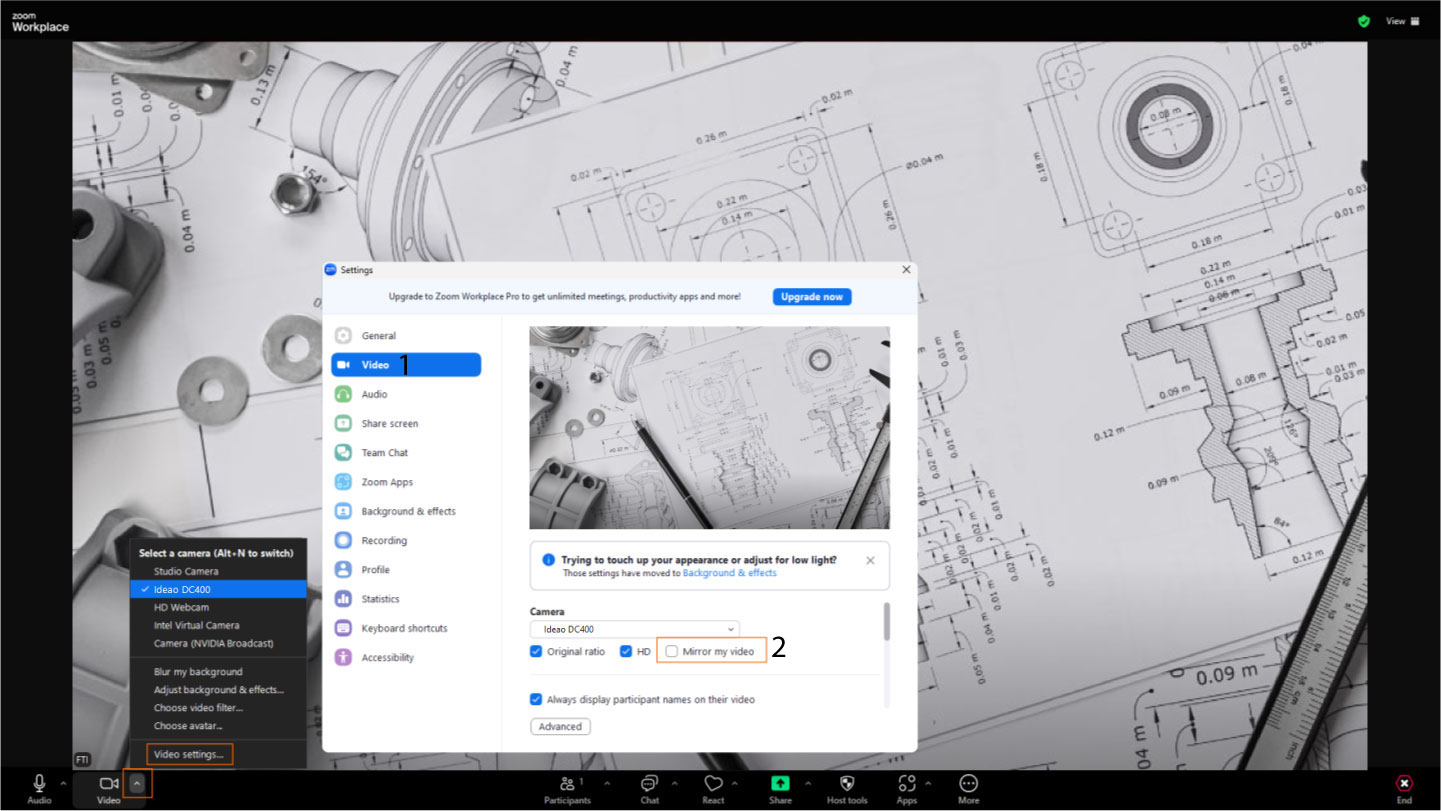
Zoom: (Watch tutorial)
1.Go to “Video Settings” in Zoom
2.Un-tick the box “Mirror my video”
There are several ways to display images from multiple cameras in video conferencing software as below.
Webcam + Share screen:
1. Select the webcam for showing your face in the video conferencing software.
2. Launch Ideao VisualCam and display the image from DC400 there.
3. Click “Share” in the video conferencing software
4. Select ‘Ideao VisualCam’ as the source and click ‘Share’ to start sharing.
Ideao VisualCam split screen mode
1. Do not turn on camera in Video Conferencing software
2. Launch Ideao VisualCam and display the image from DC400 there
3. Click “Split Screen” at the left top corner of the screen.
4. Click any part of the right side of the screen to show the “Menu” icon.
5. Click the menu icon and click “Switch to camera”
6. Click “Device” and select the camera you want to display the image from.
Ideao VisualCam PIP mode
1. Do not turn on camera in Video Conferencing software
2. Launch Ideao VisualCam and display the image from DC400 there
3. Click PIP icon in the tool bar on the left side to display the image from the camera.
Embed the live image from DC400 in a PowerPoint presentation
1. While creating the presentation contents, select “Cameo” from “Insert tab”.
2. Choose the camera style, click “Preview,” and select the DC400 as the camera source.
3. Start the presentation, and the live view from the DC400 will appear while also displaying your face in the video conferencing software.
Manage app settings to allow Ideao VisualCam to run on your computer.
Avast: https://support.avast.com/en-ph/article/Use-Antivirus-blocked-allowed-apps
Kaspersky: https://support.kaspersky.com/KART/3.0/en-US/130083.htm
Please follow the steps below to run the software automatically at startup in Windows.
- Select the Start button and scroll to find the app.
- Right-click the app, select More, and then select Open file location. This opens the location where the shortcut to the app is saved.
- With the file location open, press the Windows logo key+ R, type shell:startup, then select OK. This opens the Startup
- Copy and paste the shortcut to the app from the file location to the Startup
- Go to Windows settings > Apps > Startup.
- Select the toggle to set it to On.
- Restart the PC and make sure the app runs automatically.
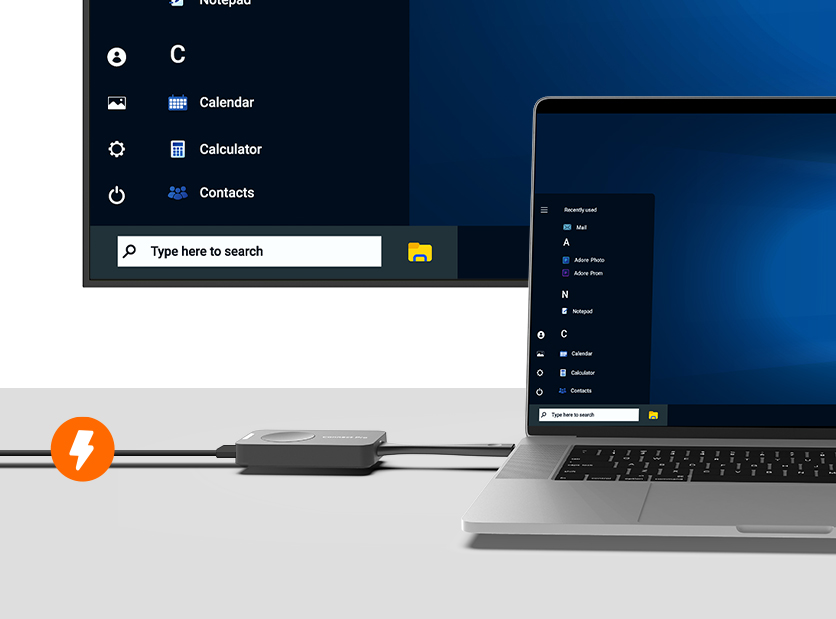
- Connect the RX100 receiver to the display using the power cable and HDMI cable. If the display does not have a Type-C port to support power more than 5V/2A, use the included switch cable to convert it into two USB-A connectors. One of the USB-A connectors should be USB3.0, which can supply power for the receiver. Alternatively, you can connect the Type-C cable to a power adapter (not included in the package).
- To connect a USB webcam, plug the camera’s USB cable into the USB-A port on the receiver.
- Mount the receiver RX100 on the display using the built-in mounting clip. Ensure that the receiver is positioned towards the front side for optimal wireless signal transmission. The optimal wireless transmission range is within 5 meters.
- Switch the display output source to the connected HDMI port.
- Connect the speakerphone ST100 to a full-featured Type-C port on your laptop. Wait until the screencasting button light turns green, then press the button to start casting your screen. Press the button again to pause screencasting. * In the case where the laptop’s type C port does not meet the full feature requirement, use the USB-C to HDMI & USB-A Adapter instead.
- To use the speakerphone ST100 and access the camera wirelessly, in your video conference software, select “Connect” as your microphone, speaker, and camera.
Not all laptops’ Type C port supports display signal. Furthermore, there could be compatibility issue among different manufacturers and models, resulting in such failure. A Type C to A and HDMI converter is included for user as an alternative instead. 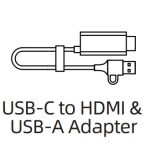
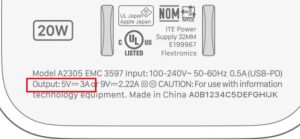
If your display lacks a USB-C port with more than 5V/2A output, you can connect the USB-C cable to a charger adapter (USB charger block) as an alternative.
Please make sure to use an adapter with specification of 5V/2A or higher (Normally, USB C port will be on the charger block instead of USB A) to ensure adequate power supply to the receiver RX100. Otherwise the receiver RX100 may not function correctly. 
The Connect speaker (ST100) volume button only works on adjusting the system volume in Windows (currently not working with MAC), it does not change the speaker volume in some video conference softwares. Please use the video conference volume control in the software application to adjust volume.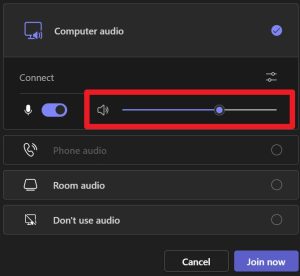
Sometimes when Innex Connect is connected to your device, the volume settings may not synchronize correctly. This can cause the output sound to be lower than expected.
If this happens, try pressing the Volume Down button once or twice. In some cases, the sound may become louder after doing so.
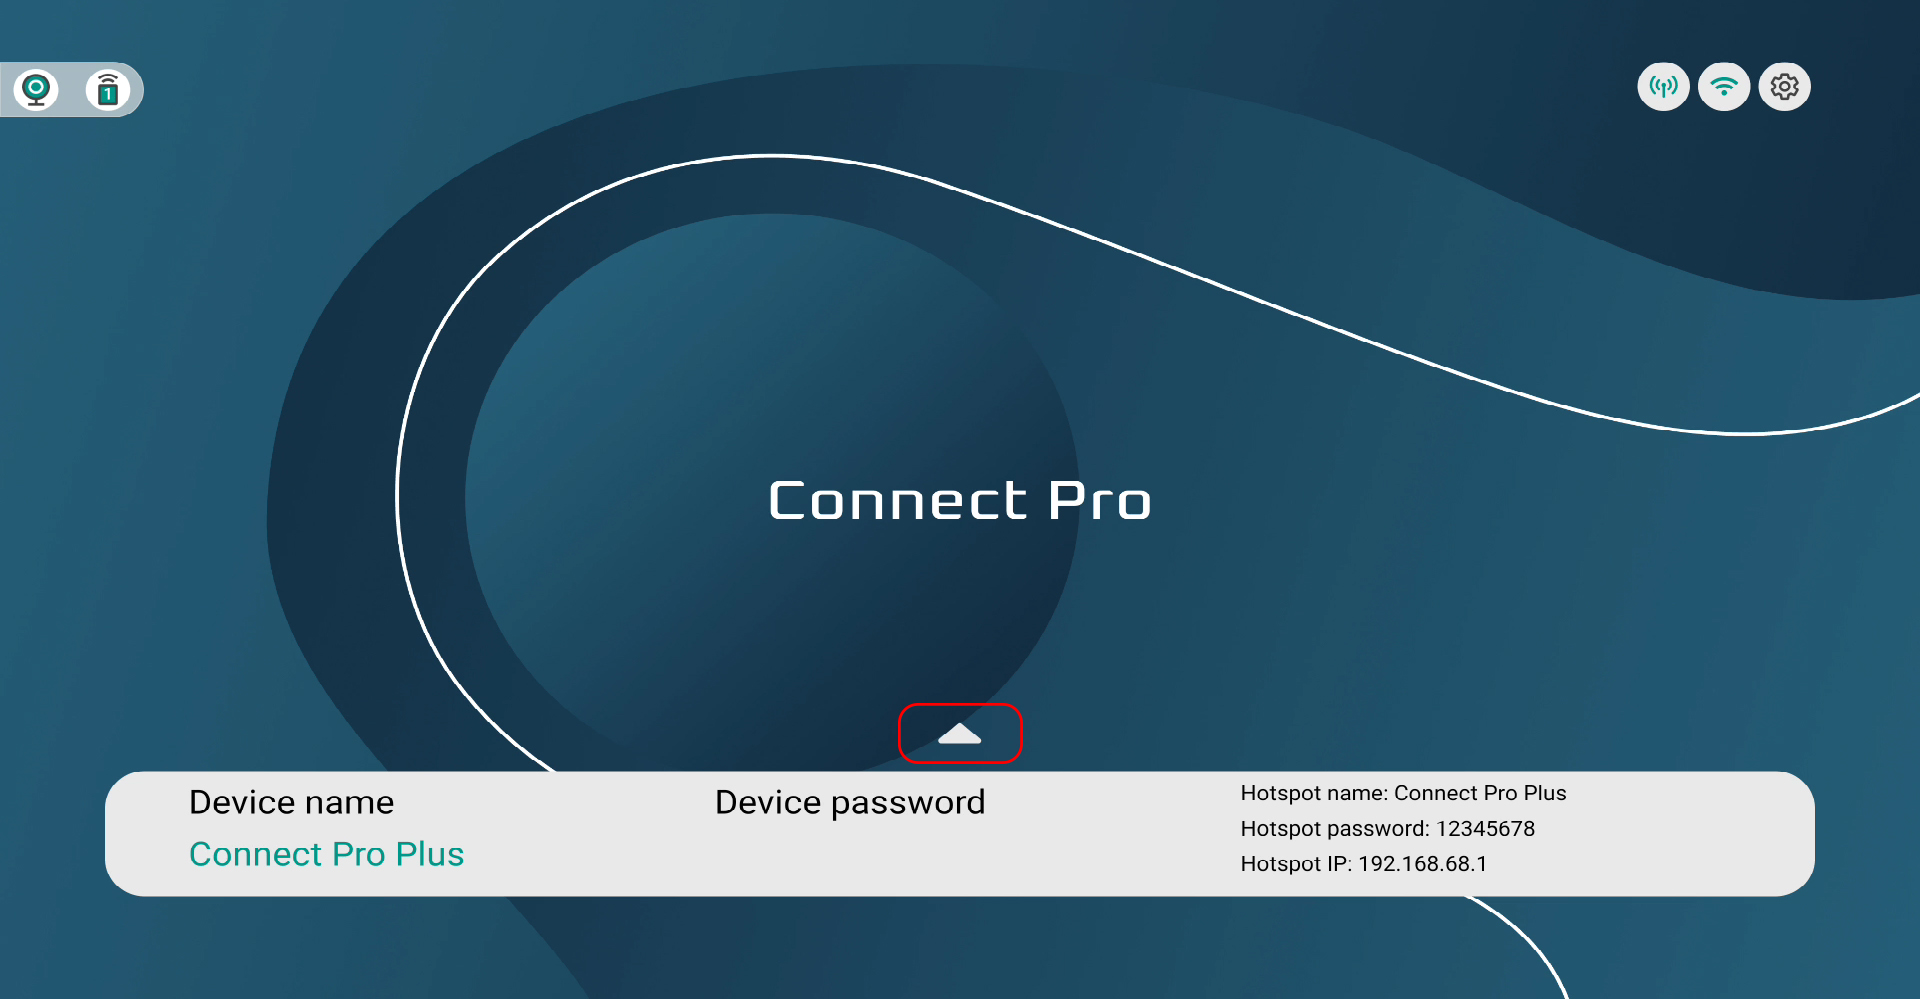
The device name identifies your Innex Connect Pro+ receiver — it is needed when connecting via Connect Pro Software, AirPlay, Miracast, or Chromecast.
To configure the password settings, tap the gear icon at the top and go to “More” settings. After a 4-digit password is set, the password will be required before casting.

Yes. To configure the hotspot settings, tap the hotspot icon at the top.
Note: that after changing the hotspot name or password, the Connect Pro Button must be paired again.
Innex Connect Pro+ indicator normally turns blue when powered on and changes to purple while screen sharing.
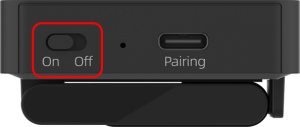
If the indicator stays off, check that the side power switch is turned on and the power cable is properly connected. If the indicator still stays off please contact your dealer.
If the indicator remains red, it may indicate a hardware failure with Innex Connect Pro+ that cannot be resolved through troubleshooting.Please contact your dealer for further assistance.
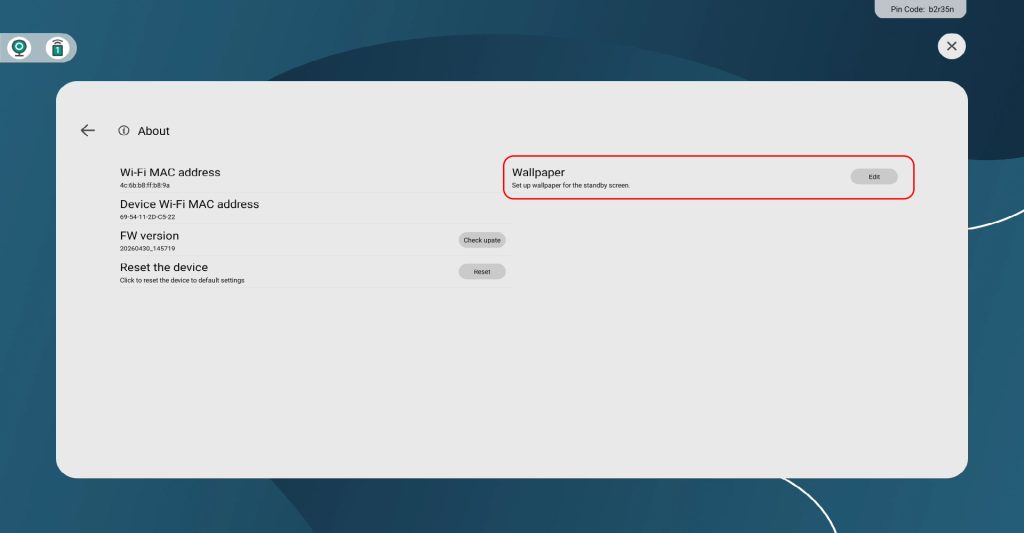
Yes. Tap the gear icon at the top to enter Settings. Then go to “About” and tap “Wallpaper Setting” to change the background image.
We strongly recommend keeping the device up to date.
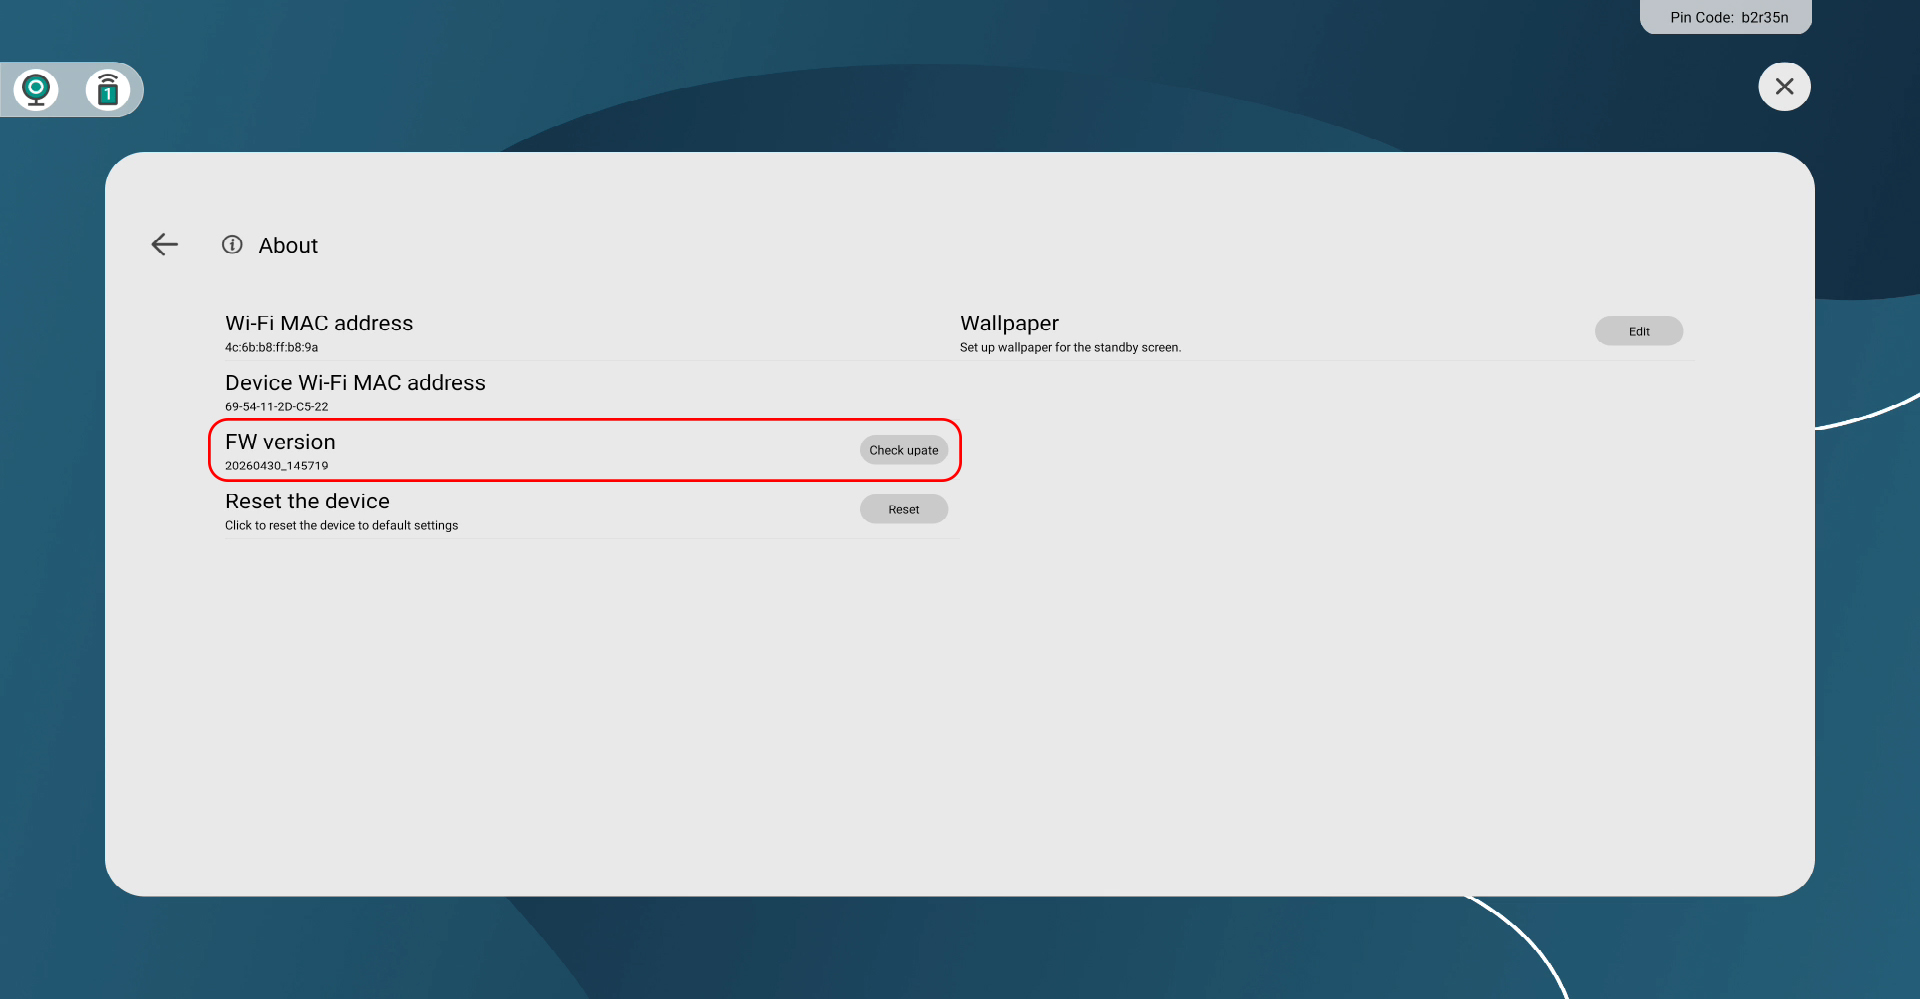
Innex Connect Pro+ supports OTA (Over-the-Air) updates. When connected to the internet, the system will notify you if a new firmware version is available. Simply follow the on-screen instructions to update.
To check for updates manually, tap the gear icon and go to “About” to see whether a firmware update is available.
Innex Connect Pro+ automatically verifies and registers itself when connected to the internet. Ensure the device is properly connected to an external network. Registration will start automatically after the connection is established, and a confirmation message will appear once registration is complete.
Note that some network firewalls may block the automatic registration process. If this happens, try connecting to a different network or using a mobile hotspot. If registration still fails while connected to the internet, please contact your dealer.
There are two floating elements shown during initial setup:
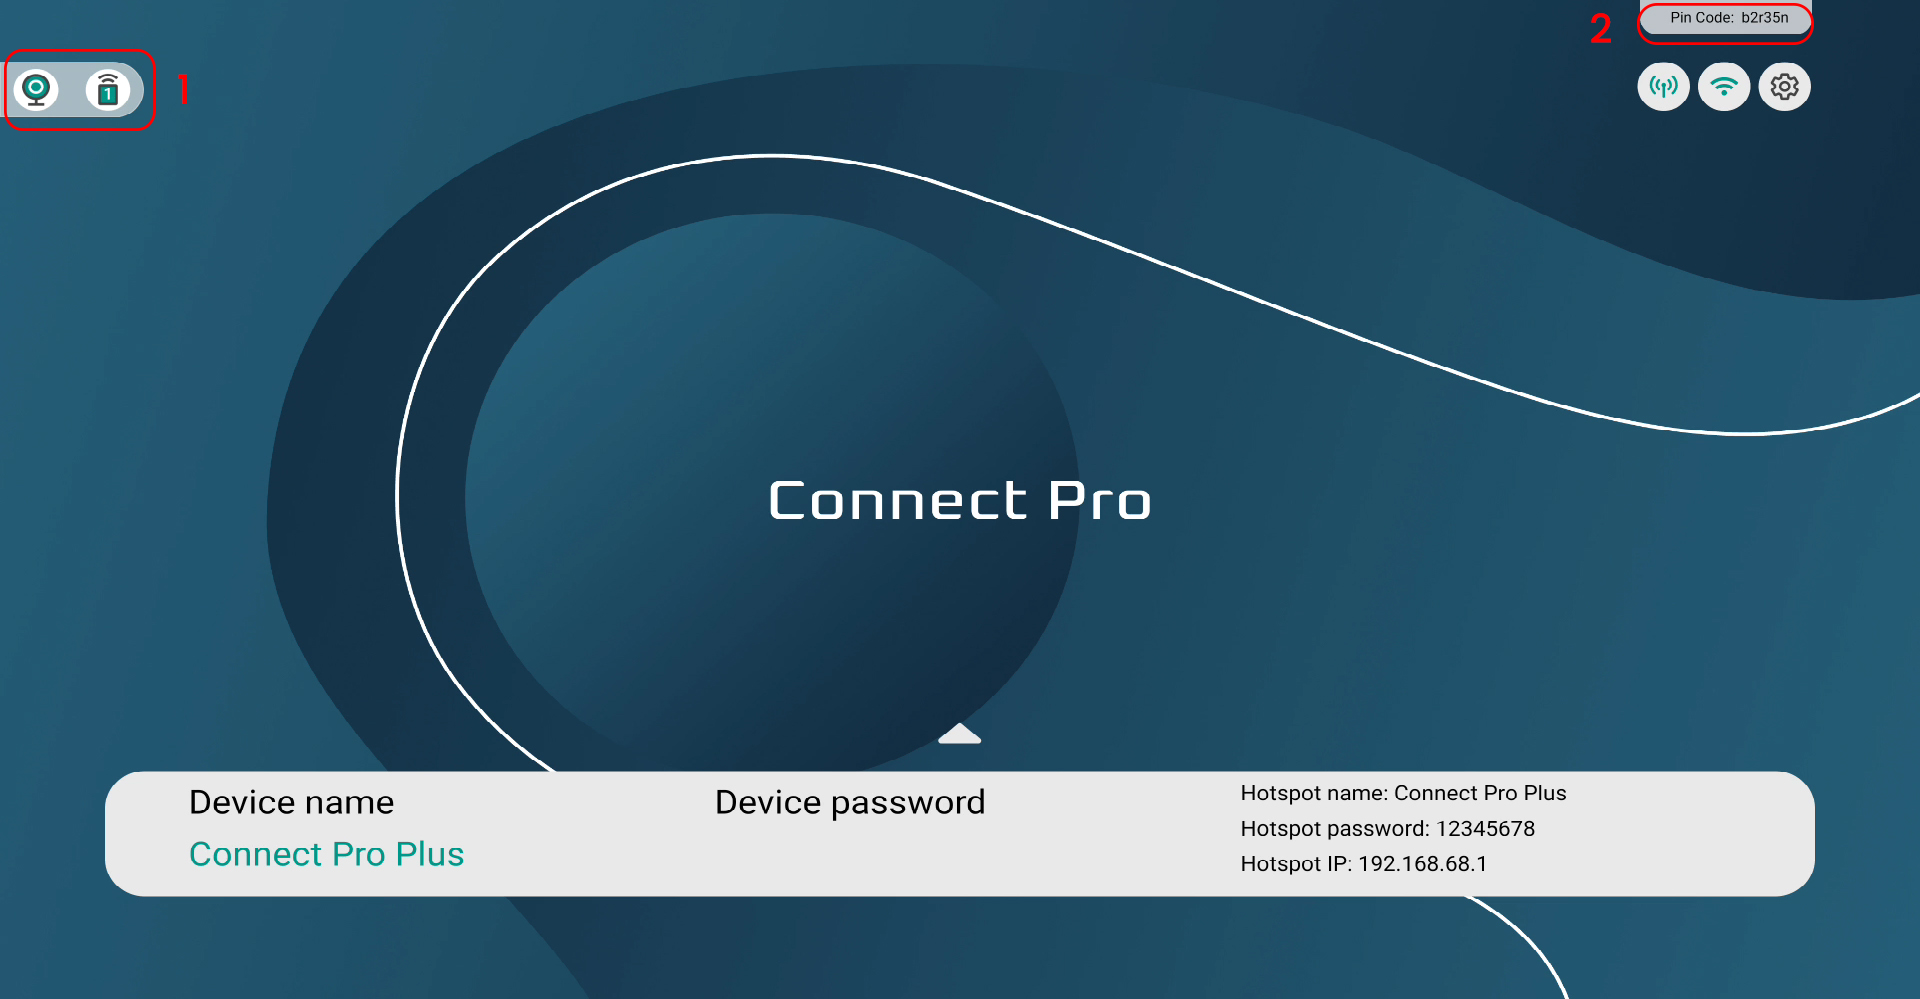
1. Moderator:
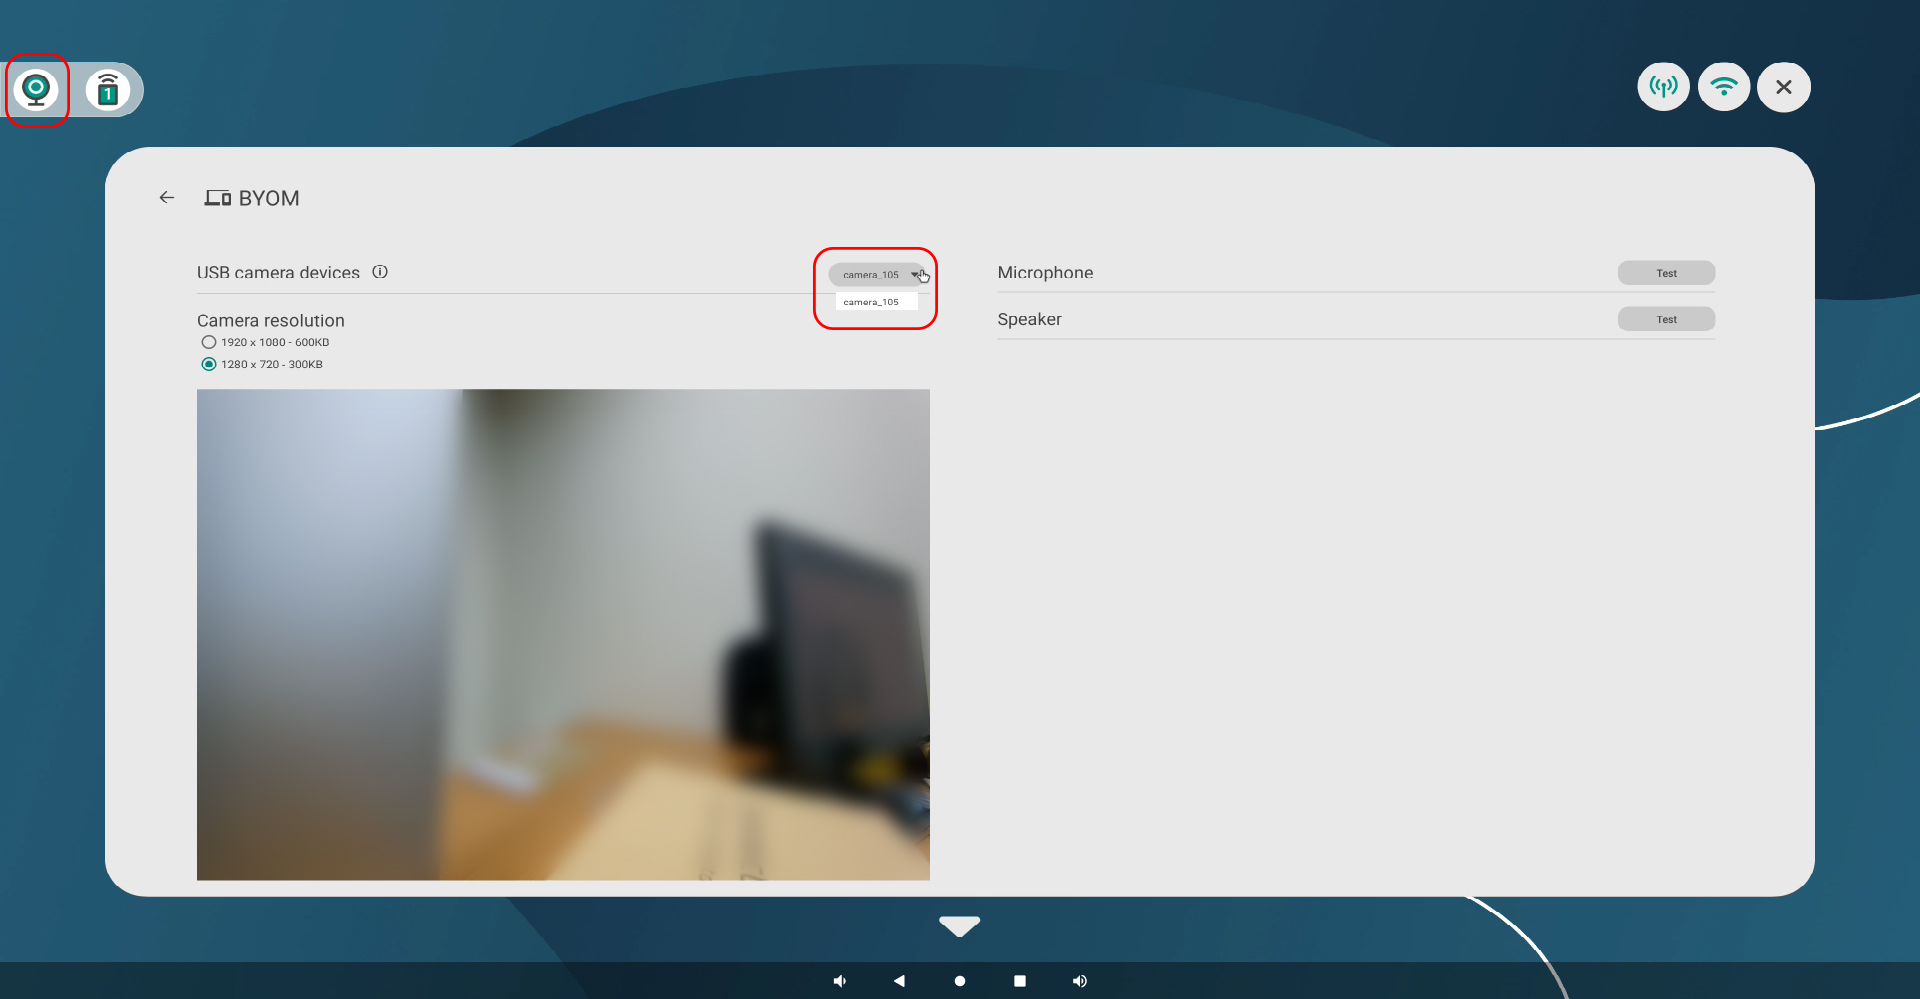
・BYOM icon: Turns on when a camera is detected (tap to access BYOM settings)
・Device icon: Displays the number of connected sources.
To hide, go to “More” Settings > Advanced Settings and turn off “Moderator”.
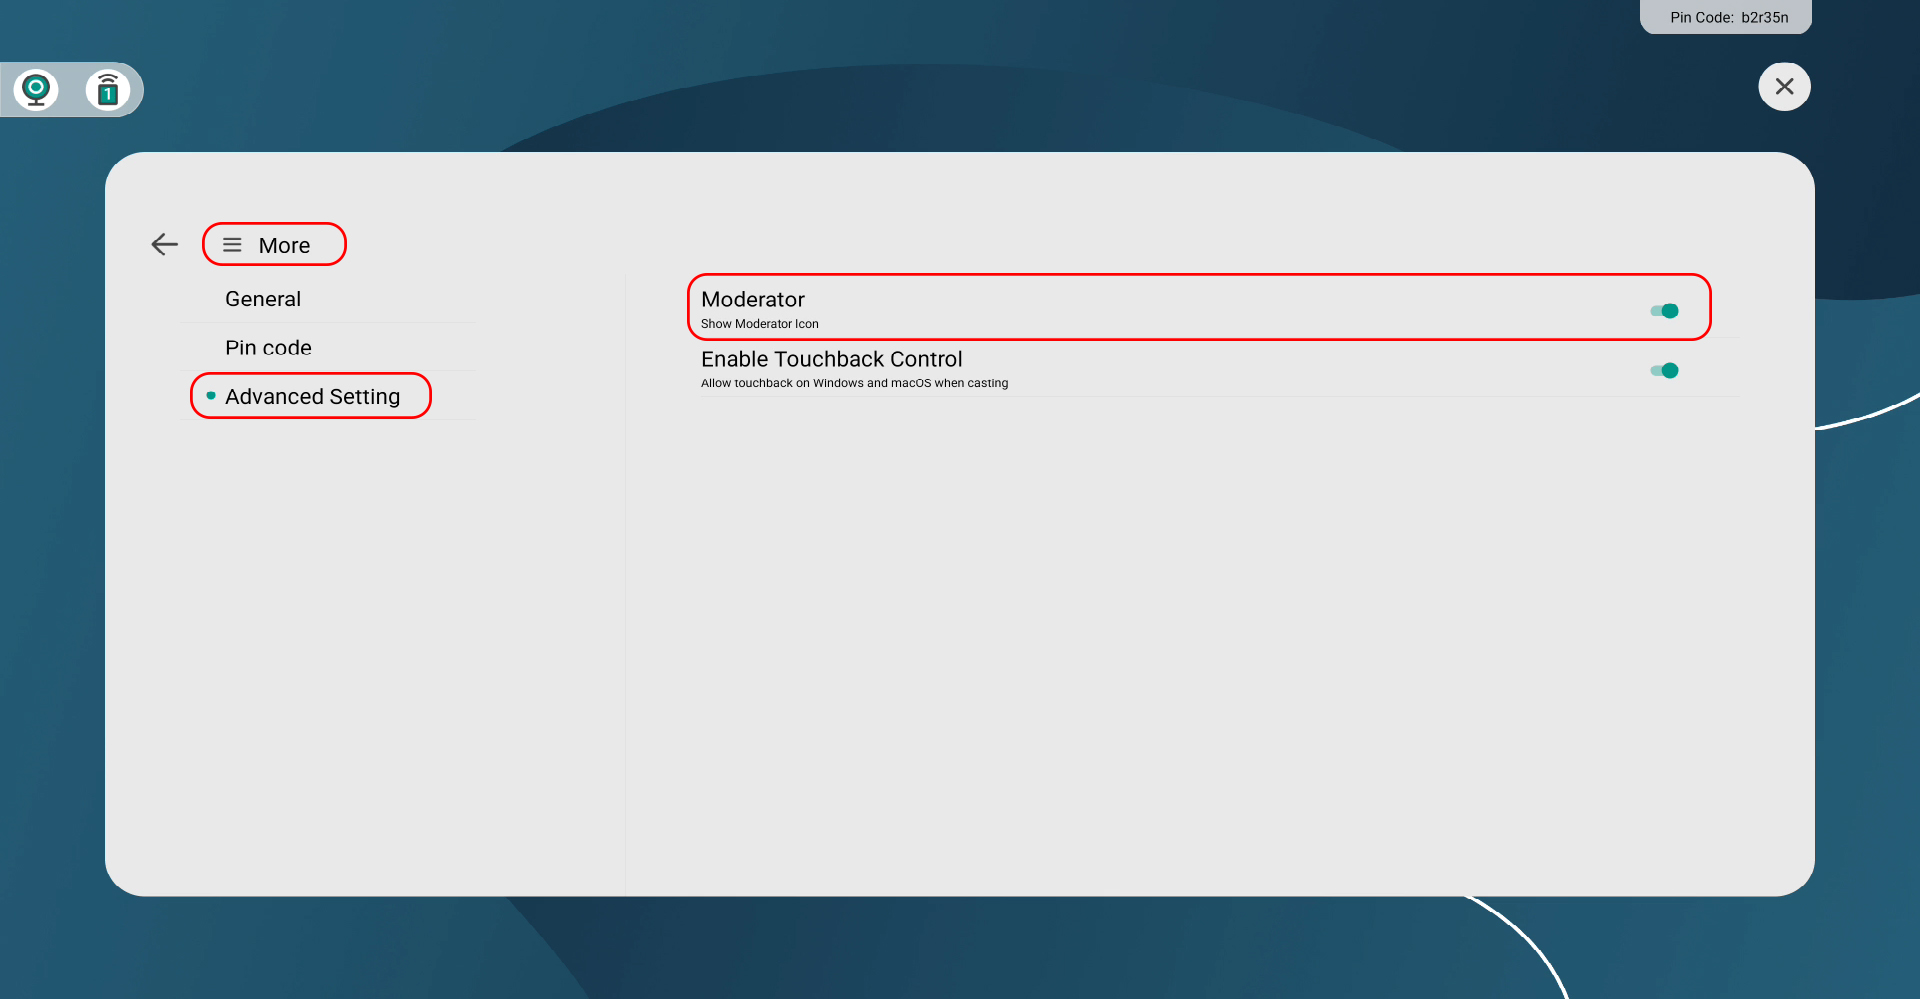
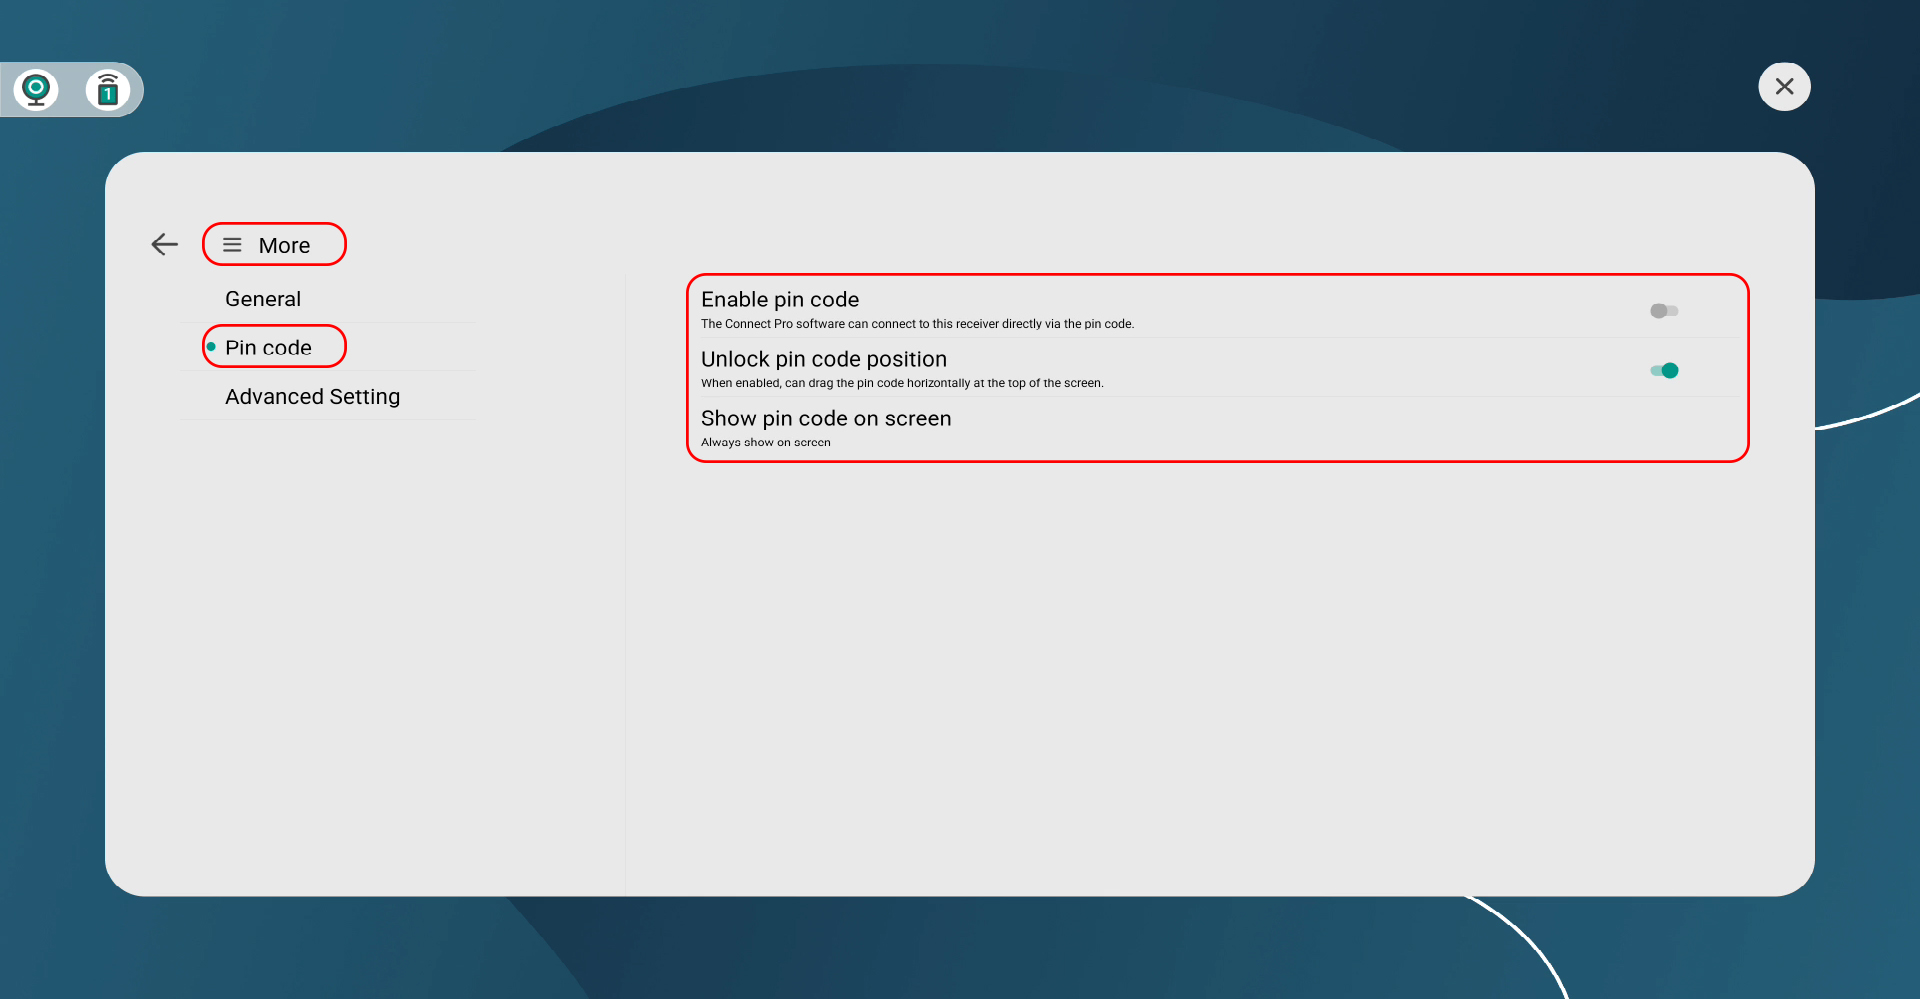
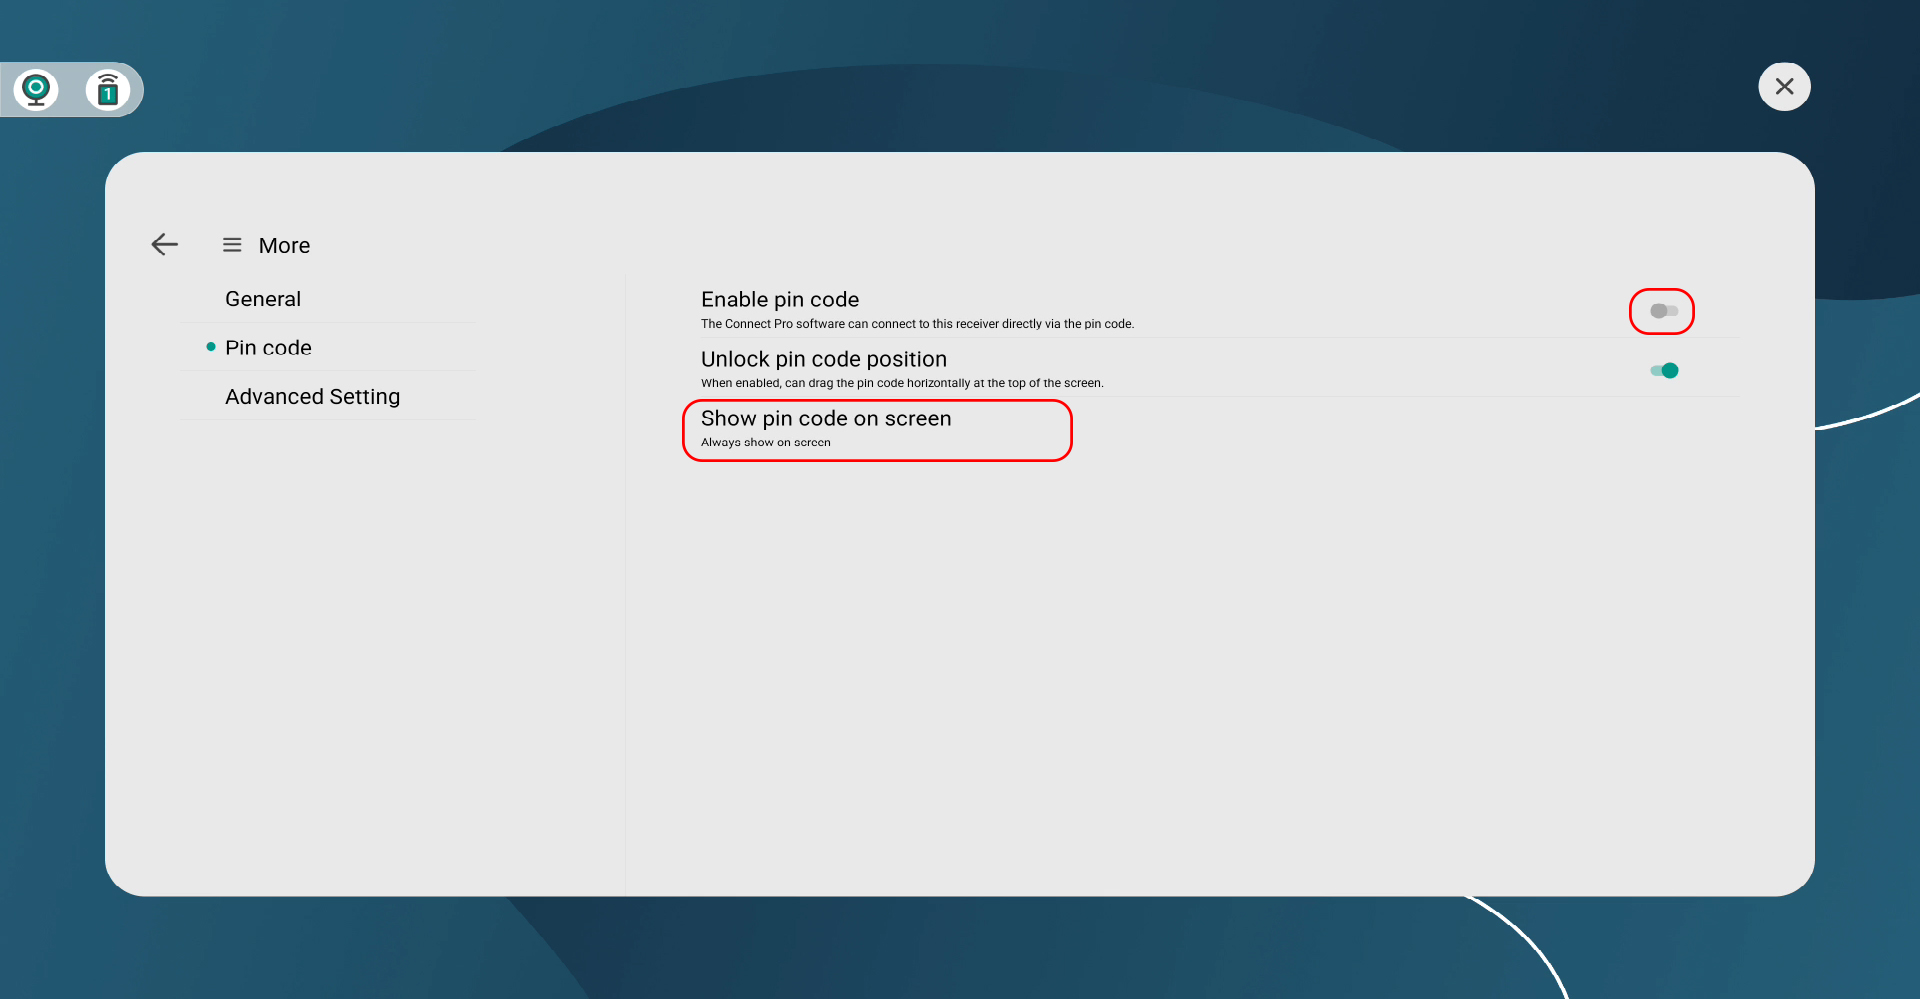
2. PIN Code:
Used for Connect Pro Software connections. To hide, go to “More” Settings > PIN Code > turn off PIN Code.
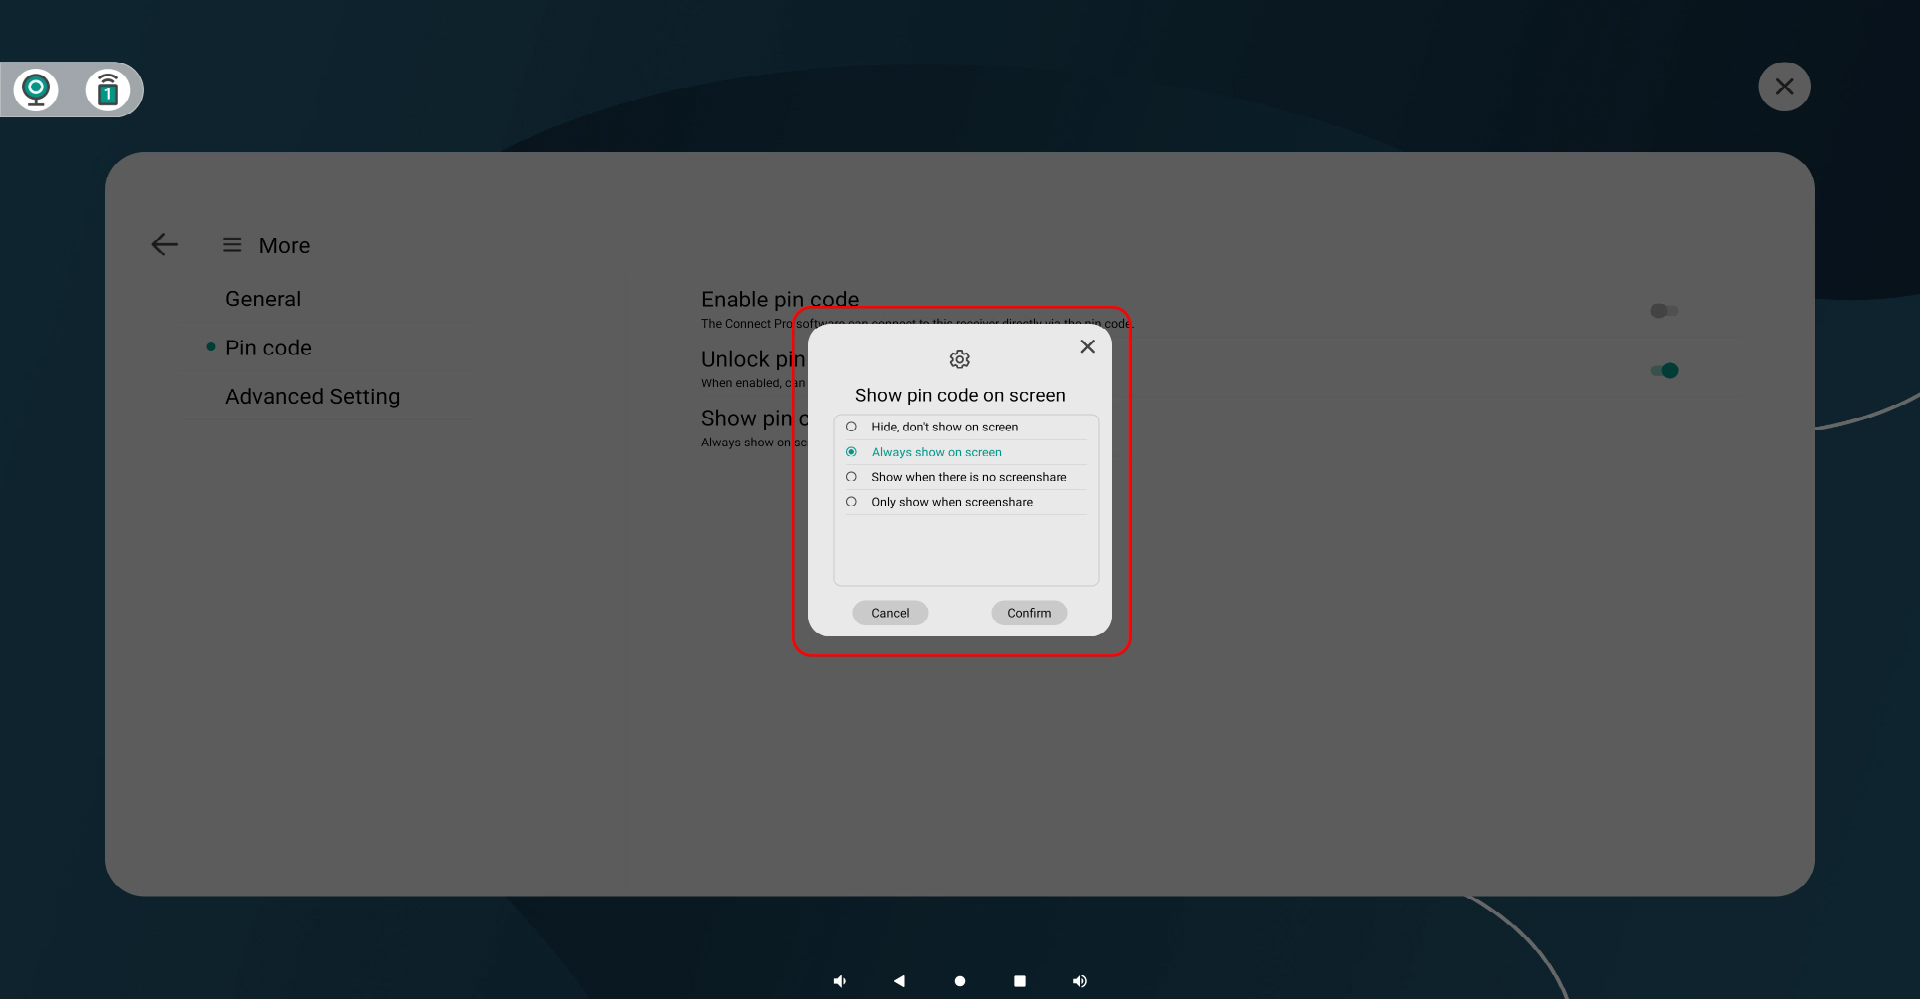
*We also recommend checking the “Show PIN code on screen” setting after turning off the PIN code display on the screen.
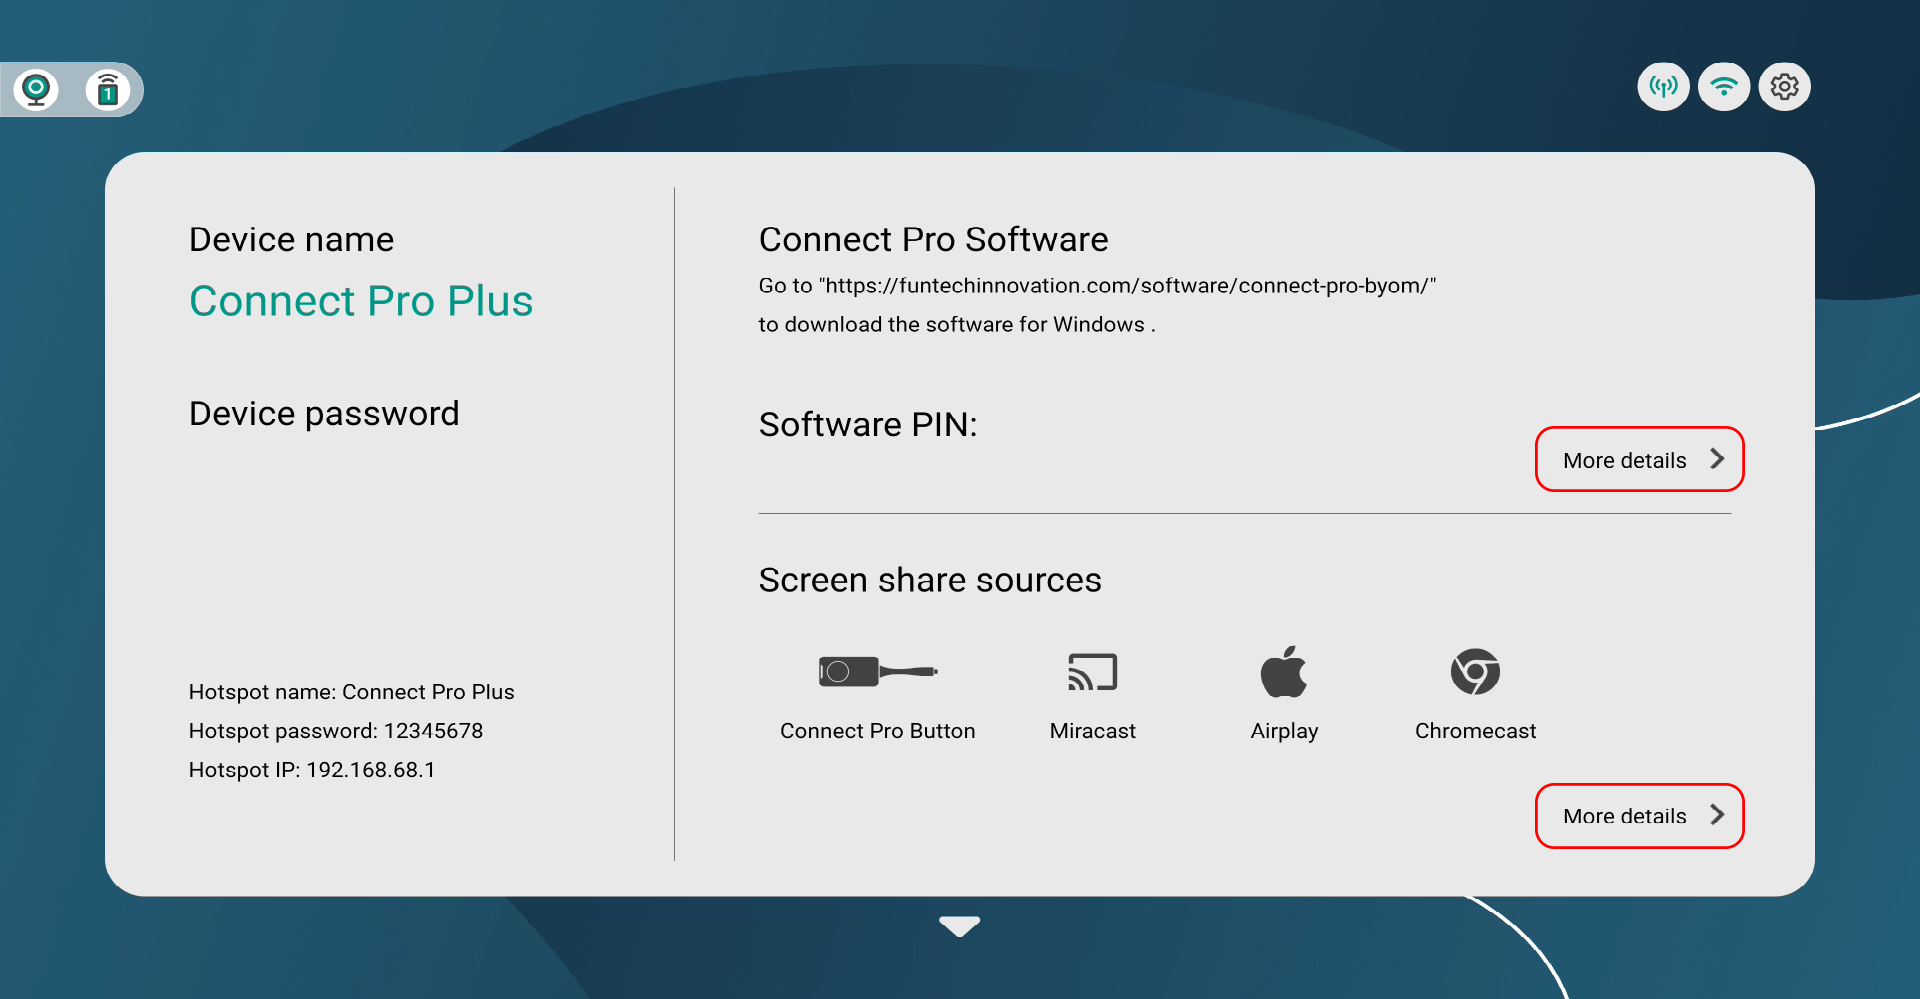
Innex Connect Pro+ supports Connect Pro Software, AirPlay, Miracast, Chromecast, and Connect Pro Button.
Tap the triangle icon at the bottom of the interface to open the help panel with step-by-step instructions for each method.
- First, please ensure your device is on the compatibility list.
- Power on Innex Connect Pro+ and connect it to the display.
- Then connect the external device to Innex Connect Pro+. Innex Connect Pro+ will automatically set the last-detected microphone and speaker as the system audio devices.
- If the device still cannot be used, contact your dealer.
This usually happens when Innex Connect Pro+ does not correctly detect the display’s maximum resolution.
- Restart the display to force the resolution to be detected again.
- For the best result, power on Innex Connect Pro+ first, connect the HDMI cable, and then turn on the display.
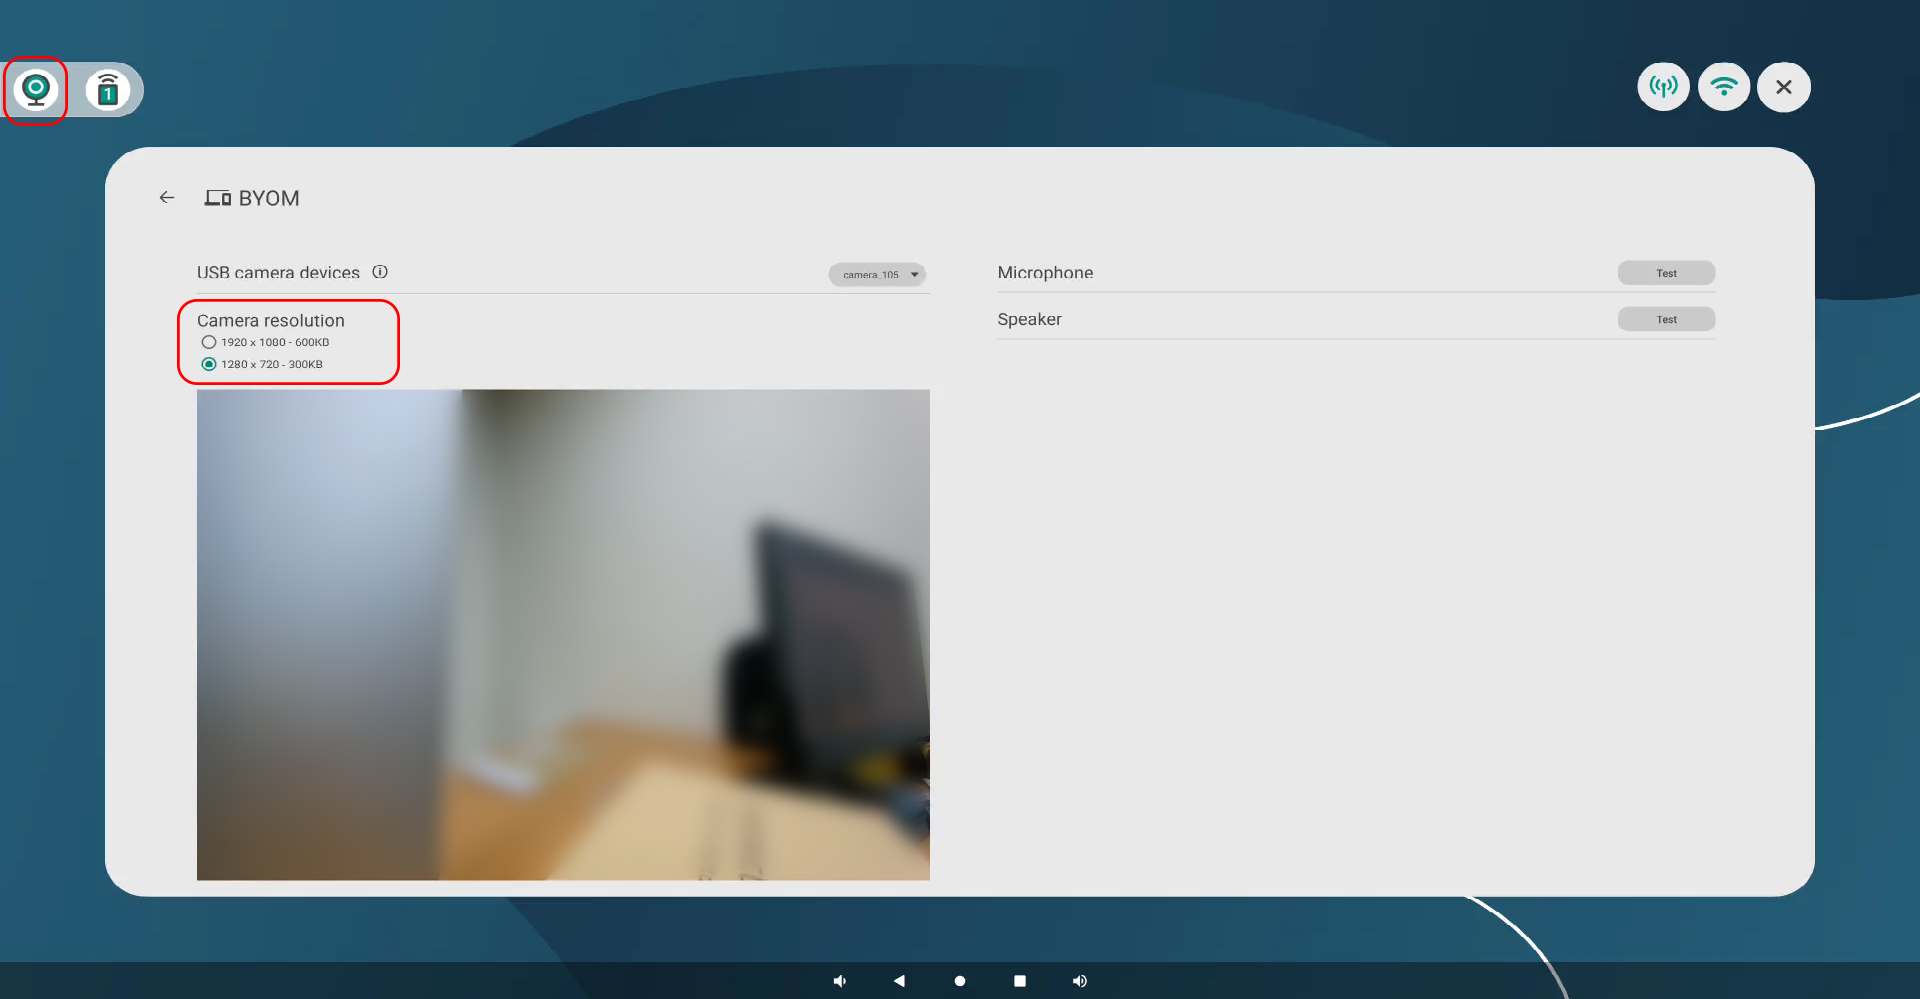
- First, check whether your device is listed on the compatibility list.
- Make sure the signal cable is connected to the USB-A port on the back of Innex Connect Pro+, and confirm that the device is powered on if required.
- Once connected properly, tap the camera icon in the top-left corner to open the preview.
- If multiple devices are connected, select the desired device from the drop-down menu.
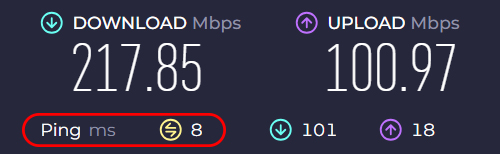
Screen sharing quality depends heavily on the network environment. For stable performance, make sure the network latency is below 10 ms. You can use an online speed test website to check your current network conditions.

You may also improve performance by disabling Wi-Fi and using only the Innex Connect Pro+ hotspot.
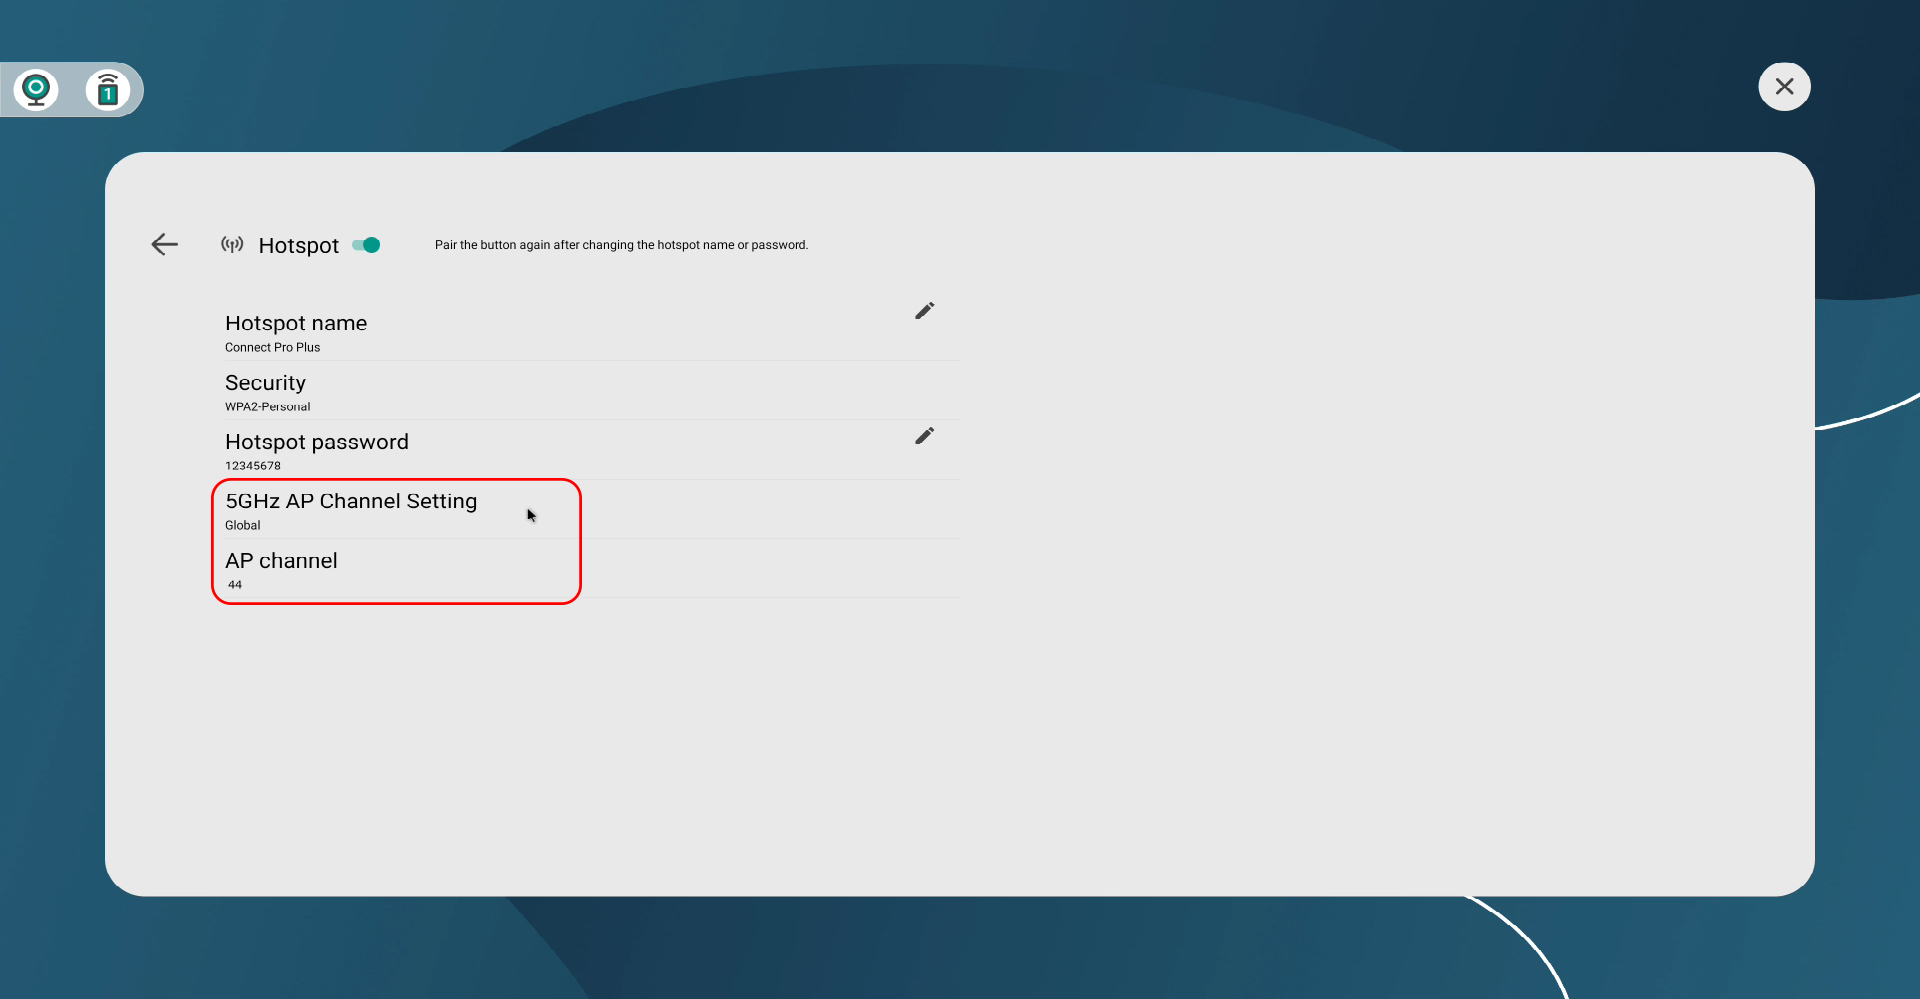
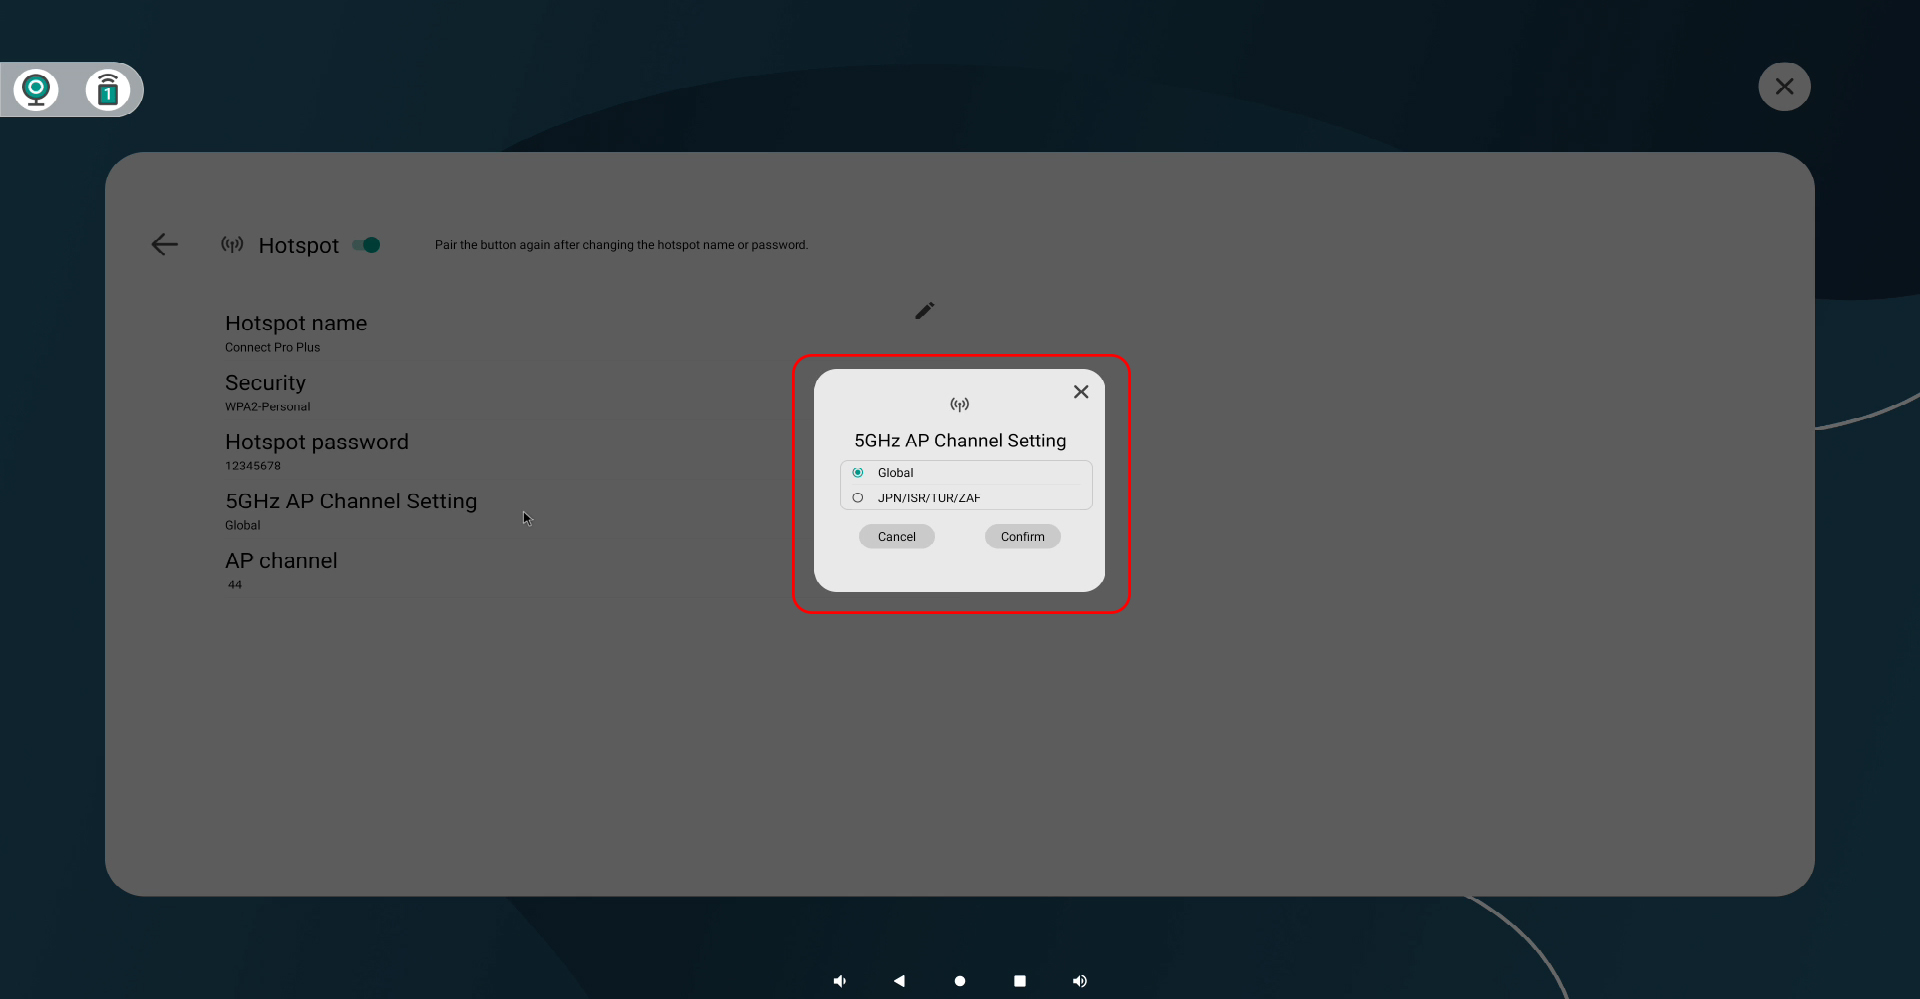
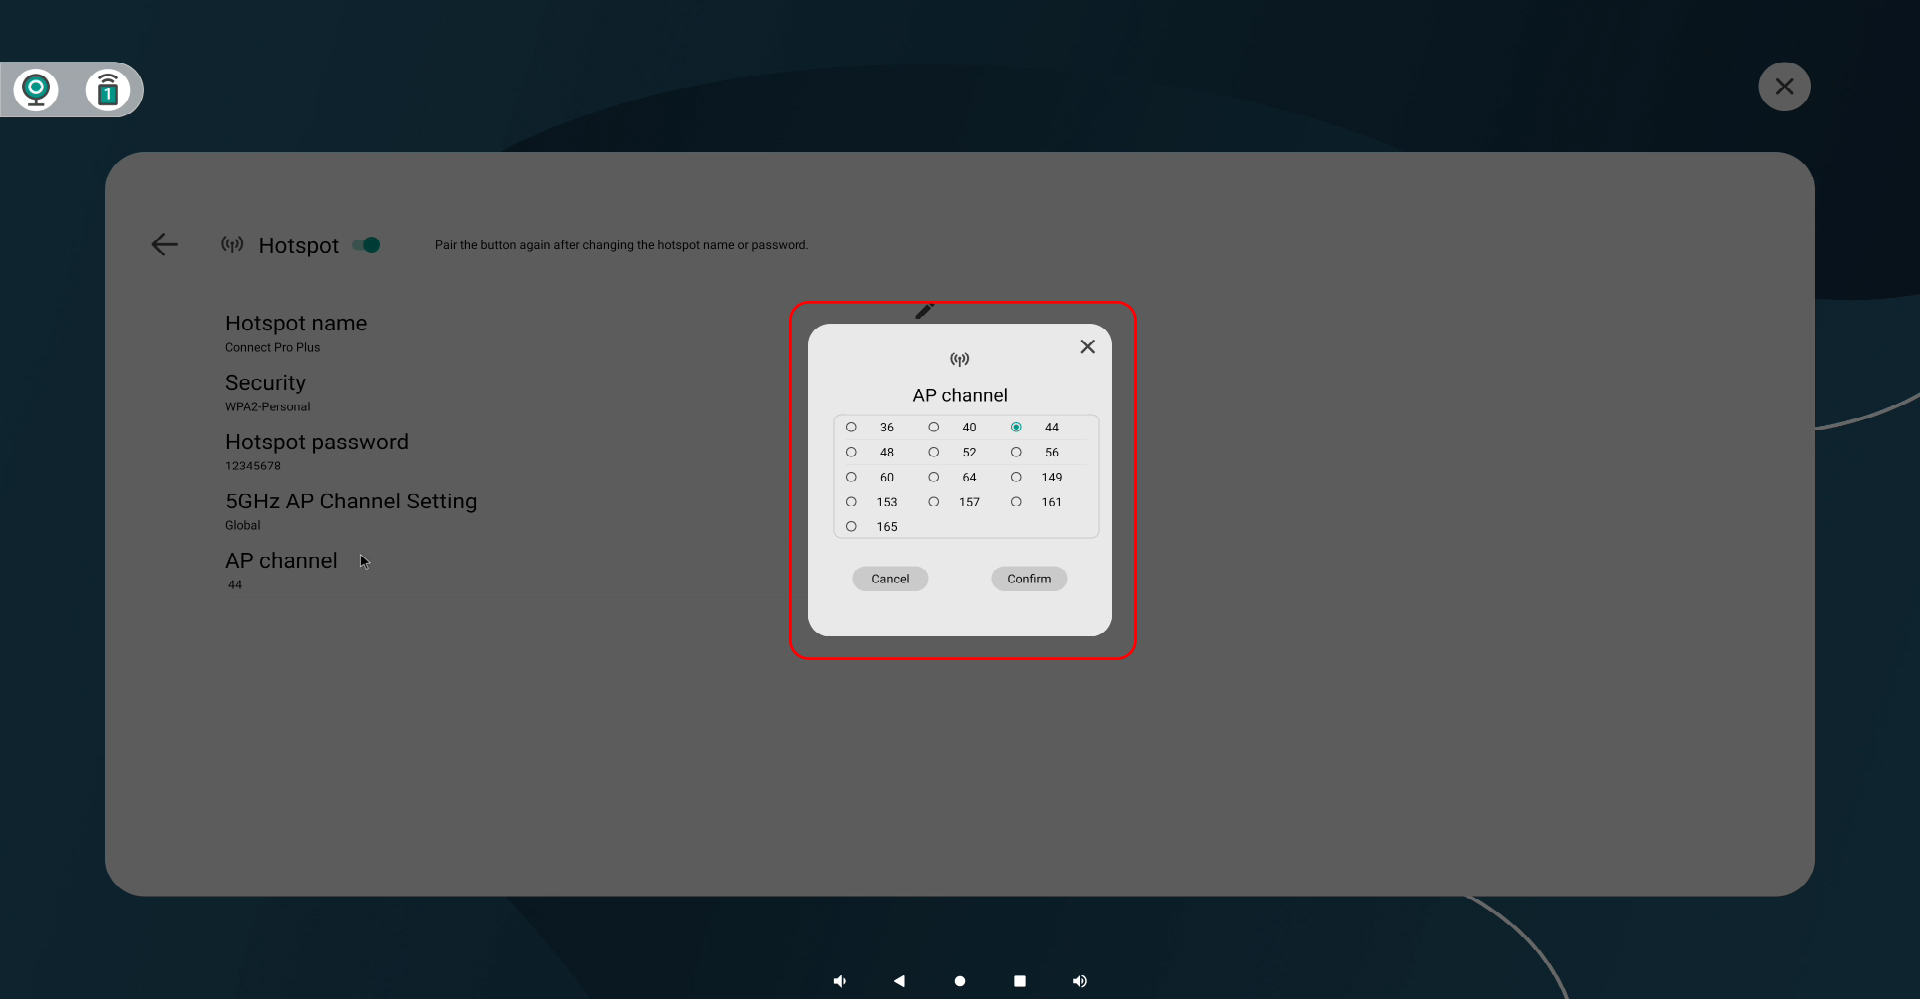
Select the appropriate region and switch to a less congested channel to reduce interference and improve screen sharing quality.
For connections using Connect Pro Software, please also ensure that your computer meets the minimum system requirements.
- If nothing happens when attempting to share your screen from your device, please ensure your device is properly connected to the Innex Connect Pro+.
- When connected successfully, a number will appear in the top-left corner indicating how many source devices are linked. Click it to view the source list. If your device is not connected, the receiver will not detect or display it.
- Sometimes the issue may be caused by poor network conditions. Please check the network status.
- If using Connect Pro Button and two nearby receivers share the same hotspot name and password, your screen may project to the wrong device.
- If another receiver is within 10 meters/32.8 ft, use unique hotspot names and passwords to avoid conflicts.

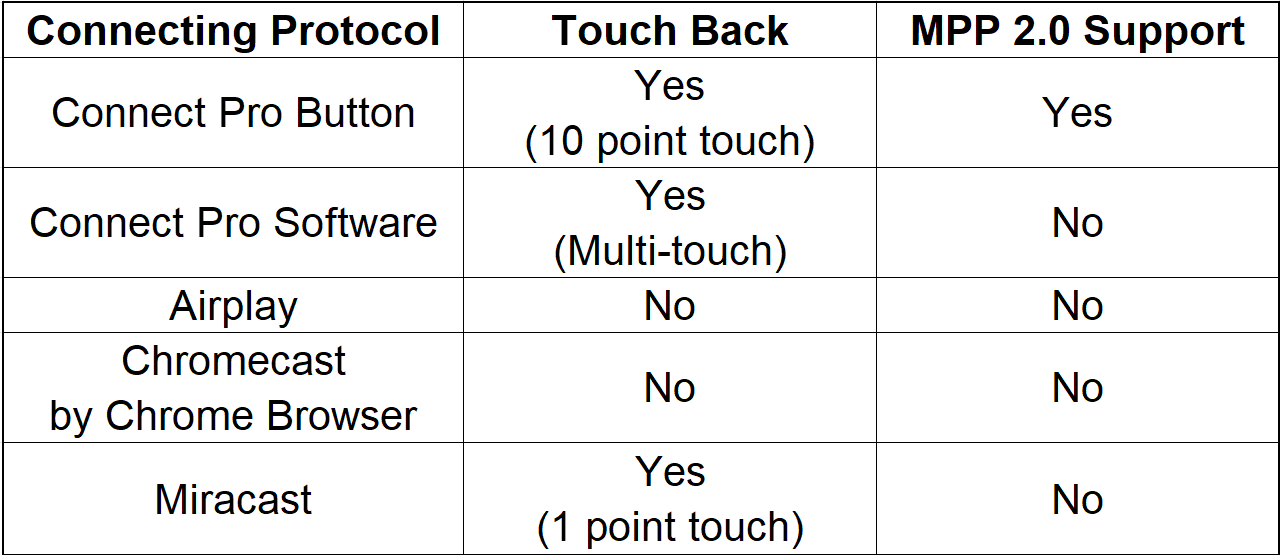
Innex Connect Pro+ supports all major screen sharing protocols, making it compatible with virtually any device. The table below summarizes the supported operating systems, typical compatible devices, and key features of each protocol.
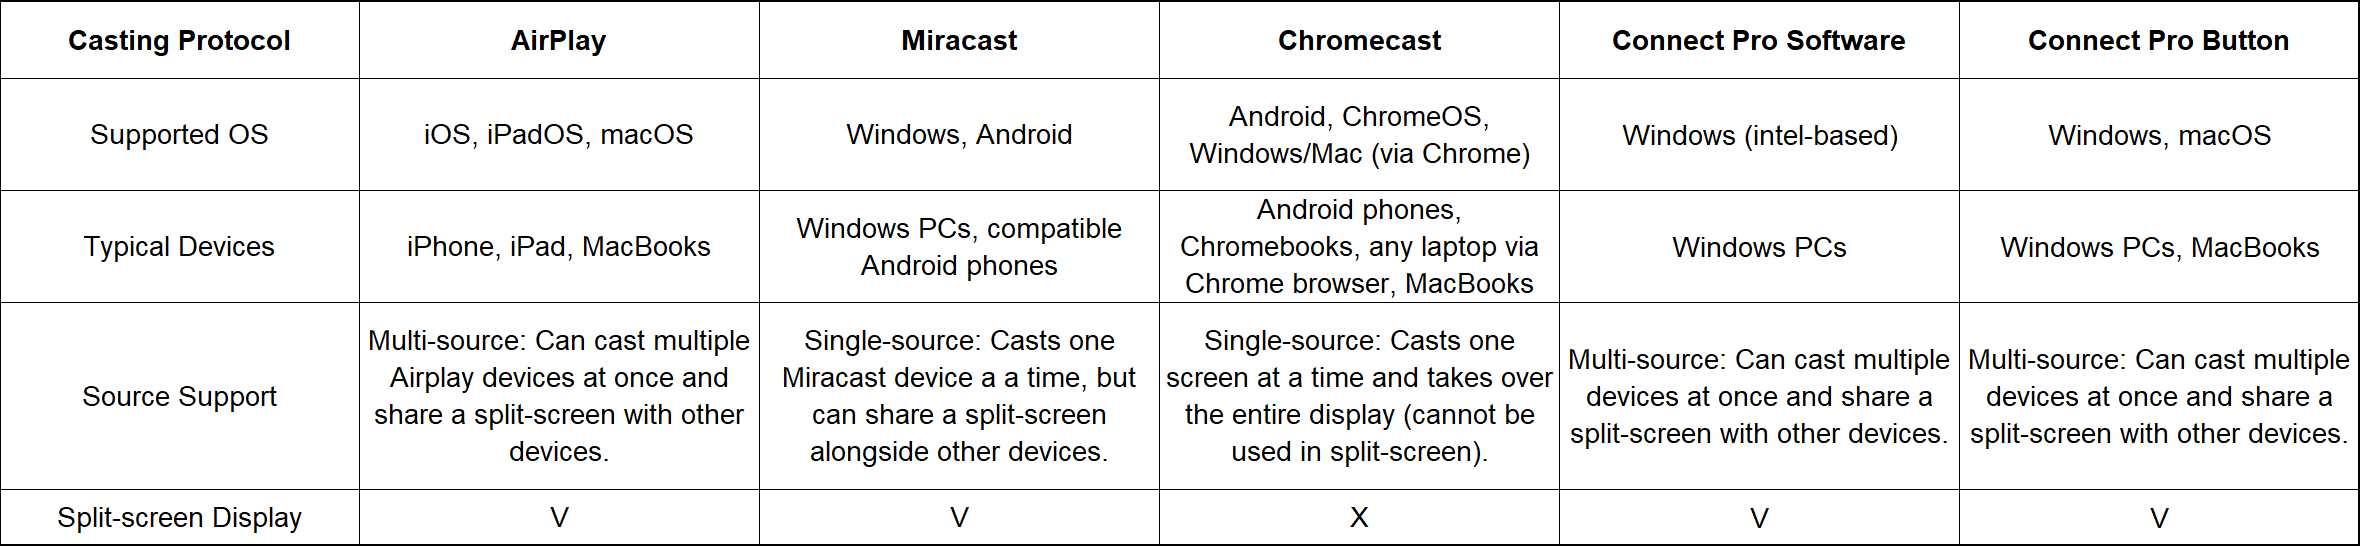
Each method provides different features depending on whether you need screen sharing or camera streaming functionality. Refer to the comparison table below to choose the method that best suits your needs.

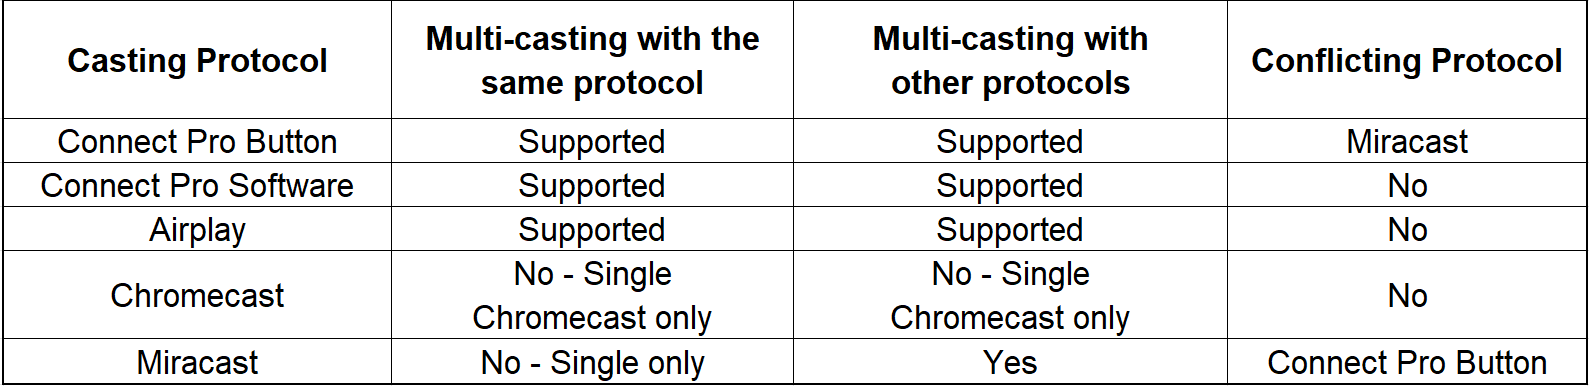
Yes — Innex Connect Pro+ supports up to 9 simultaneous split-screen sources (default: 4).
To adjust, go to More Settings > General > Max. split screens.
Note: Heavy network congestion may cause some sources to show as black screens or with lag. Refer to the table below for split-screen support per protocol.
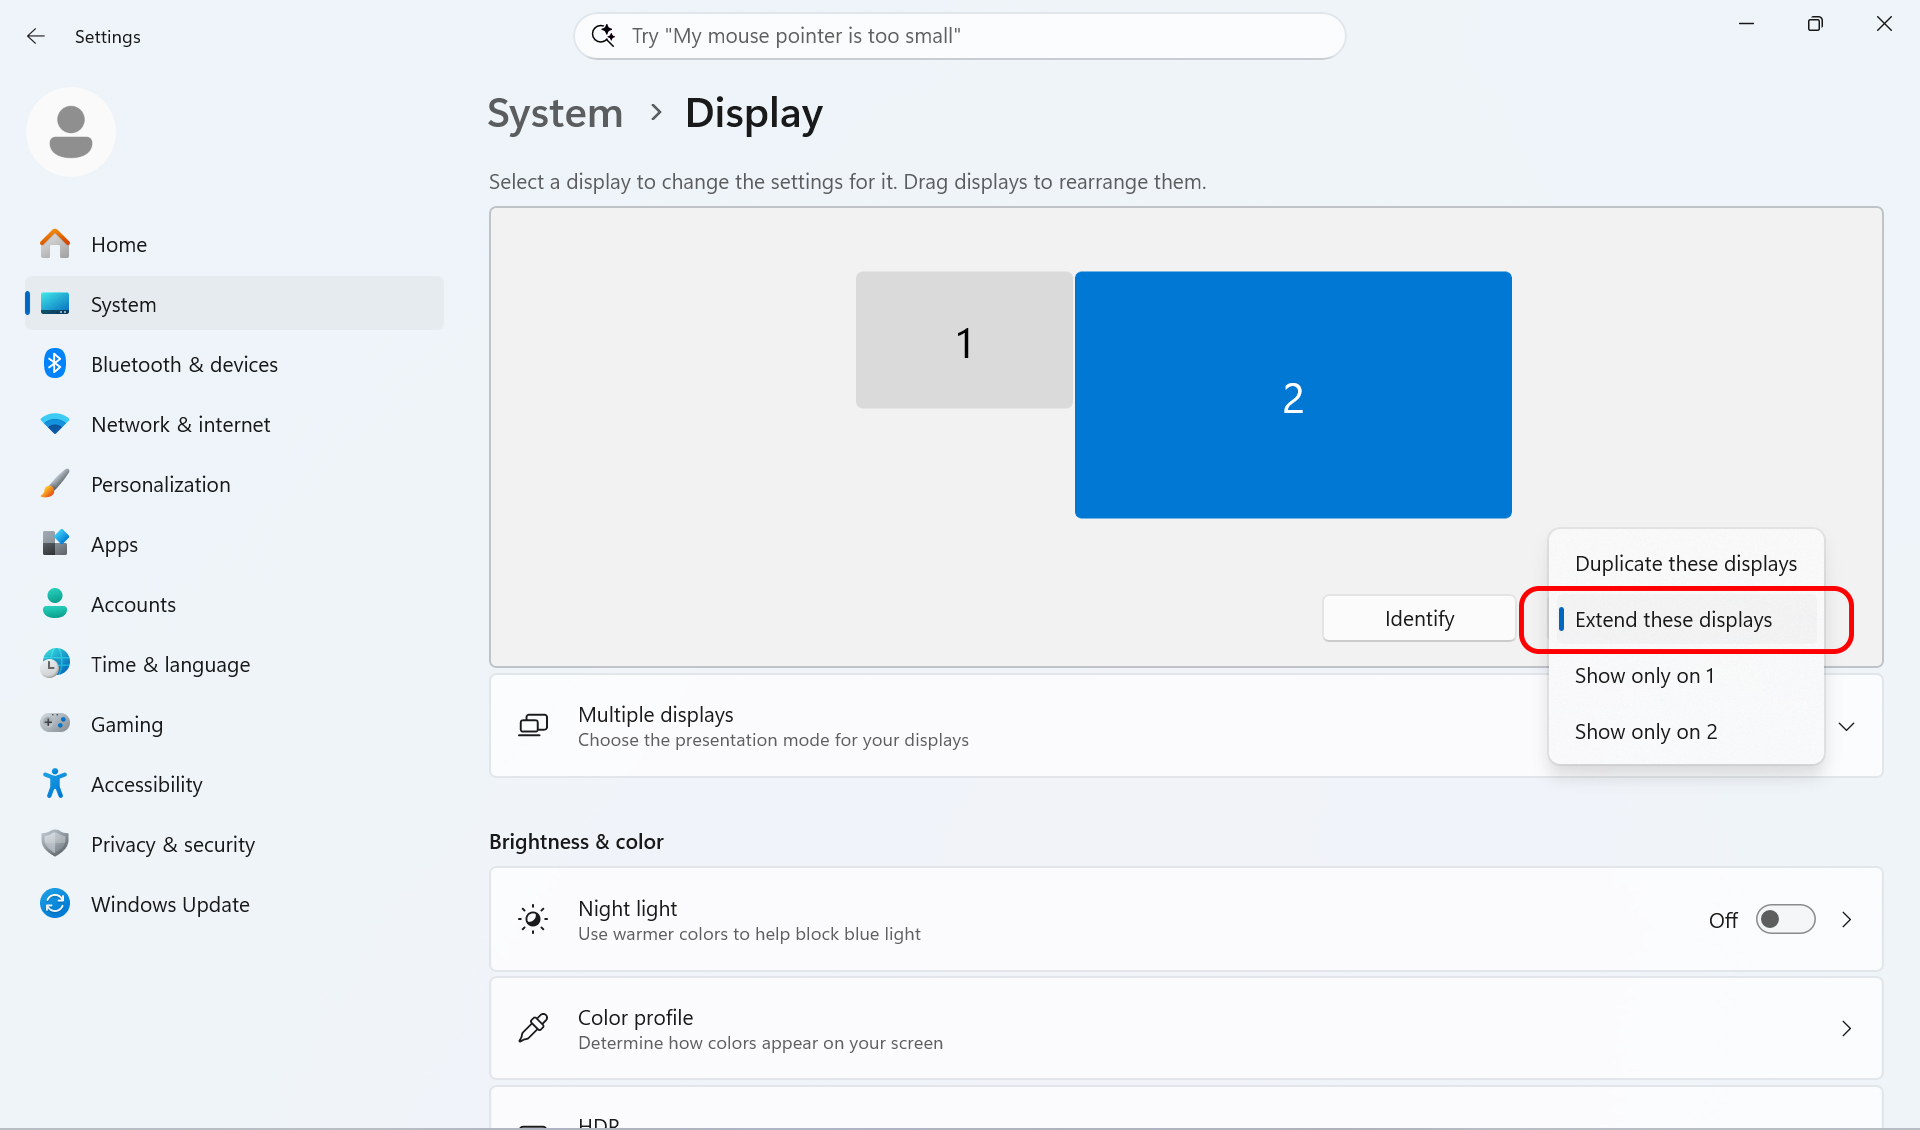
Screen sharing resolution defaults to current output resolution of the source device. To enable 4K output, set Innex Connect Pro+ as an extended display on the source device and manually select a 4K resolution. Please note that increasing the resolution from 1080p to 4K may reduce the refresh rate from 60 Hz to 30 Hz.
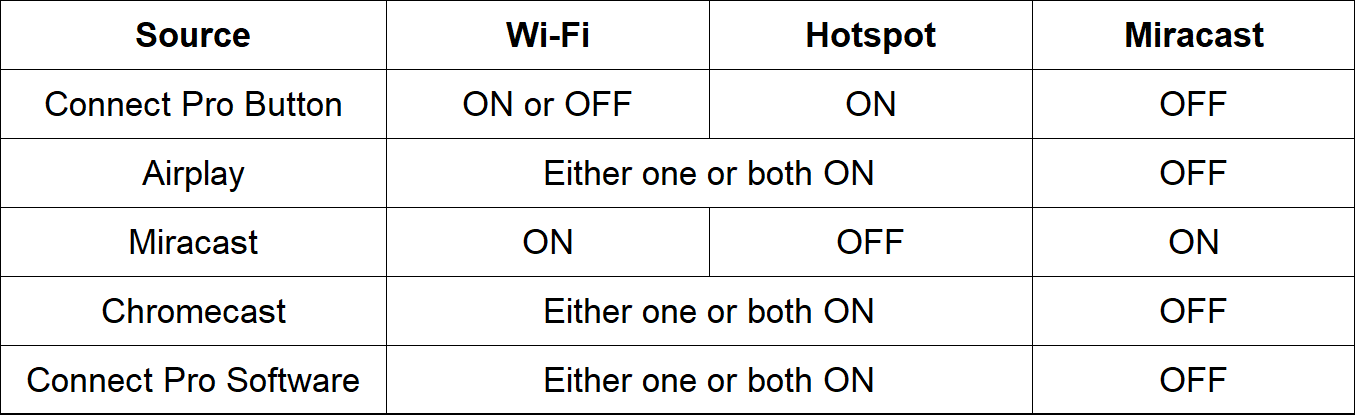
Requirements vary depending on the protocol. Refer to the table below to see the required Wi-Fi and hotspot configuration for each sharing method.
Yes. Touch back control is available when Innex Connect Pro+ is connected to a compatible touch screen using an HDMI cable and a USB touch cable, and the screen is shared through a supported protocol.
Please note that some incompatibilities may occur, as touch screen protocols vary by manufacturer. Refer to the table below for touch back support by screen sharing protocol.
Tap the camera icon in the top-left corner to open the preview page, then select a lower resolution. If streaming at 1080p is laggy, the camera’s data throughput may be overloading the decoder. Switching to 720p may provide a smoother, lower-latency image.
* Data throughput may vary between cameras even at the same 1080p resolution, which can result in differences in display performance.
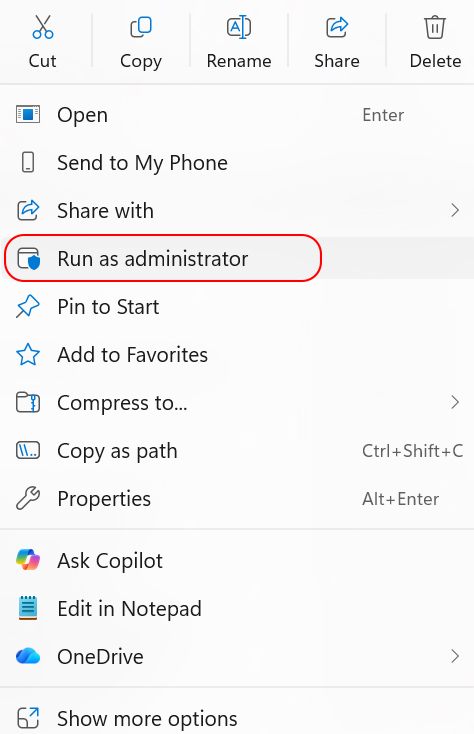
Ensure the installer was downloaded from our official website. During installation, grant administrator privileges when prompted to ensure a complete installation. The current version supports up to Windows 11 25H2. If the issue persists, please contact support.
* Please note that this software supports only Intel-based Windows computers and does not support ARM-based systems.
1. Go to Settings > “More” Settings > PIN Code and make sure the PIN Code function is enabled.
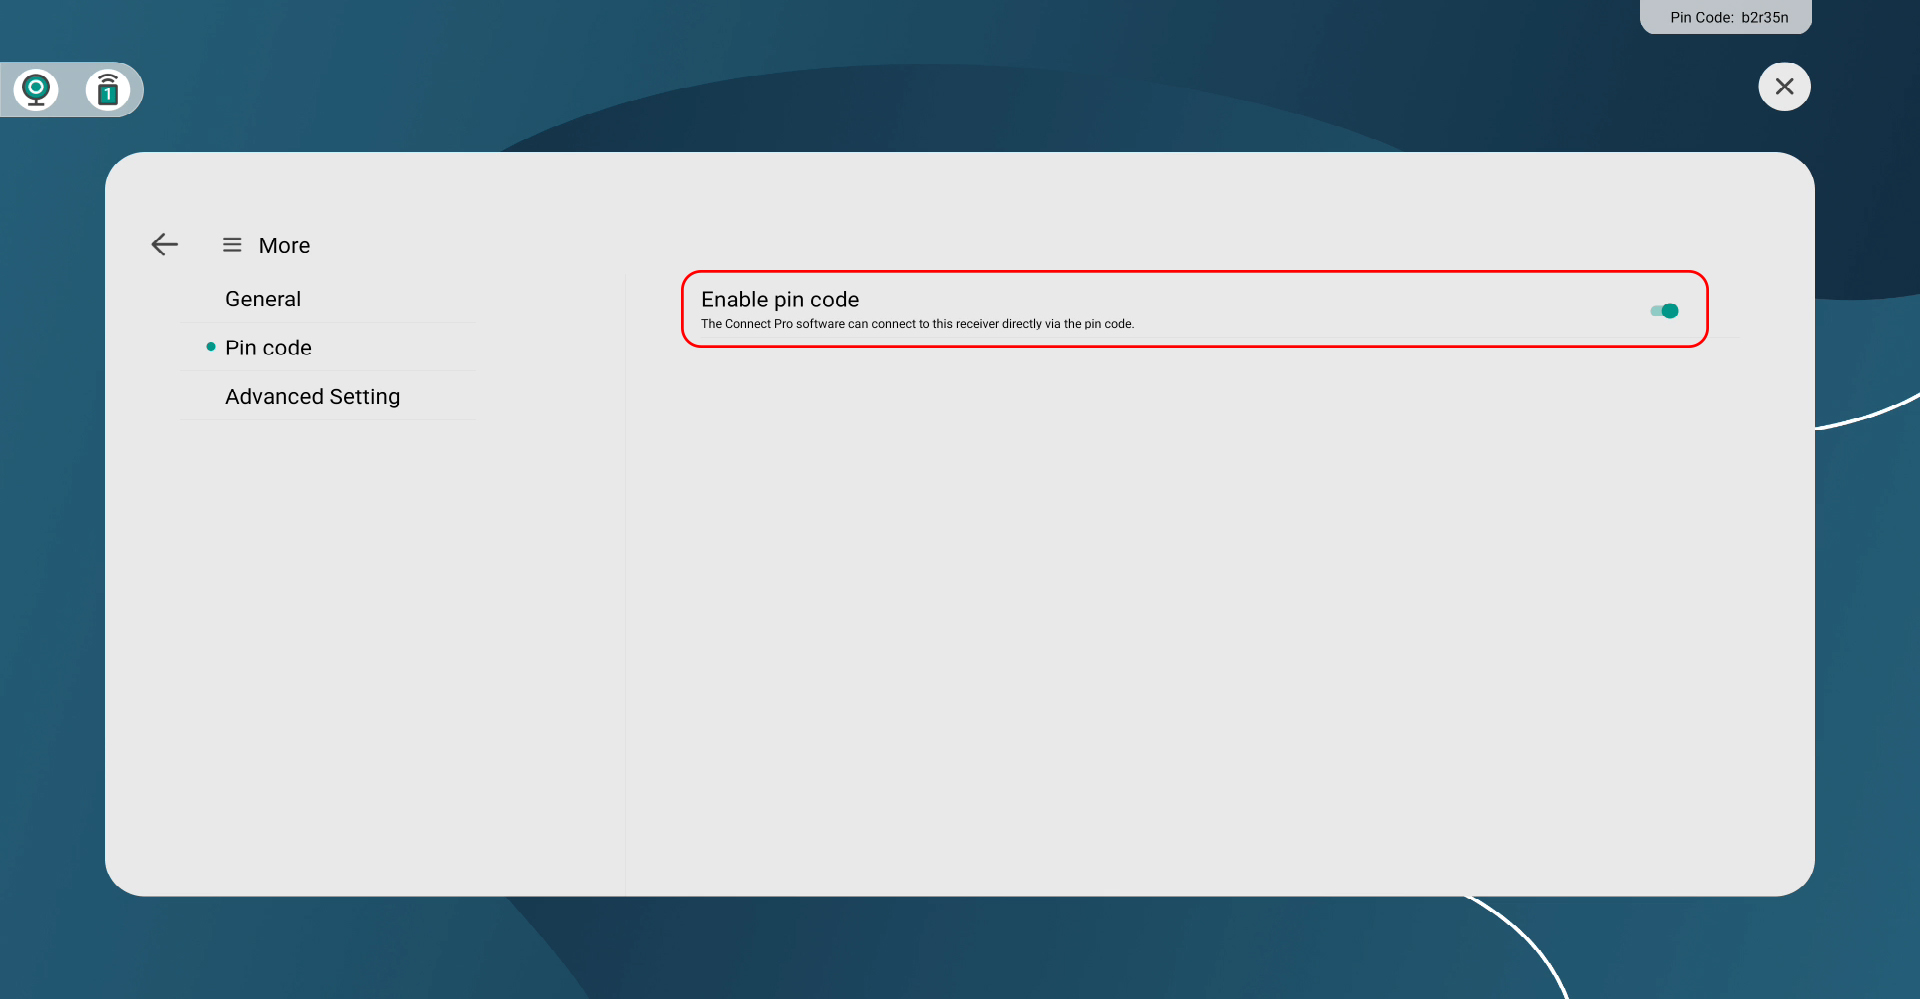
2. Even if the PIN code feature is enabled, the wrong option may be selected in “Show PIN code on screen” for your needs. Go to “More” Settings > “PIN Code” and turn it off once. Then check the “Show PIN code on screen” setting and make sure the correct option is selected. After that, enable the PIN code again.
3. If the network connection becomes unstable, the system may automatically disable the PIN Code. To re-enable it, go to Settings > “More” Settings > PIN Code, then turn the PIN Code off and back on again to check whether it appears on the screen.
1. Ensure that your computer and Innex Connect Pro+ are on the same network.
2. Check again that the device name displayed on the Innex Connect Pro+ home screen matches your intended target device.
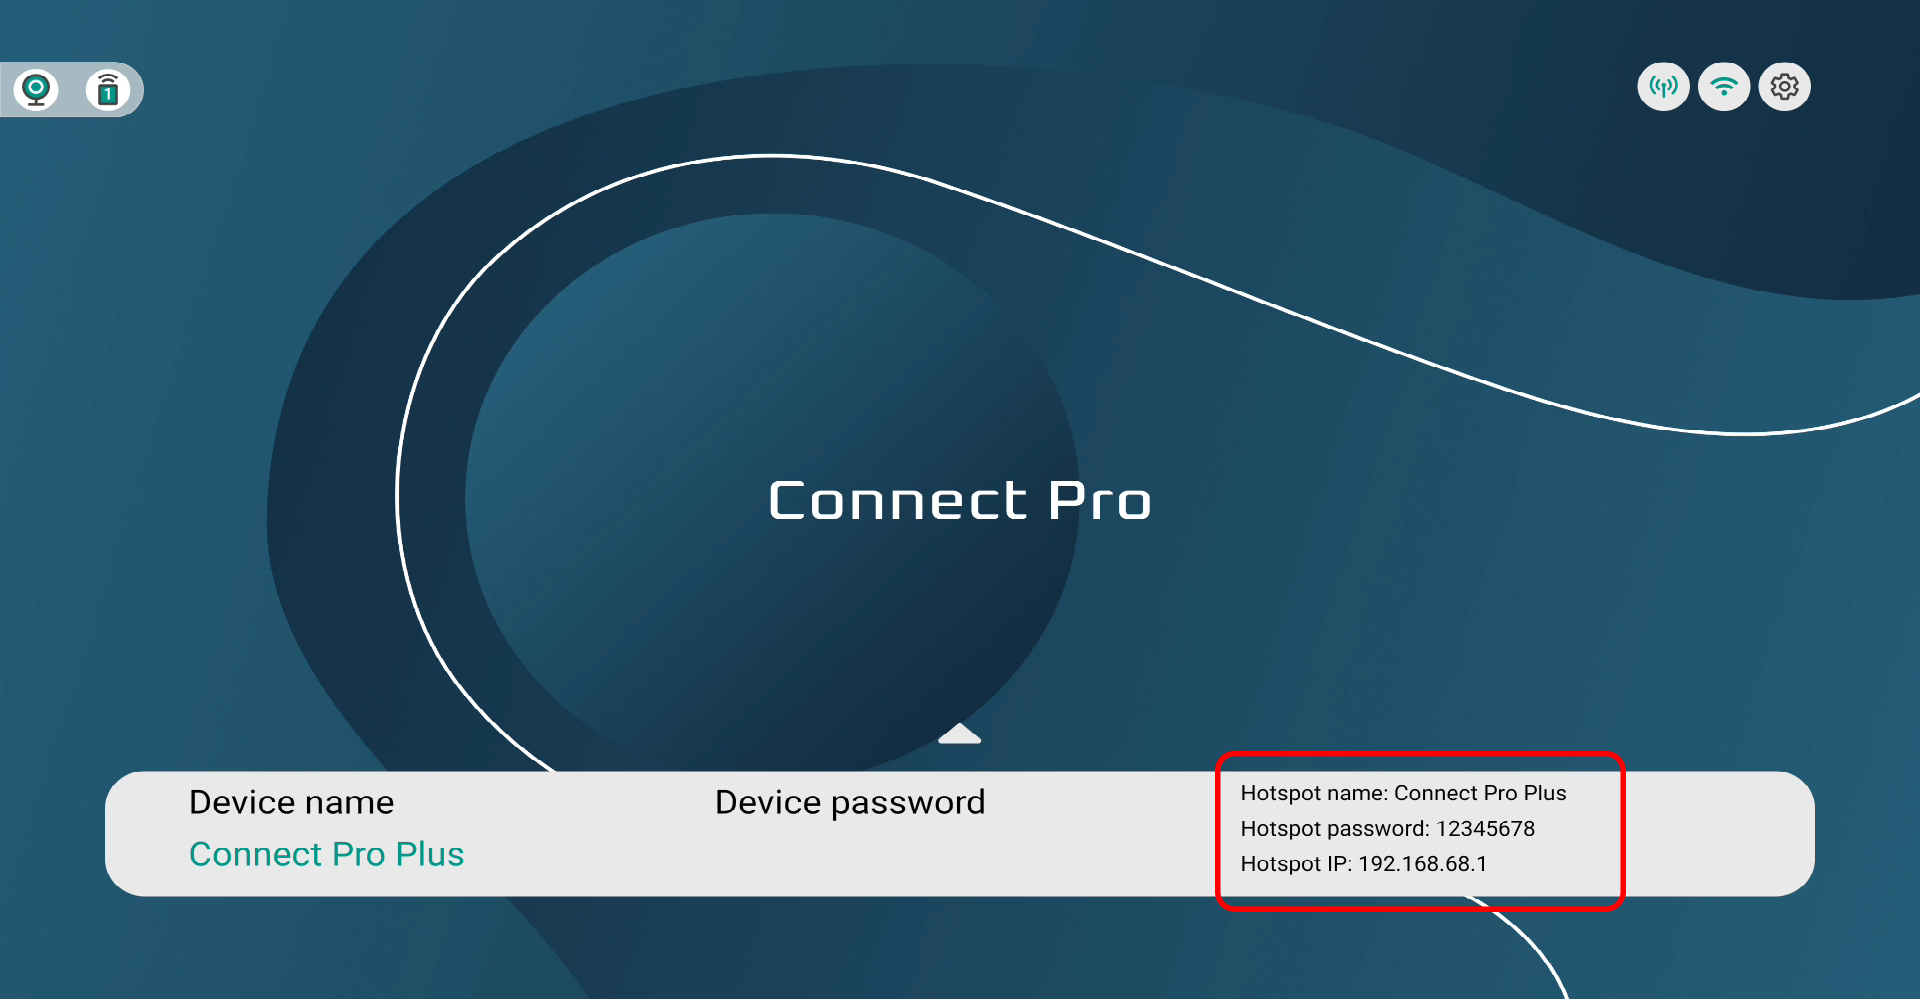
3. If the network environment is unstable, the software may not be able to detect Innex Connect Pro+. In this case, try connecting using a PIN code, or connect via hotspot and enter the hotspot IP address manually.
To connect your computer to Innex Connect Pro+ using the hotspot IP address, first connect your computer to the Innex Connect Pro+ hotspot, then enter the hotspot IP address in the software to establish the connection.
If your computer and Innex Connect Pro+ are connected to the same local network, enter the Wi-Fi IP address instead to locate the device.
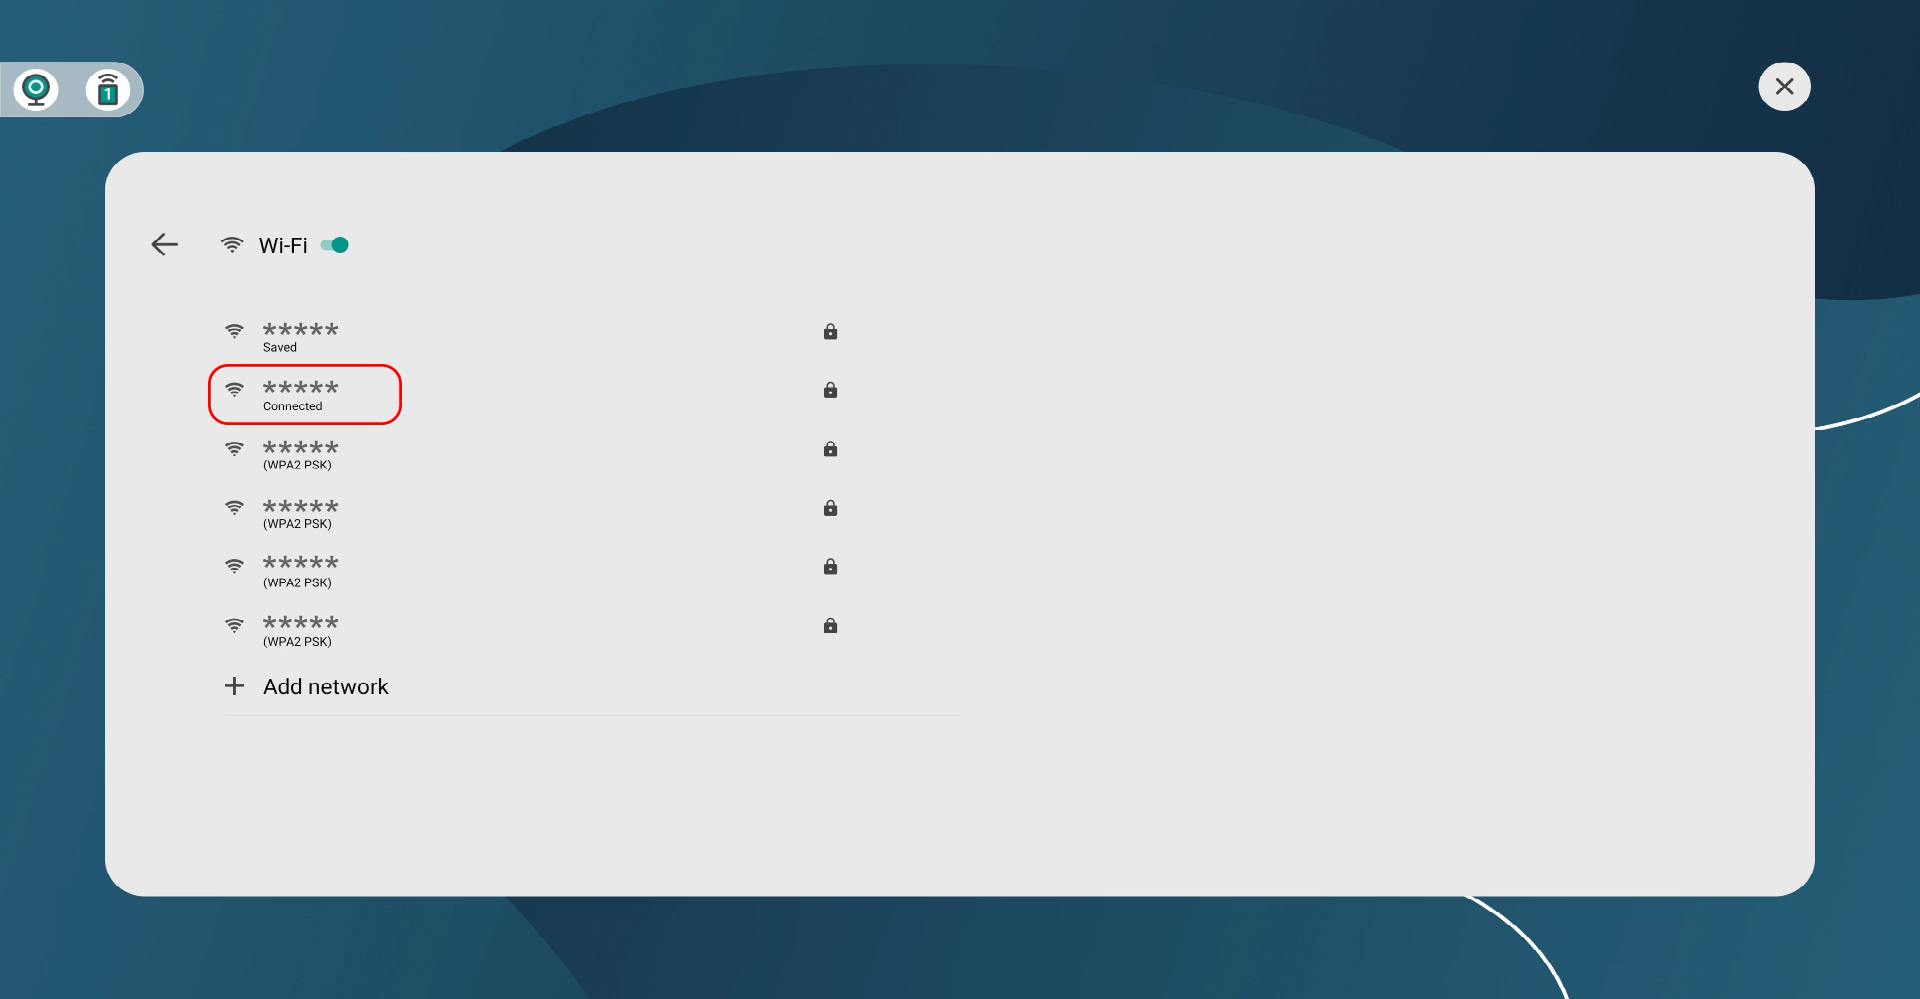
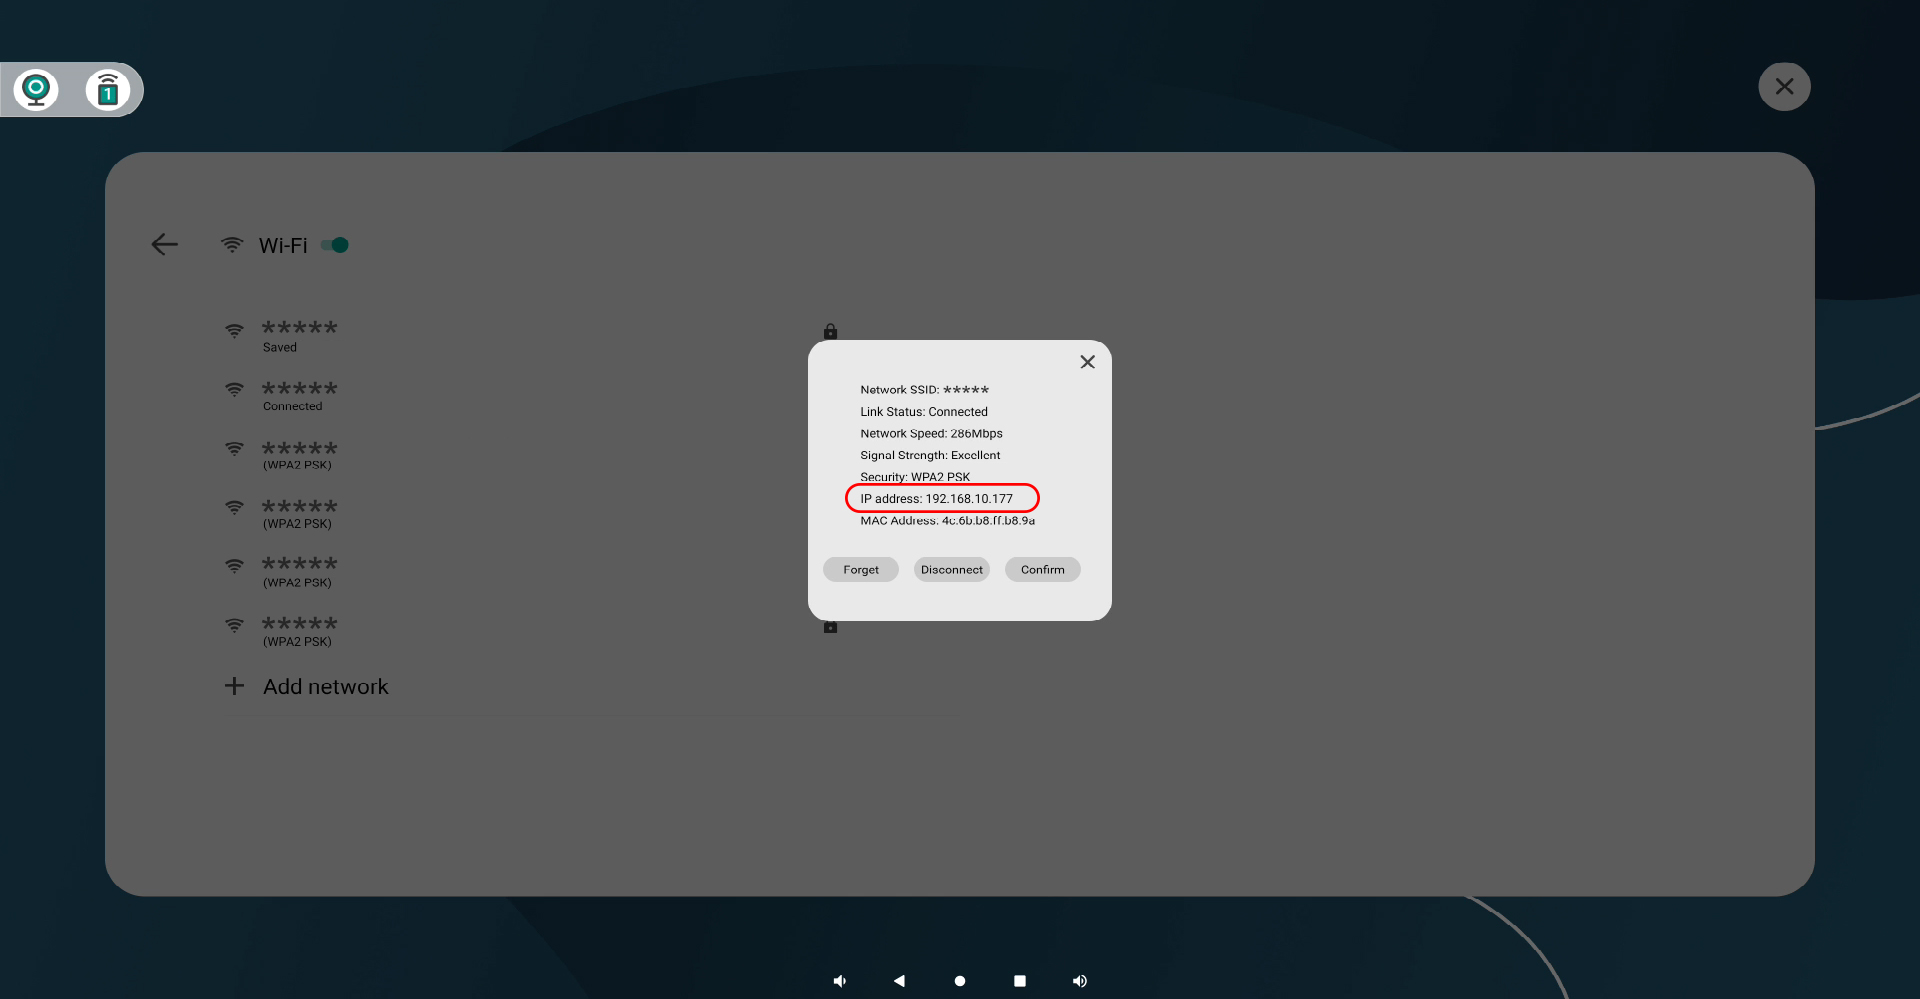
Image quality depends on network latency — please keep latency below 10ms to ensure stable performance. You can use a speed test website to evaluate your current network environment. Also, please confirm that your computer meets the minimum system requirements for the software.
1. Make sure the video device is properly connected to Innex Connect Pro+.
2. After selecting the target device for screen sharing, enable the BYOM option. (Disabled by default)
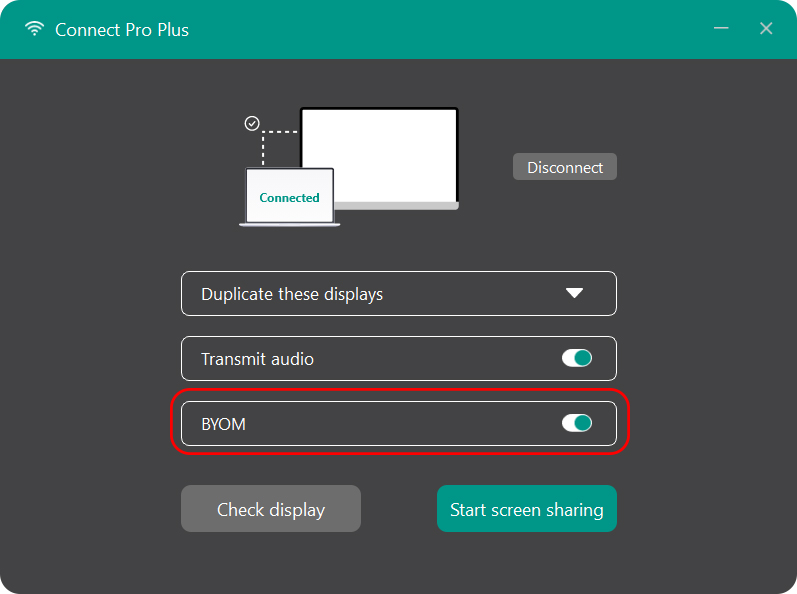
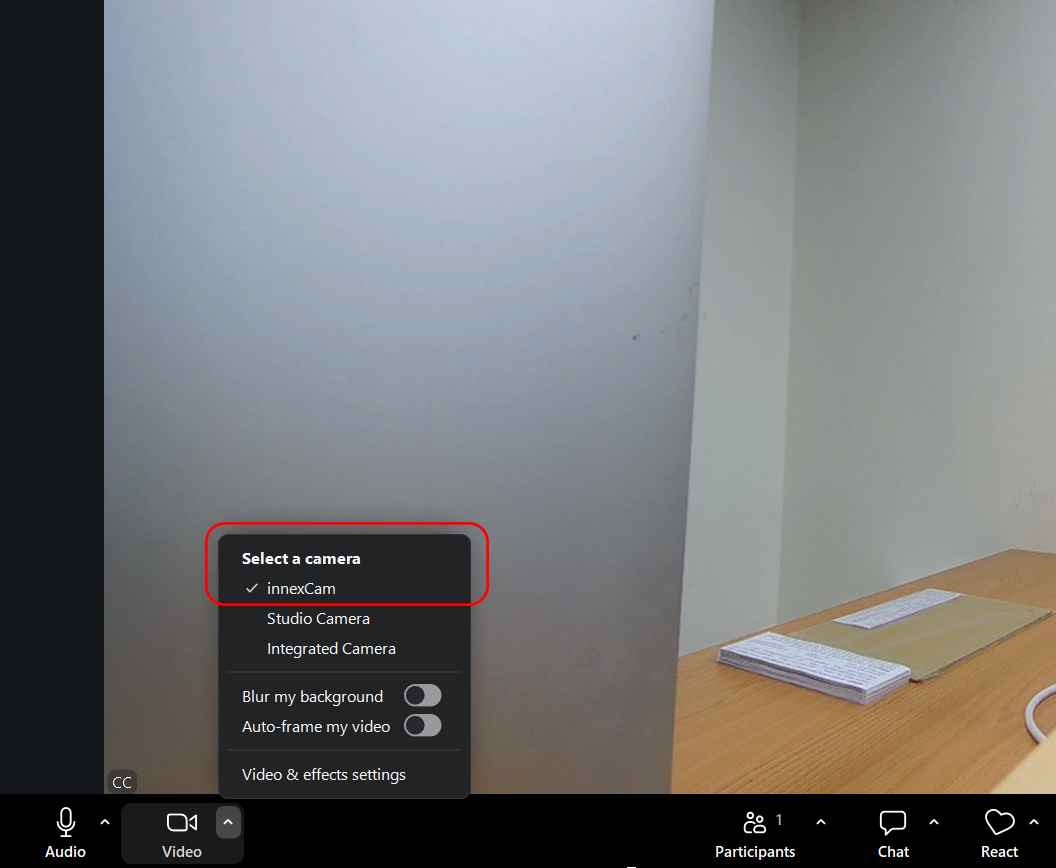
3. Once connected and screen sharing has started, open your video conferencing application and select “innexCam” as the camera and microphone, and “innexAudio” as the speaker.
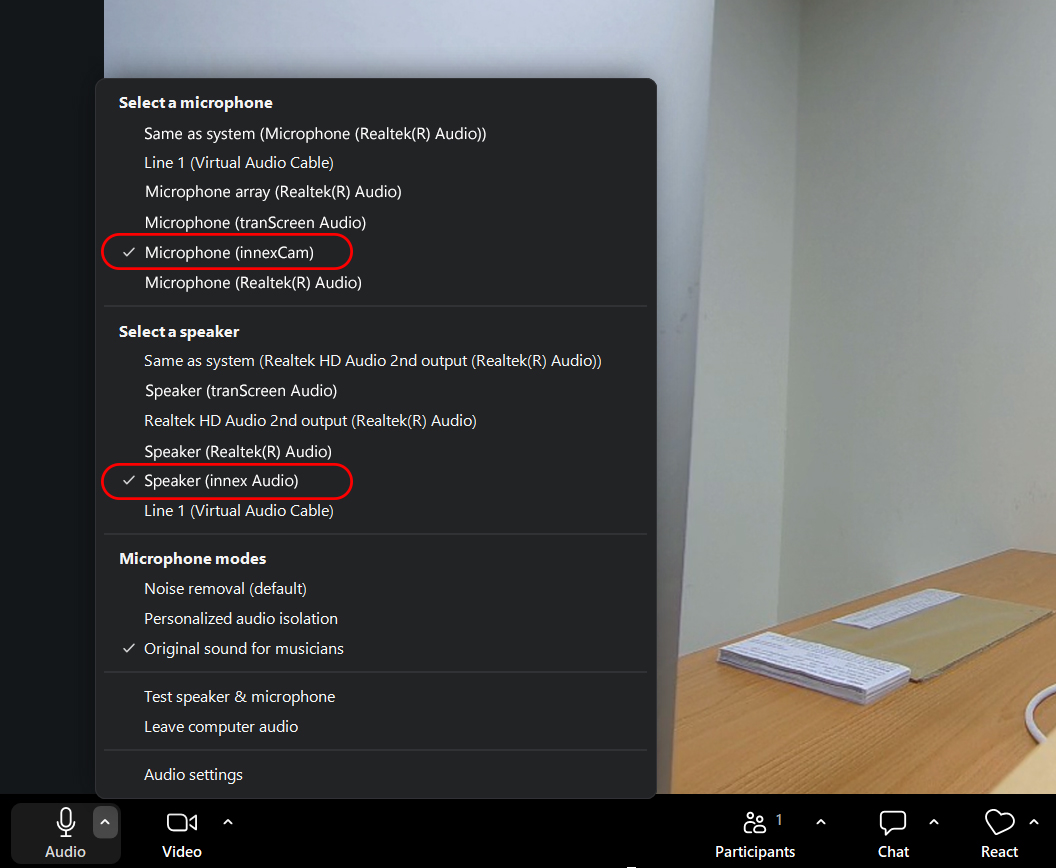
1. Make sure the video device is properly connected to Innex Connect Pro+.
2. After selecting the target device for screen sharing, enable the “BYOM” option. (Disabled by default)
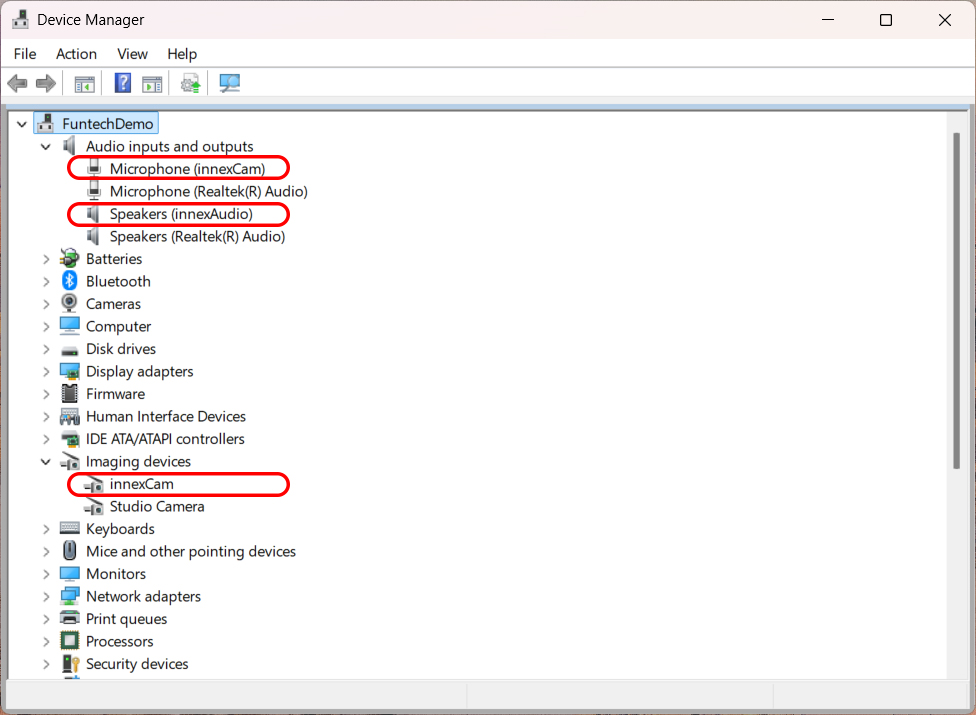
3. Open Device Manager in Windows and check whether “innexCam” appears under Imaging Devices and “innexAudio” under Sound, video and game controllers. If either device is missing, the driver in Connect Pro software may not have been installed correctly. Uninstall and reinstall Connect Pro Software using administrator privileges.
1. Make sure the video device is properly connected to Innex Connect Pro+.
2. After selecting the target device for screen sharing, enable the BYOM option. (Disabled by default)
3. A blue screen is commonly caused by an unstable or poor network connection. Please check your network status and ensure the connection is stable.
When searching for devices in the Chrome browser, a “Source” button will appear at the bottom of the window. Click it to choose between casting the entire screen or a single tab.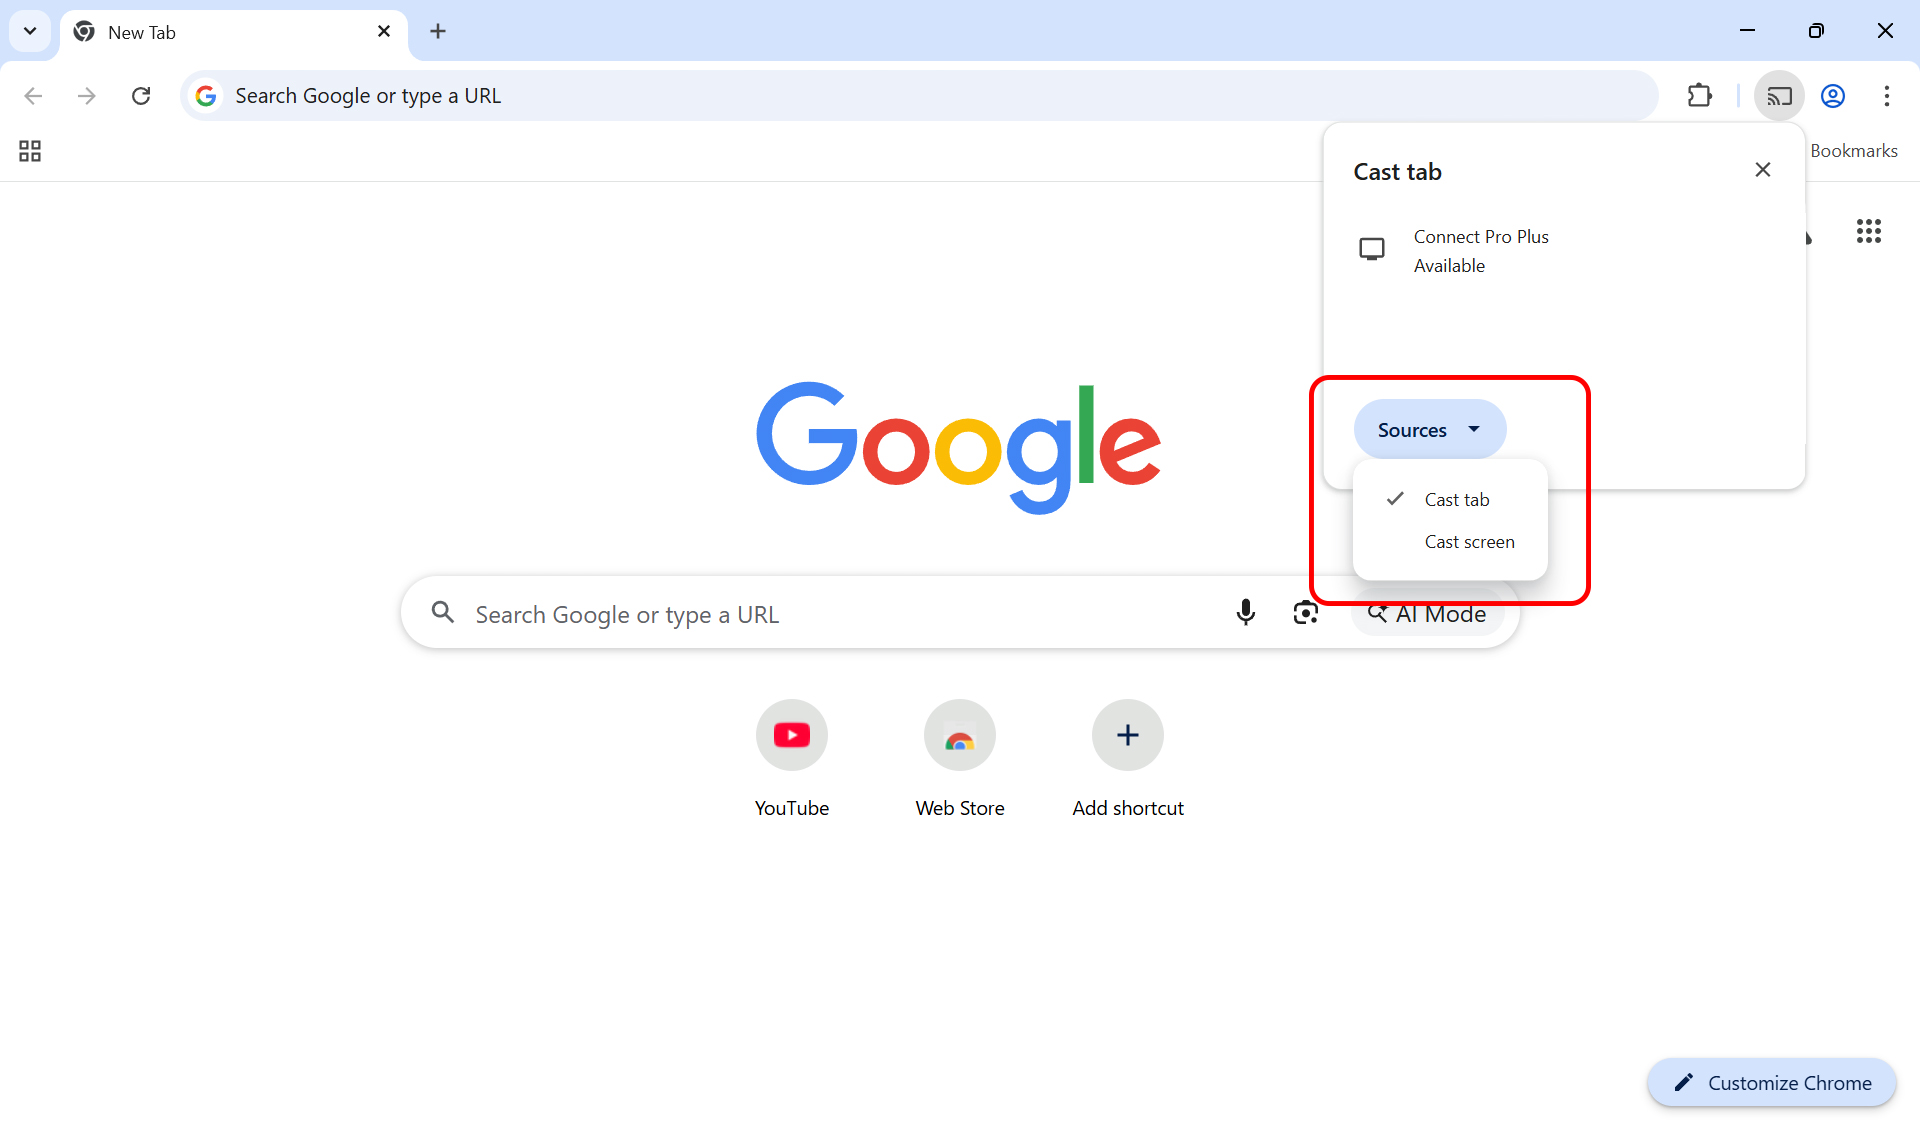
Innex Connect Pro+ uses a 16:9 Chromecast output aspect ratio. If you are mirroring your laptop screen, the image may not fill the entire display because many laptops use a different aspect ratio. To display the image in full screen, use extended display mode or change the source resolution to 16:9.
The Chromecast protocol does not support split-screen display together with other casting protocols. When Chromecast is active, only one Chromecast source can be displayed at a time.
When the Connect Pro Button is plugged into a computer, it will start flashing red, indicating that it is connecting to the computer and searching for the receiver.
Once the button starts flashing white, it is ready for screen sharing. Press the button to start sharing the screen.
1. Make sure your computer’s USB-C port supports DisplayPort Alt Mode.
2. If your computer has multiple USB-C ports and one is primarily used for power input, the Connect Pro Button may be misidentified as a power source, preventing a successful connection. In this case, please connect your computer to its charger first before plugging in the Connect Pro Button.
If the computer successfully detects the external device but the indicator remains red, it means the Connect Pro Button cannot find Innex Connect Pro+. Please check the following:
1. Pair the Connect Pro Button with Innex Connect Pro+ again.
2. Make sure the Innex Connect Pro+ hotspot is turned on.
Even if both above are done and the indicator still keeps red there might be wireless interference in the current environment. Please change the hotspot channel to resolve the issue.
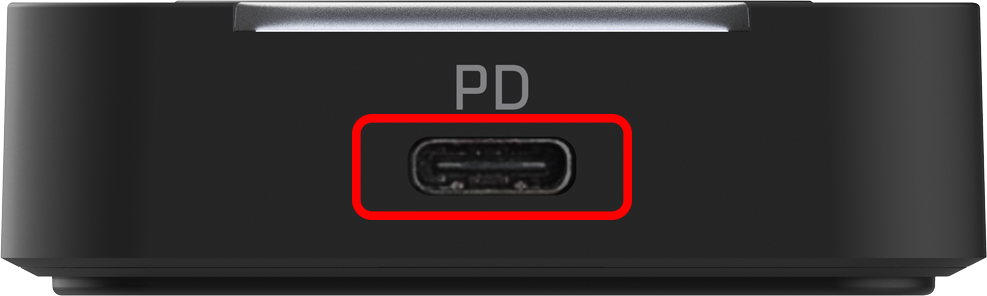
Yes. The Connect Pro Button features a USB-C pass-through charging port on the side. Simply connect your original charging cable to this port to charge your computer while screen sharing.
Unplugging the Connect Pro Button without stopping screen sharing first — especially while a charging cable is connected to the USB Type-C power pass-through port — may temporarily cause screen stuttering. If this happens, disconnect the charging cable from the back of the Connect Pro Button and wait about one minute. The screen should return to normal. If the issue persists, restart Innex Connect Pro+.
Recommended procedure:
1. Stop screen sharing.
2. Disconnect the charging cable from the Connect Pro Button.
3. Disconnect the Connect Pro Button from your computer.
Please use your computer’s original power adapter to avoid damaging the Connect Pro Button or your computer. Since power passes through the Connect Pro Button, some power loss is normal, so the charging speed may be slower than usual, and your system may display a slow charging warning. This is normal behavior.
Connect Pro Button supports OTA upgrades. Insert it into the USB-C port on the side of Innex Connect Pro+ for pairing — when Innex Connect Pro+ is connected to the internet, it will check for updates and automatically download and install any available firmware.
It is a known issue that some HP PCs may have USB Type-C compatibility issues. If you encounter this problem, please connect a power source to the USB Type-C (Power) port on the side of the Connect Pro Button. Please note that this port is for power input only. The Connect Pro Button should then display a white light, indicating normal operation.
If the issue persists, you may use the Connect Pro Software on your PC as an alternative.
This situation should only happen on Windows computers. Navigate to Settings > Bluetooth & devices, then find “AutoPlay,” or simply type “AutoPlay” in the search bar. Turn off “Use AutoPlay for all media and devices,” or select “Take no action” from the drop-down menu of “Removable drive.”
● Solid Blue – Power is connected and the device is on.
● Flashing Blue – The device has entered Sleep Mode. Tap the touchscreen to wake it.
● Solid Blue Light with a Dark Screen – The device is in “Sound Only” mode. Press the “Sound Only” button on the remote control again to return to the normal mode.
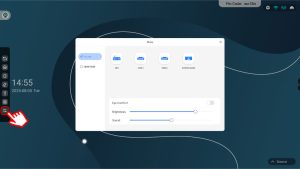
You can adjust the color temperature (Display mode) and brightness from Settings (Main Settings) > Sound & Display > Display.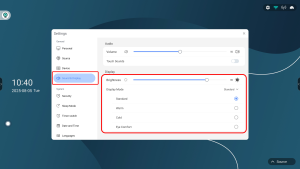
CM55 does not support changing the screen aspect ratio.
The OPS will not power on unless the input source is switched to OPS.
For turning on OPS:
1. Switch the input source to OPS.
2. At first, the screen may display “No Signal” — this is normal. The system is waiting for the OPS to fully power on and boot up. Please wait a few moments, and the OPS display should appear automatically once it’s ready.
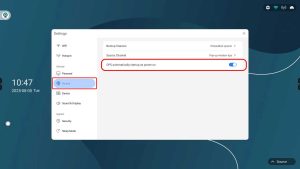
3. Or, in the main settings, go to Source and enable “OPS automatically startup as power on” to allow the OPS to start automatically with the system.
Tap the Wi-Fi icon at the top-right corner of the screen and Wi-Fi settings pops up.
● Tap the Hotspot icon on the main interface to enable it.
● For changing the hotspot name (SSID) or password, go to Settings > Network > Hotspot.
● After editing the SSID and Password fields, press “Save” to save the new settings.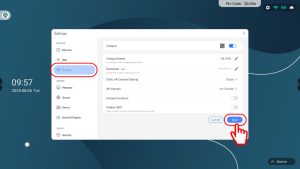
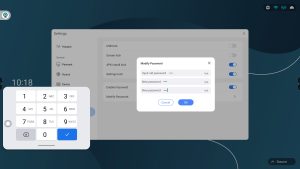
The default password is 1234.
You can change it at “Settings” > “Security” and entering a new password.
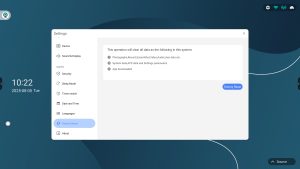
If you have forgotten the CM55 system settings password, here is how you can recover:
- Default Password
● The default password is 1234. - Password Reset via Factory Reset
● If you changed the password and forgot it, you must perform a factory reset.
● To reset: Press and hold the physical reset button on the back of the CM55 until the screen goes dark.
● After rebooting, the system will restore to factory settings, and the password will be reset to the default 1234. - Reminder
● This action will reset all system settings to their original state. Use with caution if the device is already configured for production or deployment.
Note: For security reasons, the Settings page is password-protected by default.
1. Tap the “Finder” icon on the desktop.
2. In the left-hand sidebar, locate and select the USB flash drive listed under Devices.
3. Tap the USB drive to browse and access its contents.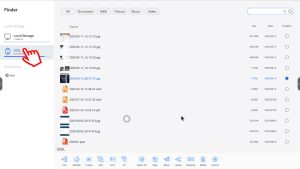
You can switch the input source in several ways:
1. Use the remote control to directly change the input source.
2. Tap the Signal Source icon in the bottom-right corner and select your desired input.
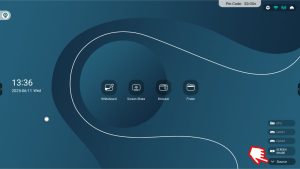
3. Tap the Menu icon on the side toolbar and choose the input source from the menu.
4. If you go to Settings > Source > Source Channel and select Auto Switch, the device will automatically switch to a newly detected input signal.
If Pop-up window tips is selected, a pop-up message will appear when a new input is detected, prompting you to confirm the switch.
1. Check the cable connection: Ensure the HDMI cable is securely connected and not damaged.
2. Adjust EDID settings: While on the signal source screen, open the side toolbar and tap the menu icon. When the signal source window appears, tap HDMI EDID and switch the EDID mode between 1.4 and 2.0 to resolve compatibility issues with the connected device.
1. Open the Toolbox from the side toolbar.
2. Tap “TouchLock”, then set a one-time password. Or, press Touch lock button on the remote control.
3. When Touch Lock is activated, the screen will dim slightly, and a lock icon will appear in the bottom-left corner.
4. To unlock, tap the lock icon and enter the same password.
Note: Don’t forget the password. If it is lost, you will need to restart the CM55 to regain access.
1. Audio output device is not set to CM55: On the connected device (e.g., laptop), the audio output may still be set to its internal speakers. Go to the sound settings and select “CM55” or “HDMI Audio” as the output device.
2. Audio cable is not connected (if using HDMI + USB): For some device, HDMI is only for video and audio may require a separate USB connection
Ensure both HDMI and USB cables are connected properly.
3. CM55 speaker volume is too low or muted: Check the CM55’s volume settings and ensure it is not muted.
4. Device sound volume is too low or muted: Check the connected device’s sound volume settings and ensure it is not muted.
5. Content is protected or restricted (DRM): Some protected content (like Netflix) may block audio output over certain configurations. Try different content or confirm compatibility.
6. Cable or port issue: Try using a different HDMI cable or port.
1. Check the batteries: The batteries may be depleted or improperly installed. Replace with new batteries and ensure correct polarity.
2. Line of sight blocked: The remote uses infrared (IR), which requires a clear line of sight to the sensor. Make sure nothing is obstructing the path between the remote and the device.
3. Remote is out of range: IR remotes have a limited range.
Operate the remote within 5–7 meters of the device.
4. Receiver not responding: The device may be frozen or unresponsive. Restart the device and try again.
The blue-labeled buttons on the remote control are used to operate the built-in cameras. They will not function unless the camera is active or in use.
Yes. While we recommend using the included mobile stand for its convenience—allowing you to easily move the display around the room and turn any space into a collaborative area—the CM55 can also be wall-mounted or attached to a third-party stand.
The CM55 supports the VESA mount standard
VESA size: 600 × 200 mm
This is a widely adopted standard, compatible with many commercial wall mounts and brackets.
Note: Ensure that the mount or bracket you choose supports VESA 600×200 and is rated to hold the weight of a 55-inch display.
*Before upgrading, please note that this method will restore the device to factory settings, and all user data will be erased.
1. Prepare a USB drive formatted in FAT32.
2. In the root directory of the USB drive, create a folder named “update”.
3. Unzip the firmware package, copy the firmware file into the USB drive, and rename it to “YS-EMEETING-ES982.img”.
4. Insert the USB drive into the USB 2.0 port of the CM55.
5. Open the Apps list and launch the OTA (Over-the-Air Update) app.
*If you cannot find the OTA app:
– Long press the Apps title.
– A password screen will appear.
– Enter your password or the default password 1234.
– Press OK, and the hidden OTA (Over-the-Air Update) app will become visible.
6. Select “USB Update.” When the upgrade file appears on the screen, press “OTA (Over-the-Air Update)” to begin the upgrade process.
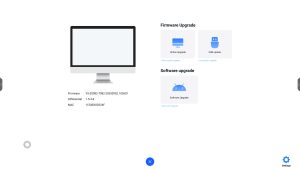
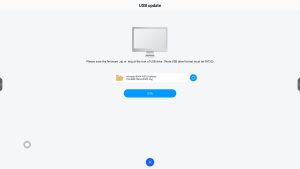
Some changes require a system restart to take effect. After changing the language, please restart the CM55 to ensure the new language setting is fully applied.
● Flashing Red (Slow): Connecting
● White flashing (Fast): Connected / Waiting for casting
● Solid White: Casting
● Solid Red: Working Abnormally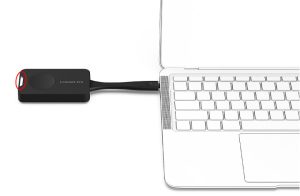
1. Tap the Scree Sharing icon on the home screen or the source menu.
2. Tap the Settings icon at the top-right corner of Connect Pro UI.
3. Go to General settings and tap “Dynamic device password”. There are two options available:
● Static Password
– When Static Password is selected, you may change the password at “Device password”, and use the same password every time.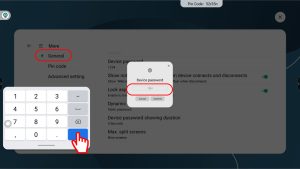
● Random Password with Timed Refresh
– The system will generate a random password that automatically refreshes at regular intervals for enhanced security. (You can select the refresh time from 10, 30, 45, 60 and 120 minutes.)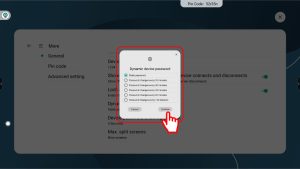
Yes, you can adjust the duration of the password toast notification in the Settings menu. Go to the screen sharing settings > General > Device password showing duration. However, please note that the device password is also shown directly on the home screen, so you can view it at any time without waiting for the toast message.
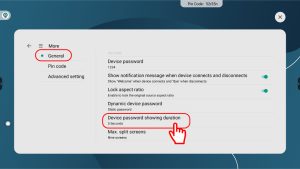
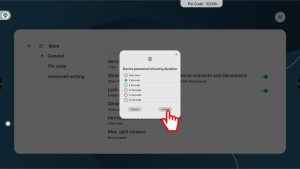
It is used to identify the host device so that you can connect your device and cast your screen to it. By default, the device name for screen sharing is the same as the hotspot name.
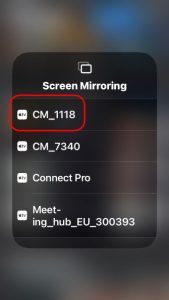
You can change the device name independently from the hotspot name by following these steps
● Open Settings in Connect Pro > More > General
● Turn off “Sync the device name with the hotspot name”
● Tap “Device Name” to edit and set a new name
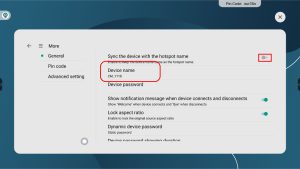
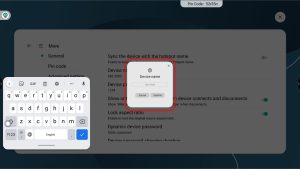
This is expected behavior when connecting for the first time or using a new device. Here’s what you can expect:
1. After the Connect Pro Button is plugged into a device, the LED starts blinking red.
2. It takes approximately 15 seconds for the Connect Pro button to communicate with the receiver and get ready for screen casting.
3. Once connected, the LED will blink white, indicating the button is ready for screen sharing.
When you press the button, the LED will turn solid white, indicating that screen sharing is active.
Please check whether your PC’s USB Type-C port supports Power Delivery (PD) and DisplayPort Alternate Mode (DP Alt Mode).
If your USB Type-C port does not support DP Alt Mode or Power delivery, please use an alternative method to share your screen, such as Connect Pro software, Miracast, or Chromecast.
Connect Pro button LED indicator showing Solid red when the pairing has some errors. Folllow the steps below and pair with the receiver once again.
1. Plug the Connect Pro Button into the USB Type-C port on the back of the CM55.
2. The screen will display the connection status.
3. When the LED indicator changes from solid red to blinking white, it means the button has successfully paired with the CM55.
4. Once paired, you can plug the button into your PC and begin screen sharing.
For using Connect Pro Button
1. Ensure that Connect Pro Button is paired to the receiver. If the LED indicator stays Solid red, please do the pairing once again.
2. Ensure that the USB type C port of your device supports DP alt mode and Power delivery
3. If Connect Pro Button is connected to your device via a USB hub with other accessories, it may not get enough power to run properly. Please connect directly to your device.
For using Connect Pro Software
1. Ensure the software is the most updated version.
2. Ensure your device and the receiver are connected to the same network (and same subnet if using VLANs).
3. Ensure routers or enterprise networks are not blocking mDNS
4. If the routers or enterprise networks are blocking mDNS, connect your device to the hotspot instead.
5. Connecting with IP address requires the device to be connected to the receiver hotspot.
For using Airplay
1. Ensure your device and the receiver are connected to the same network (and same subnet if using VLANs).
2. Ensure routers or enterprise networks are not blocking mDNS
3. If the routers or enterprise networks are blocking mDNS, connect your device to the hotspot instead.
4. Videos from platforms such as Netflix cannot be cast via AirPlay due to content protection policies and digital rights management (DRM).
5. Sometimes restarting helps. Restart your iPhone and try again.
For using Miracast
1. Ensure to turn off the hotspot function of CM55. For turning off the hotspot, go to the main settings > Hotspot and turn off the toggle switch.
2. Ensure Miracast function is on. For turning on Miracast function. Go to Connect Pro settings > Miracast and turn on the toggle switch.
3. Ensure the device is connected to the same network
4. On some Windows or Android devices, the Miracast feature must be enabled manually. Ensure it is enabled.
5. Ensure graphics and Wi-Fi drivers of your device are updated. Outdated graphics or Wi-Fi drivers can prevent Miracast from working, especially on Windows PCs.
6. Interference from antivirus or firewall software: Certain network protection settings or firewall rules may block casting connections.
7. Certain network protection settings or firewall rules may block casting connections. Physical distance, walls, or interference from other devices can weaken the Miracast signal.
8. After using Miracast to cast your screen, if you change the device name, the previous device name may still appear in the list of available displays the next time you try to connect. By selecting the old device name and connecting, the updated device name will be reflected. Alternatively, you can go to Windows Settings > Bluetooth & devices > Wireless displays & docks, select the old device name, and choose “Remove this device.” Then perform the Miracast device search again, and the new device name will appear.
For using Chromecast
1. Ensure your device and the receiver are connected to the same network (and same subnet if using VLANs).
2. Ensure routers or enterprise networks are not blocking mDNS
3. If the routers or enterprise networks are blocking mDNS, connect your device to the hotspot instead.
4. Videos from platforms such as Netflix cannot be cast via Chromecast due to content protection policies and digital rights management (DRM).
5. Sometimes restarting helps. Restart your device and try again.
During connection, the LED on the Connect Pro Button flashes red. Once the connection is established, it flashes white, indicating that it is ready for screen sharing.
If the Connect Pro Button continues flashing red for an extended period, please check the following:
1. Ensure your laptop detects a new external device named “Connect Pro.”A pop-up window should appear when the device is recognized.
* If your laptop does not detect the Connect Pro Button, try connecting your laptop to a power source.
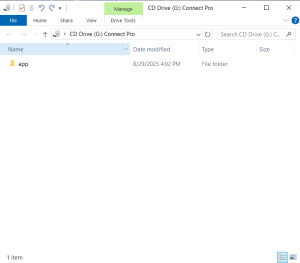
2. After detection, the Connect Pro Button automatically scans and searches for the Receiver. Depending on the network environment, this process may take over 30 seconds.
3. If the red light continues to flash, open the hotspot settings and check the channel used by CM55.
* For better stability, it is recommended using non-DFS channels such as 36, 40, 44, 48, 149, 153, 157, or 165.

For first-time use, the stylus must be charged beforehand.
● The stylus is shipped in shipping mode to prevent battery over-discharge.
● Charging the stylus will take it out of shipping mode and prepare it for use.
Ensure the stylus is fully charged.
● Please use a USB-A to USB-C cable. Using a USB-C to USB-C cable may prevent the pen from charging properly.
● While charging, the orange light stays on.
● When fully charged, the light will turn off, and the pen will be ready to use.
● A full charge takes approximately 1 hour. Be sure to unplug the pen after charging to protect battery life.
● When fully charged, the stylus can be used for up to 50 hours of continuous writing.
● If left unused, the stylus will enter sleep mode to conserve power.
If you are using a third-party stylus, please ensure it supports MPP.
The stylus comes with two replacement pen tips included in the package. If the pen tip is worn out or damaged, you can replace it with one of the included tips.
Note: The back end of the stylus (pen tail) is not replaceable, and no replacement parts are provided for it.
General: Ensure that the “Touch Lock” is disabled. If it is enabled, please unlock it first.
HDMI connection: When connecting a device via HDMI, you must also connect a USB-B to USB-A cable in order for the CM55 to support touch control.
Using Connect Pro:
● iOS devices do not support touchback control due to system restrictions.
● Screen sharing via AirPlay or Chromecast does not support touchback control.
● Ensure that Touchback Control is enabled in Connect Pro > Advanced Settings.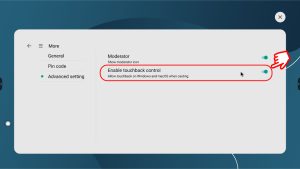
By default, the CM55 whiteboard tool only accepts stylus input. To write using your finger, please enable the “Touch as Pen” option in the bottom toolbar of the whiteboard app.
Below are the multi-finger gestures available in the CM55 whiteboard tool:
● Move the canvas: Drag with two fingers to reposition the canvas.
● Zoom in/out: Pinch with two fingers to zoom in or out.
The performance of the CM55 whiteboard may be affected by the contents on the canvas and overall system usage. For example, running multiple browser tabs or playing videos can consume significant CPU and memory resources, which may cause the whiteboard to lag or run slowly.
To help ensure a smoother whiteboard experience, we recommend the following:
● Limit background tasks while using the whiteboard
● Use the whiteboard as a standalone application whenever possible
● Regularly save your content by taking screenshots to avoid accidental data loss due to system lag
To access and save the whiteboard content:
1. Ensure that your mobile device is connected to the hotspot.
2. Tap the “Share” function on the CM55.
3. A QR code will appear on the screen.
4. Scan the QR code with your mobile device.
5. This will open a web page displaying the current whiteboard content.
6. You can screenshot or download the content directly from the page to keep a record of the discussion.
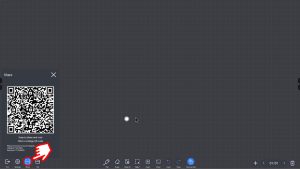
Touch performance may occasionally be affected by power supply or nearby frequency interference. Please check the following:
1. Ensure the device power and electrical outlet are properly grounded. Use the original power cord provided with the device.
2. Check for nearby motors, electrical equipment, or other low-frequency interference sources operating at frequencies similar to the stylus. If such equipment is present, turn it off or move the device away from the interference source.
Gallery Mode is a feature that automatically detects multiple participants in the camera’s field of view and displays individual close-up frames of each person on the screen simultaneously. This creates a more focused and engaging video conferencing experience by highlighting each participant equally. On the CM55, Gallery Mode supports up to 5 individuals at once.
Auto-framing is a feature on the CM55 that automatically detects and adjusts the camera’s framing to keep all participants in view. As people enter or leave the meeting space, the camera dynamically zooms and pans to ensure everyone remains properly framed without manual adjustment.
Speaker Tracking is a feature that uses advanced audio recognition to detect and automatically track the active speaker. The camera adjusts its framing in real time to focus on the person currently speaking, making it ideal for presentations and dynamic discussions.
Check your CM55 firmware version.
● If the version is older than “YS-ES982-T982-20250804.095522”, please update to the latest version.
* Before updating, back up any important files. The USB OTA process may reset your settings and data.
● If the firmware version is newer than “YS-ES982-T982-20250804.095522”, follow the steps below:
1. Open Settings in Connect Pro > More > Advanced Setting > Moderate, then turn it off.
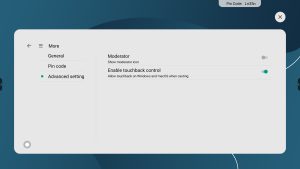
2. Go to Settings > More > Pin code, then either disable the pin code or select the option not to display it on screen.

3. Visit or refresh the website that requires camera and microphone access. Chrome will automatically prompt for permission—please select Allow to grant access.
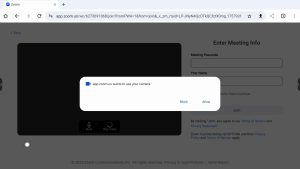
4. If the camera or microphone still do not work, click the lock icon on the top-left of the browser’s address bar to open the permission settings, and verify that the site has the proper access permissions.
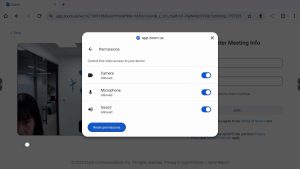
For the main UI wallpapger, from the side toolbar, tap the “Apps” icon and open “Theme.” You can choose from built-in themes or upload a custom image to set as the wallpaper.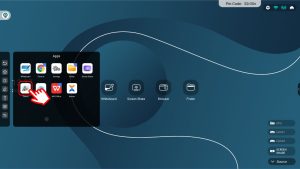

- Make sure that cables are connected to PC and Ideao Hub tightly.
- Make sure that correct signal source is selected. Swipe down from the top right edge with two fingers to open OSD menu. From the OSD, you may switch to the correct source.
- Try a different cable and see if the screen can be projected on Ideao Hub.
- Make sure that in your computer settings, sound output is set as Ideao Hub.
- Make sure Ideao Hub is not muted. Swipe down from the top right edge with two fingers to open OSD menu. On the OSD, check the current sound volume and turn it on.
- If you are connecting Ideao Hub to the computer with DVI or VGA (D-Sub), it is necessary to connect with an audio cable to output the sound from Ideao Hub speaker. (If you are connecting with USB type-C or HDMI cable, an extra audio cable is not required.)
If connecting to PC with other than USB Type C cable, such as with HDMI or VGA D-sub cable, in order to enable touch control, it is necessary to also connect with USB Type A-B cable. USB-B for touch at the Hub end, and USB-A at your computer end.
Touch back may vary depending on model.
For iPhone or those devices that doesn’t support touch control with external devices, are unable to do so.
Yes. For switching signal sources, swipe down from the top right edge with two fingers to open OSD menu. From the OSD, you can select the signal source.
At Display Settings, set the Ideao Hub as your main display.
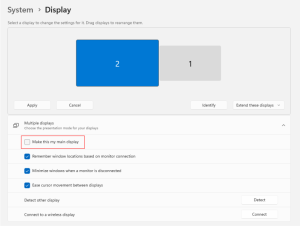
If you don’t want to set the Hub your as main display, please follow the steps below.
1. Click the Start Menu, Type [Control Panel] and click [Control Panel]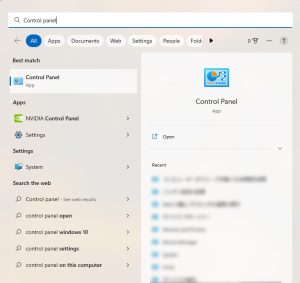
2. Within the Control Panel, select [Hardware and Sound]
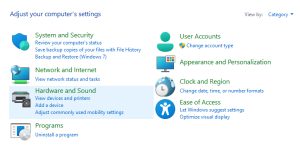
3. Within Hardware and Sound, select [Tablet PC Settings]
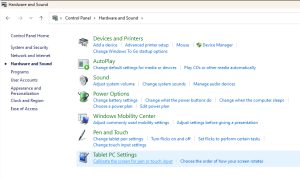
4. Click [Setup] and select [Touch Input]
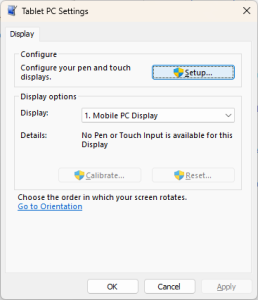
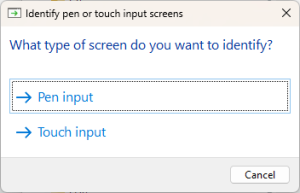
5. The message below appears on each display one by one. If it appers on Ideao Hub, touch the screen. If it appears on other screens, press [Enter]

6. The setup closes automatically after the process is completed.
7. Restart the computer and verify if the touchworks correctly
First, try reconnecting all the cables and power cycle the Ideao Hub by turning it off and then on again. If the issue persists, directly unplug the power cable from the Ideao Hub while the screen is powered on, and then replug the power cable.
If Reactiv SUITE crashes on Startup and fails to show a crash report, perform the following steps:
- Open Event Viewer in Windows

- Go to Windows Logs > Application. Look for the Error where the source is Application Error. The latest crash entry will be on the top

- Copy the contents of the General Tab and send it to techsupport@vizetto.com

Based on the content of these details we can determine the next course of action.
NOTE: Ensure that you have an updated version of Microsoft Office. Outdated versions may result in errors during startup.
Check to see if you are using the new Intel i10 Ice Lake or i11 Tiger Lake CPU. The new Intel CPU chips have an issue and will cause Reactiv SUITE to crash. A temporary workaround is listed below so you can continue to use Reactiv SUITE:
- Open “File Explorer” (Win+E), right-click on “This PC”, and select “Properties”

- Select “Advanced System Settings”

- Select “Environment Variables” in the “Advanced” tab

- Select “New…” under “System variables”

- Input the text below and select “OK”
Variable name: OPENSSL_ia32cap
Variable value: ~0x200000200000000

- Confirm that the variable has been added successfully, then select “OK”

- Start Reactiv SUITE
If you didn’t already purchase a key from one of our partners, simply fill the Free trial form when you launch Reactiv SUITE, and you will receive your Trial License Key by email.
- Check your Junk Email folder
- Wait a few minutes and refresh your email
- If you still don’t receive it, you can contact us
- Go to Settings

- In Product License, activate by entering your activation code

- Go to settings
- In Product License, enter your license
- Click on Deactivate

- If you bought your license from one of our partners, contact their customer support
- If not possible, contact our customer support
Once a license is deactivated, you can use the same key and activate it again on another PC.
- Connect up to 3 additional displays to the Reactiv SUITE PC
- In Reactiv SUITE settings > Device Manager > Display Layout, configure the position of your secondary displays. Just select the available display and drop it into the position on the layout for Reactiv SUITE to take control. The location of the display represents the ‘throw’ direction of the content. Just throw content right, left or up, and the content will appear on the appropriate display as per the layout map

- Verify Windows recognizes the secondary display. In Windows, right-click on your desktop, select “displays settings”, and confirm that the secondary display is detected
- If the secondary display is not detected by Windows, try to disconnect and reconnect the display, or change the cables
If your keyboard relies on a “Bluetooth USB dongle”, the IWB might block the Bluetooth signal, if possible, try to put the USB dongle on an available USB port on the side of the IWB instead of a behind the IWB.
- If your IWB has a ShadowSense touch screen
- Make sure that you are using the pen and eraser that was originally delivered
- Go in settings > devices manager > Touch Screen:
- Make sure your touch profile is set to “IWB”
- Make sure that the ShadowSense Firmware is R11.0 or higher, otherwise, update the firmware by clicking on “firmware update” and following the instructions
- In the Touch screen settings, if you see multiple choice for the Stylus (that option is only available for some specific IWB), select the one you are using

Reactiv SUITE requires Microsoft Office to be installed and activated on the computer running the software in order to open documents such as Word, PowerPoint, or Excel.
Ensure that you are not running a 30-day free trial and your license is valid and not expired.
- In Windows, open any Office app (Excel, PowerPoint, Word…)
- Go “Files” > “account” > and verify that the product is activated

- If the account is not activated, you will need to contact your IT department to activate it or to purchase a new license
Reactiv SUITE IWB is by default configured to be in full screen “Kiosk Mode” by your IT department.
Otherwise, go in Settings > User Interface > Additional Settings and click on toggle “Fullscreen mode”.
In Reactiv SUITE Settings > User Interface > Accent Color.

Yes, in the Settings > User Interface > Background Media.

No, but we are working on additional options to choose from which will be available soon.
Move any image into the presentation folder, and rename it “folder.jpg” – that picture will become the presentation thumbnail.
Any sub-folder, inside the presentation, can also be customized by placing a “folder.jpg” file within it.
Move any picture into the presentation folder and rename it “background.jpg”, that picture will become the presentation background in STAGE.
Any sub-folder, inside the presentation, can also be customized by placing a “background.jpg” file within it.
Go in Settings > System > Browser Settings to add or remove Quick Launch shortcuts. To change the shortcut Icon, click on the icon and locate on your PC the new icon you would like to replace it with.
- On the Home screen, select Reactiv STAGE or Reactiv SCRIBBLE

- From the Lobby (Public or Private Workspaces), you can start a presentation just by clicking on any of the icons

- On the Home screen, select Reactiv STAGE or Reactiv SCRIBBLE
- From the Lobby (Public or Private Workspaces), you can add new workspaces by clicking on the ‘+’ icon

- In Details:
- Enter a title and a description
- Add a folder with the desired files to use in the Workspace by clicking on the Folder button

- In Media:
- Add images as the preview and background media by clicking on +

- Add images as the preview and background media by clicking on +
- Click on Save. Select your Workspace on the Lobby screen and start presenting
- In Details:
- On the home screen, click on the help button, ‘?’ to see mini video-tutorials explaining the basic gestures and features

- In a presentation, click on the interrogation mark in the bottom right corner to see mini video-tutorials

- For more information on basic tools, refer to the Getting Started Guide
- Use your USB key to automatically start a project
- Prepare your files in a USB flash drive
- Plug your USB flash drive into the Interactive Whiteboard
- Ensure that USB drive is enabled in SETTINGS

- Start Reactiv STAGE or SCRIBBLE and go to the lobby
- Click on the USB Project icon to start presenting

- Now, all changes will be saved back into the same USB folder
Before your presentation/at your desk:
- Open your presentation folder
- If you are using Chrome, navigate to the webpage you would like to use in Reactiv SUITE, select the address in the address bar, click and drag it into your presentation folder, and create a URL file (shortcut to a webpage)
- If you are using another browser, in your presentation folder: Right-click > New > Shortcut > past your webpage address > next > name your shortcut and click finish
In Reactiv SUITE/during your presentation:
- Click on the browser icon

- Navigate to the webpage you would like to work on
- Click on the “add to presentation” button located on the browser floating toolbar

- The webpage will now be in your presentation folder so you can open it in STAGE and SCRIBBLE
Everything you present and save, during a session, will be saved back to the exact same folder as the originating file. On-premises or off-premises storage, Local drive, USB flash drive, network drive, or Cloud, data will only be saved to the location of your choice.
Reactiv STAGE is a powerful non-linear storytelling tool that enables teams to shift focus from managing content to the narrative of a presentation. STAGE allows you to open, render, markup, and present content in any format that you routinely use. Dramatically improves the speed and accuracy of capturing audience feedback and meeting results.
At any time, click the “arrange” button at the bottom right corner of your screen to automatically arrange every object on the screen.

To clean your presentation screen, click the “remove all” button at the bottom right corner of your screen.

You can save documents, with your annotations, by clicking on the save button, located on the STAGE toolbar. Just click on any content and the toolbar will appear.

Reactiv SCRIBBLE is a breakthrough brainstorming and layout tool, that uses an infinite canvas, allowing you to sketch, write ideas, mark up pages and create dynamic layouts that accurately represent your vision.
SCRIBBLE simplifies complex ideas, visually communicates vision and intent and allows your team to capture decisions and reduce mistakes.
- Use the pagination tool to create page breaks from any part of the canvas that you would like to share. Then simply export these pages breaks into a PDF
- Once the PDF created, it will be in your presentation folder so you can share it easily

Once a page break is defined, you must click “create page” button again. Every time you want to add a new page, this button must be clicked again.

When using the smart feature, the insert path must cover the entire height/width of the objects/inking that you want to move, in order to select them. When selected properly, the content will be highlighted.

Using the Lasso tool, you can move and resize content on your canvas.
Double click on the canvas to activate the smart insert tool, and create a closed path to select everything inside the loop. Once the loop is closed, you can move the content around the canvas and resize it to re-organize the layout as you wish.

Reactiv SCRIBBLE allows users to mirror a paginated area, or the entire workspace into up to 3 secondary displays:
- To mirror a page, click & hold and throw it in the direction of the secondary display you want it to be mirrored in
- To mirror the entire workspace, click and hold the canvas, then throw it in the direction of the secondary screen
Reactiv SCRIBBLE is all about layout. It will allow you to mirror a specific layout defined by a page break. You cannot mirror just a single document – if you want to mirror a document, do that in STAGE.
To mirror the entire workspace, click and hold the background, then throw it in the direction of the secondary screen.
- Throw the same page again, in the same direction, to remove it from the secondary display
- Or throw a new document in the same direction to replace the first one
- Make sure that you are throwing in the right direction. You need to throw the content in a specific direction as each direction (left/right/up) are different displays
- Check Reactiv SUITE settings and make sure that the secondary displays are correctly configured
- Make sure that the object you are throwing is properly hitting the border of the screen and bounces back into position. If the object doesn’t properly hit the border of the screen it will not mirror
Reactiv SCRIBBLE
- Will auto-save your progress after every modification. You don’t have to worry about saving during your session, just focus on your work
- You can also paginate your canvas into individual pages, and export to PDF
Integrated services that seamlessly connect in-room devices into the Reactiv SUITE eco-system.
Remote CONNECT allows colleagues and attendees to interact with the Interactive White Board using their personal devices. They can share files with Reactiv SUITE, cast their device’s screen into it, or use their devices as keyboards for the IWB.
In-room compatible devices such as laptops, mobiles and tablets can be cast to Reactiv SUITE using build-in Airplay and Miracast capabilities.
- Which devices can I cast from?
Airplay: You can cast from iPhone, iPad, iPod Touch, MacBook, iMac, Mac mini, etc.
Miracast: You can cast from certain Android devices (Samsung and other phone/tablet which support Miracast) or Windows 10 PCs (using in-built Miracast capabilities).
Chromecast: You can cast from various Google Chromebooks and other Android devices that support Chromecast.
- In Reactiv SUITE
Ensure that Airplay, Miracast and/or Chromecast are enabled in Reactiv SUITE settings. Once a device is paired, it will appear in STAGE and SCRIBBLE in the library, under the “Devices” tab.
- On your device
Open the appropriate casting application on your device. Search for the Device Name in the list and connect to it. The Device Name is displayed in the top right-hand corner of Reactiv SUITE status bar.

Yes, Reactiv SUITE supports off-the-shelf video capture cards and USB video capture devices which convert HDMI\DP video inputs into a USB stream. These devices can be configured for use using the SETTINGS -> Device Manager -> AV Settings menu inside Reactiv SUITE. Using this menu, you can create an A/V source by combining video and audio inputs together into one stream.

There is no limit to the number of web cameras and A/V sources that can be managed by Reactiv SUITE.
Reactiv SUITE will process as many video capture devices as detected by the Operating System. It should be noted that the performance of the system is dependant on the system capabilities of the Reactiv SUITE PC. USB bus bandwidth, memory bandwidth and the ability for the CPU to process these streams will be the limiting factor.
Reactiv SUITE will detect all video input sources that are detected by the Windows OS. Check Device Manager to confirm that the device you are looking for is present. If not, re-install the device and confirm that Windows is able to detect it.


This can happen when Windows, or the installed anti-virus software on the computer, blocks access to the camera for certain desktop programs. To fix this, open Camera Privacy Settings and verify that the desktop apps have access to your camera.

Next if Anti-Virus programs (like Kaspersky) are installed, ensure that the Camera input to Reactiv SUITE application is enabled from the Kaspersky Application Control.

Kaspersky blocks both settings Access to webcam and Access to audio capturing devices for Reactiv SUITE.
Team members present in the room can wirelessly send any file to Reactiv SUITE by opening the URL displayed in the top left-hand corner of the Reactiv status bar, using any browser on their personal device. Follow the instructions on the browser to upload files directly into the active digital workspace.
For more information, refer to the Getting Started Guide – Remote Services.

Reactiv enables you to discreetly share text or complex weblinks from your remote device into the Reactiv Workspace. Just open the URL displayed in the top left corner of the Reactiv status bar on any in-room personal device. Follow the instruction to send text or URL links directly into Reactiv SUITE apps or the browser.
For more information, refer to the Advanced User Manual – Remote Keyboard (Link to file for download).
Using in-room devices as keyboard for the IWB is a feature only available for IWB using ShadowSense touchscreen technology, as Reactiv SUITE leverage specific internal connections only available with IWB powered by ShadowSense
- Open Reactiv SUITE settings > Device Manager > Touch Screen, if “ShadowSense not detected is displayed, then Remote Keyboard feature won’t work
- If the IWB is powered by ShadowSense, make sure that the ShadowSense Firmware is R11.0 or higher.
- If the Firmware is bellow r11.0, update it to the latest available firmware by clicking on “firmware update” and following the instructions

Yes, Airplay requires both the personal, in-room device and the Reactiv SUITE host PC to be on the same network for screen sharing to work.
- On iOS, open the control center and click on “Screen Mirroring”


- On macOS, click on the Airplay icon in the menu bar

- On macOS, verify that Airplay is enabled in System preference Displays “Show mirroring option in the menu bar”

- On iOS, verify that the OS is up to date
- Verify that your iPhone/iPad and the Reactiv SUITE device are on the same network
- Verify in Reactiv SUITE settings that Airplay is enabled
- On macOS, verify that incoming connections are not blocked
- Go to “System Preferences” > ”Security and Privacy”->Firewall > ”Firewall Options”, deselect “Block All incoming Connections”, and select “Automatically allow downloaded signed software to receive incoming connections” if it’s not already selected

- On the Reactiv SUITE PC, confirm that the Wi-Fi\Network connection is configured as a PRIVATE network. The PC must be discoverable for Airplay to work

- On the Reactiv SUITE PC, confirm that the firewall is configured to accept incoming connections
- On the Reactiv SUITE PC, confirm that the WiFi/Network connection is configured as a PRIVATE network. The PC must be discoverable in order for Airplay to work


- On the Reactiv SUITE PC, confirm that the firewall is configured to accept incoming connections
Please check the DNS setting (in network settings) of the PC running Reactiv SUITE. You can try using alternative DNS like Google’s free DNS 8.8.8.8 and 8.8.4.4.
Reactiv SUITE Airplay connectivity supports playback of videos using H.264 video codec and AAC audio codec. If the videos use any other format, they might not work.
If you are using a WiFi connection, the WiFi signal might be weak, or your network might be overloaded.
- Ensure a good signal between Reactiv SUITE host PC and the in-room device attempting to cast
- If possible, use a wired Ethernet cable instead of WiFi to connect the Reactiv SUITE host and macOS device to the network
- In some cases, switching off Bluetooth on in-room iOS devices can help to get a better connection
Once the screen is cast, the volume is controlled through Reactiv SUITE and not the in-room device.
- Reboot the PC running Reactiv and reboot the user’s personal devices and try again
- Refer to the IT Manual to ensure that the network configuration, ports and settings are configured correctly. Download IT Manual
- Confirm that your network supports mDNS protocol as this protocol cannot be blocked for Airplay to work correctly
- Install an off-the-shelf AppleTV device on your existing network and confirm that it works. If an off-the-shelf device works, Reactiv SUITE will also work
No, Miracast utilizes WiDi which doesn’t require the casting and receiving devices to be on the same network. As a result, any device in the room that supports Miracast will see the Reactiv SUITE Miracast server and can connect directly.
- On a Windows 10 device, click on the CONNECT icon and search for the Reactiv SUITE Device Name. Select this device and pick the projection mode

- On many Android and Samsung devices, in the Quick Settings menu open the Smart View app. Search for the Reactiv SUITE device name and follow instructions

- Not using a Samsung smartphone? See our detailed guide:
- Make sure that Reactiv SUITE PC has a valid WiFi adapter and it is turned on. Miracast requires WiFi connectivity with WiDi support. Airplane Mode must not be turned on
- On the Reactiv SUITE PC, go to “Projection Settings” and “Some Windows and Android devices can project to this PC when it is OK”, should be set to “Always Off” from the dropdown menu

- Confirm that the OS and WiDi adapter support Miracast
- On the Reactiv SUITE PC, type ‘dxdiag’ in the Windows search box
- Click ‘Save All Information’ and save the resulting file
- Open this DxDiag.txt file and confirm that Miracast is available


- On the Reactiv SUITE PC, confirm that the WiFi\Network connection is configured as a PRIVATE network. The PC must be discoverable in order for Miracast to work

- On the Reactiv SUITE PC, confirm that the firewall is configured to accept incoming connections

Refer to the IT Manual to ensure that the network configuration, ports and settings are properly configured. Download IT Manual
- On the Reactiv SUITE PC, configure ports:
- “Windows Defender Firewall” > “Advanced settings” > “Inbound Rules” > “New Rules”. Select “Port”,
- Click Next
- Now select “TCP” and “Specific Port numbers” set it to 7236
- Click Next and select “Allow the Connection”
- Click Next and select all 3 boxes “Domain”, Public” and “Private”. Click Next, give a name to the new rule
If Miracast still doesn’t work, try the Windows native Miracast app provided by Microsoft. Type ‘Connect’ in the search box.

Confirm if this app is able to connect to your mobile device. If this app also does not work, then the PC does not support Miracast.


That is to be expected, Miracast defaults to a 16:9 aspect ratio by default.
Yes, Chromecast requires both the personal, in-room device and the Reactiv SUITE host PC to be on the same network for screen sharing to work.
- Make sure your mobile phone or tablet is on the same Wi-Fi network as your Chromecast device
- Open the Google Home app

- Tap the device you want to cast your screen to
- Tap Cast my screen
 > Cast screen
- Make sure that both your in-room device and your Reactiv SUITE PC are on the same network
- On the Reactiv SUITE PC, confirm that the WiFi/Network connection is configured as a PRIVATE network. Reactiv SUITE PC IP must be discoverable

- On the Reactiv PC, open a browser and type: “Localhost\Reactiv” in the search bar to confirm that the Reactiv Webserver is working

- On the Reactiv PC, Reactiv webserver rely on port 80, and while it is normally open by default, you can create a new firewall rule to open it:
- “Windows Defender Firewall” > “Advanced settings” > “Inbound Rules” > “New Rules”. Select “Port”,
- click Next
- Now select “TCP” and “Specific Port numbers” set it to 80
- Click Next and select “Allow the Connection”
- Click Next and select all 3 boxes “Domain”, Public” and “Private”. Click Next, give a name to the new rule
- From a Windows device on the same network: Ping the Reactiv Webserver IP address to see if it is reachable:
- In windows, open Command Prompt by hitting Windows+R and typing “cmd” in the run bar, then hit enter
- In Command Prompt, type “ping reactiv_ip_address”

Reactiv SUITE creates a webserver on the PC in order for in-room devices to connect and transfer information. But the Reactiv SUITE PC could have multiple IP addresses due to multiple network adapters. An example is connecting WiFi and LAN cable to the PC, which will create two IP addresses for the same PC.
If the IP address displayed in the status bar is incorrect, you can use the Settings > System > Remote Connect > Text/File Sharing menu to pick the correct IP address.
