はい、マスクをしていても顔認識および顔追尾機能を使用可能です。
Innex CubeはAI機能を使用するのに追加のソフトウェアやアプリは必要ありません。
例えばミーティングルームのドアが解放されていて、通行人をInnex Cubeが追尾してしまう場合など、ドア部分をAIが認識しないようにブロックゾーンを設定することができます。
ブロックゾーンはリモコンを使用して設定メニューから設定することが可能です。
または、ミーティング開始時に参加者が着席した後に「一度だけ追尾」を選択し、投影位置を固定することも可能です。
最大8人まで同時にAIによる自動追尾を行うことができます。
最適な画像スティッチングの結果を得るためには、カメラから少なくとも2.3フィート(70cm)以上離れて座ることをお勧めします。この距離を超えると、スティッチングラインがほとんど見えなくなります。もし継ぎ目が顕著に見られる場合は、次の3点を確認してください:
1. カメラに近すぎる位置に座っていないことを確認してください。
2. 使用しているUSBポートが、Innex Cubeに十分な電力を供給できるUSB 3.0ポートであることを確認してください。
3. Cubeのファームウェアを最新バージョンにアップグレードされていることを確認してください。
Innex cubeは弊社ソフトウェアInnex Studioを使用してファームウェアを更新することが可能です。
下記の手順でファームウェアの更新を行なってください。
1. 次のリンクよりInnex Studioをダウンロードして、インストールを行なってください。
Windowsバージョン
mac OSバージョン
2. Innex Cubeをパソコンに接続し、Innex Studioを起動してください。その際、パソコンがインターネットに接続され、Cubeがテレビ会議ソフトウェアなど、他のソフトウェアで使用されていないことを確認してください。
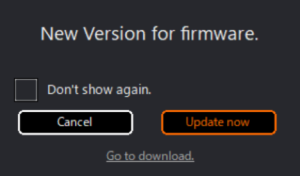
3. Innex Cubeに利用可能なファームウェアアップデートがある場合、「利用可能なファームウェアのアップデートがあります」と表示されます。「今すぐアップデート」をクリックしてください。
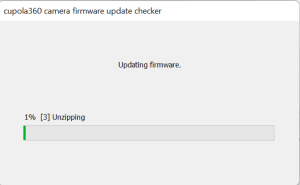
4. ファームウェアの更新がはじまり、ステータスバーが表示されます。ステータスバーが100%になり、ファームウェアの更新が完了するまでお待ちください。
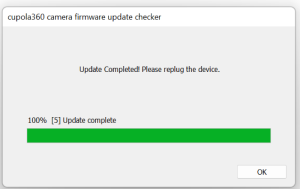
 5. アップデートが完了すると「Update completed! Please replug the device」と表示されます。「OK」をクリックして、Innex Cubeのケーブルの抜き差しを行なってください。
カメラに内蔵されたマスストレージに新しいファームウェアを書き込む必要があるため、お使いのパソコンがUSBマスストレージへのアクセスをブロックしている場合、同様にパソコンはファームウェアの更新をブロックしてしまいます。パソコンのUSBマスストレージへの書き込みのブロックを解除してから再度ファームウェアの更新を行ってください。
一部のテレビ会議ソフトウェアには、独自のAI/オートフレーミング機能が搭載されているものがあります。この機能が有効になっていると、カメラ本体のAI機能と競合し、意図しないレイアウト変更やオートフレーミングの動作が不安定になる原因となります。
この問題を回避するため、あらかじめご使用のテレビ会議ソフトウェア側でオートフレーミング機能を無効(オフ)に設定していただきますようお願いいたします。
C570のオートフレームは対象者が1〜5mの距離にいる想定で最適化されています。一人だけが対象で、距離が1m以下の場合、通常よりも不安定な動作をする場合があります。また、例えば、会議室がガラス張りで外を人が頻繁に通り過ぎる、頭がガラス越しに写っている、会議室のディスプレイに反射して顔が写っているなど、会議室の環境が原因で不安定になる場合もございます。その場合、オートフレーム機能をオフにすることをお勧めいたします。オートフレーム機能は付属のリモコン、または製品本体上部のボタンを使用してオフにすることが可能です。
これら機能のオン/オフには付属のリモコンまたは、製品本体上部のボタンから行うことができます。AIモード時にリモコンのAI/Mボタンまたは、製品本体のボタンを一回押してください。。
オートフレーム機能を使用しない、または、視野角120°が広すぎるなどの場合、手動で視野角の調整や、投影場所の調整をデジタルパン・チルト・ズーム(EPTZ)を使用して行うことが出来ます。デジタルズームはリモコンおよびカメラ本体上部のボタンにて、視野の移動はリモコンの矢印ボタンにて行うことが可能です。
ファームウェアアップデートは下記の手順に従っておこなってください。
1. 下記のリンクから最新のファームウェアをダウンロードしてください。
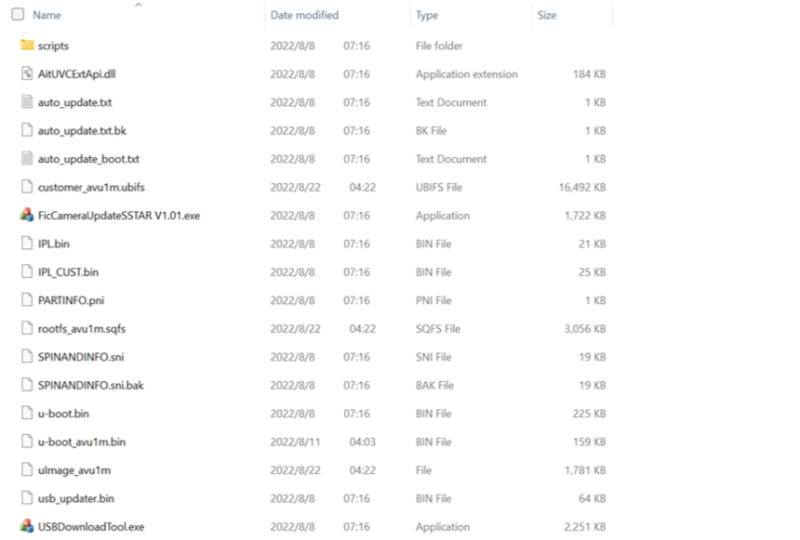
2. ダウンロードしたZipファイルを解凍してください。
3.C570をパソコンに接続してください。
4. “FicCameraUpdateSSTAR Vxxx.exe”をダブルクリックしてアップデートツールを起動してください。

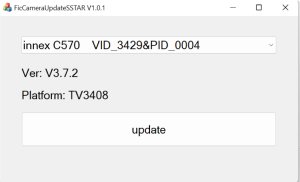
5. プルダウンリストから “innex C570 VID_3429&PID_0004” を選択してください。
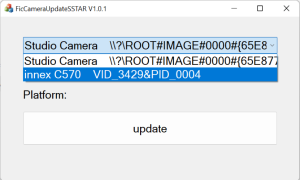
6. “update”をクリックしてください。
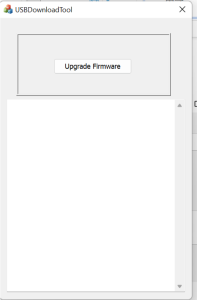
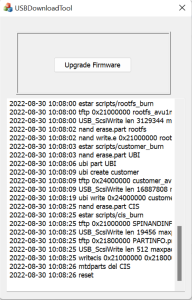
7. “Firmware”アップデートをクリックすると、アップデートを開始します。
8. “reset”が一番下に表示されたらファームウェアのアップデートは完了となります。
はい、マスクをしていても顔認識および顔追尾機能を使用可能です。
オートフレーム機能のズーム倍率は出力している解像度により異なります。例えば、出力している解像度が720Pまたはそれ以下の場合、最大ズーム倍率は3倍となります。1080Pで出力されている場合、2倍までとなります。現在において、ほとんどのテレビ会議ソフトウェアは720P解像度にてカメラからの映像を出力しているため、その場合ズーム倍率は3倍となっております。
C570はカメラ本体にAI機能を有しているため、オートフレーミング使用時にソフトウェアは必要ありません。
ファームウェアを更新する前に、C570に現在インストールされているファームウェアバージョンを確認してください。
現在のファームウェアバージョンを確認する方法:
1. リモコンで設定を開きます。
2. サイドメニューからシステムを選びます。
3. FWバージョンを確認します。V684と表示されている場合は、最新バージョンのため更新は不要です。
ファームウェアの更新手順:
1. このリンクから最新のファームウェアをダウンロードします。
2. ダウンロードしたファイルを解凍します。
3. C570をPCに接続します。
4. USBDownloadToolV2.4をダブルクリックします。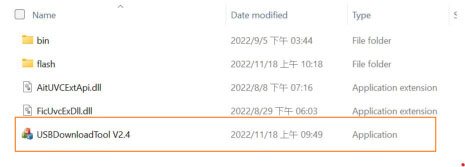
5. 表示されたウィンドウで、Innex C570 VID_3429&PID_0004が選択されていることを確認します。
6. Update Firmwareをクリックして更新を開始します。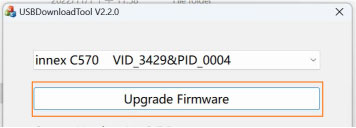
7. 更新が完了し、確認メッセージが表示されるまで待ちます。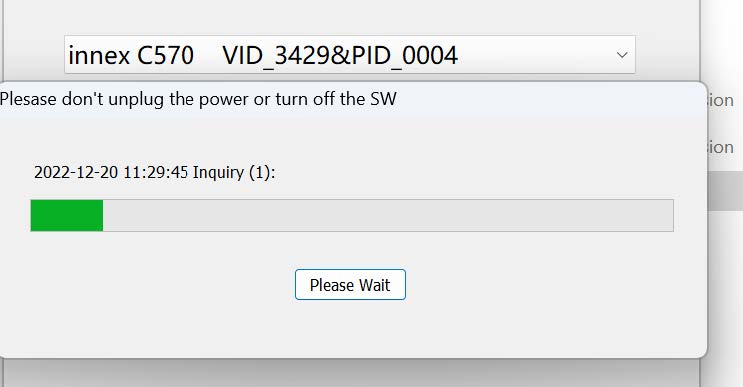
8. OKをクリックします。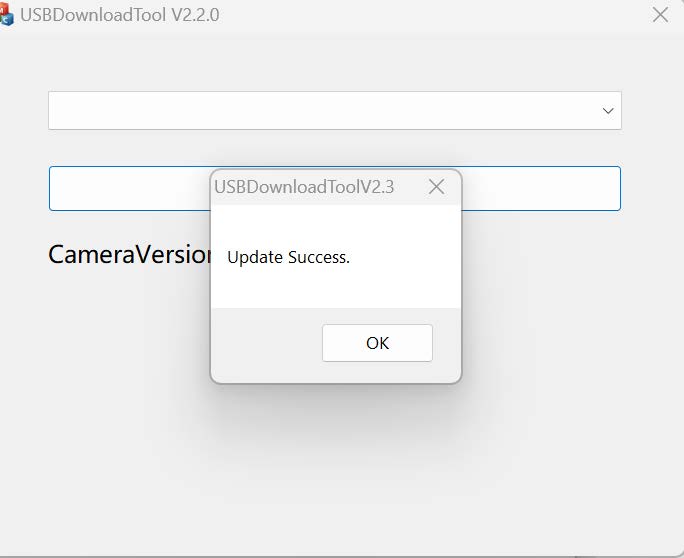
9. 設定に戻り、FWバージョンが最新バージョンになっていることを確認します。
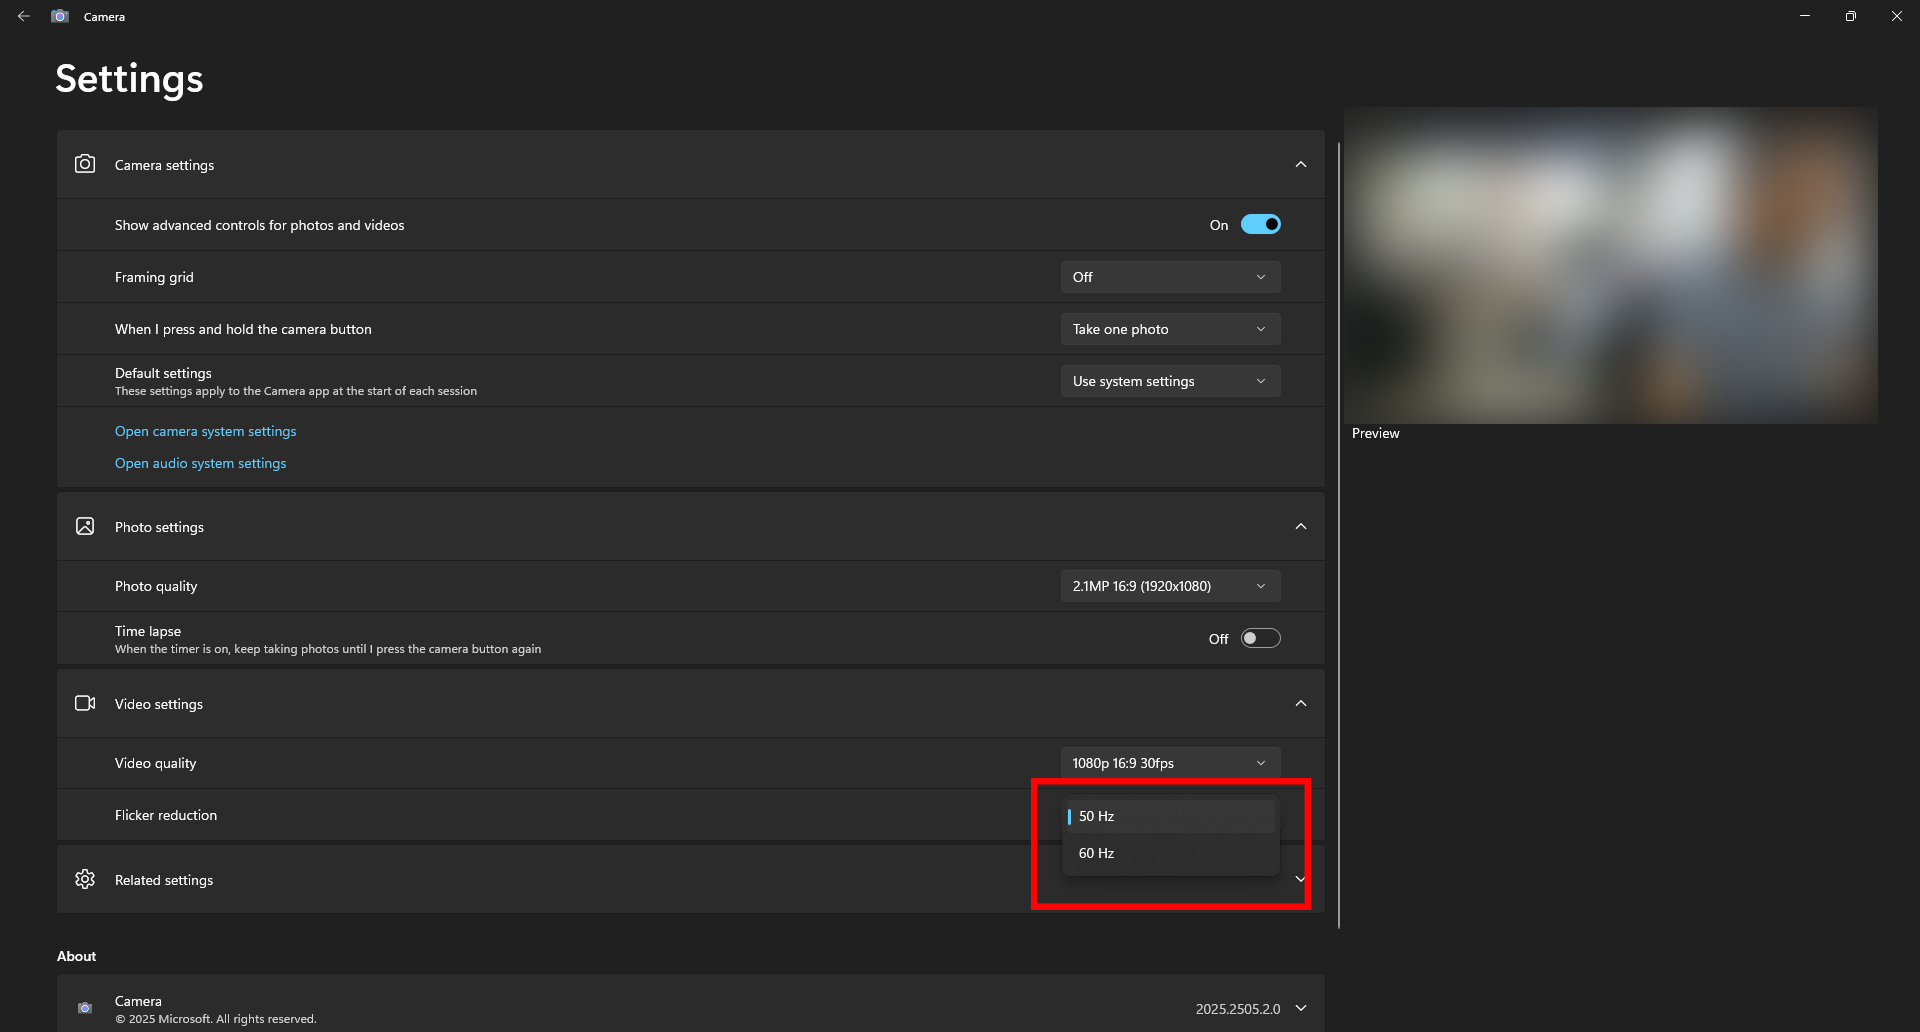
Windows以外のオペレーティングシステムを使用している場合、C570はちらつき設定を保持します。しかし、Windowsでは標準の「カメラ」アプリがカメラの設定を上書きすることがあります。
たとえば、C570の電源周波数を50Hzに設定していても、Windowsのカメラアプリが60Hzに設定されていると、カメラを再起動するたびに60Hzに戻ってしまいます。これは、他のアプリでカメラを使用していても同様です。
正しい電源周波数の設定を維持するには、Windowsのカメラアプリで設定を変更してください。
Windowsの標準「カメラ」アプリを使用している場合、カメラの設定が上書きされ、ePTZなしのデフォルトビューで起動します。リモコンの「OK」ボタンを長押しすると、プリセットビューにジャンプできます。
他のアプリやオペレーティングシステムでは、カメラはプリセットビューで起動するはずです。
Innex C570をAndroid端末との使用時にマイクからの音声が遠く感じる場合、最新のファームウェアにアップデートが必要です。
お使いのInnex C570のファームウェアが最新バージョンかご確認ください。最新ファームウェアはここからダウンロード可能です。
現在のファームウェアバージョンの確認方法
1. リモコンを使用して設定を開きます。
2. サイドメニューから「システム」を開きます。
3. FWバージョンをご確認ください。V684以降のバージョンの場合、アップデートの必要はありません。
ファームウェアアップデート方法の詳細に関しては。別項の「ファームウェアの更新方法」をご確認ください。
一部のテレビ会議ソフトウェアには、独自のAI/オートフレーミング機能が搭載されているものがあります。この機能が有効になっていると、カメラ本体のAI機能と競合し、意図しないレイアウト変更やオートフレーミングの動作が不安定になる原因となります。
この問題を回避するため、あらかじめご使用のテレビ会議ソフトウェア側でオートフレーミング機能を無効(オフ)に設定していただきますようお願いいたします。
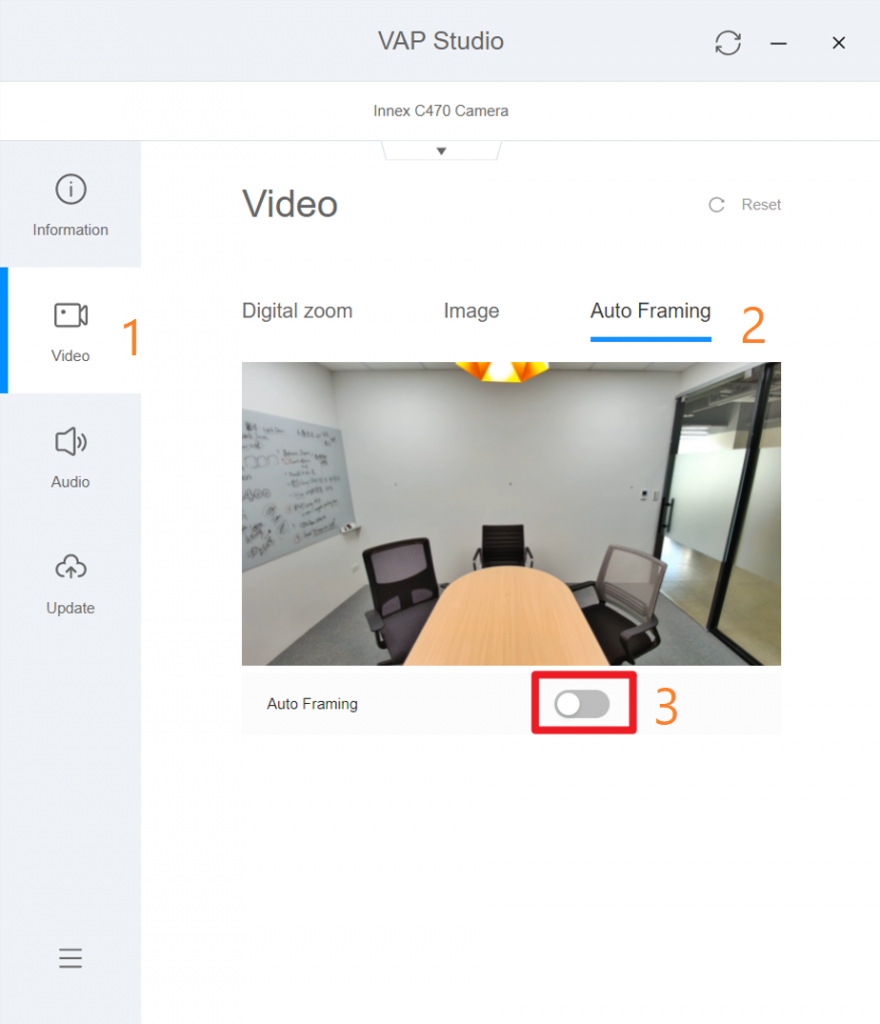
C470のオートフレームは対象者が1〜5mの距離にいる想定で最適化されています。一人だけが対象で、距離が1m以下の場合、通常よりも不安定な動作をする場合があります。また、例えば、会議室がガラス張りで外を人が頻繁に通り過ぎる、頭がガラス越しに写っている、会議室のディスプレイに反射して顔が写っているなど、会議室の環境が原因で不安定になる場合もございます。その場合、オートフレーム機能をオフにすることをお勧めいたします。オートフレーム機能をオフにする方法はビデオに(1分28秒付近)てご紹介しております。
また、ソフトウェアは次のリンクよりダウンロード可能です。funtechinnovation.com/ja/downloads/
これら機能のオン/オフにはInnex Cameraソフトウェアが必要になります。funtechinnovation.com/ja/downloads/
ソフトウェアを起動して、C470をパソコンに接続します。「video」タブから「auto-framing」をクリックしラジオスイッチでオン/オフを行います。オートフレーム機能をオフにする方法はビデオに(1分28秒付近)てご紹介しております。
オートフレーム機能を使用しない、または、視野角120°が広すぎるなどの場合、手動で視野角の調整や、投影場所の調整をデジタルパン・チルト・ズーム(EPTZ)を使用して行うことが出来ます。これら機能はソフトウェアInnex Camera(VAP Studio)にて使用可能です。詳しくはFAQ→Innex→Innex Camera(VAP Studio)→デジタルパン・チルト・ズーム(EPTZ)の使用方法をご確認ください。
Innex Camera(VAP Studio)を使用してC470のファームウェアのアップデートを行います。ファームウェアは次のリンクのC470のダウンロードセクションからダウンロード可能です。https://funtechinnovation.com/ja/downloads/
ファームウェアアップデートは下記の手順に従っておこなってください。
- C470をパソコンに接続します。
- アイコンをダブルクリックしてVAP Studioを起動します。
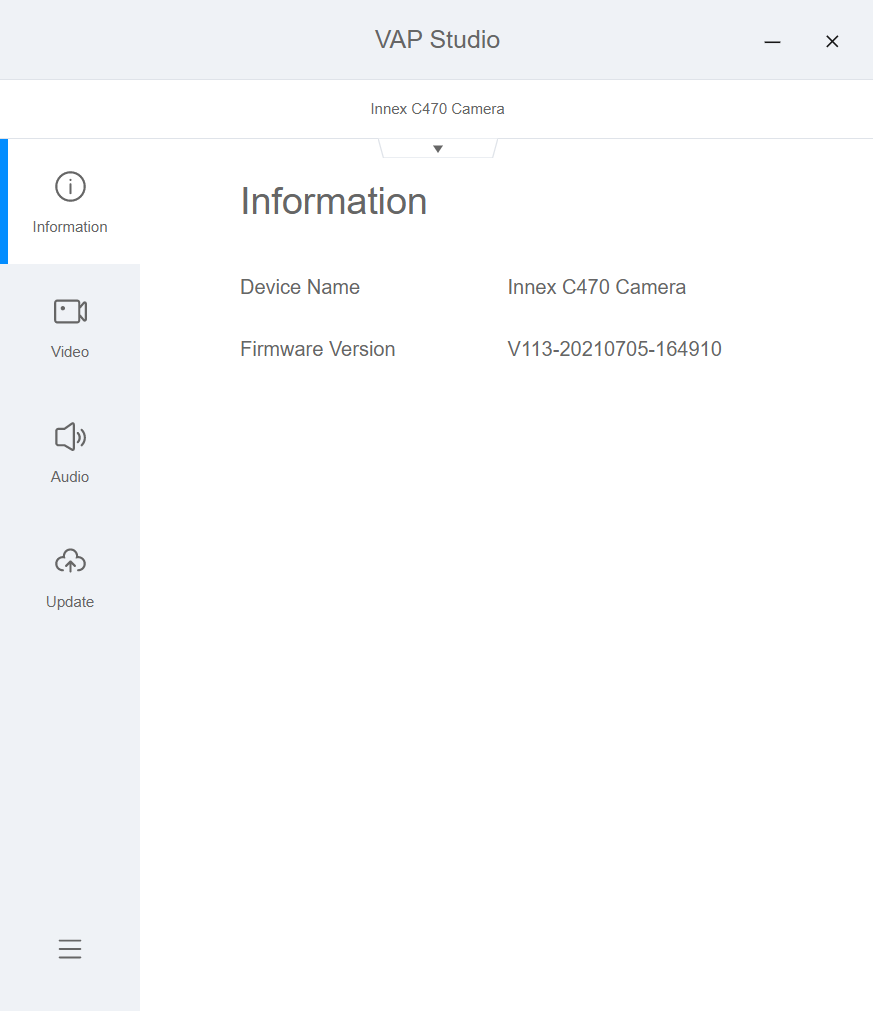
- 「Information」タブから下図のように現在のファームウェアを確認します。Firmware Versionの真ん中の8桁の数字が現在のファームウェアのバージョンがリリースされた日付となります。(例えば20210705の場合、2021年7月5日にリリースされたバージョン)
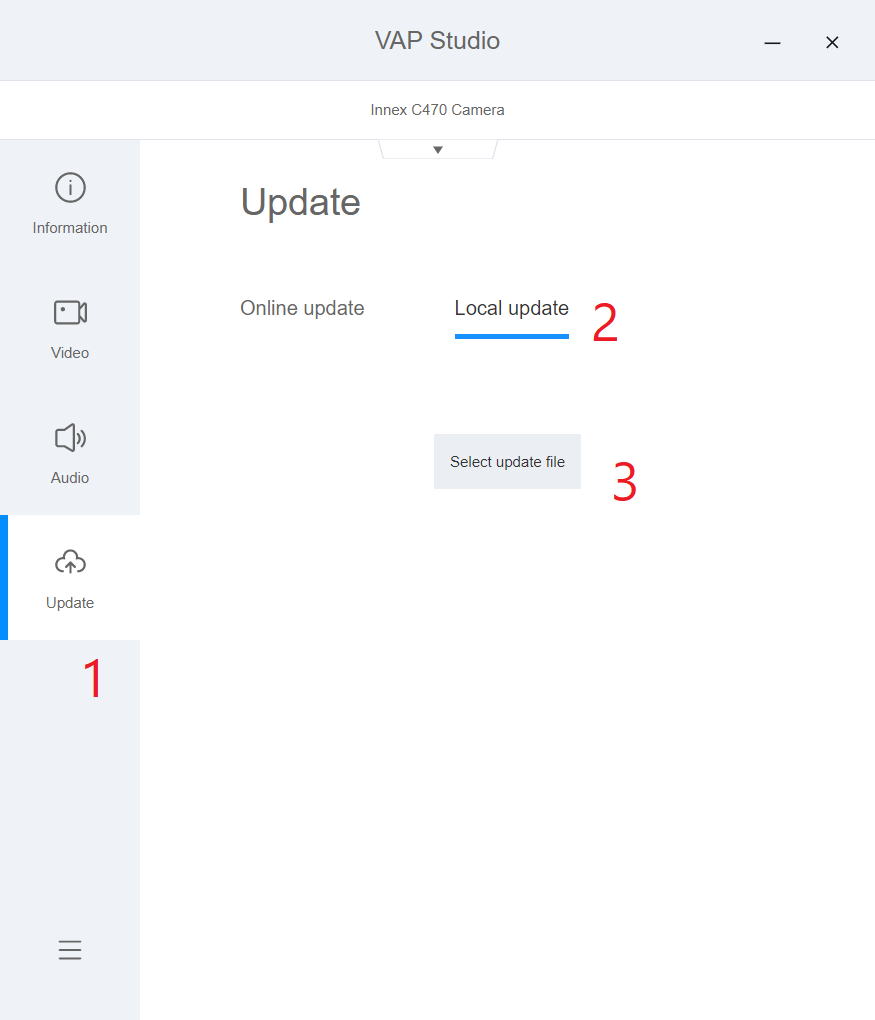
- 現在カメラにインストールされているファームウェアよりも更新されたバージョンが利用可能な場合、「Update」タブをクリックし、「Local update」から、「Select update file」をクリックし、ダウンロードしたファームウェア(.bin)をフォルダーから選択します。アップデートプロセスが開始し、ファームウェアアップデート完了後にC470は再起動します。
はい、マスクをしていても顔認識および顔追尾機能を使用可能です。
オートフレーム機能のズーム倍率は出力している解像度により異なります。例えば、出力している解像度が720Pまたはそれ以下の場合、最大ズーム倍率は3倍となります。1080Pで出力されている場合、2倍までとなります。現在において、ほとんどのテレビ会議ソフトウェアは720P解像度にてカメラからの映像を出力しているため、その場合ズーム倍率は3倍となっております。
C470はカメラ本体にAI機能を有しているため、オートフレーミング使用時にソフトウェアは必要ありません。
- Innex Camera(VAP Studio)を使用してC220のファームウェアのアップデートを行います。Innex Camera(VAP Studio)は次のリンクからダウンロード可能です。https://funtechinnovation.com/ja/downloads/
- C220をパソコンに接続します。
- アイコンをダブルクリックしてVAP Studioを起動します。
- 「Update」タブ(1)をクリックし、Online update(2)のタブからUpdate now(3)をクリックします。
*オンラインアップデートにはインターネット接続環境が必要です。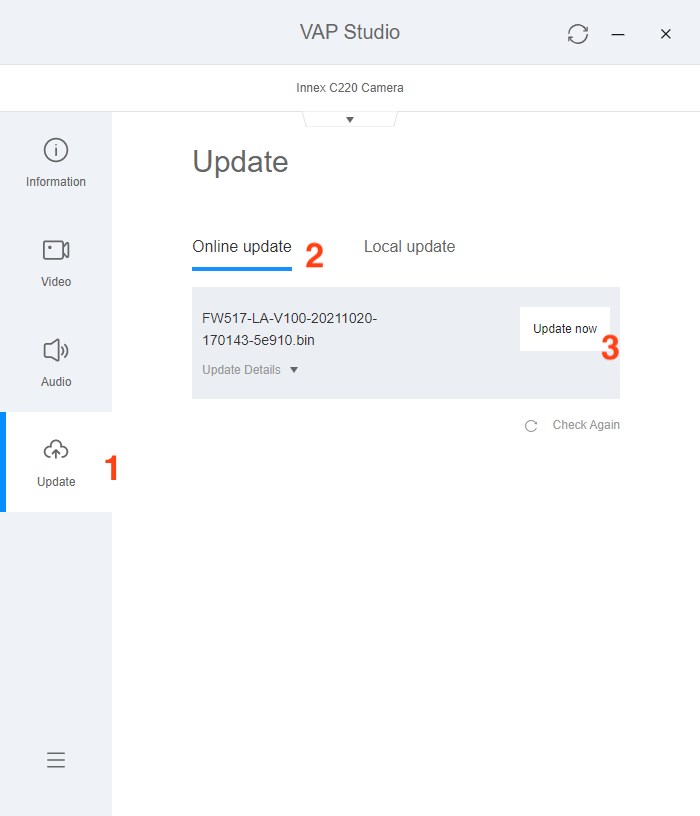
「オーディオドライバーが見つかりません。」などの表示が出ている場合でも、C220が故障しているわけではありません。C220にインストールされているドライバーが2021年9月27日以前にリリースされたものの場合、「Bluetoothとその他デバイス」の設定項目にこのメッセージが表示される場合があります。 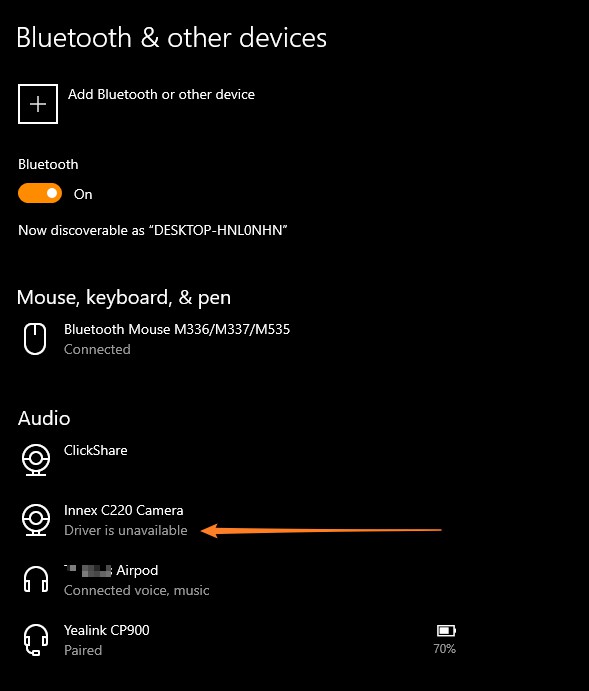 ドライバーを最新のバージョンに更新することでこの症状は改善されます。
はい、マスクをしていても顔認識および顔追尾機能を使用可能です。
はい。C830およびC831の全てのAI機能を使用するためにはInnex Studioが必要です。このソフトウェアは次のリンクからダウンロード可能です。
Innex StudioはC830/C831専用のソフトウェアです。最大8人までの同時顔追尾機能、オートフレーム、ホワイトボードスタジオモードなどのAI機能を備えております。また、このソフトウェアはC830およびC831のファームウェアアップデートにも使用いたします。Windows版、Mac版を次のリンクからダウンロード可能です。
テレビ会議時にInnex Studioを開いたままにし、テレビ会議のカメラの選択でInnex C830やC831ではなく、”Studio Camera” を選択してください。
詳しくはYouTubeビデオをご確認ください。(Link:https://youtu.be/d0AnV05HV-U)
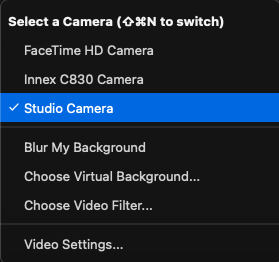
Innex Studioで使用したいモードに選択すると、プレビュー画面と同じ画面がテレビ会議のカメラとし投影されます。
Innex Studioのバージョンが1.3515.1以前の場合、Mac OS 14.1以降ではStudio Cameraがカメラリストに現れません。Innex Studioを更新する必要があります。
- お使いのMacがインターネットに接続されている場合、Innex Studioを起動すると”New Version For Innex Studio” というメッセージがポップアップします。”Update now”をクリックしてインストラクションに従いソフトウェアのアップデートを完了させてください。
 アップデートに関するメッセージが表示されないなどの場合、下記のリンクより最新版のソフトウェアをダウンロードも可能です。https://drive.google.com/drive/folders/1r7kUWcbT6G7Bhi94UZ1eXsRvgOL5udcN?usp=sharing
 - アップデート完了後に “System Extension Blocked”. というメッセージが表示されます。
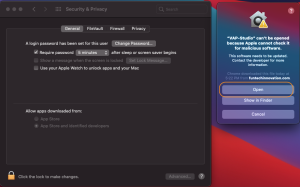
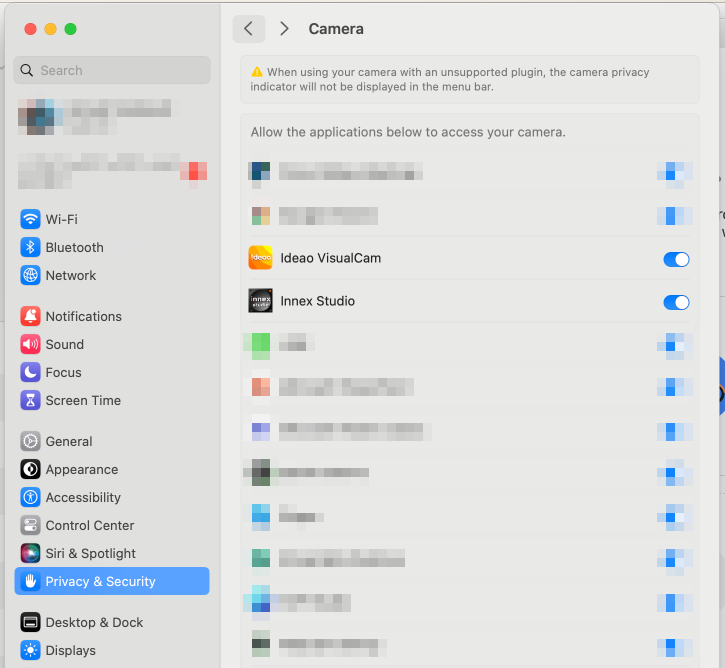
 “Open System Settings”をクリックするか、Macの設定のプライバシーとセキュリティから”アプリケーション“innex studio”のシステムソフトウェアの読み込みがブロックされました。の「許可」をクリックします。
- 許可後にInnex Studioに戻ると”System restart required….”というメッセージが表示されます。「OK」をクリックしてInnex Studioを再起動してください。

- もし、メッセージが表示された際に「OK」を押さなかった場合、後から手動で変更可能です。Mac OSの設定から、「一般」>「ログイン項目と機能拡張」と進み、画面を下にスクロールし、「機能拡張」の中の「カメラ機能拡張」の「!」をクリックし、「Innex Studio」をオンにしてください。
- 上記プロセス終了後にStudio Cameraがカメラリストに表示されない場合、Macを再起動してください。
以下の手順で設定を行ってください。
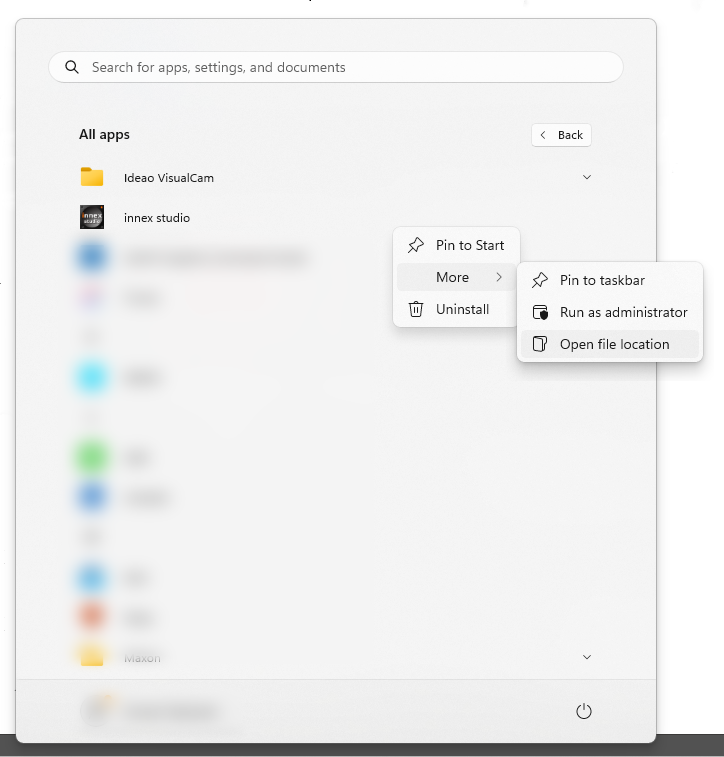
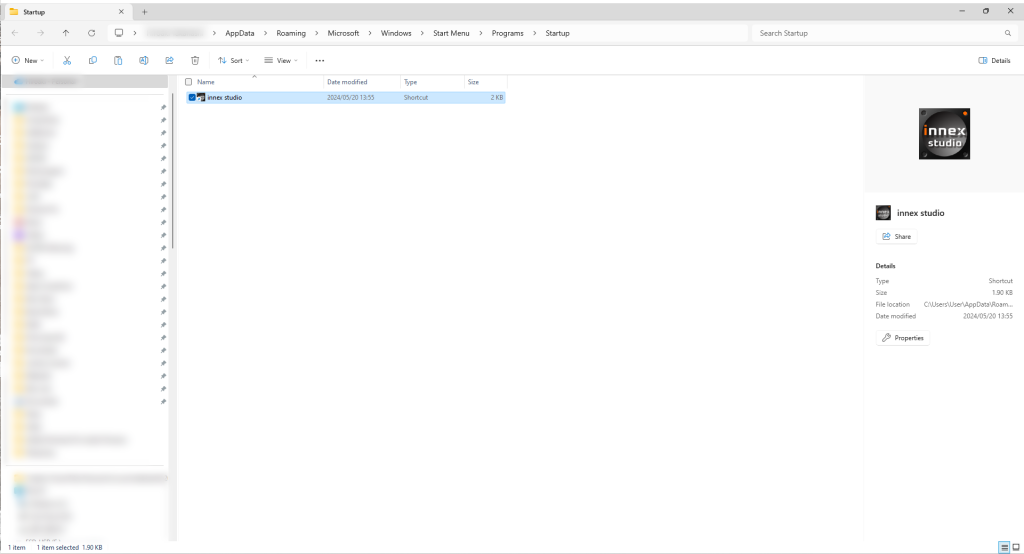
- Windowsのスタートボタンを押し、アプリのリストから自動起動したいアプリを探してください。
- アプリのアイコン上で右クリックをし、詳細>「ファイルの場所を開く」をクリックし、アプリのショートカットがあるフォルダーを表示します。
- フォルダーが表示されている状態でキーボードのWindowsロゴとRを同時に押し、「ファイル名を指定して実行」に「shell:startup」を入力して、OKを押すと「スタートアップ」フォルダが表示されます。
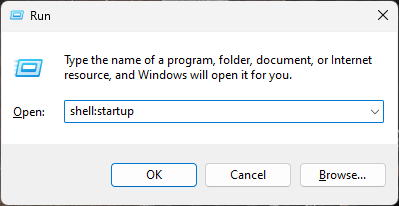
- アプリのショートカットをコピーして「スタートアップ」フォルダに貼り付けます。
- Windowsの設定からアプリ>スタートアップを開きます。
- アプリのトグルスイッチをオンにします。
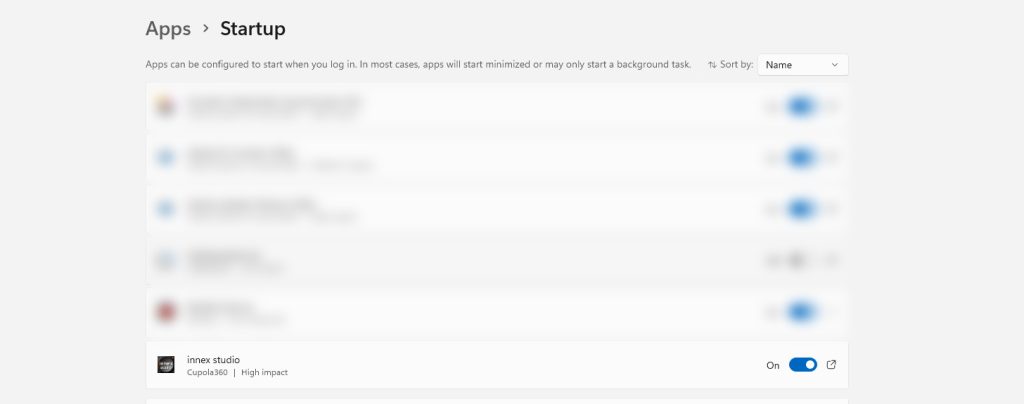
- パソコンを再起動して、自動的にアプリが起動するか確認してください。
Innex Cameraは画質設定やEPTZ、オートフレーム機能の設定やファームウェアのアップデートを行うためのソフトウェアです。C220およびC470専用で、Windows版とMac版があります。次のリンクにてダウンロード可能です。 https://funtechinnovation.com/software/innex-camera-vap-studio/
- VAP Studioを最新のバージョンに更新してください。
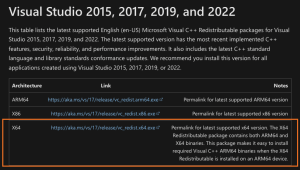
このソフトウェアはMicrosoft Visual Studioを使って作られているため、Windowsパソコンで正しく動かすためにはパソコンにMicrosoft Visual C++がインストールされている必要があります。インストールされていない場合、下記のMicrosoft社のリンクより英語版Microsoft Visual C++ 再頒布可能パッケージ (Visual Studio 2015, 2017, 2019, and 2022 x64)をダウンロードしてインストールを行ってください。 https://learn.microsoft.com/en-us/cpp/windows/latest-supported-vc-redist?view=msvc-170
インストール後に再度VAP Studioを起動してください。
- 2021年9月27日リリース版以降のバージョンに更新しても改善されない場合、お手数ですが、次のリンクより弊社テクニカルサポートまでご連絡ください。 https://funtechinnovation.com/faq/
ご使用の環境に応じてC470およびC220の画質の調整をおこなうにはInnex Camera(VAP Studio)を使用いたします。本ソフトウェアは次のリンクよりダウンロード可能です。https://funtechinnovation.com/ja/downloads/
- カメラをパソコンに接続します。
- アイコンをダブルクリックしてVAP Studioを起動します。
- 「Video」タブ(1)をクリックし、「Image」タブ(2)からスライダー(3)をスライドして各項目の調整を行います。「Reset」(4)を押すと画質設定が初期設定状態に戻ります。
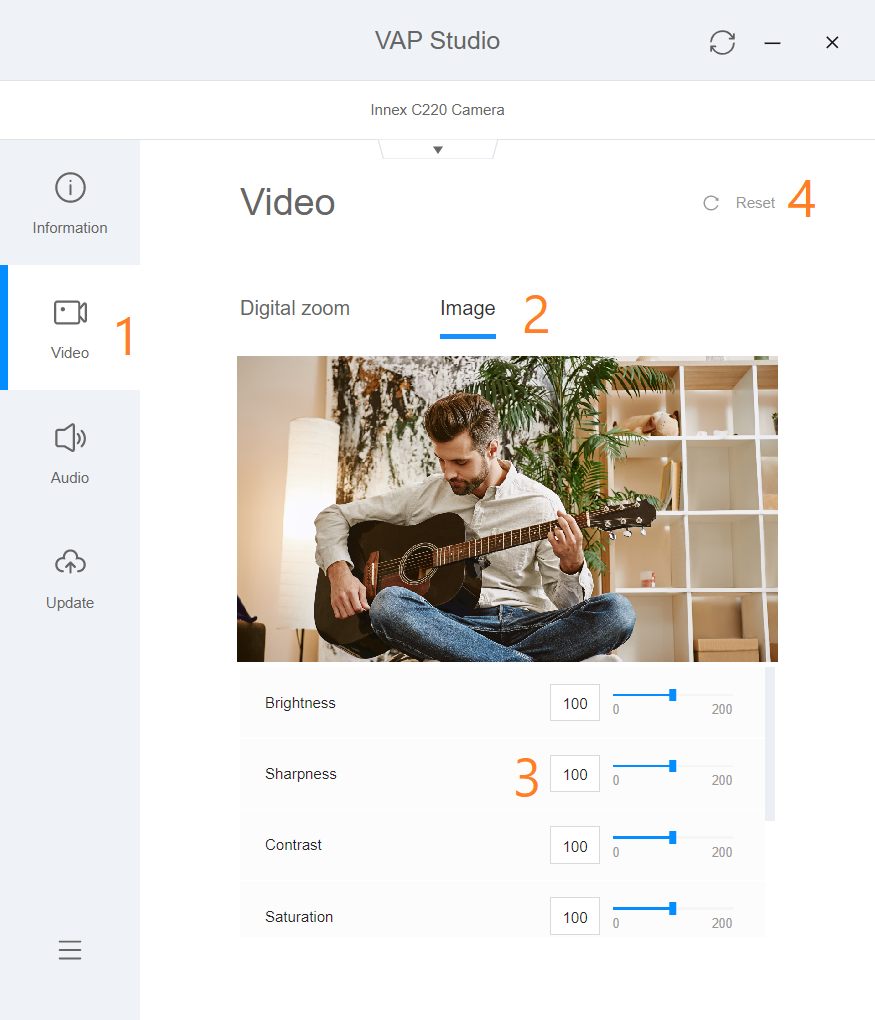
- 設定内容はカメラ本体に記憶され、パソコンとの接続を解除しても保持されます。
使用環境に合わせて視野角(FOV)の調整や、投影場所(ROI)の調整を行いたい場合、ソフトウェアInnex Camera(VAP Studio)をダウンロードして使用します。本ソフトウェアは次のリンクより使用可能です。https://funtechinnovation.com/ja/downloads/
この機能はC470のみ使用可能です。
- カメラをパソコンに接続します。
- アイコンをダブルクリックしてVAP Studioを起動します。
- 次の操作を行い、オートフレーム機能をオフにします。:「Video」タブ(1)をクリック、「Auto Framing」タブ(2)をクリック「Auto Framing」のラジオスイッチを左にスライドさせてオフにする。
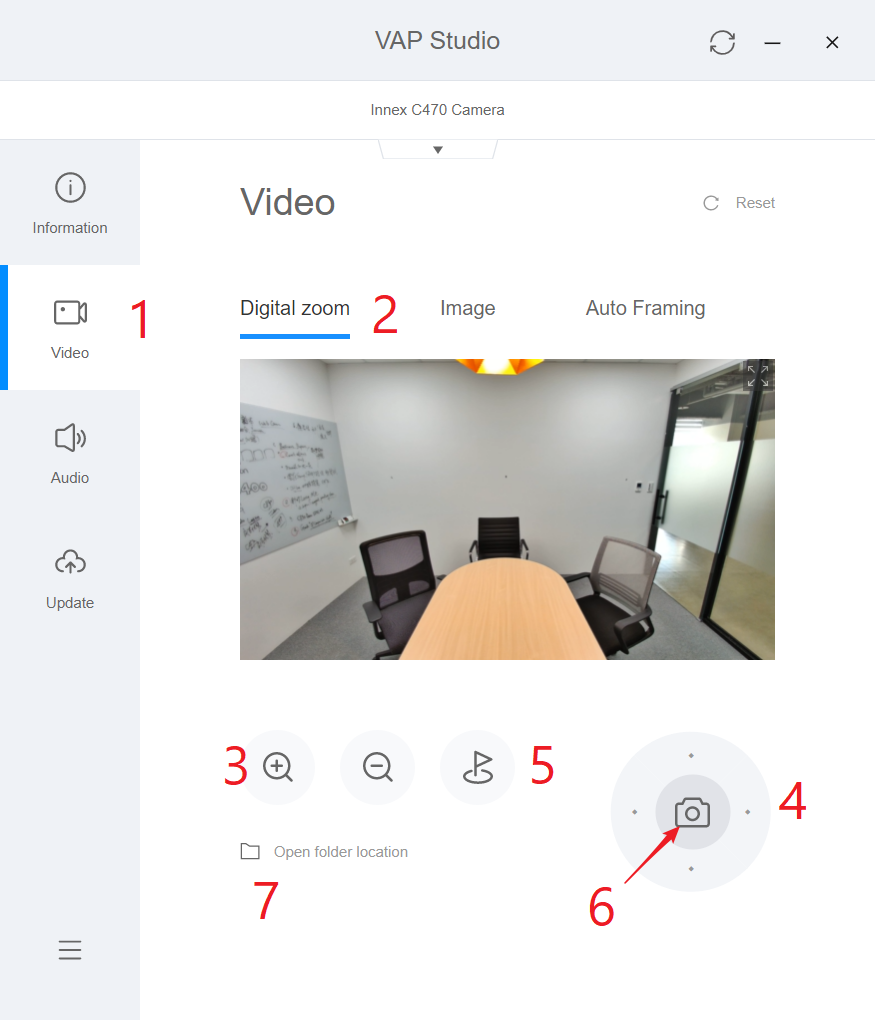
- EPTZを調整します。:「Video」(1)タブ内の「Digital zoom」をクリックし、(3)のプラス/マイナスボタンを使用して、ズームの調整、(4)の方向キーを使用してパンとチルトの調整を行います。「Reset」(5)を押すと画質設定が初期設定状態に戻ります。(6)のカメラアイコンを押すと、写真を撮影することが出来、現在のFOVおよびROIの確認を行うことが出来ます。(7)からフォルダーを開いて写真を確認することが出来ます。
- 再起動後にカメラが変更された設定を保存します。再度設定を行う必要はありません。
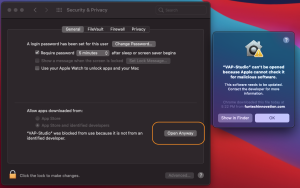
APP Store以外からダウンロードしたソフトウェアをMacがブロックする可能性があります。次のステップでソフトウェアのインストールを行なってください。
1. Macのシステム環境設定を開き、「セキュリティとプライバシー」をクリックします。
2. 「一般」(1)のタブをクリックし、(2)の鍵のアイコンをクリックします。ロック解除後に(3)のAPP Storeと確認済みの開発元からのアプリケーションを許可を選択します。
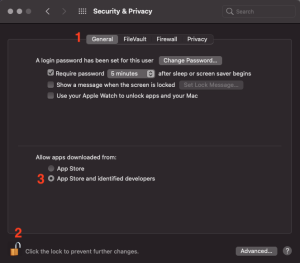
3. VAP Studioをインストールします。
以下の手順で設定を行ってください。
- Windowsのスタートボタンを押し、アプリのリストから自動起動したいアプリを探してください。
- アプリのアイコン上で右クリックをし、詳細>「ファイルの場所を開く」をクリックし、アプリのショートカットがあるフォルダーを表示します。
- フォルダーが表示されている状態でキーボードのWindowsロゴとRを同時に押し、「ファイル名を指定して実行」に「shell:startup」を入力して、OKを押すと「スタートアップ」フォルダが表示されます。
- アプリのショートカットをコピーして「スタートアップ」フォルダに貼り付けます。
- Windowsの設定からアプリ>スタートアップを開きます。
- アプリのトグルスイッチをオンにします。
- パソコンを再起動して、自動的にアプリが起動するか確認してください。
Innex DS200 がお使いのパソコンで認識されない場合は、次の手順をお試しください:
1. システムの互換性を確認してください。ご使用のデバイスとオペレーティングシステムが Innex DS200 をサポートしている必要があります。
対応 OS:
・Microsoft Windows 10、11
・MacOS 11 以降
2. パソコンの別の USB ポートに接続してみてください。
3. USB ポートからの電源供給が不十分な場合は、付属の電源アダプターを Innex DS200に接続し、電源に差し込んでください。
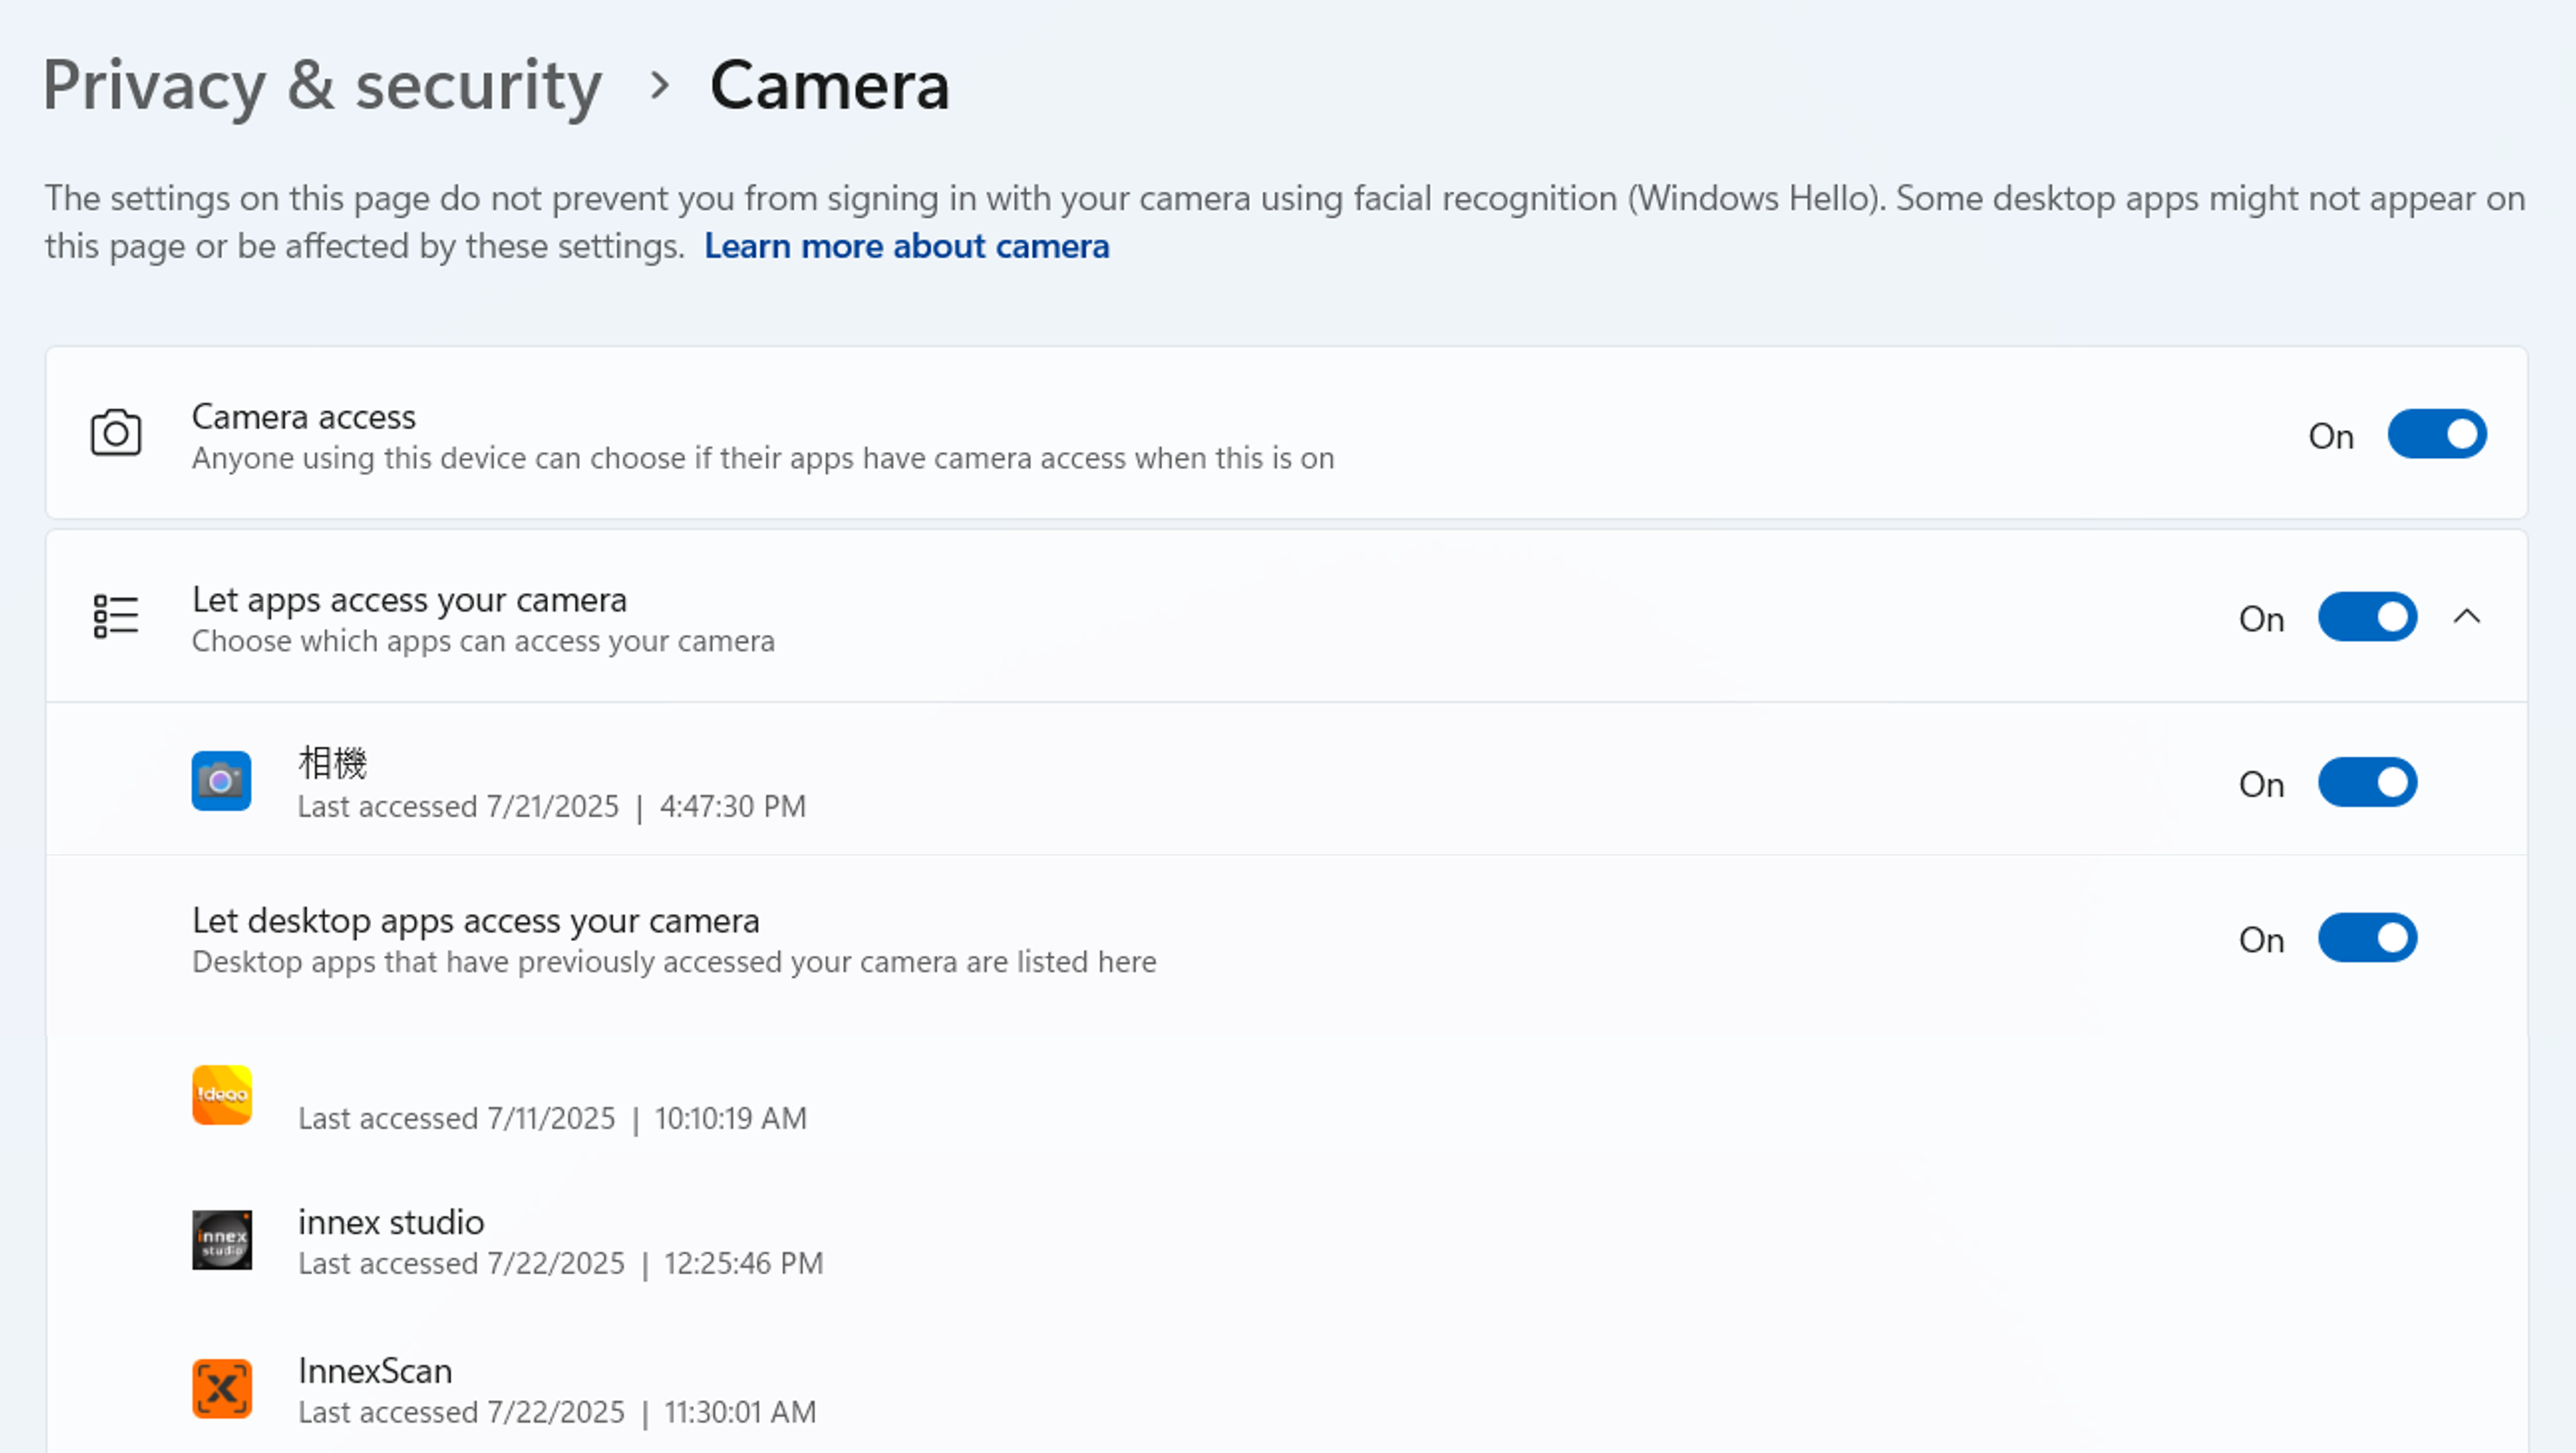
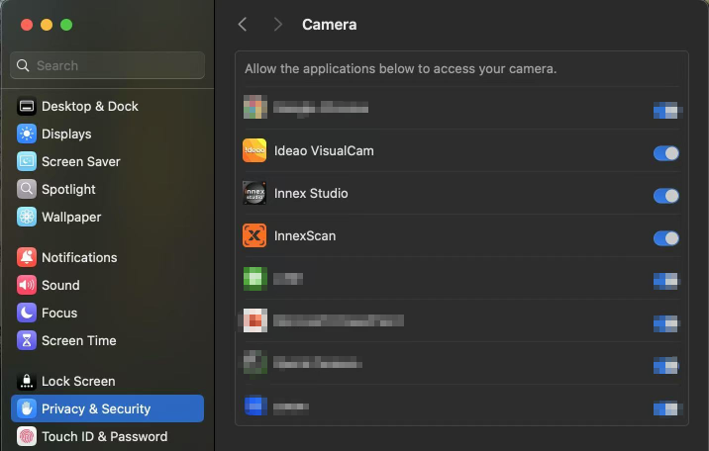
4. 「プライバシーとセキュリティ」設定で、アプリがカメラとマイクにアクセスできるように許可されていることを確認してください。
5. ウイルス対策ソフトが InnexScan をブロックしていないか確認してください。ウイルス対策ソフトのアプリ管理設定で、InnexScan が実行できるように許可する必要があります。以下に例を示します。
Avast: https://support.avast.com/en-ph/article/Use-Antivirus-blocked-allowed-apps
Kaspersky: https://support.kaspersky.com/KART/3.0/en-US/130083.htm”
6. 使用したいアプリ以外でカメラを使用しているソフトがないか確認してください。カメラを使用している可能性のある他のソフトウェアを終了させてください。
例:Zoom でカメラを開こうとすると、InnexScan がまだ使用中であるためにZoomにて映像が表示されません。
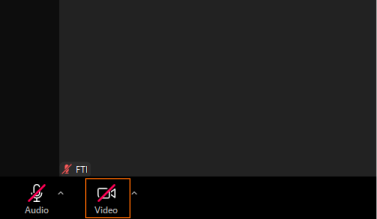
ビデオ会議ソフトを使用中にカメラ映像が表示されない場合は、カメラがミュートされていないか確認してください。通常、ビデオアイコンは画面左下にあり、ミュートされている場合は赤い斜線が入っています。アイコンをタップするとミュートが解除されます。”
7. 複数のカメラがデバイスに接続されていて、他のカメラ映像が表示される場合は、以下の操作を行ってください。
InnexScan の場合:
・画面左下の「デバイス」をクリックし、DS200 を選択してください。
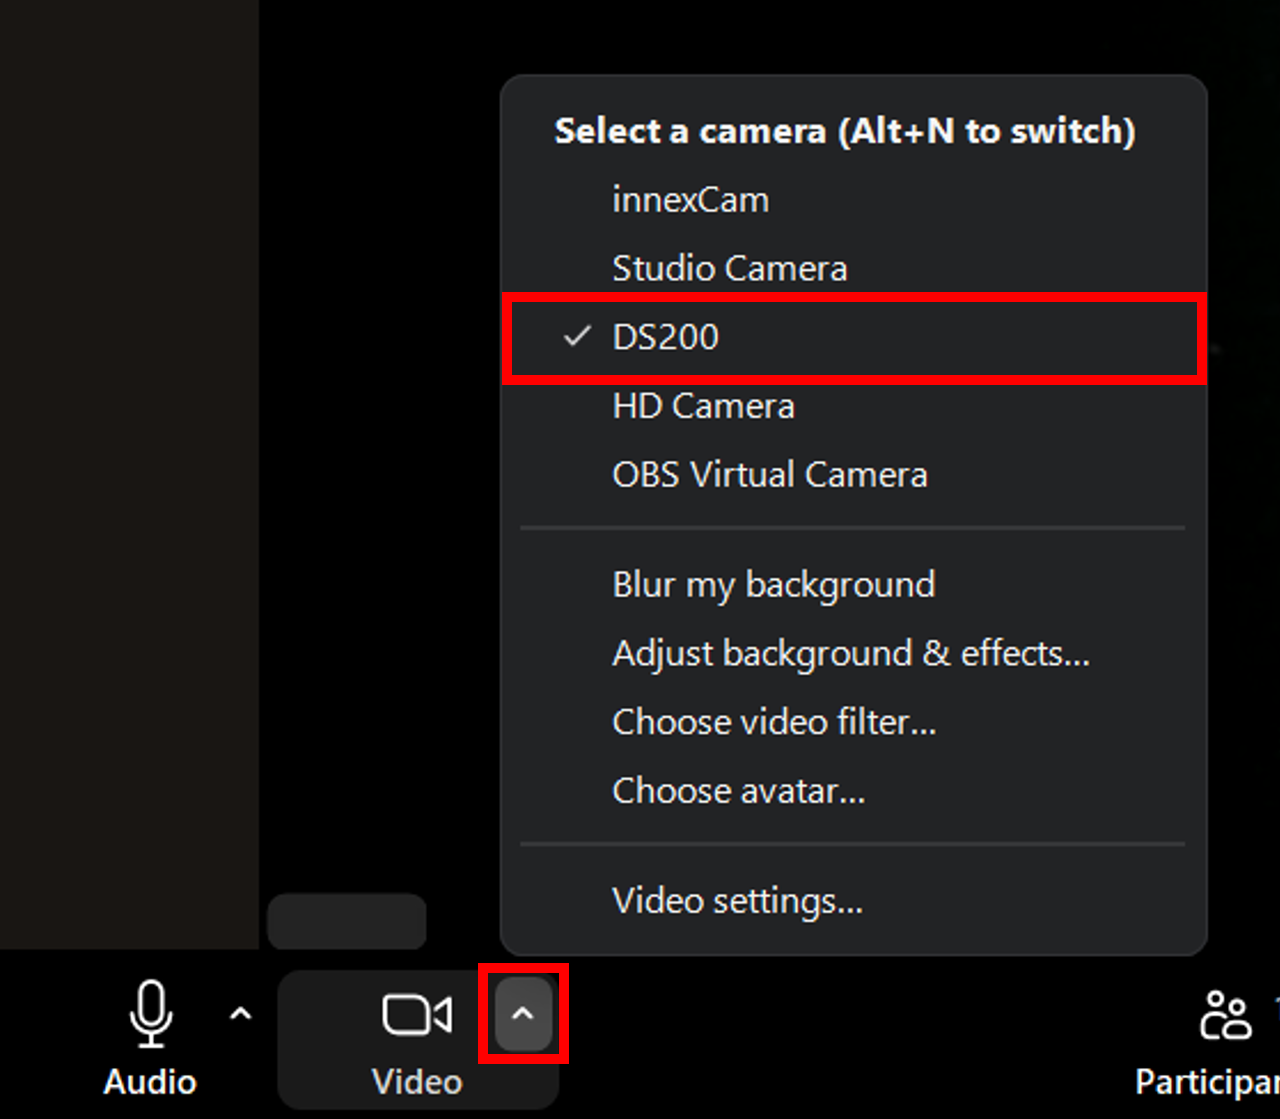
ビデオ会議ソフトの場合:
・ビデオアイコンの横にある「▲」をクリックすると、カメラの一覧が表示されます。(通常は画面左下にあります。)
・DS200 を選択してください。
8. 上記の手順で問題が解決しない場合は、次の方法をお試しください。
・ソフトウェアを起動する前に Innex DS200 を接続する。
・別の同等のケーブルを使って Innex DS200 を接続し、認識されるか確認する。
・別のパソコンに接続し、Innex DS200 が認識されるか確認する。
・解決しない場合はサポートへお問い合わせください。
1. ドキュメントモードで 「複数ページ」オプション が選択されていることを確認します。
2. 各ページを順にスキャンすると、スキャンが終わるごとにプレビューパネルに新しいサムネイルが表示されます。
3. すべてのページをスキャンし終えたら 「出力」 をクリックしてください。ファイルは出力フォルダパネルに保存されます。
InnexScan の 「本」モード を使用すると、本の表紙と裏表紙を簡単に取り込むことができます。以下の手順に従ってください。
1. InnexScan で本モードを選択します。
2. 表紙をスキャンします。
・プレビューパネルのサムネイルで「表紙」をクリックして選択します。
・本の表紙を配置し、「スキャン」をクリックします。
・表紙が取り込まれ、プレビューに表示されます。
3. 裏表紙をスキャンします。
・プレビューパネルのサムネイルで「裏表紙」をクリックして選択します。
・本の裏表紙を配置し、「スキャン」をクリックします。
・裏表紙が取り込まれ、プレビューに追加されます。
ファイルを出力します。
・表紙・裏表紙と本文ページをすべてスキャンし終えたら、「出力」をクリックして保存してください。保存されるファイルには、表紙・裏表紙とスキャンした内容が含まれます。
注意:表紙または裏表紙を選択している間、一部のツールバー設定は一時的に無効になる場合があります。
2台目のカメラ映像をスキャンに表示させるには、以下を確認してください。:
設定 > サブカメラ に進み、「合成する)」を選択し、2台目カメラ映像の表示位置を指定します。
Windows の場合:
文書モードを選択し、スキャンオプションを「単一ページ」に設定してください。
Mac の場合:
サポートされるのは IDカードモードとビデオモードです。
IDカードモードを使用する場合は、トリミングを「自動シングル」に設定してください。
バーコードをスキャンし、対応する JPG 画像とともに Excel ファイルに結果を出力するには、以下の手順に従ってください。
1. InnexScan を起動し、「バーコード」タブに移動します。
2. 出力ファイル形式で「Excel+JPG」を選択し、その他の設定をお好みに合わせて調整します。
3. 「スキャン」ボタンをクリックすると、ソフトウェアが設定に従って各バーコードを処理します。
4. スキャン後:
・各バーコードは、出力フォルダーに個別の JPG 画像として保存されます。
・スキャンしたバーコードの一覧表、および、それぞれの画像へリンクが含まれたExcel ファイルが生成されます。
指消し補正機能の手順
1. InnexScanで「指消し補正」オプションが選択されていることを確認します。
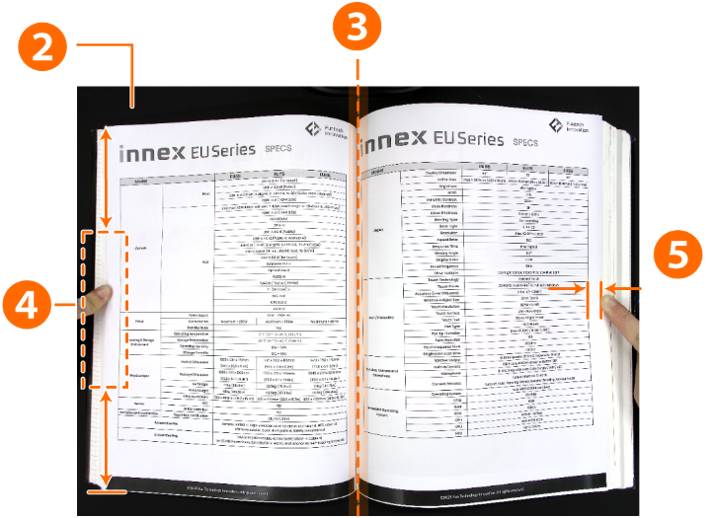
2. 表面を上にして本をスキャンマットの上に置きます。
3. 本の中央が画面上の縦のオレンジ線と揃っていることを確認します。
4. ページをしっかり押さえるために、指を開いた本の縁の中央部分に置きます。
5. 指と文字や画像の間を最低10 mm以上離すようにしてください。
注意: 指が文字や画像に近すぎると、ソフトウェアが正確に検出・除去できない場合があります。
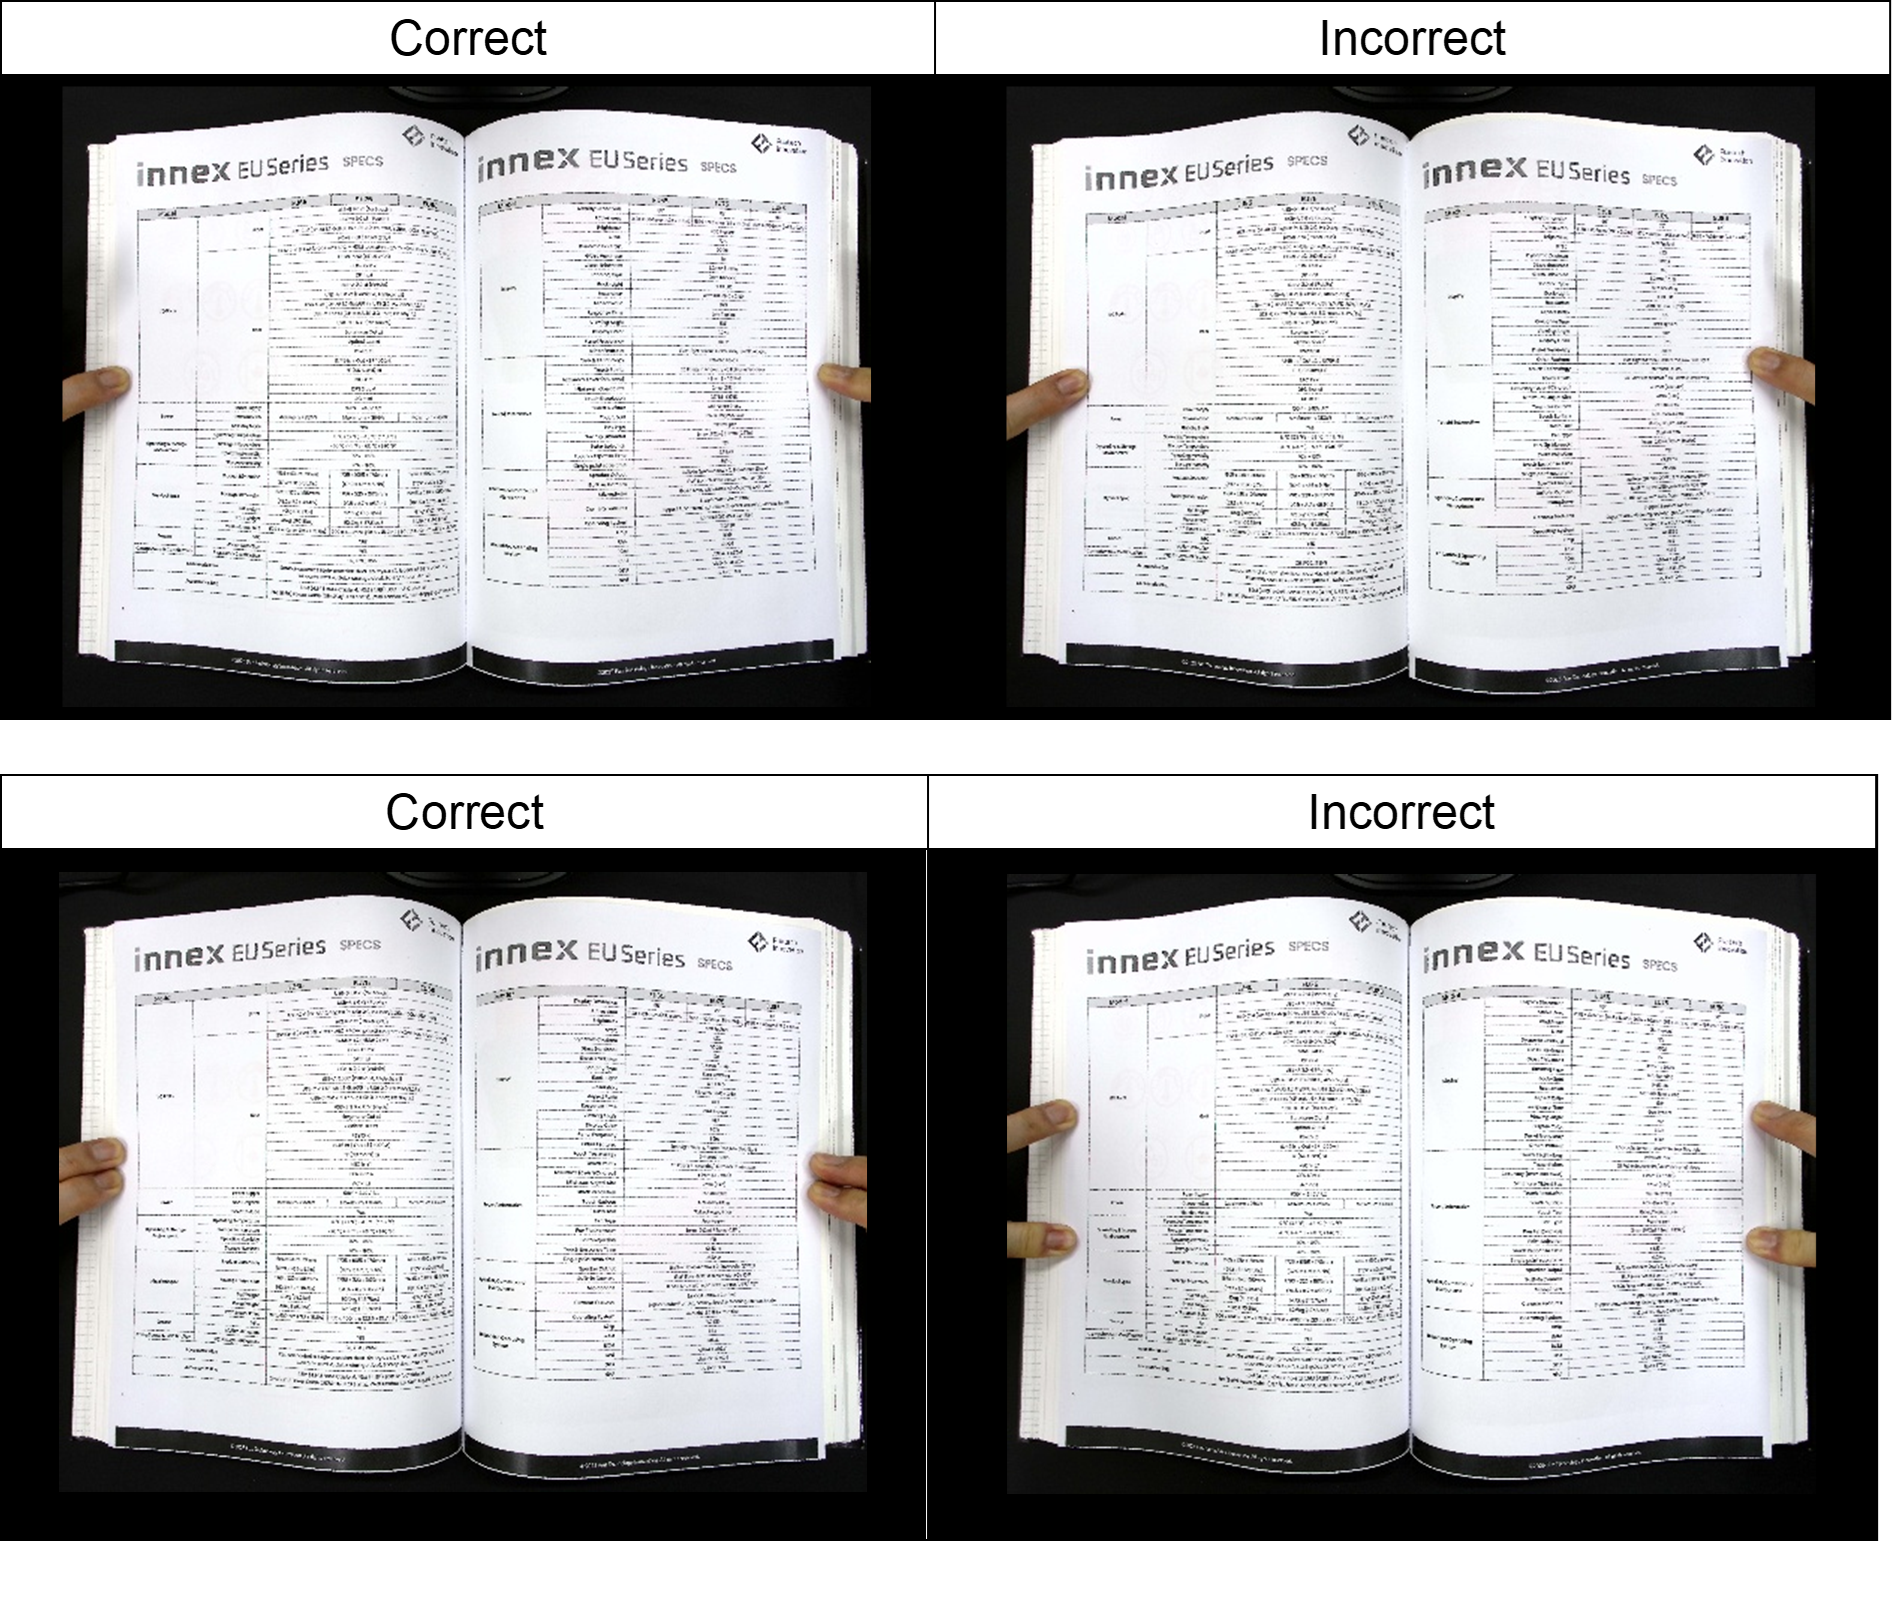
指消し補正機能使用時の指の位置に関して
1. 指はまっすぐにし、開いた本の縁の中央に沿って置きます。
2. ページの上端や下端付近には指を置かないでください。
3. 複数の指を使用する場合は、中央の縁に近づけてまとめて置きます。指を広げると検出精度に影響する可能性があります。
指消し補正機能に関するコツ
1. 本の周囲に黒い余白を確保してください。
スキャン時に本の周囲に黒い部分が見えるようにします。これにより、ソフトウェアが本の縁と指を区別しやすくなります。
2. 上下の縁を対称に保ってください。
本の上端と下端を水平かつ対称に保つことで、指検出の精度が向上します。
3. 十分な余白を確保してください。
指は空白の余白部分に置き、文字や画像などのコンテンツから少なくとも10 mm離してください。コンテンツに重なると正しく除去できない場合があります。
4. カラーの図やイラストのあるページは避けてください。
指隠し機能は、カラーの図や複雑なイラストがあるページでは指を検出しにくくなります。最適な性能を得るには、文字中心または白黒ページで使用することを推奨します。
「本」モードがInnexScanの画面にない場合は、以下の手順を試してください。
1. 外部シャッターボタンの接続を確認してください。
本モードは、ソフトウェアが外部ハンドボタンまたはフットペダルの接続を検出した場合にのみ有効になります。
2. ソフトウェアを再起動してください。
それでも本モードが表示されない場合は、InnexScanを再起動してインターフェースを更新してください。
サポートされている形式は以下の通りです:
画像ファイル: BMP、JPG、PNG、TIFF
PDFファイル: PDF(画像)、PDF(検索可能)、PDF(テキスト)
ドキュメントファイル: テキスト、Word、Excel、EPUB
音声ファイル(テキスト読み上げ): MP3、WAV
※Windows版のみ利用可能
動画ファイル: AVI(Windows)、MP4、QuickTime Movie(MacOS)
注意: 選択したスキャンモードによって、利用可能な出力形式は異なります。
1. ソフトウェア左下の 「デバイス」 をクリックします。
2. リストから使用したいデバイスを選択します。
注意: InnexScanはInnex DS200専用に設計されています。サードパーティ製デバイスやサポートされていないハードウェアでは、正常に動作しない場合があります。
Innex DS200には、正確な書類配置をサポートする クラス2レーザーガイド が搭載されています。
安全のため、直接レーザーや反射光を見ないでください。 見ると目に傷害を与える可能性があります。
スキャンした文書を PDF(テキスト)、PDF(検索可能)、または Word などの形式でエクスポートする場合は、スキャン前に「OCR言語」にて文書の内容に合った言語を選択してください。
下記を順にご確認ください。
・本製品がお使いのデバイスおよびOSに対応しているかご確認ください。対応しているOSは下記の通りです。
<DC500>
Windows 11/10
macOS 10.10以降
Chrome OS
iPadOS 17以降 (USB Type Cポートを搭載したiPad)
<Ideao VisualCam>
Windows 11/10
macOS 10.15以降
<IdeaoCam (Chrome拡張機能)>
Windows/macOS/Chrome OS
・製品に同梱のケーブルまたは同等のケーブルを使用してデバイスに接続しているかご確認ください。極端に長いケーブルや認証のないケーブルなどを使用してデバイスに接続するとDC500が認識されない可能性があります。
・カメラが他のデバイスと一緒にUSBハブ経由で接続されていないことを確認してください。他のデバイスが接続されていると電力が不足し、DC500が認識されない可能性があります。他のデバイスを取り外すか、DC500を直接お使いのデバイスに接続して、認識されるか確認してください。
・他のUSBポートに接続して認識されるか試してください。
・ケーブルが破損していることが原因の場合もあります。同等のケーブルがある場合は、そちらで接続してDC500が認識されるか確認してみてください。
・複数のケーブルを試してもDC500が認識されない場合は、別のデバイスをお持ちの場合、それらデバイスに接続して認識されるか確認してください。
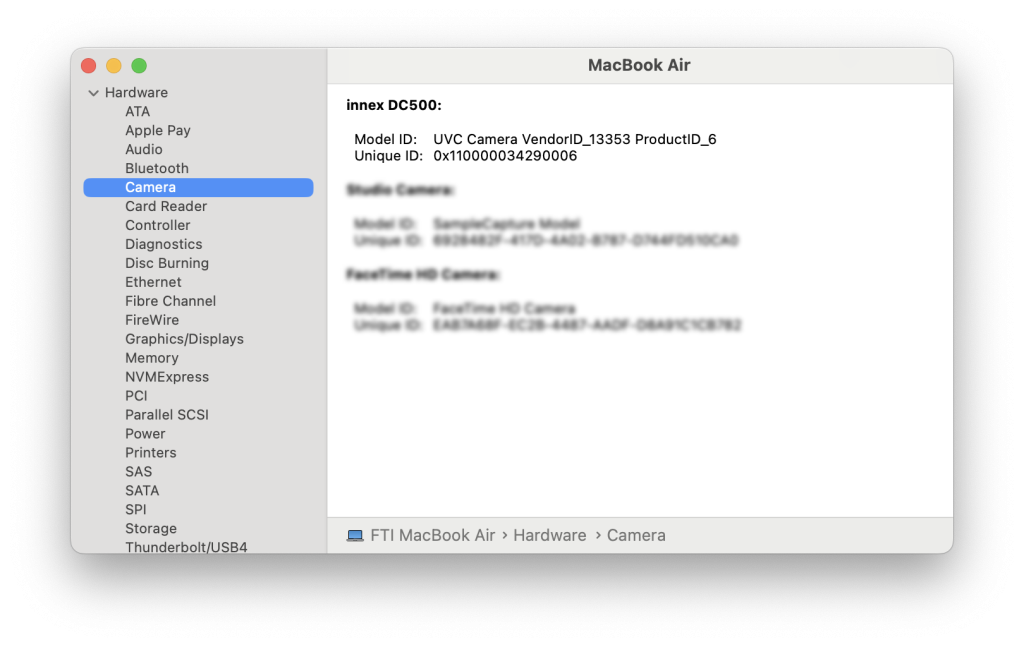
・Windowsでデバイスマネージャーを開くか、Macでシステムレポートを開いて、DC500がカメラとして認識されているか確認してください。Chrome OSを使用しているデバイスでは、設定を開き、「デバイス」または「Bluetooth」を選択して、DC500がリストに表示されるか確認します。これまでの上記の手順をすべて試してもデバイスがDC500を認識しない場合は、 サポートまでお問い合わせください

 デバイスがカメラを認識しているが、画像を取得できない場合は、「デバイスがカメラを認識しているが、DC500からの画像を一部のソフトウェアで取得できない」という項目を参照してください。
下記を順にご確認ください。
・プライバシーとセキュリティの設定で、デバイスがアプリにカメラとマイクへのアクセスを許可していることを確認してください。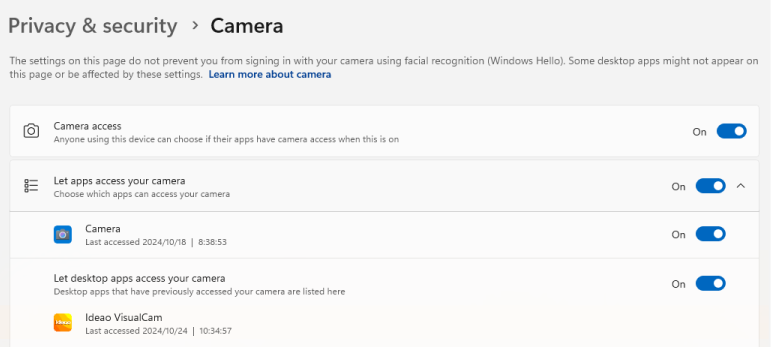
 ・ウイルス対策ソフトウェアがIdeao VisualCamをブロックしていないことを確認してください。ウイルス対策ソフトウェアのアプリの管理設定にてIdeao VisualCamがデバイスで実行できるように許可してください。以下はその例です。
Avast: https://support.avast.com/en-ph/article/Use-Antivirus-blocked-allowed-apps
Kaspersky: https://support.kaspersky.com/KART/3.0/en-US/130083.htm
・テレビ会議時に、カメラの名称が表示されているにも関わらず、カメラからの映像が表示されない場合、カメラが同時に例えば、Ideao VisualCam他のテレビ会議ソフトウェア、カメラ設定ツール、OBSなどのストリーミングソフトウェアなどの他のソフトウェアに使用されている可能性があります。カメラを使用している可能性のあるソフトウェアを閉じてください。例えば、バックエンドでIdeao VisualCamがカメラを使用しているため、Zoomで使用できないなどといったことが発生することがあります。
・ビデオ会議ソフトウェアを使用していてカメラから画像が取得できない場合、カメラがミュートになっていないか確認してください。通常、ビデオアイコンは画面の左下隅にあり、ミュートになっている場合はアイコンに赤い線が引かれています。アイコンをタップしてカメラのミュートを解除してください。
複数のカメラがデバイスに接続されており、アプリに別のカメラの画像が表示されている場合は、以下の操作を行ってください:
Ideao VisualCamの場合:
・画面の左上隅にあるメニューアイコン(横に三本線がある円形のアイコン)をクリックします。
・メニューから「デバイス」をクリックします。
・Innex DC500を選択します。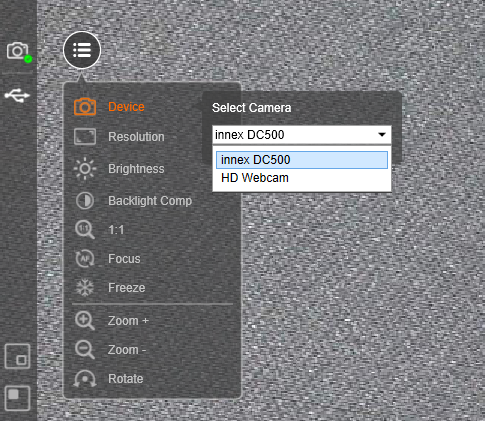 ビデオ会議ソフトウェアの場合:
・ビデオアイコンの隣にある「^」アイコンをクリックします(通常、このアイコンは画面の左下隅にあります)と、カメラのリストが表示されます。
・Innex DC500を選択します。
下記を順にご確認ください。
・『プライバシーとセキュリティ』の設定に移動し、次に『マイク』をクリックして、お使いのアプリがマイクへのアクセスを許可されていることを確認してください。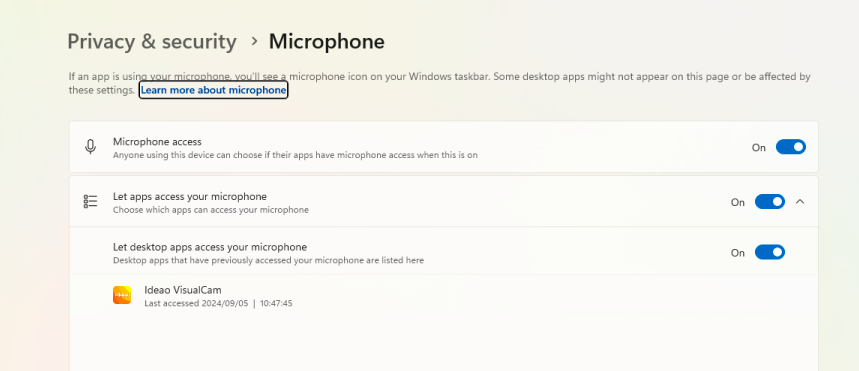
 ・ビデオ会議ソフトウェアを使用している場合、映像ソースと音声ソースは別々に選択されます。したがって、動画がInnex DC500に切り替わっても、DC500がマイクとしても選択されているとは限りません。「オーディオ」アイコンの隣にある「^」アイコンをクリックし、Innex DC500がマイクとして選択されているかご確認ください。
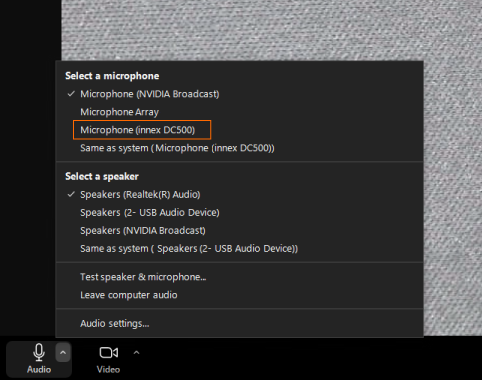 Windows/Macのサウンド入力設定またはビデオ会議のマイク設定でマイクのボリュームがゼロになっていない、または著しく小さくなっていないかご確認ください。
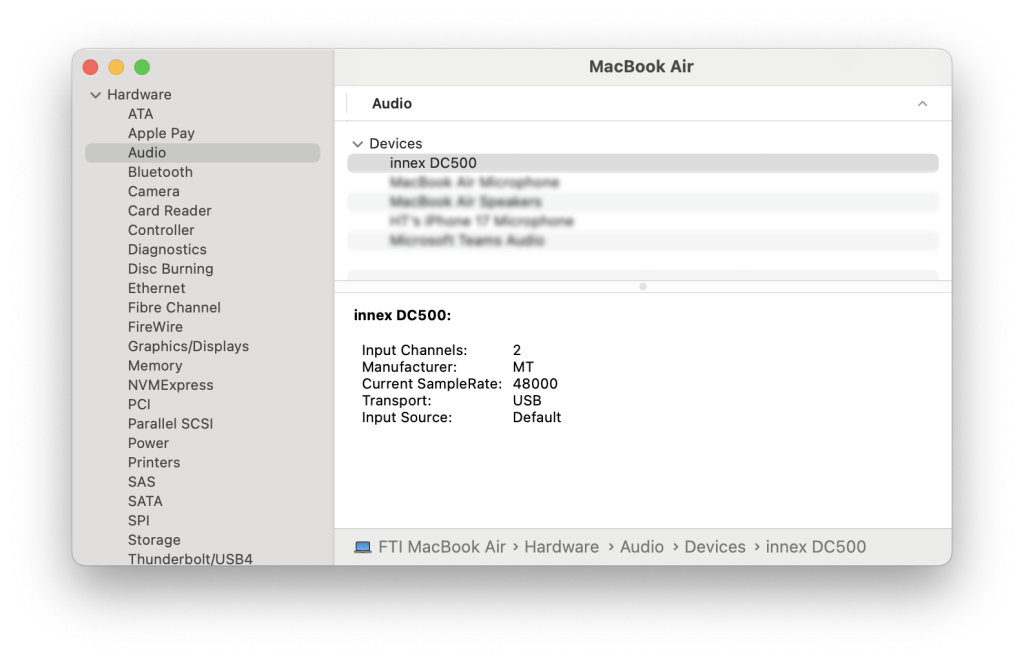
・Windowsでデバイスマネージャーを開くか、Macでシステムレポートを開いて、DC500がUSBオーディオデバイスとして認識されているか確認してください。Chrome OSを使用しているデバイスでは、設定を開き、「デバイス」または「Bluetooth」を選択して、DC500がリストに表示されるか確認します。上記の手順をすべて試してもデバイスがDC500を認識しない場合は、 サポートまでお問い合わせください 。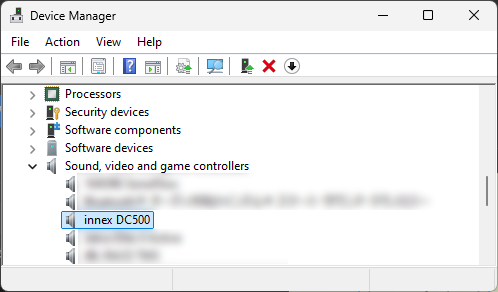
iPadでの使用に際して下記の点をご留意ください。
1. 全てのiPadが外付けカメラに対応しているわけではございません。USB Type Cのポートを搭載したiPadのみ対応しております。
2. バージョン17以上のiPadOSが搭載されている必要があります。
3. 全てのアプリケーションが外付けカメラに対応しているわけではございません。
4. パソコンやMacでの使用と比較して、同等のユーザー体験が得られない可能性がございます。
5. 解像度やフレームレートはiPadおよびご使用のソフトウェアに依存します。
6. アプリによってはカメラを切り替える機能がない場合があります。カメラが接続されている場合、画像ソースが自動的に外付けカメラに切り替わる場合があります。内蔵カメラに戻すには、カメラを物理的に切断する必要がある場合があります。
7. 外付けカメラからの入力をサポートしていないビデオ会議アプリの場合は、サードパーティ アプリを使用してカメラ画像を表示し、ビデオ会議アプリで画面を共有する必要がある場合があります。
下記を順にご確認ください。
・レンズのプラスチックカバーがついたままになっていませんか?
・対象物からDC500のレンズが10cm以上離れていますか?対象物との距離が10㎝以下の場合、正しくピントが合いません。
・AF(オートフォーカス)ボタンを押して再度フォーカスの調整を行なってみてください。(チュートリアルを見る)
画像の明るさは背景の色に影響されます。例えば、背景が暗く、撮影している対象が明るい場合、DC500は支配的な背景色に基づいてホワイトバランスを調整する傾向があります。その結果、画像が明るく見えることがあります。Ideao VisualCamをご使用の場合、『バックライト』アイコンをクリックし、スライダーを使用してホワイトバランスを調整できます。ホワイトバランス調整機能がないソフトウェアの場合は、背景と対象のコントラストが極端でないことを確認してください。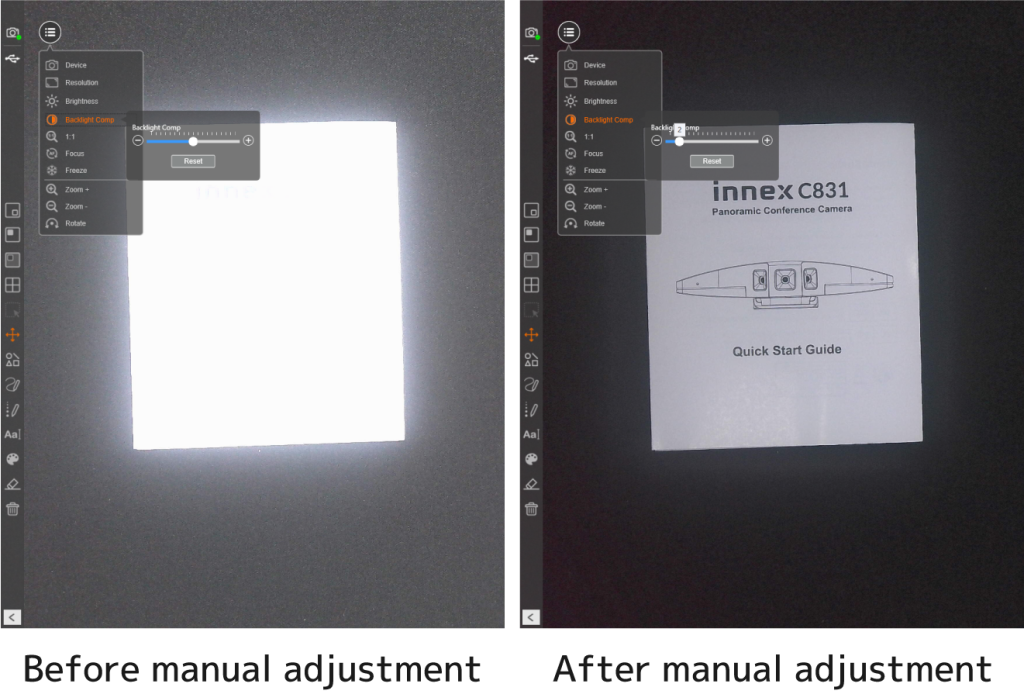
下記を順にご確認ください。
・弊社ソフトウェアであるIdeao VisualCamは4K解像度をサポートしていますが、ビデオ会議ソフトウェアなどでは、使用するデータ量を抑え、ミーティングがスムーズに行えるようにカメラの最大解像度を制限している場合があります。使用しているソフトウェアがサポートしている最大解像度を確認してください。
・ご使用のソフトウェアにより、初期設定が低い解像度に設定されている場合がございます。解像度の設定をご確認ください。 ・デジタルズームを使用すると、元の画像の一部をトリミングしてデジタル的に拡大するため、画像が粗くなります。デジタルズームを使用する代わりに、カメラを対象物に物理的に近づけることをお勧めします。そうすることで、解像度を犠牲にすることなく、画像をクリアに保つことができます。(対象物がフォーカスに保たれるためには、カメラレンズと対象物の間の距離が少なくとも10cm/3.9インチであることを確認してください)
下記を順にご確認ください。
・カメラが強い磁場を発生させるデバイスの近くに置かれていないことを確認してください。
・電源周波数がお使いの地域に一致していることを確認してください。現在の電源周波数を確認または変更するには、Ideao VisualCamを起動し、メニューから「機器の選択」をクリックします。
・DC400/500のアームを最大限に伸ばしてください。
・カメラレンズ部分が紙の中心の真上に来るようにし、カメラレンズが水平になるように配置してください。
・画面左側のメニューボタン(3本の横線のアイコン)を押してください。
・解像度をクリックし、解像度を3840 x 2880に設定してください。
・カメラがA3用紙全体を撮影できていない場合は、カメラの位置を調整してください。
通常、Google MeetやZoom、Microsoft Teams、WebExなどにおいて、投影者が見るプレビュー画面では画面が反転していますが、リモートの参加者が見る映像は反転していません。書画カメラ使用時に反転していない画面を表示するのはいくつかの方法があります。
共通(全てのテレビ会議ソフトウェアに適用することが出来る方法です。)
1. Ideao VisualCamを起動し、Innex DC500カメラからの画像を表示します。
2. ビデオ通話中にDC500を選択しないでください。
3. 「画面を共有」または「今すぐ発表」を選択(使用しているソフトウェアによって異なります)し、Ideao VisualCamの画面を共有します。
Google Meet: (チュートリアル)
1.Google Chromeには、動画をミラーリングするためのいくつかの拡張機能があります。その中でも「VideoMirror」をダウンロードすることをお勧めします。 
2. Google Meetの通話を開始し、Innex DC500カメラを選択してから、拡張機能のアイコンをクリックします。そうすると、映像が反転されます。
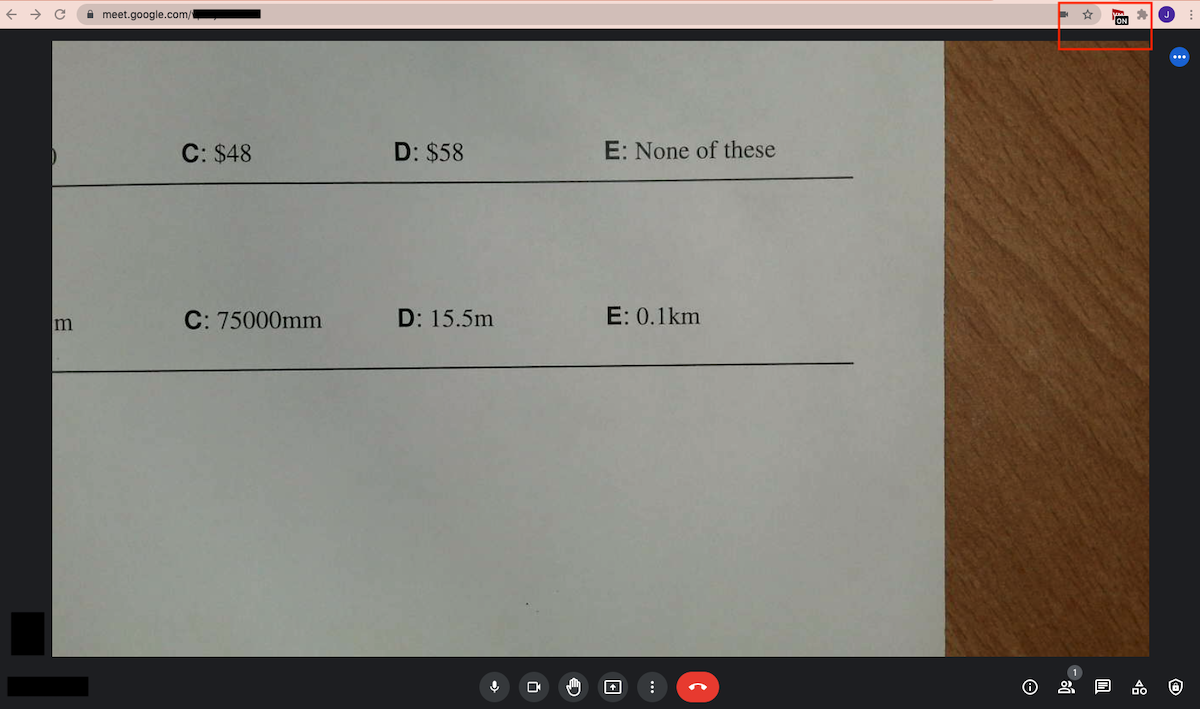
* VideoMirrorはサードパーティのアプリですので、FTIはこのアプリに関するカスタマーサポートを提供していないことにご注意ください。
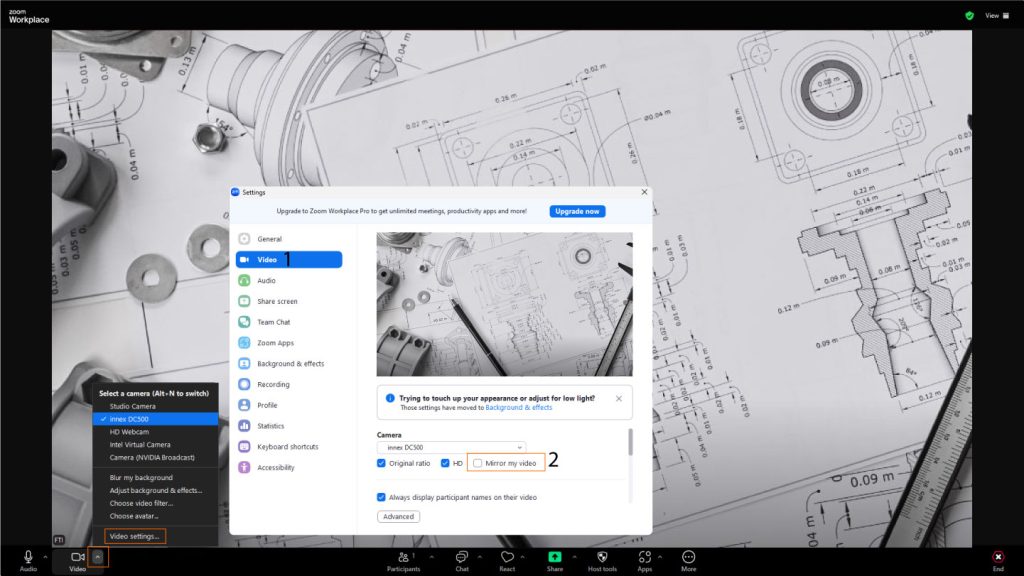
Zoom: (チュートリアル) または他のビデオ会議ソフトウェア
1. Zoomの「ビデオ設定」に移動します。
2. マイビデオをミラーリングのチェックマークを外します。
DC500を含めた複数のカメラからの画像をビデオ会議ソフトウェアで表示する方法はいくつかあります。
Webカメラ + 画面共有:
1. ビデオ会議ソフトウェアで顔を映すためのWebカメラを選択します。
2. Ideao VisualCamを起動し、DC500からの画像を表示します。
3. ビデオ会議ソフトウェアで「共有」をクリックします。
4. ソースとして「Ideao VisualCam」を選択し、「共有」をクリックして共有を開始します。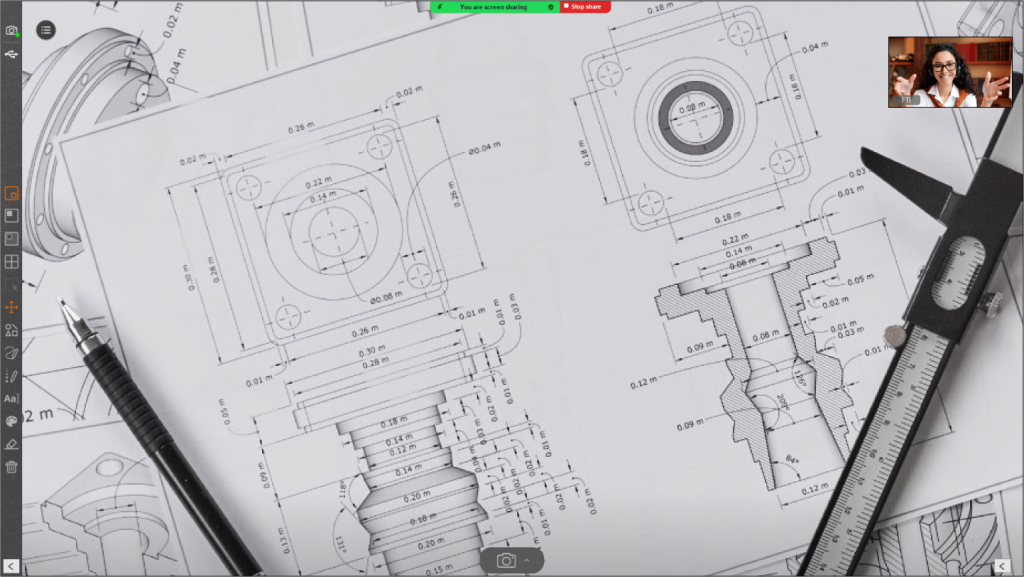
Ideao VisualCamの分割画面モードを使用する
1. ビデオ会議ソフトウェアでカメラをオンにしないでください。
2. Ideao VisualCamを起動し、DC500からの画像を表示します。
3. 画面の左上隅にある「スクリーン画面」をクリックします。
4. 画面の右側の任意の部分をクリックして、「メニュー」アイコンを表示します。
5. メニューアイコンをクリックし、「機器の選択」を選択します。
6.「デバイスを選択」をクリックし、画像を表示したいカメラを選択します。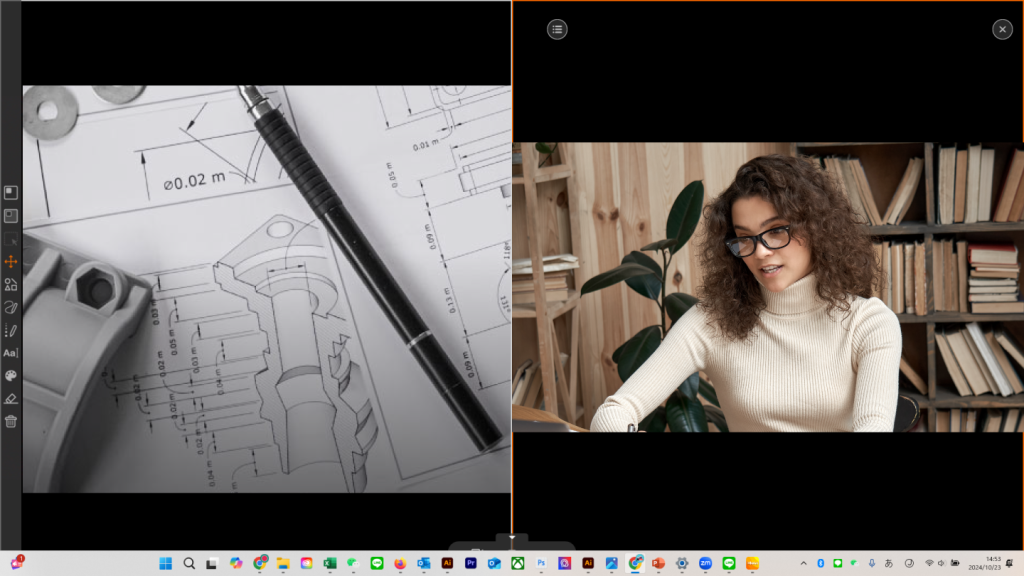
Ideao VisualCamのPIPモードを使用する
1. ビデオ会議ソフトウェアでカメラをオンにしないでください。
2. Ideao VisualCamを起動し、DC500からの画像を表示します。
3. 左側のツールバーにあるPIPアイコンをクリックして、カメラからの画像を表示します。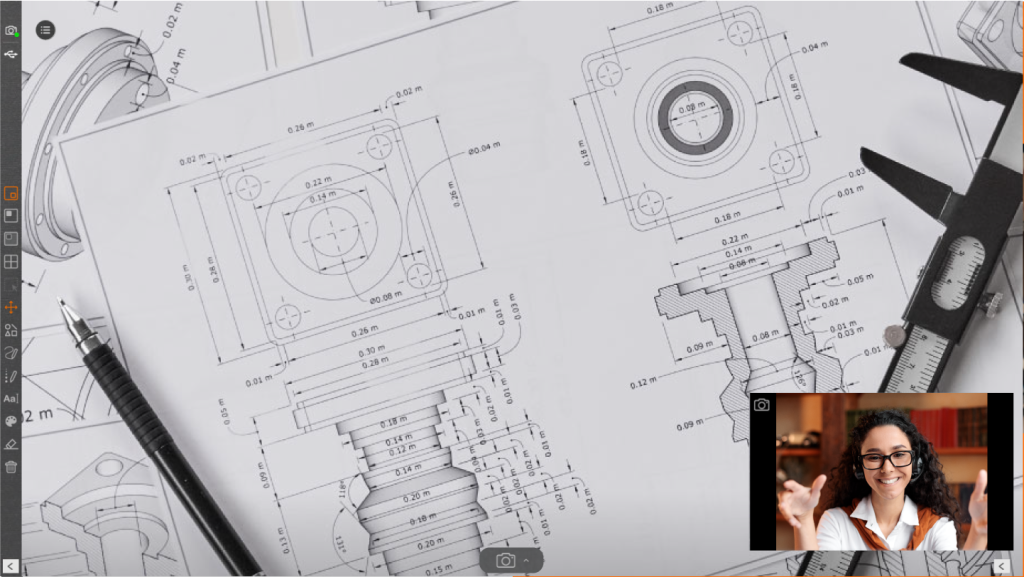
DC500のライブ画像をPowerPointプレゼンテーションに埋め込む
1. プレゼンテーションの内容を作成中に、「挿入タブ」から「レリーフ」を選択します。
2. スタイルを選び、「プレビュー」をクリックして、DC500をカメラソースとして選択します。
3. プレゼンテーションを開始すると、DC500からのライブビューが表示され、ビデオ会議ソフトウェア上でのWebカメラからの入力も同時に行うことができます。
下記を順にご確認ください。
本製品がお使いのデバイスおよびOSに対応しているかご確認ください。対応しているOSは下記の通りです。
<DC400>
Windows 11/10
macOS 10.10以降
Chrome OS<Ideao VisualCam>
Windows 11/10
macOS 10.15以降<IdeaoCam (Chrome拡張機能)>
Windows/macOS/Chrome OS
・製品に同梱のケーブルまたは同等のケーブルを使用してデバイスに接続しているかご確認ください。極端に長いケーブルや認証のないケーブルなどを使用してデバイスに接続するとDC400が認識されない可能性があります。
・カメラが他のデバイスと一緒にUSBハブ経由で接続されていないことを確認してください。他のデバイスが接続されていると電力が不足し、DC400が認識されない可能性があります。他のデバイスを取り外すか、DC400を直接お使いのデバイスに接続して、認識されるか確認してください。
・他のUSBポートに接続して認識されるか試してください。
・ケーブルが破損していることが原因の場合もあります。同等のケーブルがある場合は、そちらで接続してDC400が認識されるか確認してみてください。
・複数のケーブルを試してもDC400が認識されない場合は、別のデバイスをお持ちの場合、それらデバイスに接続して認識されるか確認してください。
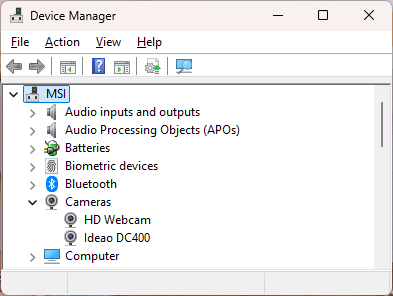
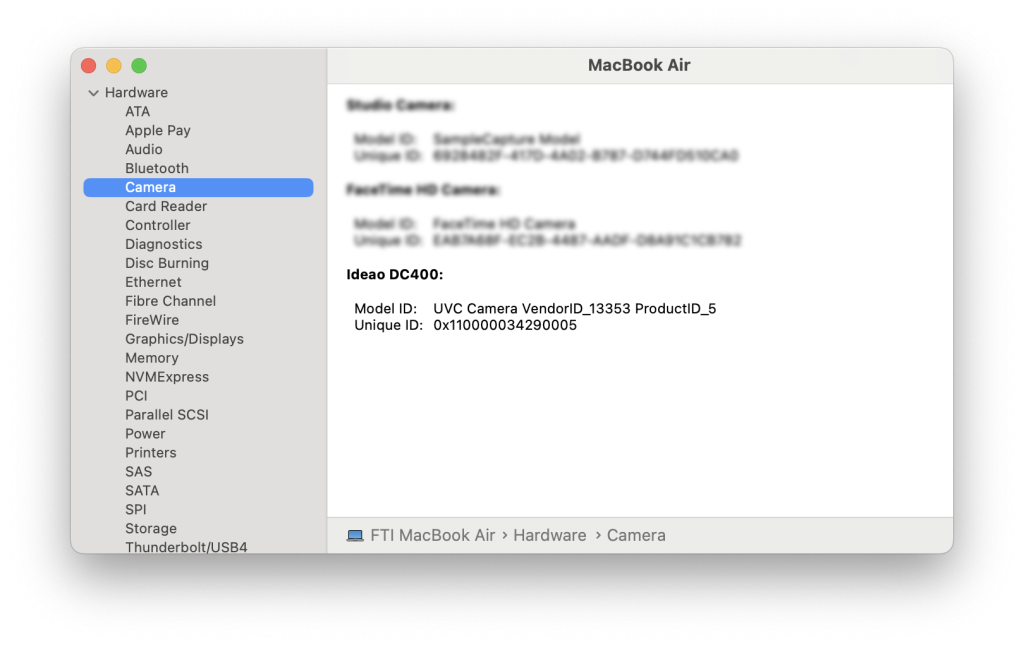
・Windowsでデバイスマネージャーを開くか、Macでシステムレポートを開いて、DC400がカメラとして認識されているか確認してください。Chrome OSを使用しているデバイスでは、設定を開き、「デバイス」または「Bluetooth」を選択して、DC400がリストに表示されるか確認します。これまでの上記の手順をすべて試してもデバイスがDC400を認識しない場合は、サポートまでお問い合わせください。
 デバイスがカメラを認識しているが、画像を取得できない場合は、「デバイスがカメラを認識しているが、DC400からの画像を一部のソフトウェアで取得できない」という項目を参照してください。
下記を順にご確認ください。
・プライバシーとセキュリティの設定で、デバイスがアプリにカメラとマイクへのアクセスを許可していることを確認してください。・ウイルス対策ソフトウェアがIdeao VisualCamをブロックしていないことを確認してください。ウイルス対策ソフトウェアのアプリの管理設定にてIdeao VisualCamがデバイスで実行できるように許可してください。以下はその例です。
Avast: Avastのサポートページ
Kaspersky: Kasperskyのサポートページ
テレビ会議時に、カメラの名称が表示されているにも関わらず、カメラからの映像が表示されない場合、カメラが同時に例えば、Ideao VisualCam他のテレビ会議ソフトウェア、カメラ設定ツール、OBSなどのストリーミングソフトウェアなどの他のソフトウェアに使用されている可能性があります。カメラを使用している可能性のあるソフトウェアを閉じてください。例えば、バックエンドでIdeao VisualCamがカメラを使用しているため、Zoomで使用できないなどといったことが発生することがあります。
ビデオ会議ソフトウェアを使用していてカメラから画像が取得できない場合、カメラがミュートになっていないか確認してください。通常、ビデオアイコンは画面の左下隅にあり、ミュートになっている場合はアイコンに赤い線が引かれています。アイコンをタップしてカメラのミュートを解除してください。
複数のカメラがデバイスに接続されており、アプリに別のカメラの画像が表示されている場合は、以下の操作を行ってください:
Ideao VisualCamの場合:
・画面の左上隅にあるメニューアイコン(横に三本線がある円形のアイコン)をクリックします。
・メニューから「デバイス」をクリックします。
・Ideao DC400を選択します。
 ビデオ会議ソフトウェアの場合:
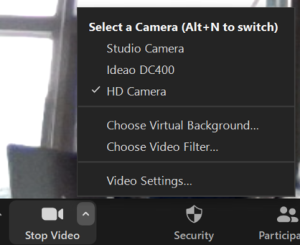
・ビデオアイコンの隣にある「^」アイコンをクリックします(通常、このアイコンは画面の左下隅にあります)と、カメラのリストが表示されます。
・Ideao DC400を選択します。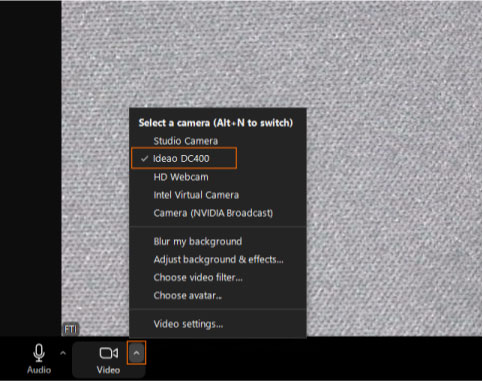
下記を順にご確認ください。
・『プライバシーとセキュリティ』の設定に移動し、次に『マイク』をクリックして、お使いのアプリがマイクへのアクセスを許可されていることを確認してください。・ビデオ会議ソフトウェアを使用している場合、映像ソースと音声ソースは別々に選択されます。したがって、動画がIdeao DC400に切り替わっても、DC400がマイクとしても選択されているとは限りません。「オーディオ」アイコンの隣にある「^」アイコンをクリックし、Ideao DC400がマイクとして選択されているかご確認ください。 Windowsのサウンド入力設定またはビデオ会議のマイク設定でマイクのボリュームがゼロになっていない、または著しく小さくなっていないかご確認ください。
・Windowsでデバイスマネージャーを開くか、Macでシステムレポートを開いて、DC400がUSBオーディオデバイスとして認識されているか確認してください。Chrome OSを使用しているデバイスでは、設定を開き、「デバイス」または「Bluetooth」を選択して、DC400がリストに表示されるか確認します。上記の手順をすべて試してもデバイスがDC400を認識しない場合は サポートまでお問い合わせください 。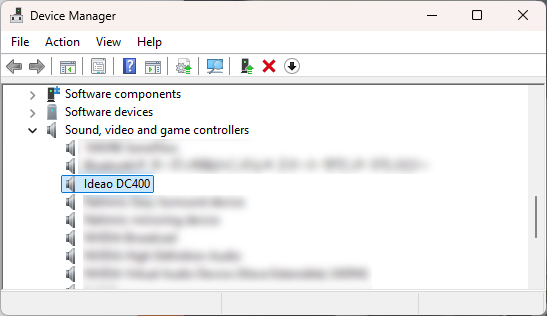

iPadでの使用に際して下記の点をご留意ください。
1. 全てのiPadが外付けカメラに対応しているわけではございません。USB Type Cのポートを搭載したiPadのみ対応しております。
2. バージョン17以上のiPadOSが搭載されている必要があります。
3. 全てのアプリケーションが外付けカメラに対応しているわけではございません。
4. パソコンやMacでの使用と比較して、同等のユーザー体験が得られない可能性がございます。
5. 解像度やフレームレートはiPadおよびご使用のソフトウェアに依存します。
6. アプリによってはカメラを切り替える機能がない場合があります。カメラが接続されている場合、画像ソースが自動的に外付けカメラに切り替わる場合があります。内蔵カメラに戻すには、カメラを物理的に切断する必要がある場合があります。
7. 外付けカメラからの入力をサポートしていないビデオ会議アプリの場合は、サードパーティ アプリを使用してカメラ画像を表示し、ビデオ会議アプリで画面を共有する必要がある場合があります。
下記の項目をご確認ください。
・レンズのプラスチックカバーがついたままになっていませんか?
・対象物からDC400のレンズが10cm以上離れていますか?
・AF(オートフォーカス)ボタンを押して再度フォーカスの調整を行なってみてください。(チュートリアルを見る)
例えば、毎回手などにフォーカスを合わせようとして画面がオートフォーカスを繰り返すのを防ぐために、常にオートフォーカスし続けるのではなく、手動でのトリガーとなっています。
高解像度で画像を映し出すためには、ご使用のパソコンのオペレーションシシテムおよびアプリケーションも高解像度に対応している必要があります。また、4K画質での表示には4K解像度に対応したモニターも必要となります。
ZoomやTeams、Google Meet、Webexなどのテレビ会議用ソフトウェアは現状720Pまでの解像度にのみ対応しております。
- USBケーブルがDC400本体とパソコンに正しく接続されているかご確認ください。
- パソコンのUSBポートを変更してみてください。
- Webカメラからの映像を選択してください。
 2. 「画面の共有」をクリックします。
3. 「詳細」タブをクリックし、「第2カメラのコンテンツ」を選択します。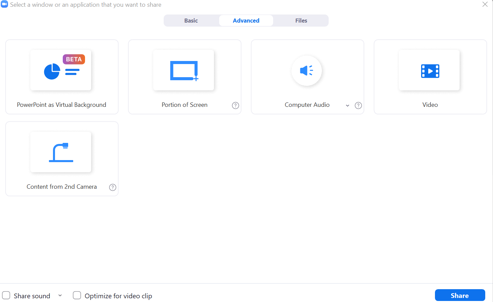 4. 複数のカメラが接続されている場合、「カメラの切り替え」をクリックして映像のソースを切り替えます。
通常、Google MeetやZoom、Microsoft Teams、WebExなどにおいて、投影者が見るプレビュー画面では画面が反転していますが、リモートの参加者が見る映像は反転していません。
書画カメラ使用時に反転していない画面を表示するのはいくつかの方法があります。
共通(全てのテレビ会議ソフトウェアに適用することが出来る方法です。)
1. Ideao VisualCamを次のリンクよりダウンロードします。https://funtechinnovation.com/ja/software/ideao-visualcam/
2. ソフトウェアを起動し、DC400を選択します。
3. テレビ会議時に「画面の共有」(お使いのテレビ会議用ソフトウェアにより名称は異なります。)を行い、Ideao VisualCamの画面を共有します。
4. ソフトウェア上で画面の反転、ミラー、回転、手書き入力などを自由自在に行うことが出来ます。
Google Meet: (チュートリアルを見る)
1. 「VideoMirror」などのGoogle Chromeの拡張機能を使用して映像をミラーリングすることが出来ます。
2. Google Meetでのテレビ会議を開始したらIdeao DC400を選択し、拡張機能のアイコンをクリックすると、画面がミラーリングします。
*VideoMirrorはサードパーティー製のアプリのため、FTIではこのアプリに関するサポートを行なっておりません。
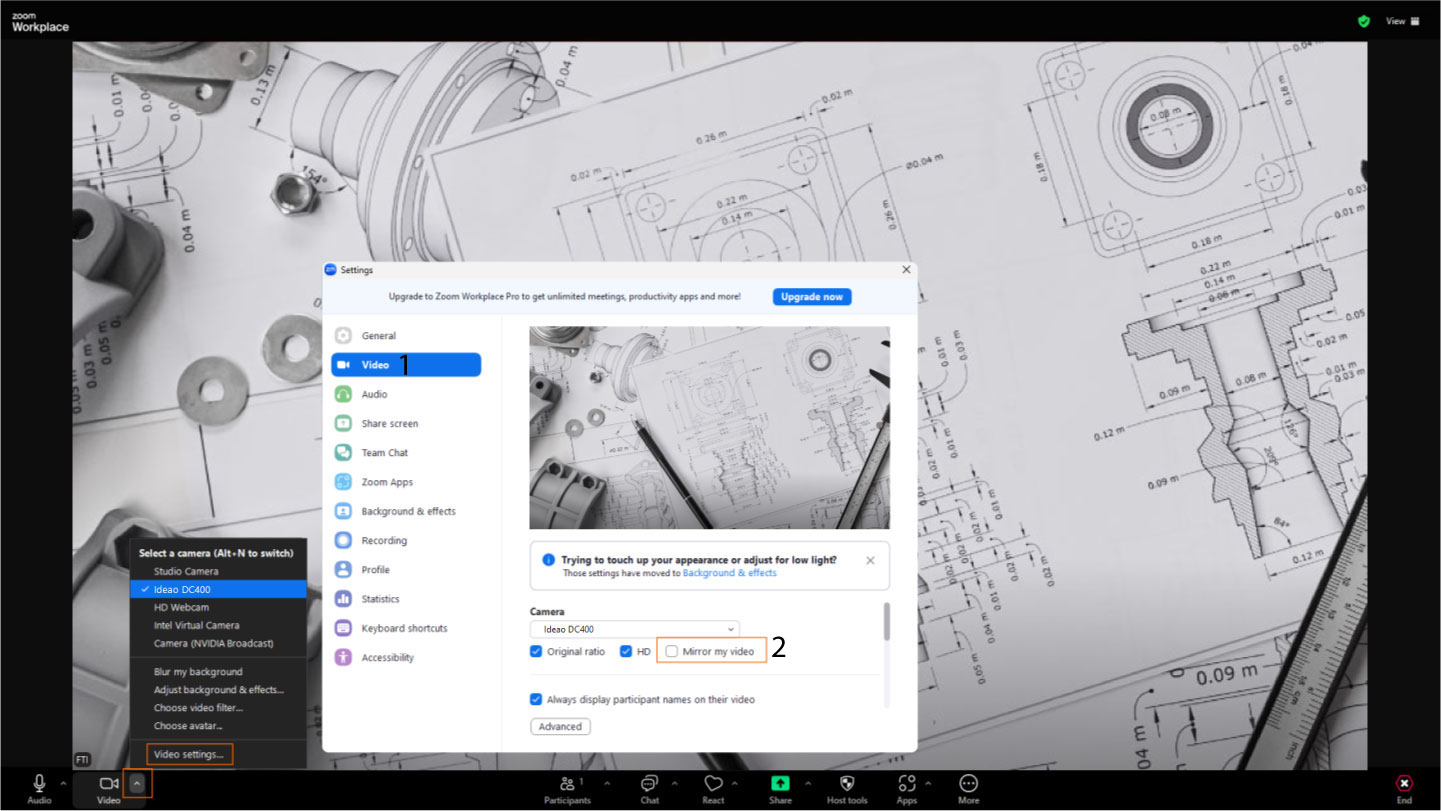
Zoom:(チュートリアルを見る)
1. Zoomの「ビデオ設定」を開きます。
2. 「マイビデオをミラーリングします」にチェックマークを入れます。

ほとんどのテレビ会議ソフトウェアではWebカメラとマイクは別々に選択する必要があります。Ideao DC400がWebカメラとして選択されていても、マイクとして選択されていない可能性があります。例えばZoomでは画面の左下にオーディオに関する設定のためのアイコンがありますので、それをクリックしてIdeao DC400がマイクとして選択されているかご確認ください。
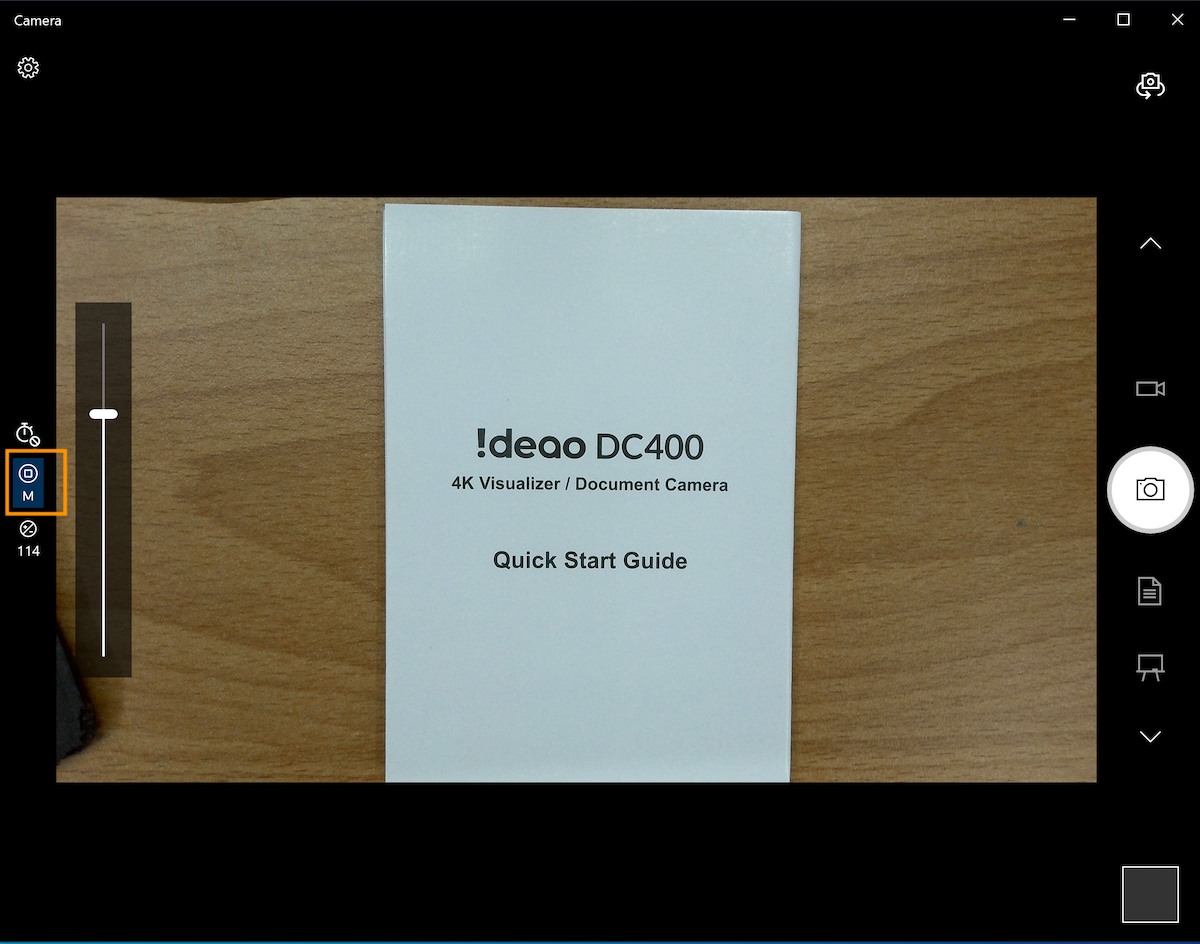
もし、常にオートフォーカスし続けて、それを停止したい場合、3rdパーティー製のアプリを使用した下記の方法で手動でのオートフォーカスに変更することが可能です。
Windows PCの場合:
カメラアプリを使用:Windowsに標準搭載されたカメラアプリを使用してスナップショットの撮影や録画を行なっている場合、以下の手順で手動フォーカスに切り替えることが可能です。
1. カメラアプリの設定を開き、「プロモード」をオンにします。
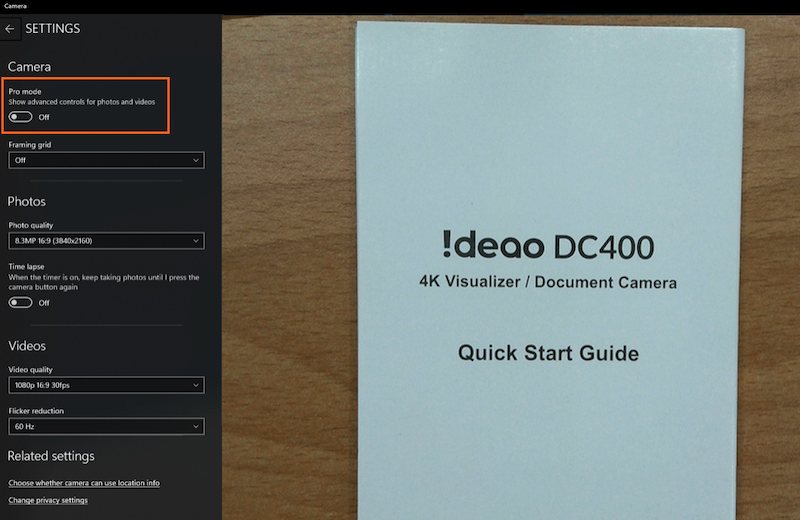
2. DC400が選択されている場合、Autoと書かれた丸いアイコンが表示されています。アイコンをクリックすると右側にスライダーが表示されます。スライダーを上にドラッグするとアイコンがAutoからM(マニュアル)に変わります。

3. DC400の本体上のAFボタンでフォーカスを合わせます。
4. 一度フォーカスを合わせて、フォーカスが固定されます。対象物の位置などが変わってピントがずれた場合、再度本体のボタンを押してフォーカスを合わせてください。
5. 再び常にオートフォーカスを起動させたい場合、スライダーを一番下に合わせます。(アイコンがAutoに変わります。)
AMCapを使用:3rdパーティー製のソフトウェア「AMCap」を使用してオートフォーカスの設定を変更することも可能です。
1. 以下のリンクからAMCapをダウンロードしてインストールします。https://amcap.en.softonic.com/download
2. Ideao DC400を接続してソフトウェアを起動します。
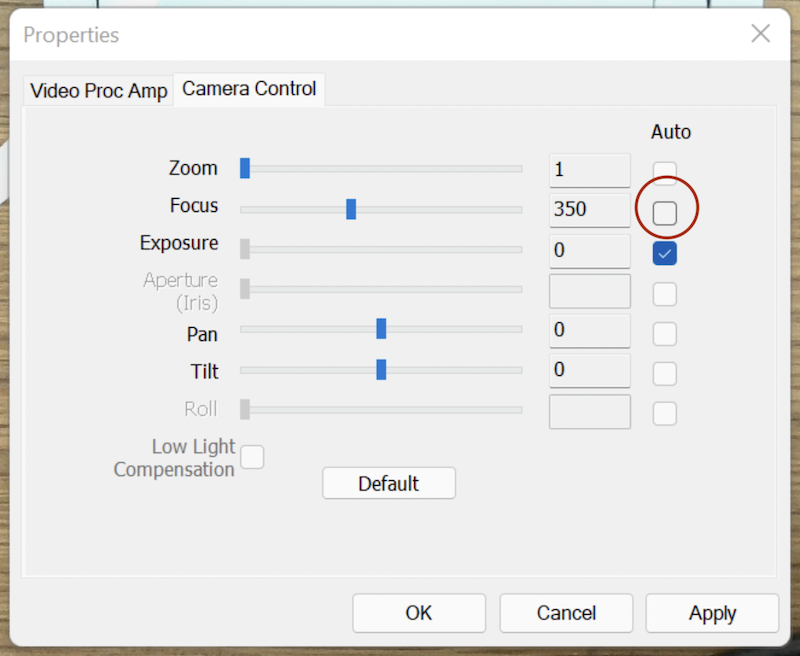
3. Ideao DC400をDevice(カメラリスト)より選択します。
4. Option(オプション)タブからVideo Device(ビデオデバイス)→Property(プロパティー)を選択します。
5. Camera Control(カメラコントロール)のタブを開きます。
6. Focus(フォーカス)のAuto部分のチェックマークを解除しApply(適用)を押します。
7. チェックマークを解除しても、ソフトウェアにカメラからの画像を投影開始した際には一度フォーカスを合わせます。これは正常な動作です。対象物の位置などが変わってピントがずれた場合、再度本体のボタンを押してフォーカスを合わせてください。
Macの場合:
Webcam Settingを使用: 3rdパーティー製のソフトウェア「Webcam Setting」を使用してオートフォーカスの設定を変更することも可能です。App Storeで”Webcam Setting”を検索、または下記のリンクからアプリをダウンロードしてインストールを行なってください。https://apps.apple.com/app/webcam-setting/id1610840452?mt=12
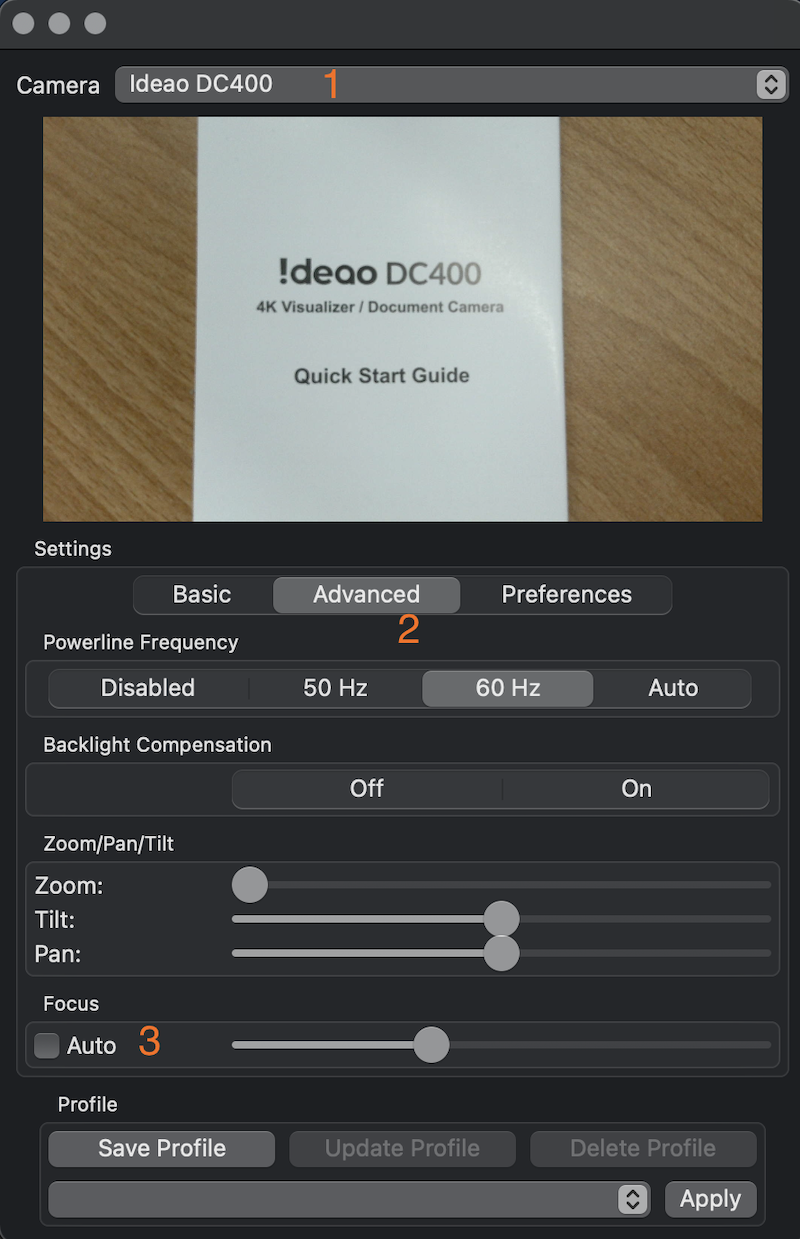
1. Ideao DC400を接続し、Webcam Settingの「Camera」でIdeao DC400選択してください。
2. 「Advanced」のタブをクリックします。
3. 「Auto Focus」のチェックマークを外します。
4. チェックマークを解除しても、ソフトウェアにカメラからの画像を投影開始した際には一度フォーカスを合わせます。これは正常な動作です。対象物の位置などが変わってピントがずれた場合、再度本体のボタンを押してフォーカスを合わせてください。
このノイズは、電源周波数の設定を調整することで除去できます。電源周波数を変更するには、付属のソフトウェアであるIdeao VisualCamを使用する必要があります。DC400をPCに接続し、Ideao VisualCamを起動して、「デバイス」セクションに移動し、DC400が選択されていることを確認してから、電源周波数の設定を調整してください。
下記を順にご確認ください。
・レンズのプラスチックカバーがついたままになっていませんか?
・対象物からDC400のレンズが10cm以上離れていますか?対象物との距離が10㎝以下の場合、正しくピントが合いません。
・AF(オートフォーカス)ボタンを押して再度フォーカスの調整を行なってみてください。 (チュートリアルを見る)
画像の明るさは背景の色に影響されます。例えば、背景が暗く、撮影している対象が明るい場合、DC400は支配的な背景色に基づいてホワイトバランスを調整する傾向があります。その結果、画像が明るく見えることがあります。Ideao VisualCamをご使用の場合、『バックライト』アイコンをクリックし、スライダーを使用してホワイトバランスを調整できます。ホワイトバランス調整機能がないソフトウェアの場合は、背景と対象のコントラストが極端でないことを確認してください。
下記を順にご確認ください。
・弊社ソフトウェアであるIdeao VisualCamは4K解像度をサポートしていますが、ビデオ会議ソフトウェアなどでは、使用するデータ量を抑え、ミーティングがスムーズに行えるようにカメラの最大解像度を制限している場合があります。使用しているソフトウェアがサポートしている最大解像度を確認してください。
・ご使用のソフトウェアにより、初期設定が低い解像度に設定されている場合がございます。解像度の設定をご確認ください。・デジタルズームを使用すると、元の画像の一部をトリミングしてデジタル的に拡大するため、画像が粗くなります。デジタルズームを使用する代わりに、カメラを対象物に物理的に近づけることをお勧めします。そうすることで、解像度を犠牲にすることなく、画像をクリアに保つことができます。(対象物がフォーカスに保たれるためには、カメラレンズと対象物の間の距離が少なくとも10cm/3.9インチであることを確認してください)
下記を順にご確認ください。
・カメラが強い磁場を発生させるデバイスの近くに置かれていないことを確認してください。
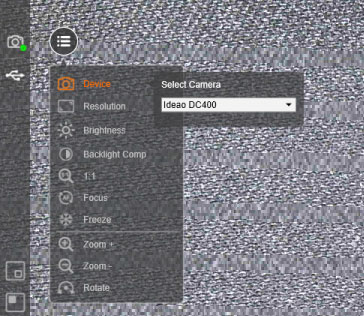
・電源周波数がお使いの地域に一致していることを確認してください。現在の電源周波数を確認または変更するには、Ideao VisualCamを起動し、メニューから「機器の選択」をクリックします。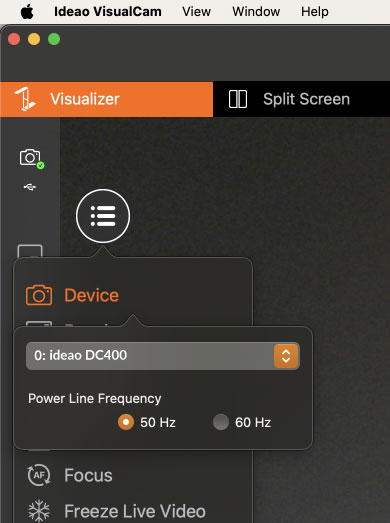
・DC400/500のアームを最大限に伸ばしてください。
・カメラレンズ部分が紙の中心の真上に来るようにし、カメラレンズが水平になるように配置してください。
・画面左側のメニューボタン(3本の横線のアイコン)を押してください。
・解像度をクリックし、解像度を3840 x 2880に設定してください。
・カメラがA3用紙全体を撮影できていない場合は、カメラの位置を調整してください。
例えば、ドキュメントやオブジェクトを被写体としているときに、手などにフォーカスが移動することを防ぐなど、固定されたシーンや特定の距離で撮影する場合、ユーザーが意図した焦点を維持するために手動で調整を行うように設計されています。
・対象物からDC400のレンズが10cm以上離れていますか?対象物との距離が10㎝以下の場合、正しくピントが合いません。
・AF(オートフォーカス)ボタンを押して再度フォーカスの調整を行なってみてください。(チュートリアルを見る)
もし、常にオートフォーカスし続けて、それを停止したい場合、3rdパーティー製のアプリを使用した下記の方法で手動でのオートフォーカスに変更することが可能です。
Windows PCの場合:
- カメラアプリを使用:Windowsに標準搭載されたカメラアプリを使用してスナップショットの撮影や録画を行なっている場合、以下の手順で手動フォーカスに切り替えることが可能です。
- カメラアプリの設定を開き、「プロモード」をオンにします。
- DC400が選択されている場合、Autoと書かれた丸いアイコンが表示されています。アイコンをクリックすると右側にスライダーが表示されます。スライダーを上にドラッグするとアイコンがAutoからM(マニュアル)に変わります。
- DC400の本体上のAFボタンでフォーカスを合わせます。
- 一度フォーカスを合わせて、フォーカスが固定されます。対象物の位置などが変わってピントがずれた場合、再度本体のボタンを押してフォーカスを合わせてください。
- 再び常にオートフォーカスを起動させたい場合、スライダーを一番下に合わせます。(アイコンがAutoに変わります。)
- カメラアプリの設定を開き、「プロモード」をオンにします。
- AMCapを使用:3rdパーティー製のソフトウェア「AMCap」を使用してオートフォーカスの設定を変更することも可能です。
- 以下のリンクからAMCapをダウンロードしてインストールします。 https://amcap.en.softonic.com/download
- Ideao DC400を接続してソフトウェアを起動します。
- デバイスからDC400を選択します。次に、ビデオ > プロパティ > カメラコントロールに移動し、オートフォーカスのチェックボックスを外します。その後、「適用」をクリックします。
4. これでオートフォーカスがオフになります。
5. チェックマークを解除しても、ソフトウェアにカメラからの画像を投影開始した際には一度フォーカスを合わせます。これは正常な動作です。対象物の位置などが変わってピントがずれた場合、再度本体のボタンを押してフォーカスを合わせてください。
Macの場合:
- Webcam Settingを使用: 3rdパーティー製のソフトウェア「Webcam Setting」(有料)を使用してオートフォーカスの設定を変更することも可能です。App Storeで”Webcam Setting”を検索、または下記のリンクからアプリをダウンロードしてインストールを行なってください。 https://apps.apple.com/app/webcam-setting/id1610840452?mt=12
- Ideao DC400を接続し、Webcam Settingの「Camera」でIdeao DC400選択してください。
- 「Advanced」のタブをクリックします。
- 「Auto Focus」のチェックマークを外します。
- チェックマークを解除しても、ソフトウェアにカメラからの画像を投影開始した際には一度フォーカスを合わせます。これは正常な動作です。対象物の位置などが変わってピントがずれた場合、再度本体のボタンを押してフォーカスを合わせてください。
* AMCapおよびWebcam SettingsはFTIによって開発されていません。FTIはこれらのソフトウェアの保守に責任を持たず、その機能や利用可能性を保証するものではありません。
通常、Google MeetやZoom、Microsoft Teams、WebExなどにおいて、投影者が見るプレビュー画面では画面が反転していますが、リモートの参加者が見る映像は反転していません。書画カメラ使用時に反転していない画面を表示するのはいくつかの方法があります。
共通(全てのテレビ会議ソフトウェアに適用することが出来る方法です。)
1. Ideao VisualCamを起動し、Ideao DC400カメラからの画像を表示します。
2. ビデオ通話中にDC400を選択しないでください。
3. 「画面を共有」または「今すぐ発表」を選択(使用しているソフトウェアによって異なります)し、Ideao VisualCamの画面を共有します。
Google Meet: (チュートリアル)
1.Google Chromeには、動画をミラーリングするためのいくつかの拡張機能があります。その中でも「VideoMirror」をダウンロードすることをお勧めします。
2. Google Meetの通話を開始し、IDEAO DC400カメラを選択してから、拡張機能のアイコンをクリックします。そうすると、映像が反転されます。
* VideoMirrorはサードパーティのアプリですので、FTIはこのアプリに関するカスタマーサポートを提供していないことにご注意ください。
Zoom: (チュートリアル) または他のビデオ会議ソフトウェア
1. Zoomの「ビデオ設定」に移動します。
2. マイビデオをミラーリングのチェックマークを外します。
DC400を含めた複数のカメラからの画像をビデオ会議ソフトウェアで表示する方法はいくつかあります。
Webカメラ + 画面共有:
1. ビデオ会議ソフトウェアで顔を映すためのWebカメラを選択します。
2. Ideao VisualCamを起動し、DC400からの画像を表示します。
3. ビデオ会議ソフトウェアで「共有」をクリックします。
4. ソースとして「Ideao VisualCam」を選択し、「共有」をクリックして共有を開始します。
Ideao VisualCamの分割画面モードを使用する
1. ビデオ会議ソフトウェアでカメラをオンにしないでください。
2. Ideao VisualCamを起動し、DC400からの画像を表示します。
3. 画面の左上隅にある「スクリーン画面」をクリックします。
4. 画面の右側の任意の部分をクリックして、「メニュー」アイコンを表示します。
5. メニューアイコンをクリックし、「機器の選択」を選択します。
6. 「デバイスを選択」をクリックし、画像を表示したいカメラを選択します。
Ideao VisualCamのPIPモードを使用する
1. ビデオ会議ソフトウェアでカメラをオンにしないでください。
2. Ideao VisualCamを起動し、DC400からの画像を表示します。
3. 左側のツールバーにあるPIPアイコンをクリックして、カメラからの画像を表示します。
DC400のライブ画像をPowerPointプレゼンテーションに埋め込む
1. プレゼンテーションの内容を作成中に、「挿入タブ」から「レリーフ」を選択します。
2. スタイルを選び、「プレビュー」をクリックして、DC400をカメラソースとして選択します。
3. プレゼンテーションを開始すると、DC400からのライブビューが表示され、ビデオ会議ソフトウェア上でのWebカメラからの入力も同時に行うことができます。
アンチウイルスソフトのアプリの管理設定にてIdeao VisualCamの使用を許可してください。
Avast: https://support.avast.com/en-ph/article/Use-Antivirus-blocked-allowed-apps
Kaspersky: https://support.kaspersky.com/KART/3.0/en-US/130083.htm
以下の手順で設定を行ってください。
- Windowsのスタートボタンを押し、アプリのリストから自動起動したいアプリを探してください。
- アプリのアイコン上で右クリックをし、詳細>「ファイルの場所を開く」をクリックし、アプリのショートカットがあるフォルダーを表示します。
- フォルダーが表示されている状態でキーボードのWindowsロゴとRを同時に押し、「ファイル名を指定して実行」に「shell:startup」を入力して、OKを押すと「スタートアップ」フォルダが表示されます。
- アプリのショートカットをコピーして「スタートアップ」フォルダに貼り付けます。
- Windowsの設定からアプリ>スタートアップを開きます。
- アプリのトグルスイッチをオンにします。
- パソコンを再起動して、自動的にアプリが起動するか確認してください。
- RX100レシーバーを、電源ケーブルとHDMIケーブルを使ってディスプレイに接続します。ディスプレイに5V/2A以上をサポートするType-Cポートがない場合は、同梱されているスイッチケーブルを使って、2つのUSB-Aコネクターに変換して使用することもできます。USB-Aコネクターの1つはUSB3.0である必要があり、これがレシーバーの電源供給に使われます。あるいは、Type-Cケーブルを市販の電源アダプターに接続して使用することも可能です。
- USBウェブカメラを接続するには、カメラのUSBケーブルをレシーバーのUSB-Aポートに差し込みます。
- 内蔵のマウントクリップを使って、レシーバーRX100をディスプレイに取り付けます。最適なワイヤレス信号伝送のために、レシーバーが前方を向いていることを確認してください。最適なワイヤレス伝送範囲は5メートル以内です。
- ディスプレイの出力ソースを接続したHDMIポートに切り替えます。
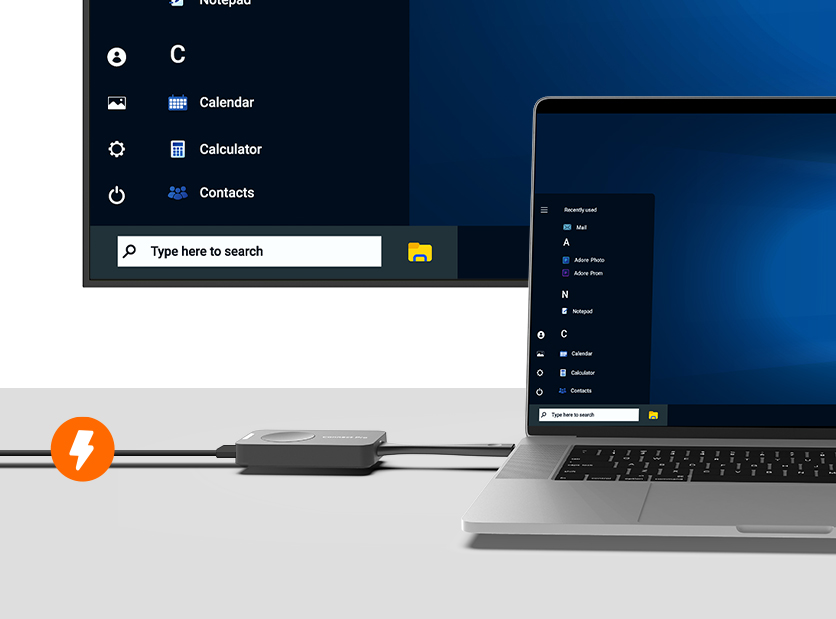
- スピーカーフォンST100を、ノートパソコンのType-Cポートに接続します。画面投影ボタンが緑色に変わったら、ボタンを押して画面の投影を開始します。もう一度ボタンを押すと、投影が停止します。ノートパソコンのType-CポートがDisplayPort Alt modeなどの機能要件を満たしていない場合は、USB-CからHDMIおよびUSB-Aアダプターを使用してください。
- スピーカーフォンST100とワイヤレスでカメラを使用するには、ビデオ会議ソフトウェアで、マイク、スピーカー、およびカメラとして「Connect」を選択してください。
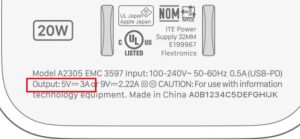
パソコンに搭載されているUSB Type Cポートが画面投影に対応していない可能性があります。画面投影を行うためにはDisplayPort Alt modeに対応している必要があります。お使いのパソコンのUSB Type Cポートが対応していない場合、付属のアダプターを使用してHDMI/USB A経由での画面投影を行ってください。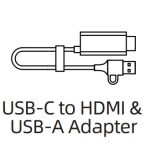
ディスプレイに5V/2A以上の出力を持つUSB-Cポートがない場合、USB-Cケーブルを代替手段として充電アダプター(USB充電器)に接続することができます。
レシーバーRX100に十分な電力供給を確保するため、仕様が5V/2A以上のアダプターを使用してください。これにより、レシーバーRX100が正常に機能するようになります。それ以下の場合、レシーバーRX100が正しく動作しない可能性があります。
Connectスピーカー(ST100)のボリュームボタンは、Windowsのシステム音量を調整するためのものです(現時点ではMACでは機能しません)。ビデオ会議ソフトウェアのスピーカー音量は変更できません。そのため、ビデオ会議ソフトのアプリケーション内の音量コントロールを使用して音量を調整してください。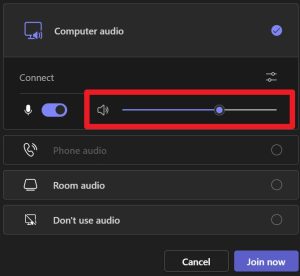
デバイスに接続した際に、音量設定が正しくデバイス間で同期されない場合があります。その結果、一見音量が最大でも小さい音しか出力されないことがあります。
この場合は、音量を下げるボタンを1~2回押すことにより、音声設定が同期され、通常の音量で出力されます。
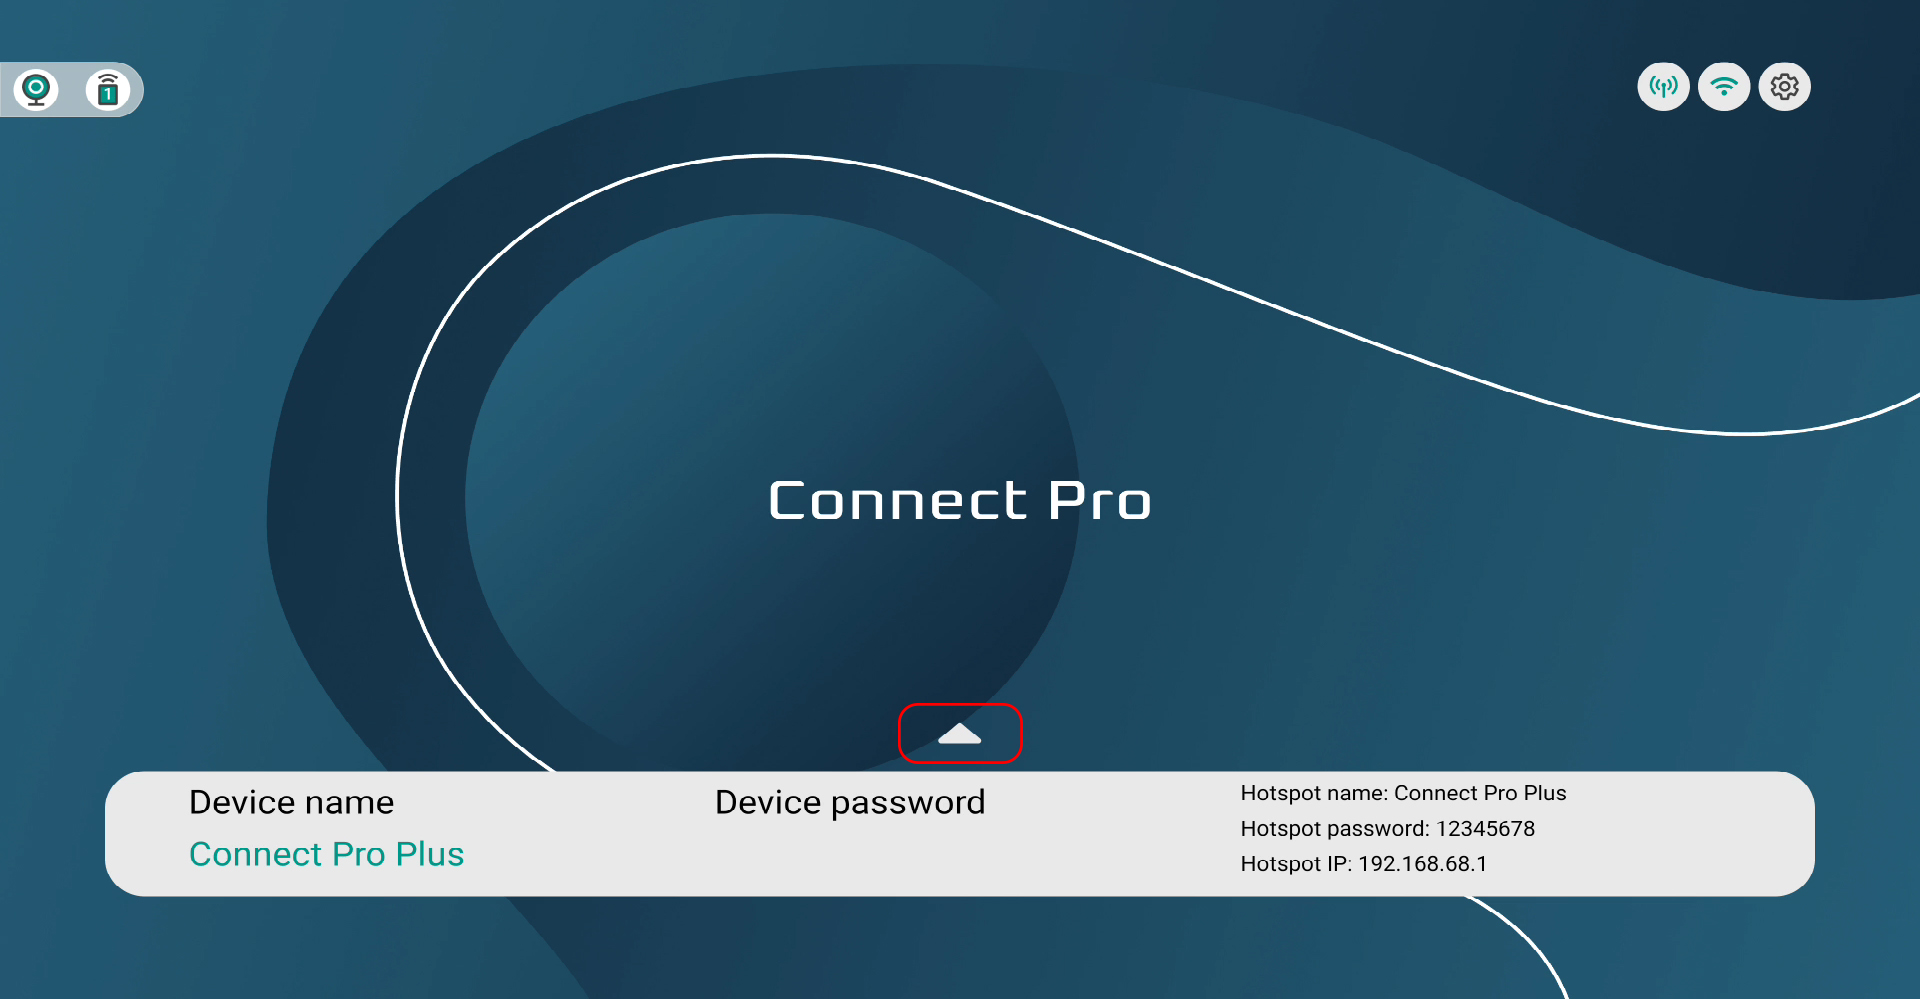
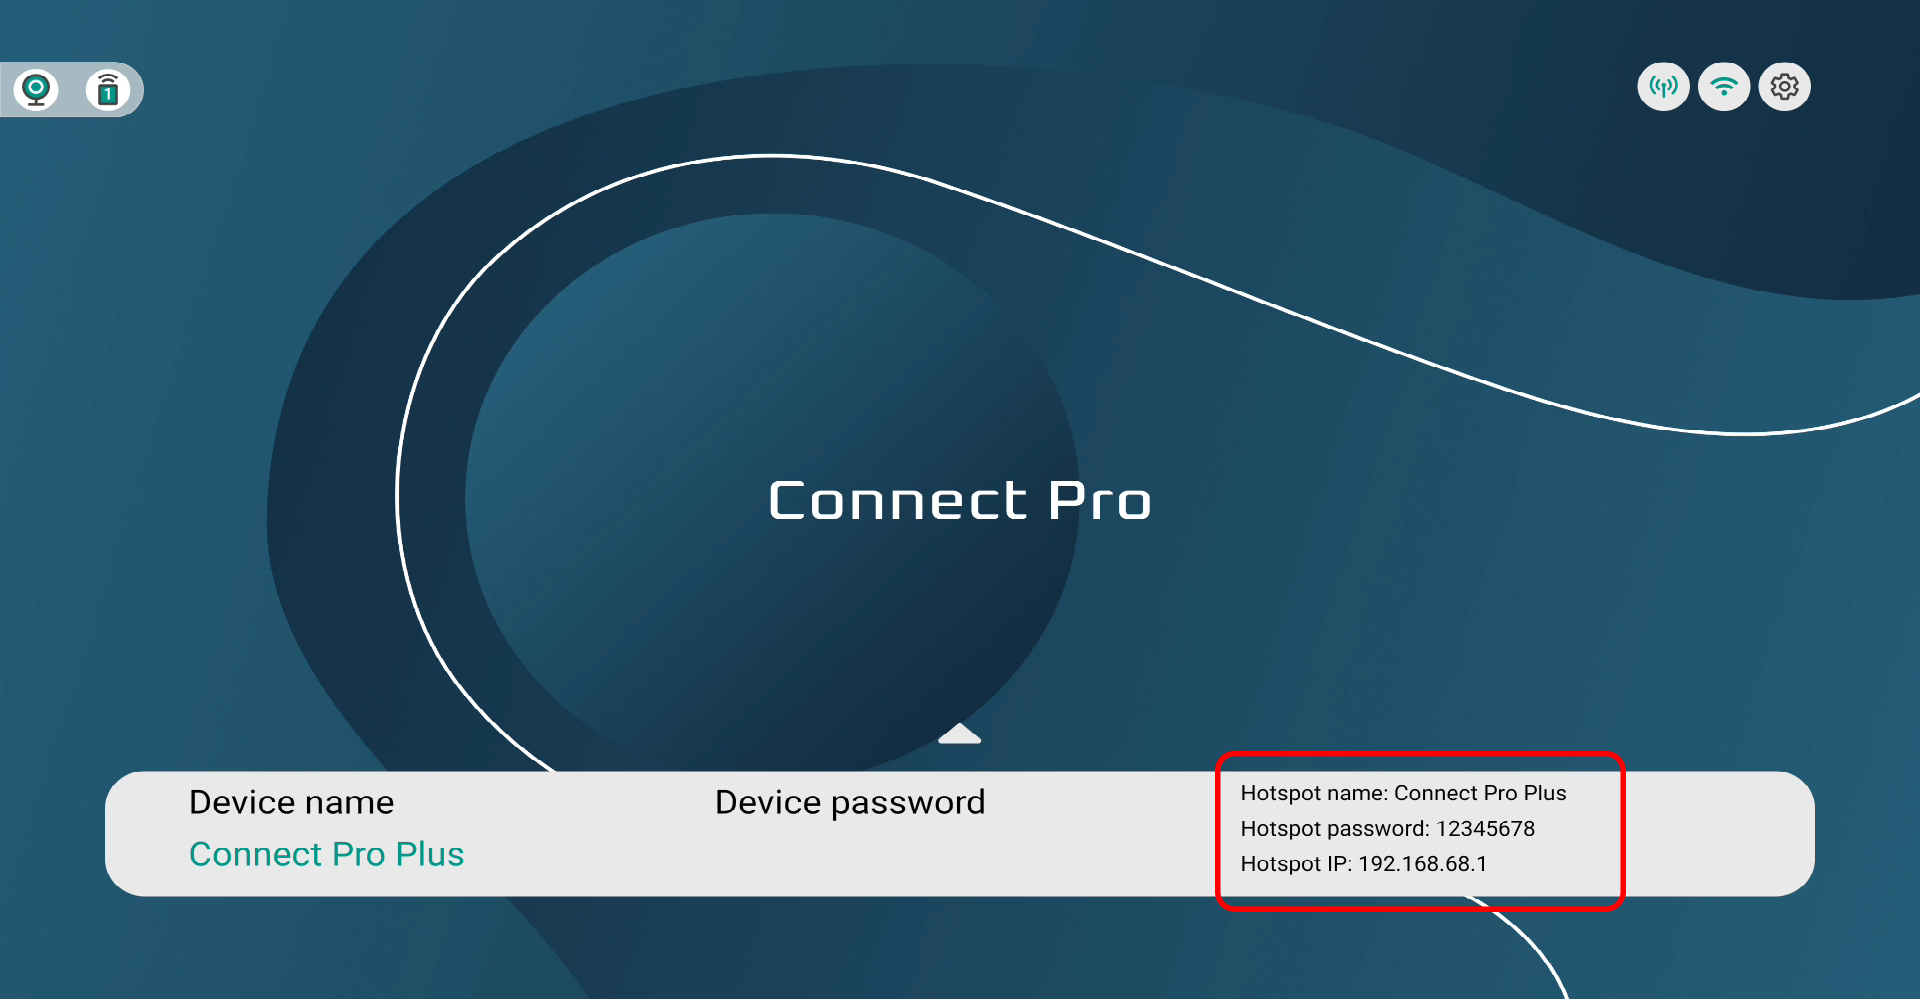
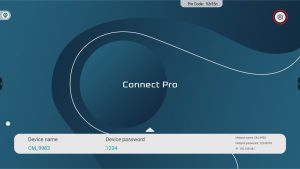
デバイス名はConnect Pro Software、AirPlay、Miracast、またはChromecastで接続するときにInnex Connect Pro+を識別するために使用します。パスワードは4桁の数字を設定することができ、設定されている場合、投影前に入力が必要です。設定するには、上部のギアアイコンをタップして「詳細設定」へ進んでください。

はい。上部のホットスポットアイコンをタップして設定画面を開いてください。
注意:ホットスポット名またはパスワードを変更すると、Connect Pro Buttonとの再ペアリングが必要になります。
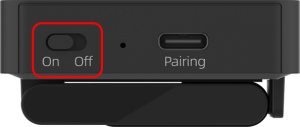
Innex Connect Pro+ のインジケーターは、通常、電源を入れると青色に点灯し、画面共有中は紫色に変わります。インジケーターが点灯しない場合は、本体側面の電源スイッチがオンになっていること、および電源ケーブルが正しく接続されていることを確認してください。それでも点灯しない場合は、販売店へお問い合わせください。
インジケーターが赤色のままの場合は、トラブルシューティングでは解決できない Innex Connect Pro+ のハードウェア故障の可能性があります。詳しくは販売店へお問い合わせください。
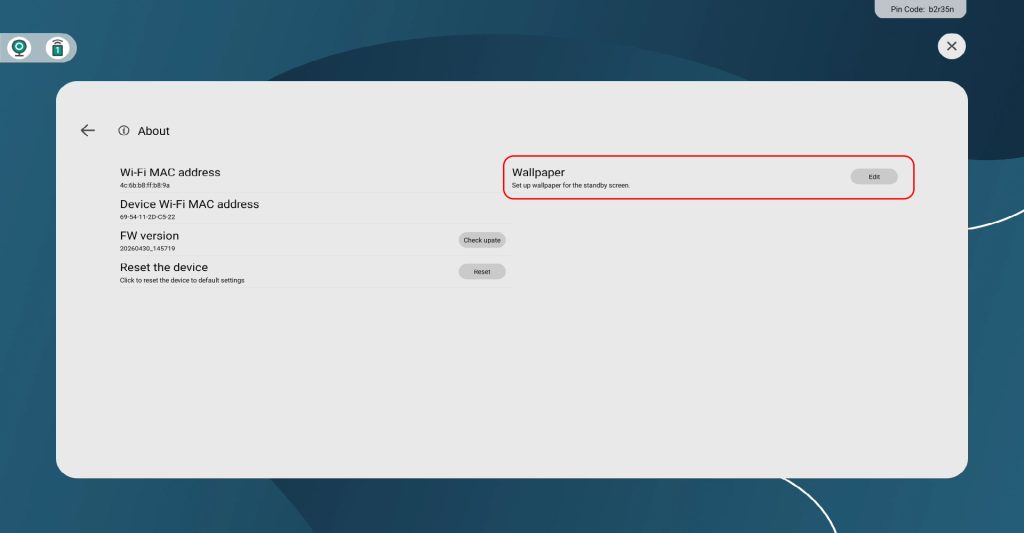
はい。上部のギアアイコンをタップし、「機器情報」へ進み、壁紙の「編集」をクリックして、編集モードから背景画像を変更できます。
Innex Connect Pro+は常に最新の状態に保つことを強く推奨します。
本製品は OTA(Over-the-Air)アップデートに対応しています。インターネットに接続されている場合、新しいファームウェアバージョンが利用可能になるとシステムが通知します。画面の案内に従ってアップデートを行ってください。
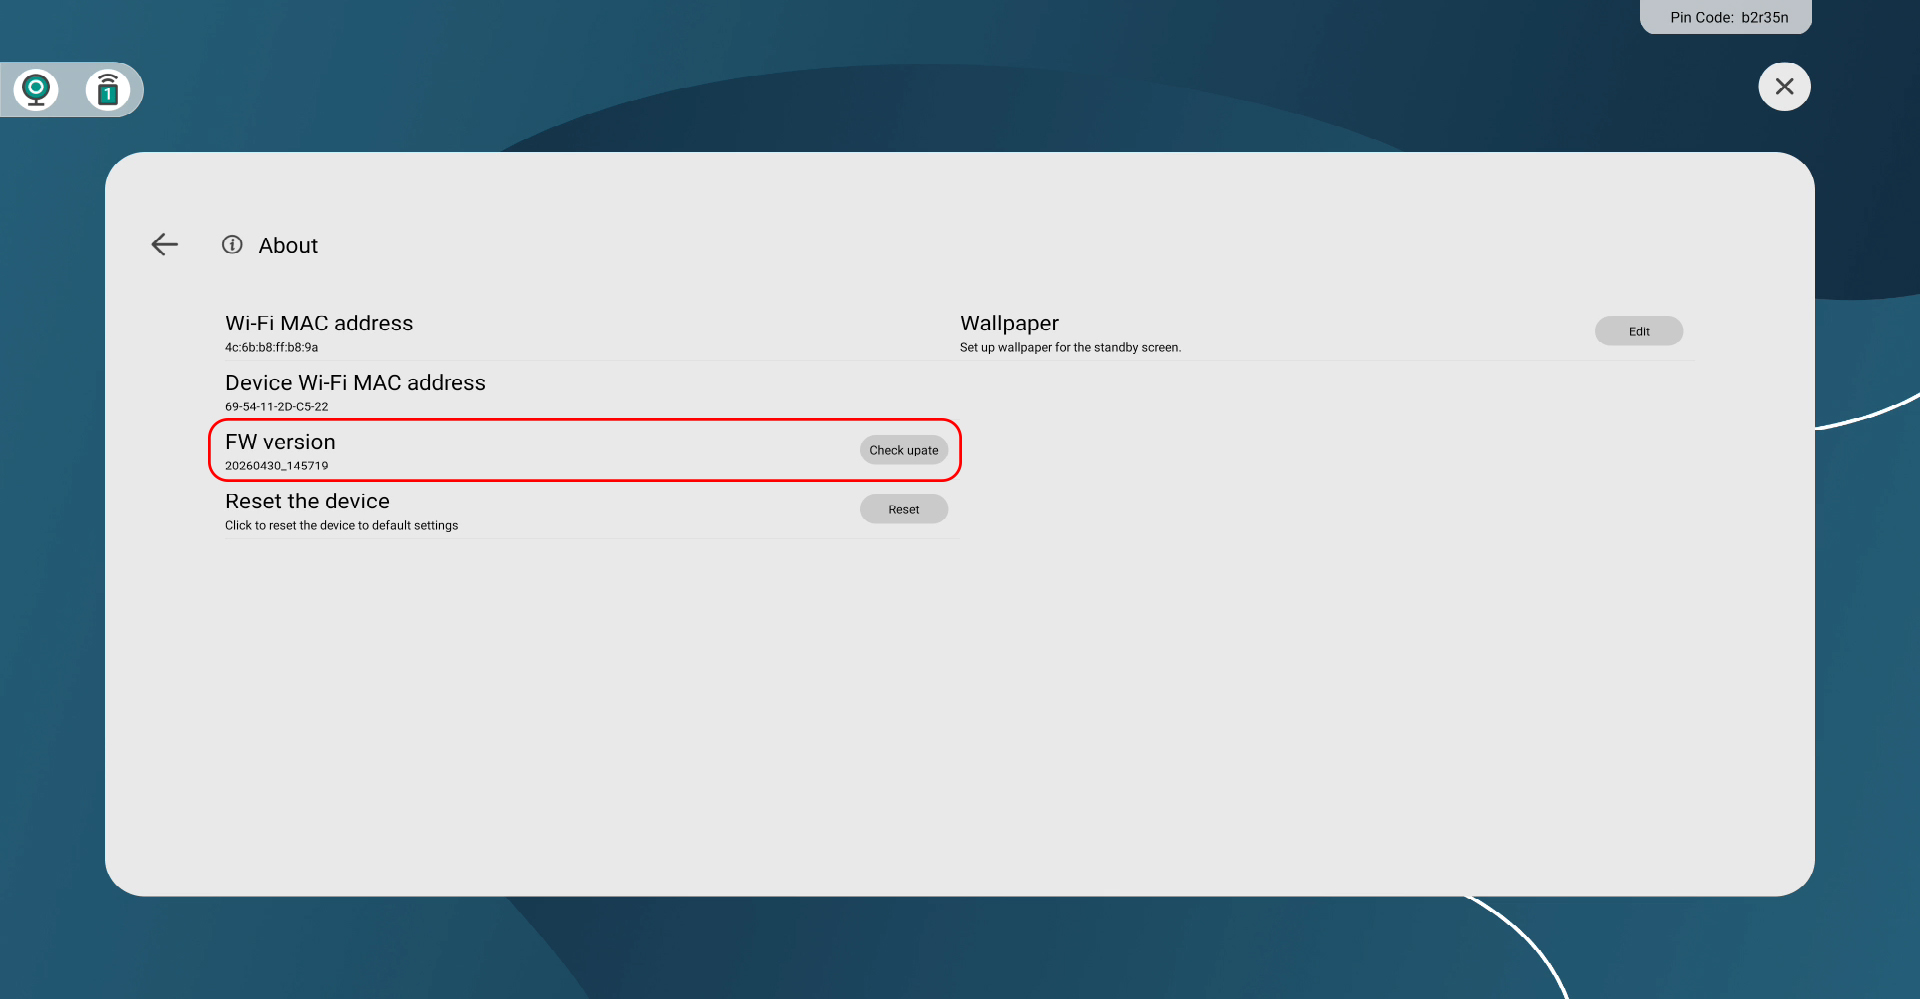
手動で更新を確認するには、ギアアイコンをタップして「機器情報」へ進み、ファームウェアアップデートが利用可能か確認してください。
Innex Connect Pro+ は、インターネットに接続されると自動的に認証・登録されます。デバイスが外部ネットワークに正しく接続されていることを確認してください。接続後、登録は自動的に開始され、完了すると成功メッセージが表示されます。
一部のネットワークファイアウォールでは、自動登録がブロックされる場合があります。その場合は、別のネットワークへ切り替えるか、モバイルデータ通信の使用をお試しください。
インターネットに接続されているにもかかわらず登録が完了しない場合は、販売店へお問い合わせください。
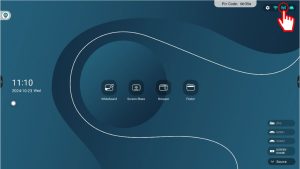
初期設定時には、2種類のフローティング表示が画面に表示されます。
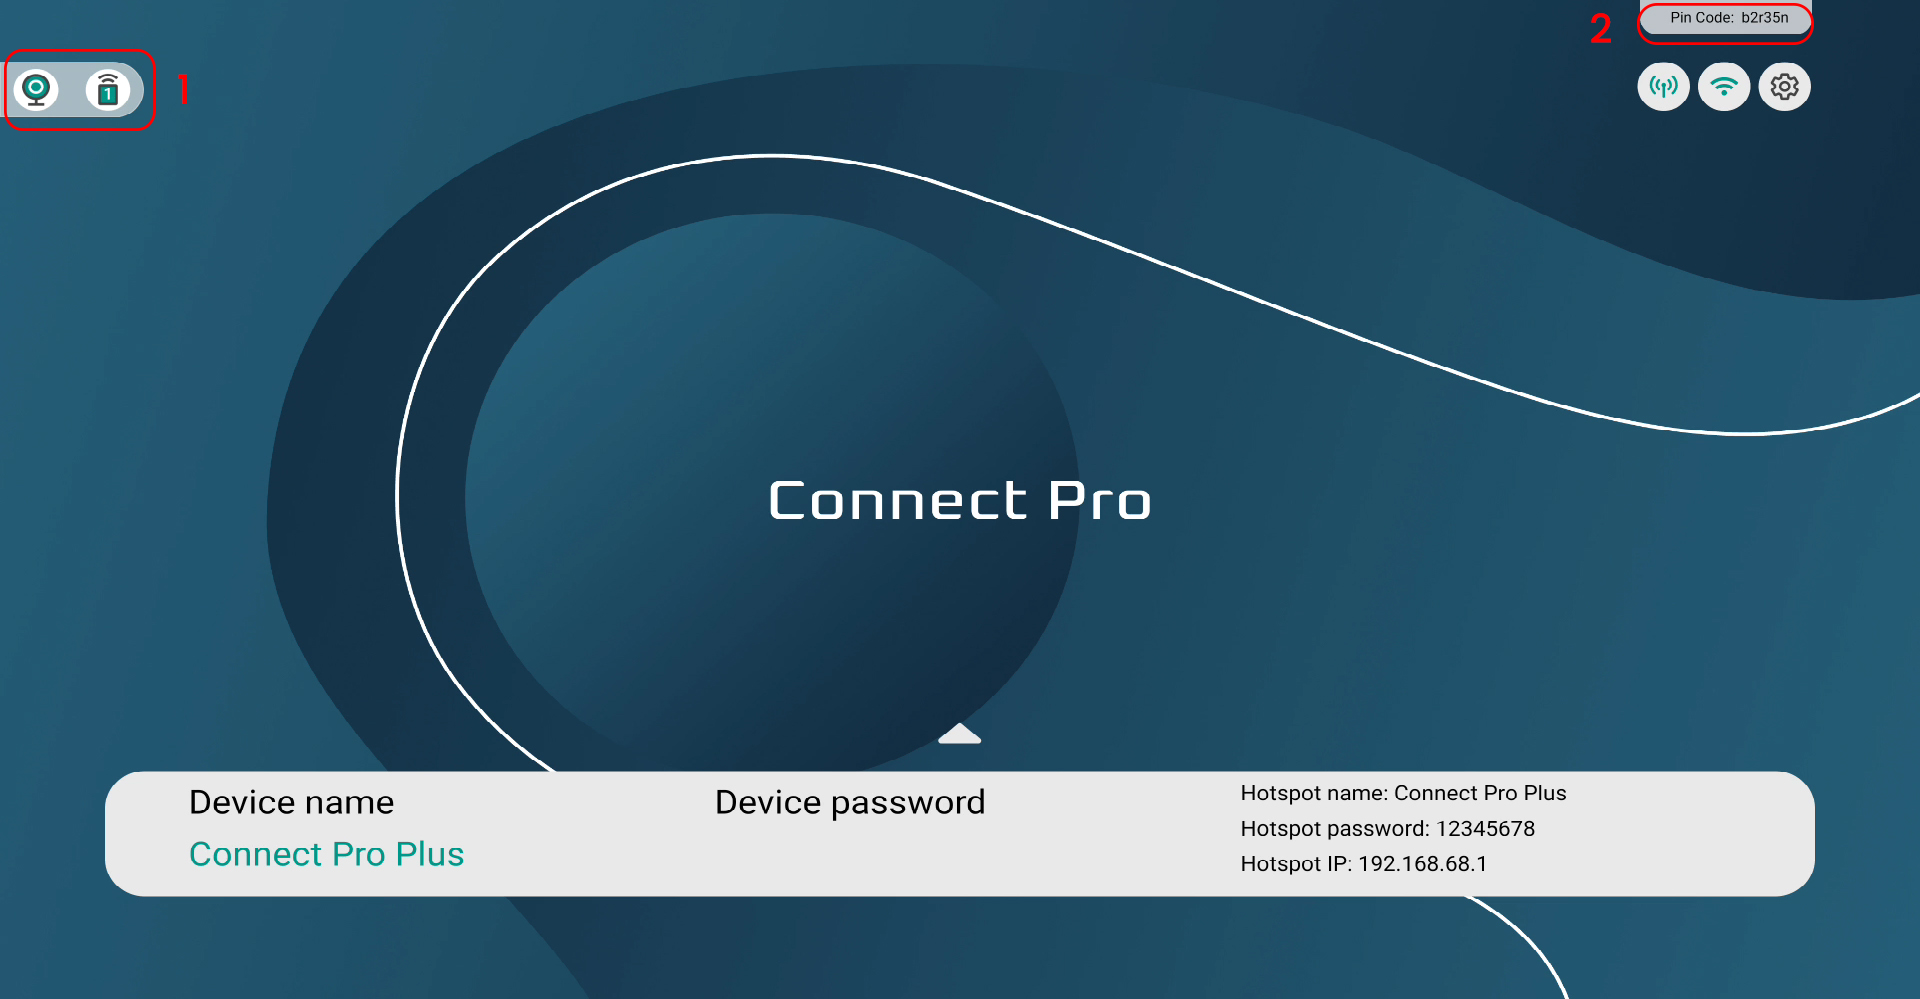
1. モデレーター
・BYOMアイコン:カメラが検出されると表示されます(タップするとBYOM設定を開けます)。
・デバイスアイコン:接続中のソースデバイス数を表示します。
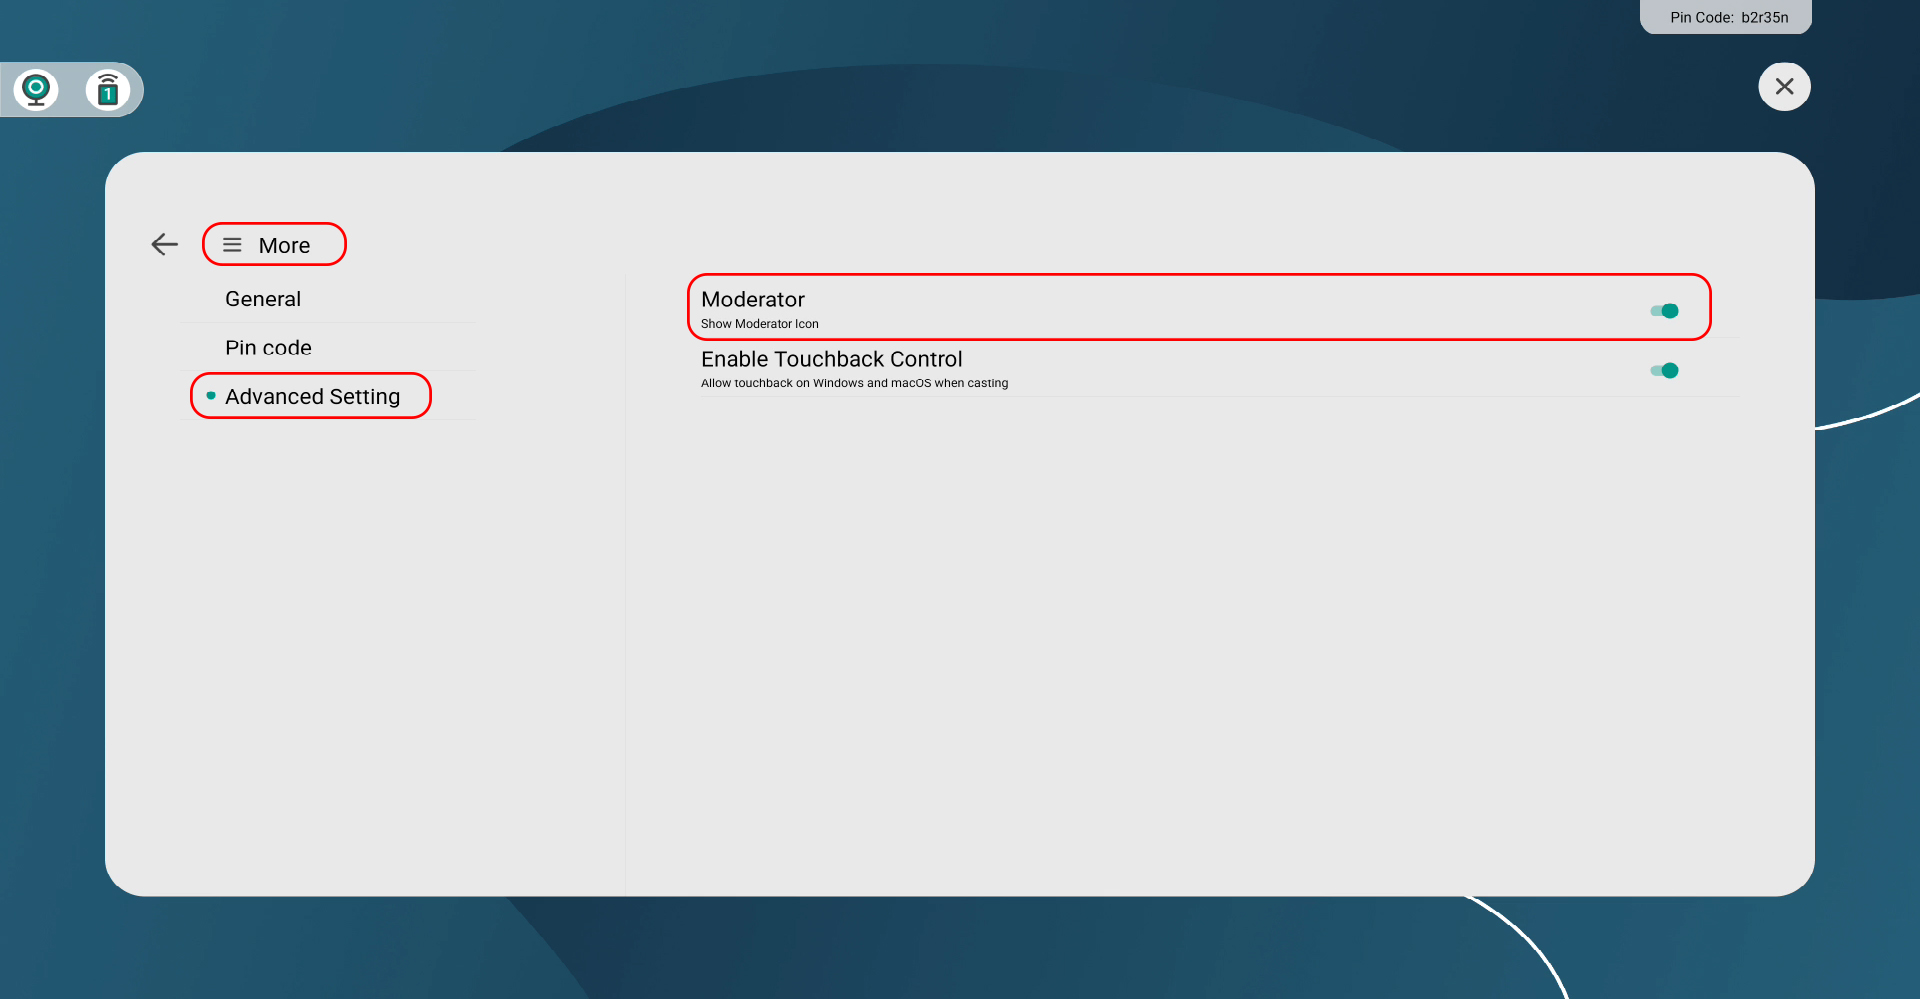
非表示にするには、「詳細設定」>「高度な設定」へ進み、「モデレーター」をオフにしてください。
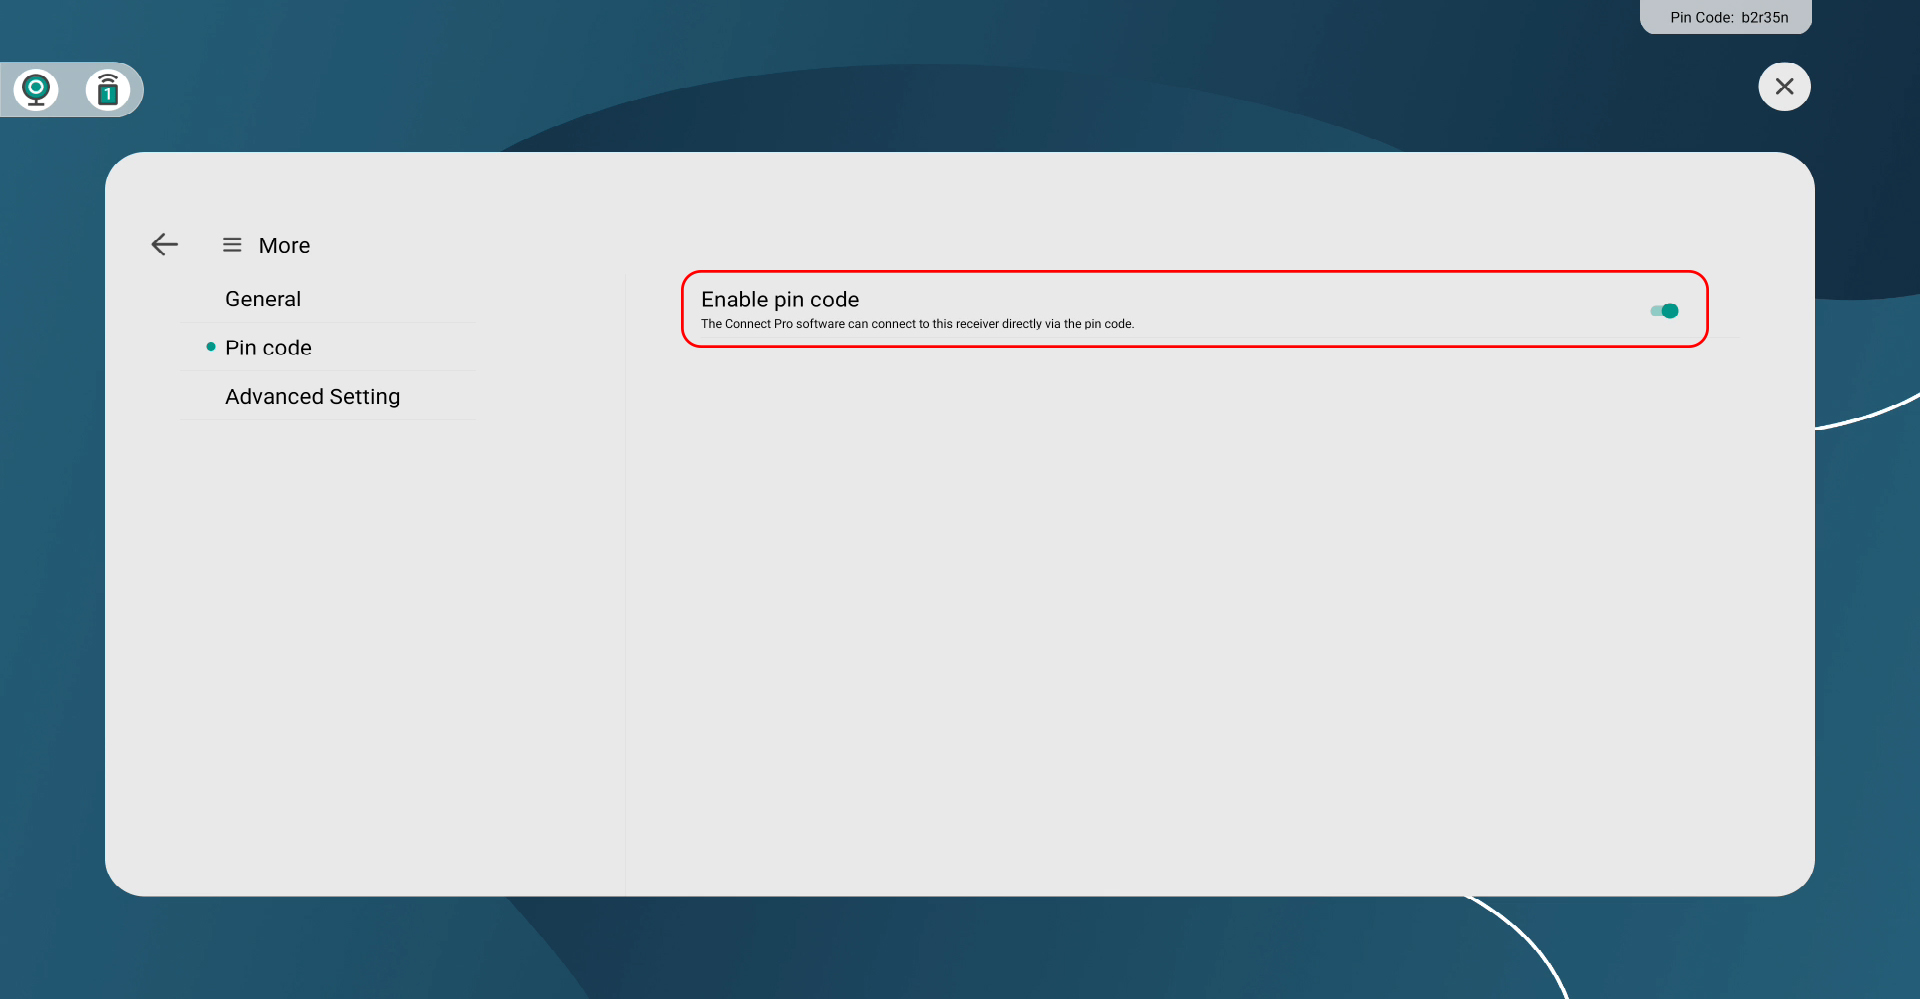
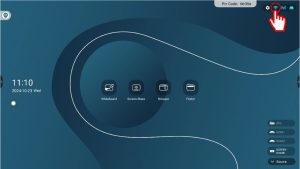
2. PINコード
Connect Pro Software 接続時に使用されます。
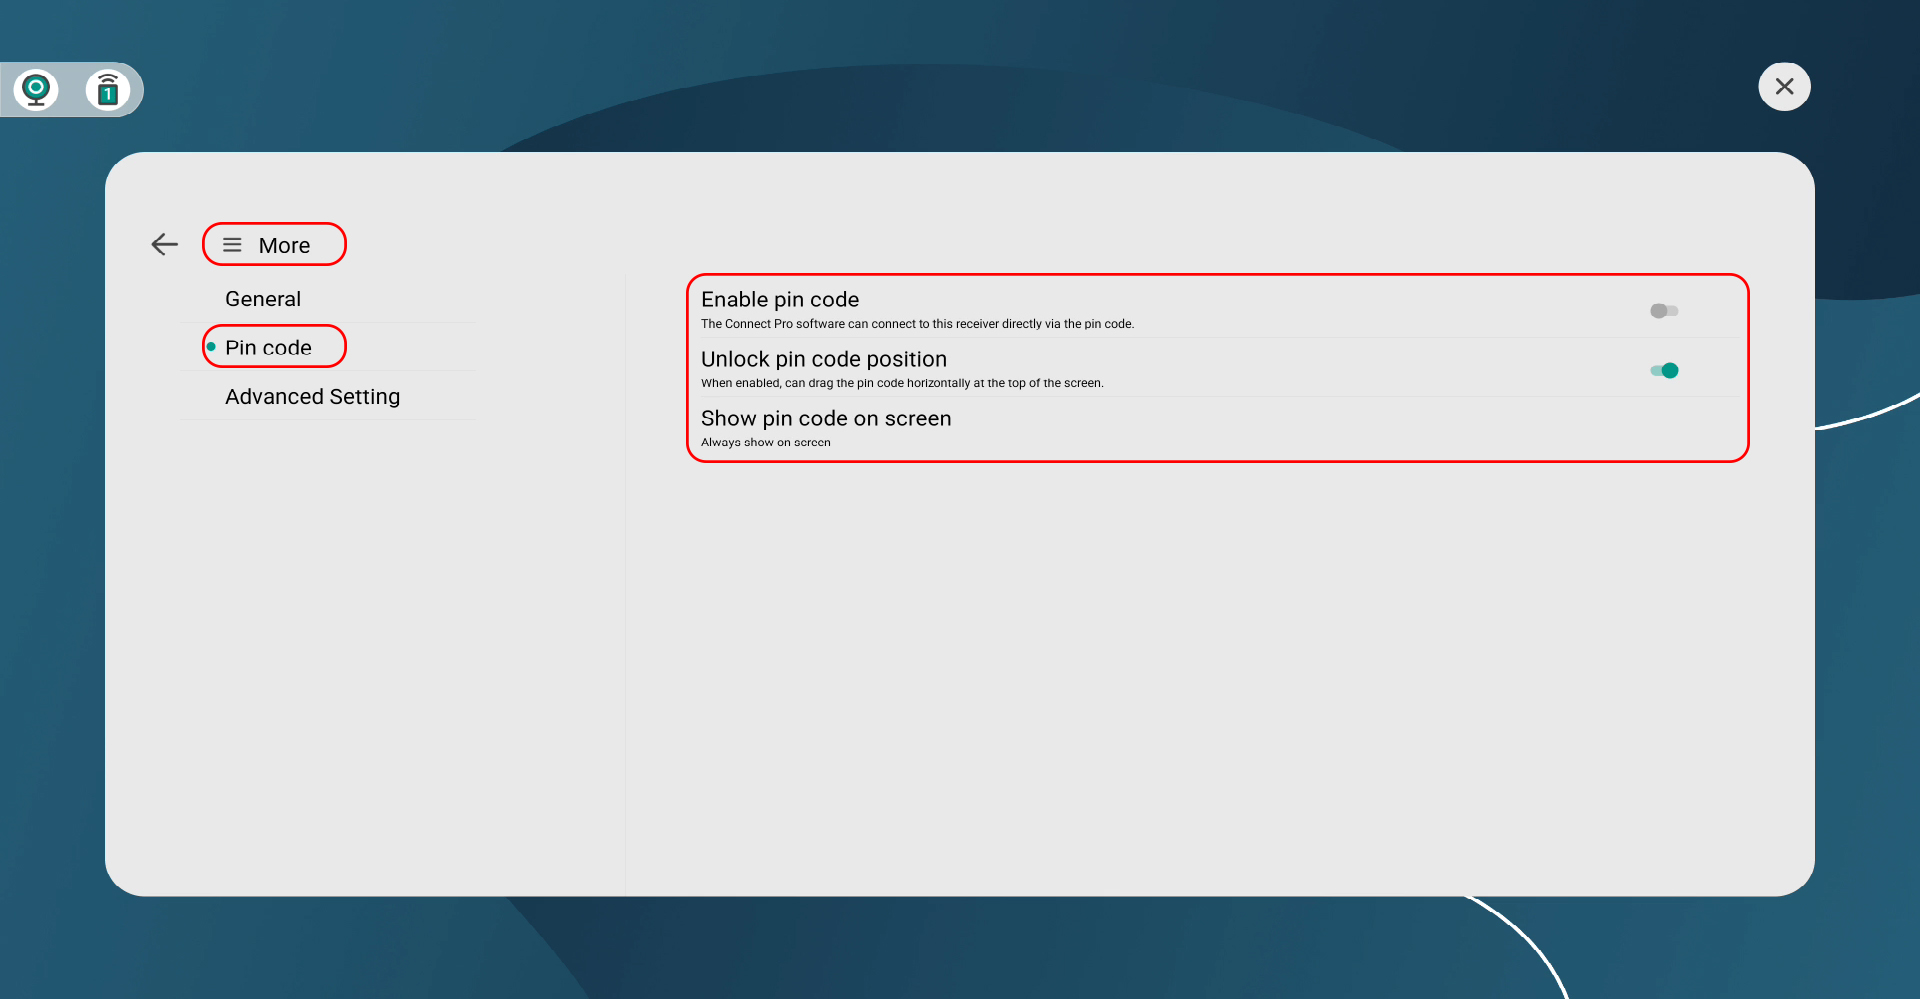
非表示にするには、「詳細設定」>「PINコード」へ進み、「PINコードを有効にする」をオフにしてください。あわせて、「画面にPINコードを表示」の設定も確認することを推奨します。
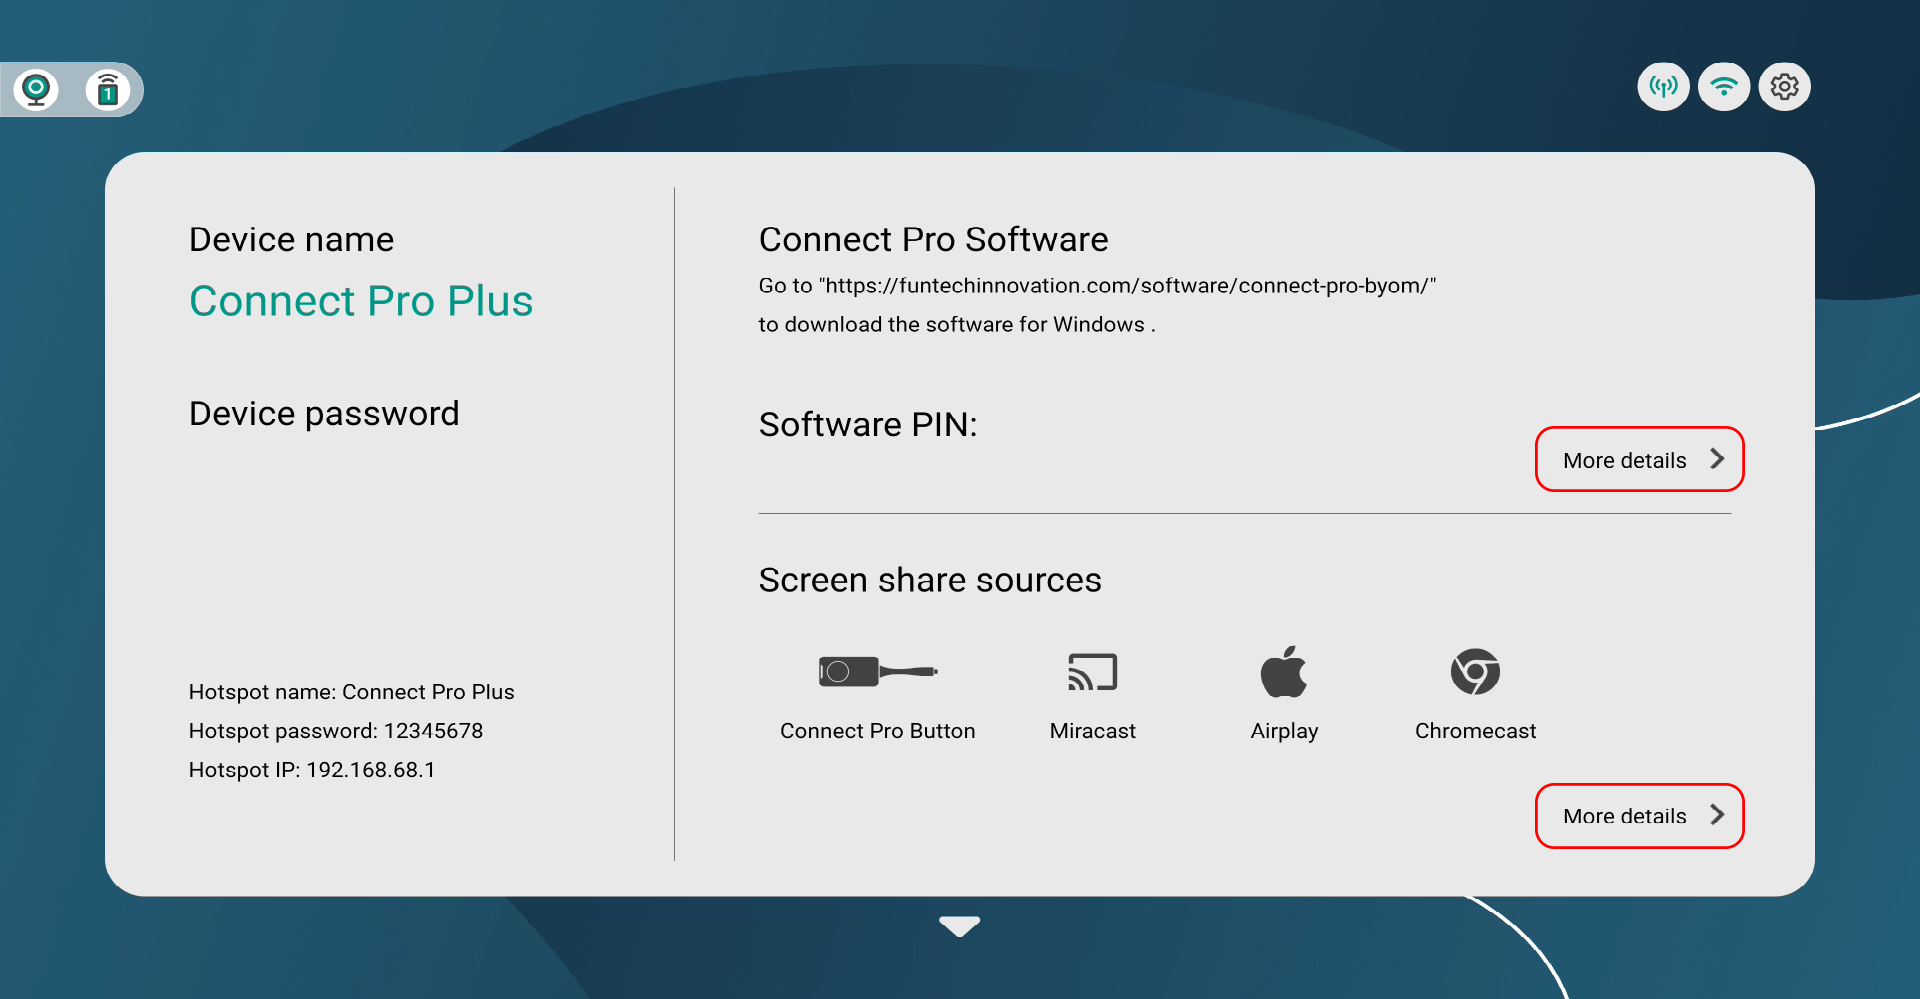
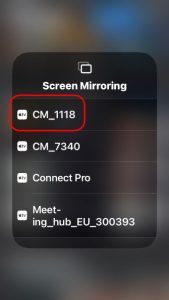
Innex Connect Pro+はConnect Pro Software、AirPlay、Miracast、Chromecast、Connect Pro Buttonに対応しています。
インターフェース下部の三角矢印アイコンをタップして情報ページを開くと、各方法の手順が確認できます。
- まず、お使いのデバイスが互換性リストに含まれていることを確認してください。
- 次に、Innex Connect Pro+ の電源を入れてディスプレイに接続し、その後、外部デバイスを Innex Connect Pro+ に接続してください。
- Innex Connect Pro+ は、最後に検出されたマイクおよびスピーカーをシステムの音声デバイスとして自動設定します。
- それでもデバイスを使用できない場合は、販売店へお問い合わせください。
これは、Innex Connect Pro+ がディスプレイの最大解像度を正しく検出できていない場合に発生することがあります。ディスプレイを再起動し、解像度を再検出してください。
最適な結果を得るために、まず Innex Connect Pro+ の電源を入れ、HDMI ケーブルを接続してから、ディスプレイの電源を入れてください。
まず、お使いのデバイスが互換性リストに含まれているか確認してください。
次に、信号ケーブルが Innex Connect Pro+ 背面の USB-A ポートに接続されていること、および必要に応じてデバイスの電源が入っていることを確認してください。
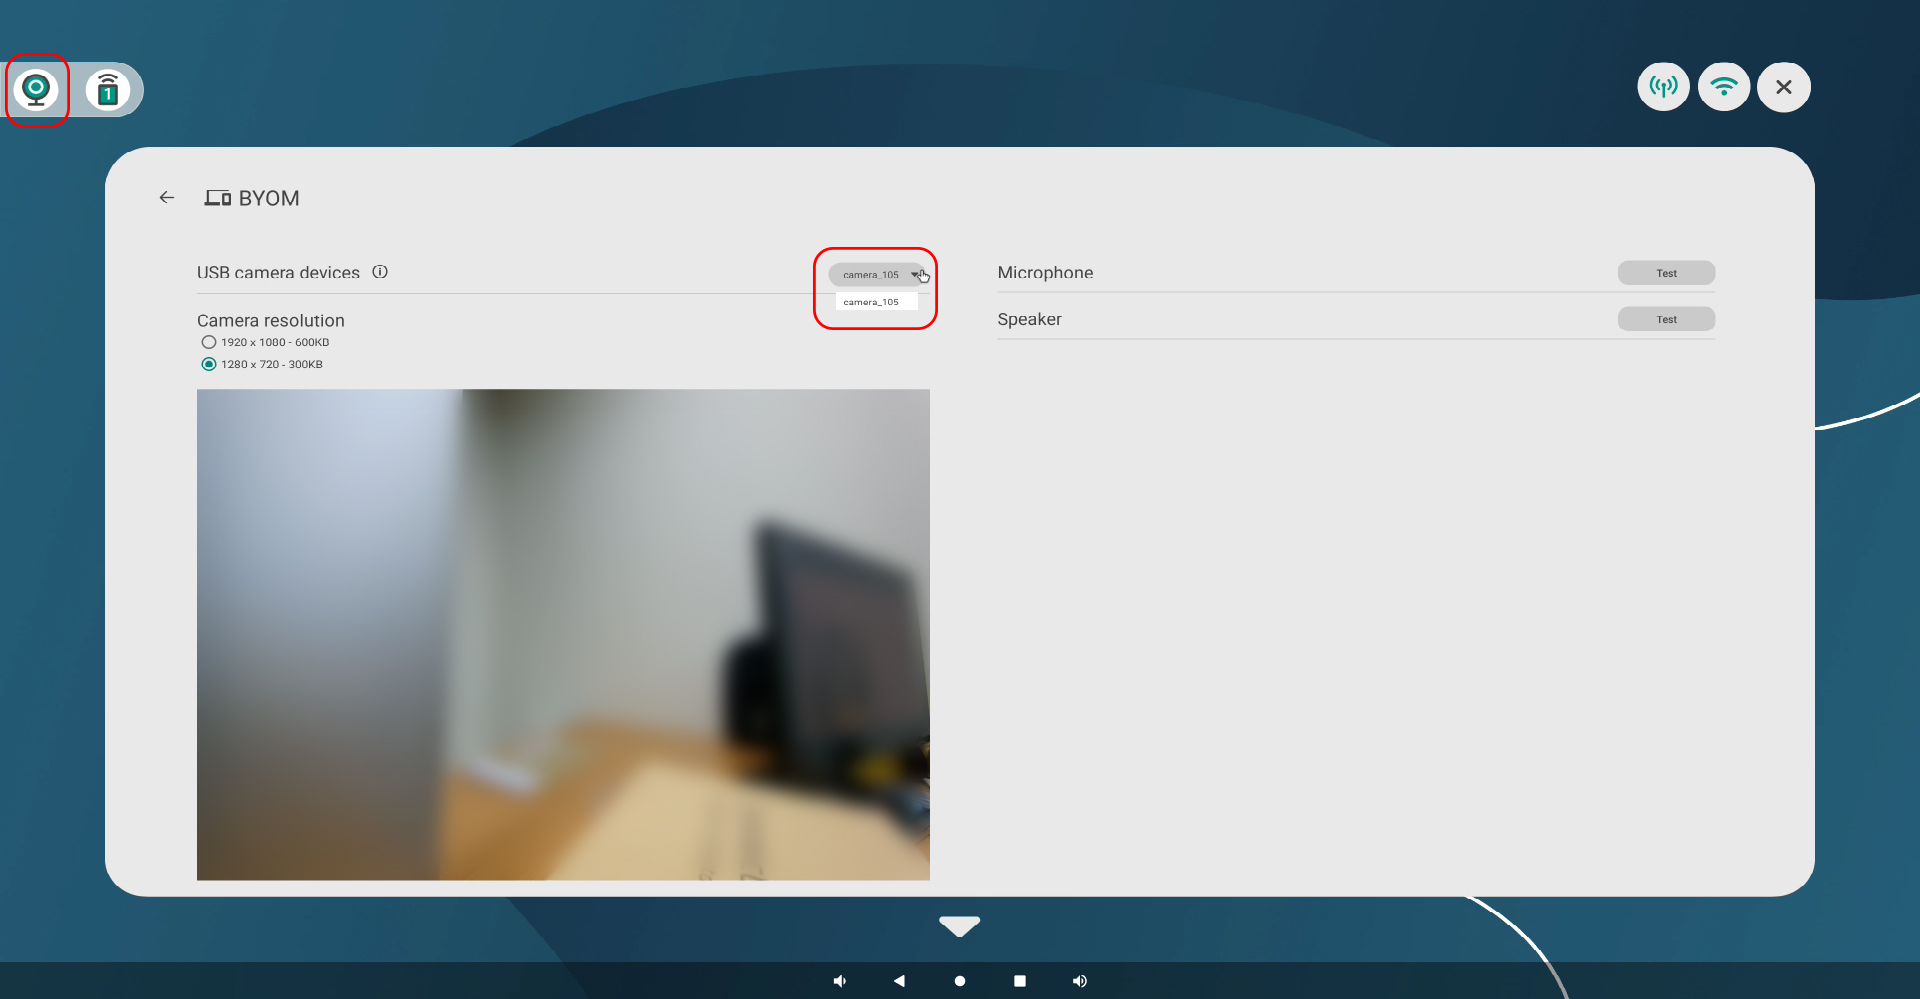
正しく接続されると、画面左上のカメラアイコンをタップしてプレビューを開くことができます。複数のデバイスが接続されている場合は、ドロップダウンメニューから使用するデバイスを選択してください。
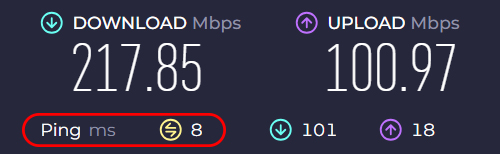
画面共有の品質は、ネットワーク環境に大きく左右されます。安定した動作のため、ネットワーク遅延(レイテンシー)が 10 ms 未満であることを確認してください。現在のネットワーク状態は、オンライン速度テストサイトで確認できます。
また、Wi-Fi 接続を無効にして Innex Connect Pro+ のホットスポットのみを使用することで、パフォーマンスが改善する場合があります。
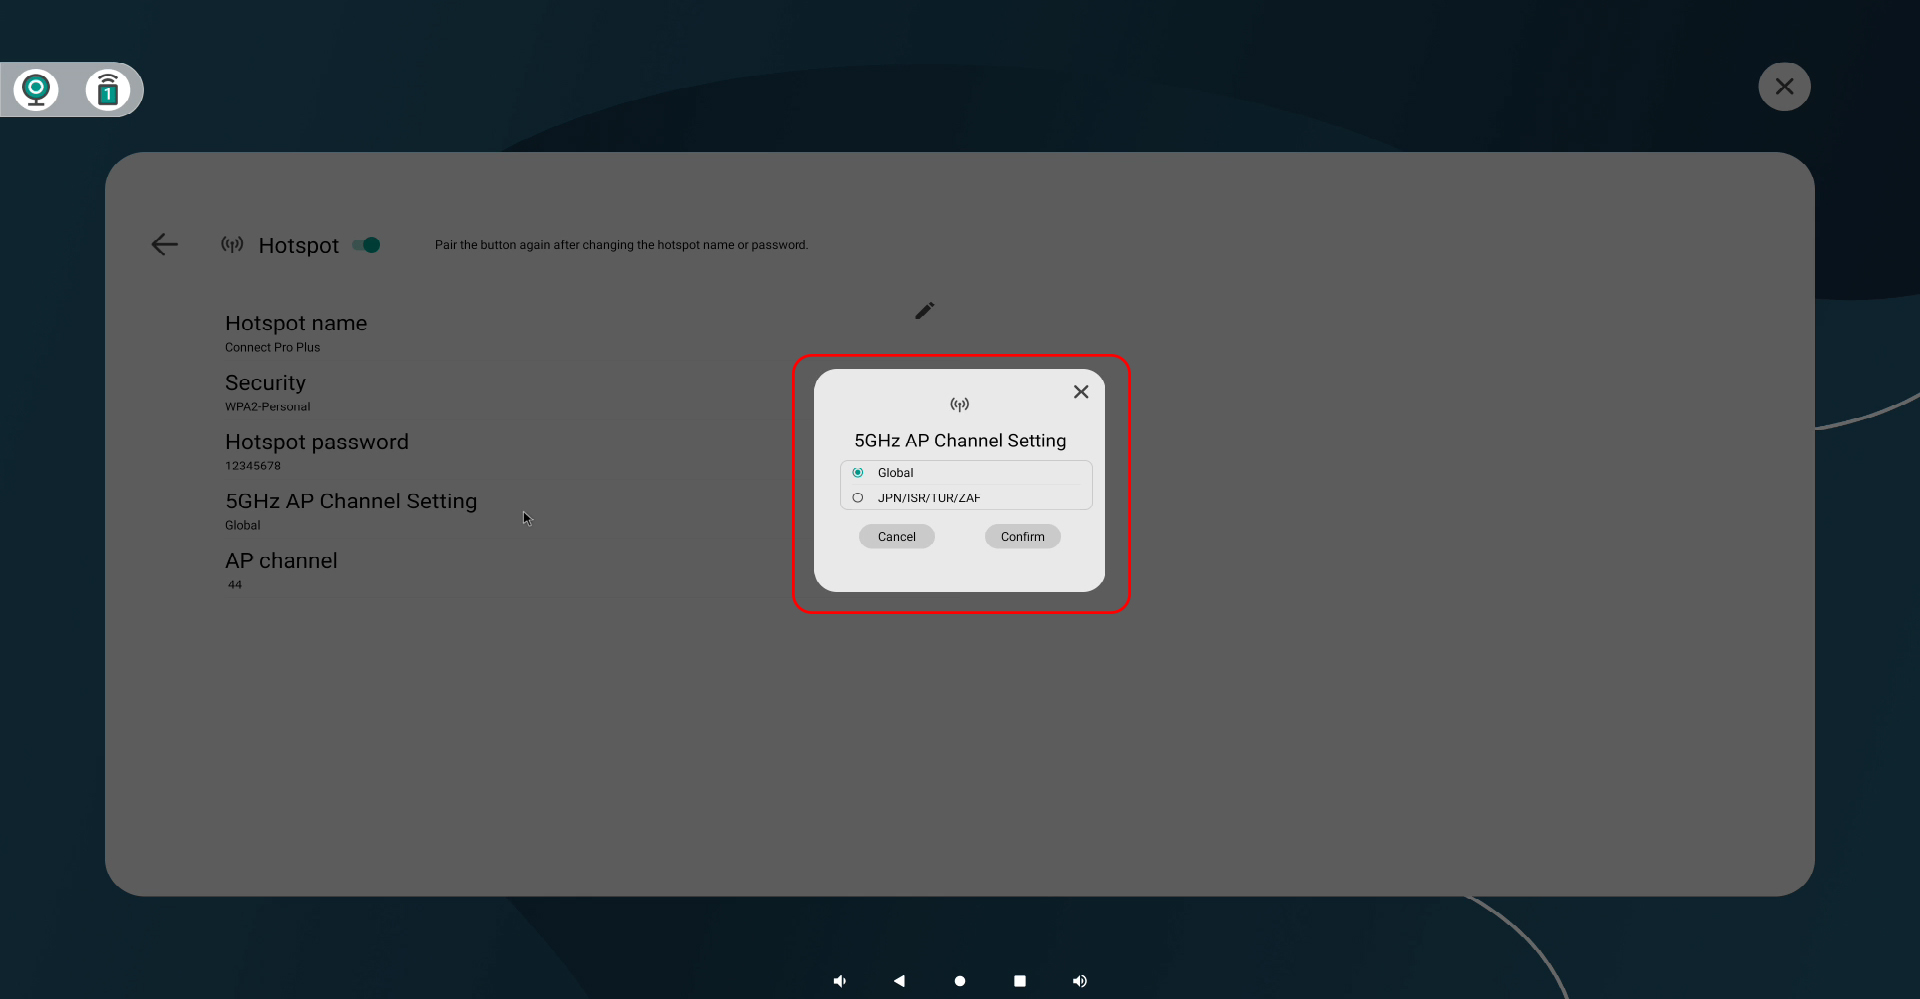
適切な地域を選択し、混雑の少ないチャンネルへ切り替えることで、干渉を減らし、画面共有品質を向上できます。
Connect Pro Software を使用して接続する場合は、お使いのコンピューターが最小システム要件を満たしていることも確認してください。(URL)
デバイスから画面共有を行っても何も表示されない場合は、まずデバイスが Innex Connect Pro+ に正しく接続されていることを確認してください。正常に接続されると、画面左上に接続中のソースデバイス数が表示されます。タップするとソース一覧を確認できます。デバイスが接続されていない場合、受信機側では検出・表示されません。
また、問題の原因がネットワーク環境にある場合もあります。ネットワーク状態を確認してください。
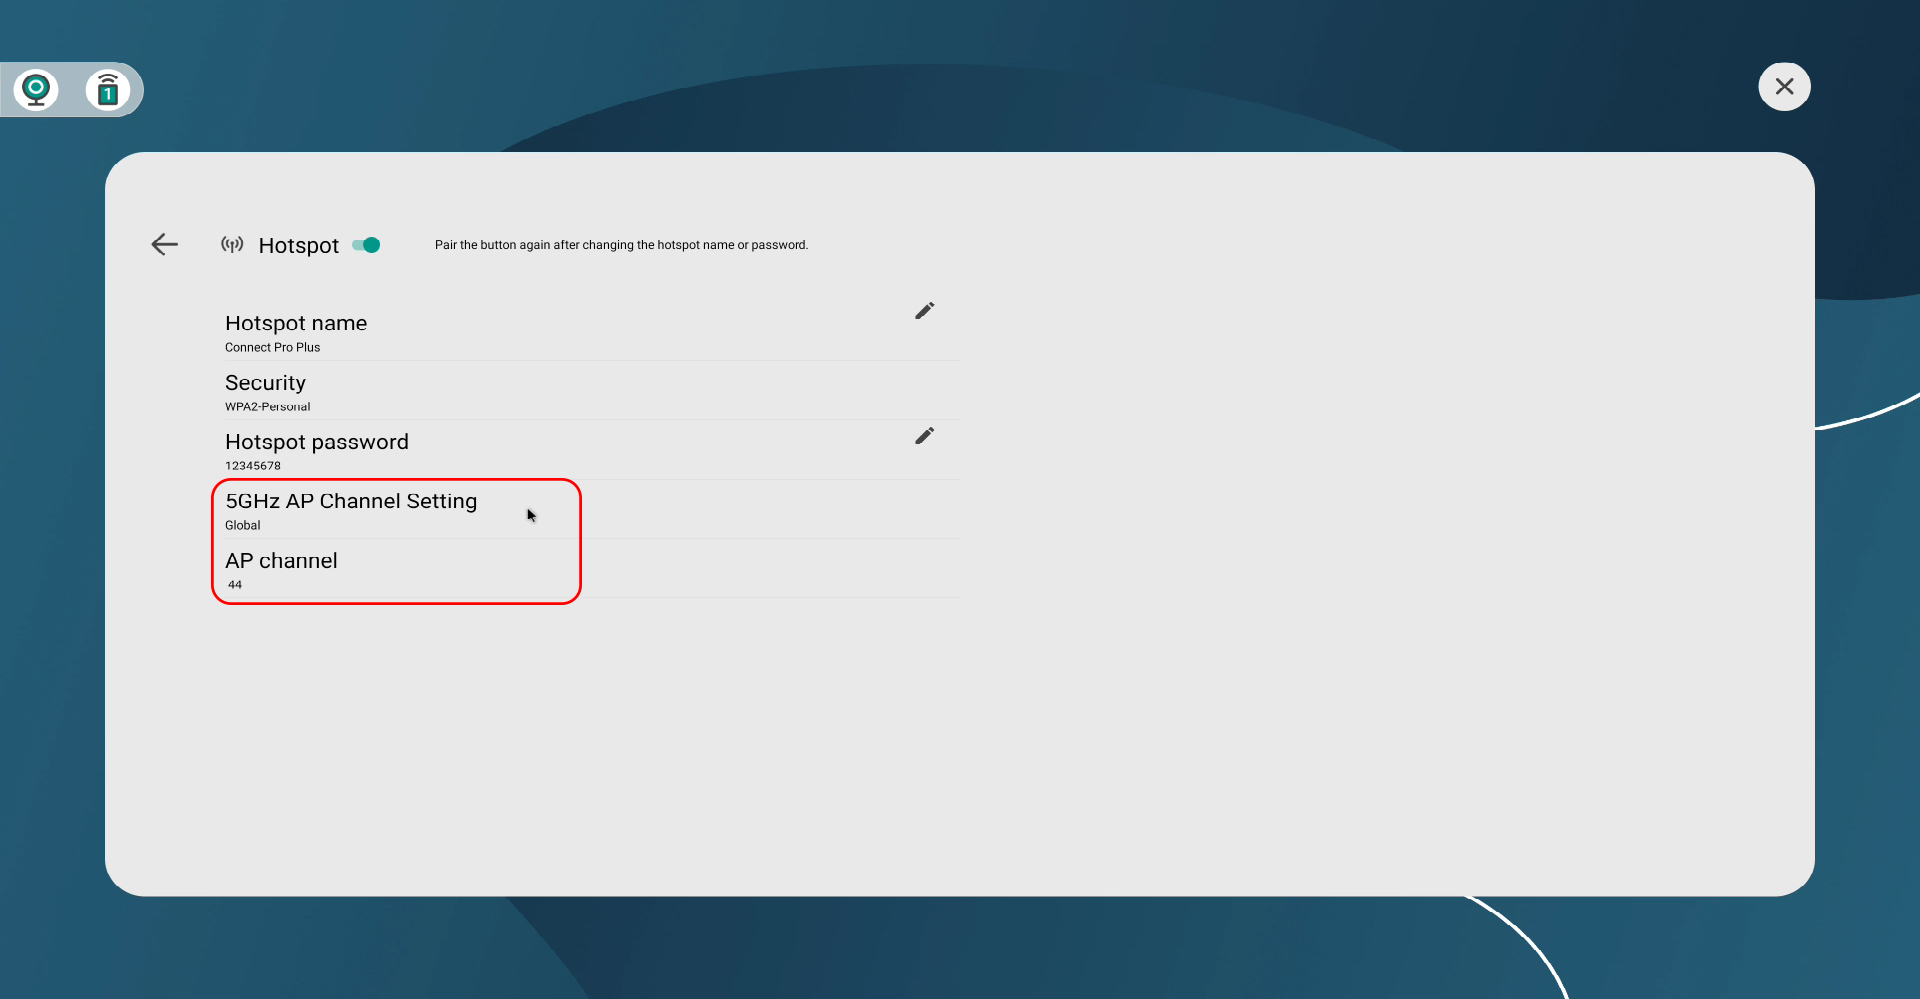
Connect Pro Button を使用している場合、近くにある2台の受信機が同じホットスポット名とパスワードを使用していると、誤ったデバイスへ投影されることがあります。10 m以内に別の受信機がある場合は、競合を避けるため、ホットスポット名とパスワードをそれぞれ固有のものに設定してください。

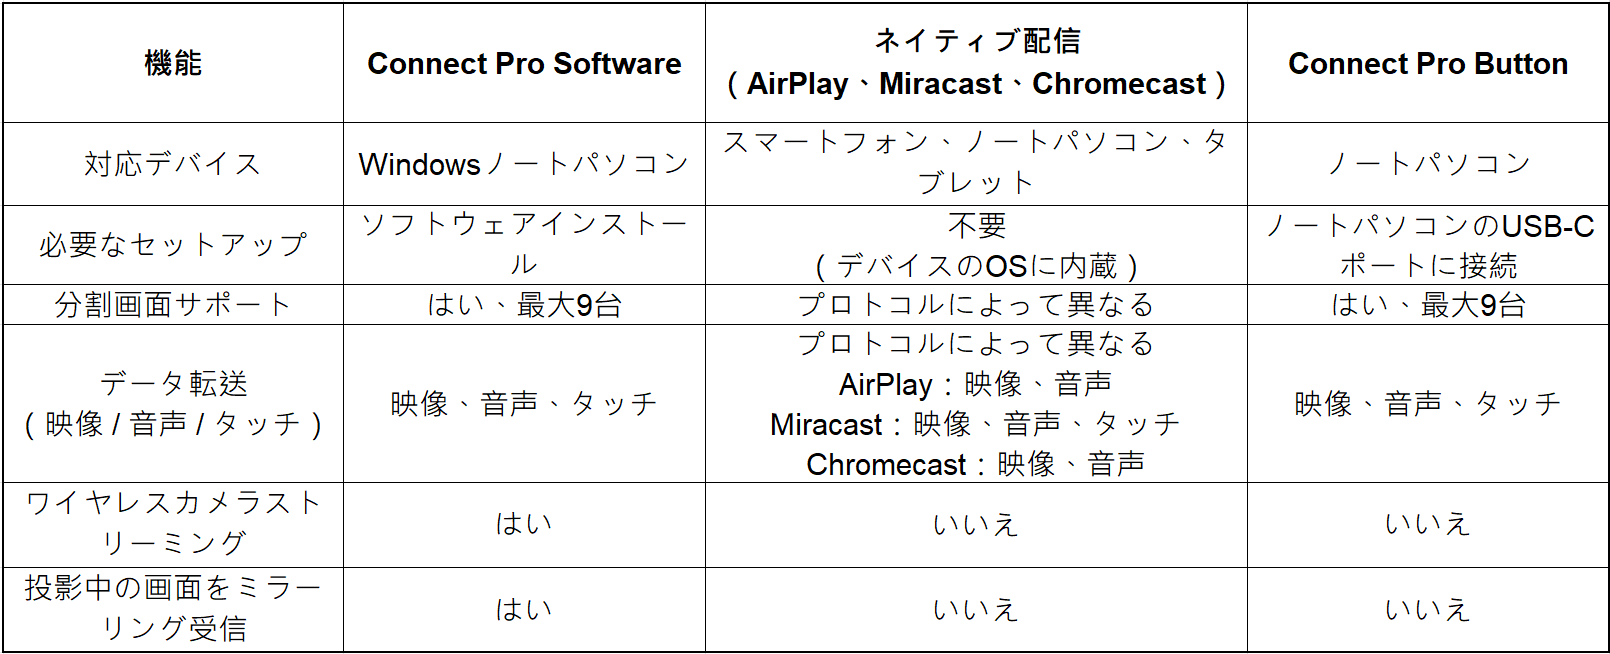
Innex Connect Pro+ は主要な画面共有プロトコルすべてに対応しており、ほぼすべてのデバイスと互換性があります。以下の表では、対応 OS、代表的な対応デバイス、および各プロトコルの主な機能をまとめています。
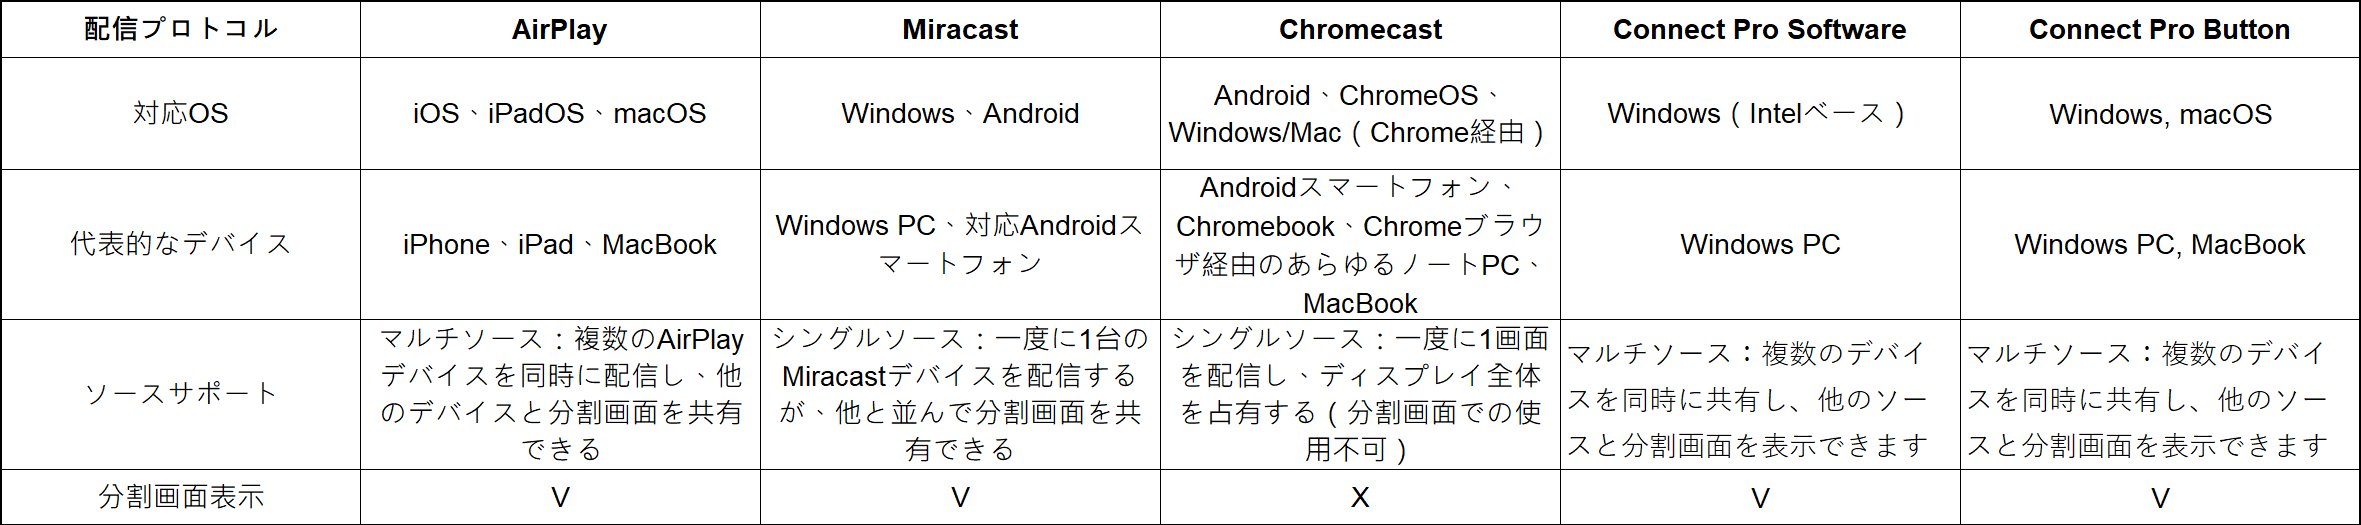
それぞれの方式は、画面共有やカメラストリーミングなど、必要な機能に応じて異なる特長を備えています。ご利用目的に合わせて、以下の比較表から最適な方式を選択してください。
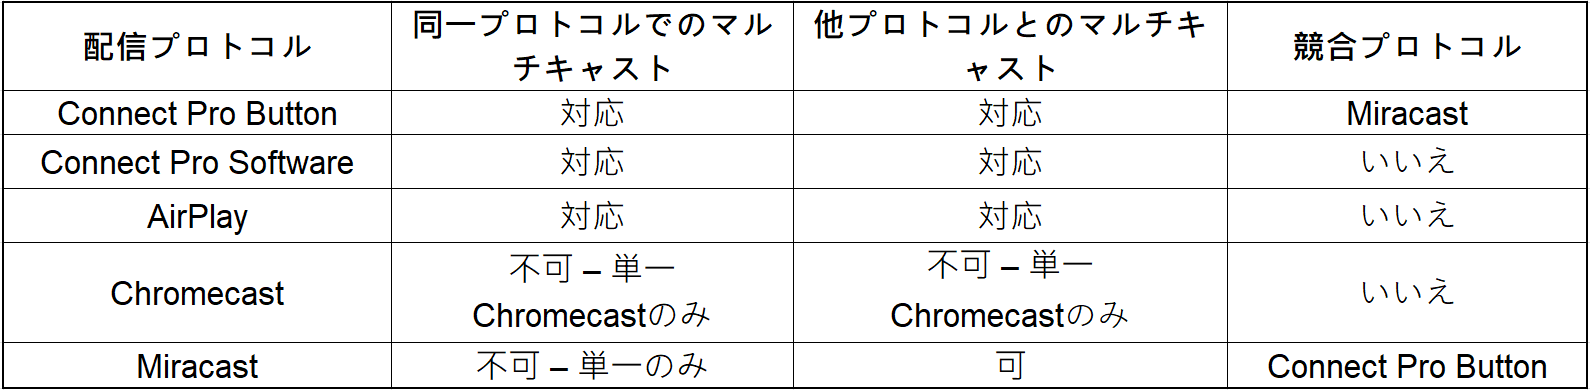
はい。Innex Connect Pro+ は最大9画面までの同時分割表示に対応しています(初期設定は4画面です)。
変更するには、「詳細設定」>「一般」>「最大分割画面」へ進んでください。
なお、ネットワークの混雑状況によっては、一部の画面が黒画面になったり、遅延が発生したりする場合があります。各プロトコルごとの分割表示対応については、以下の表をご参照ください。
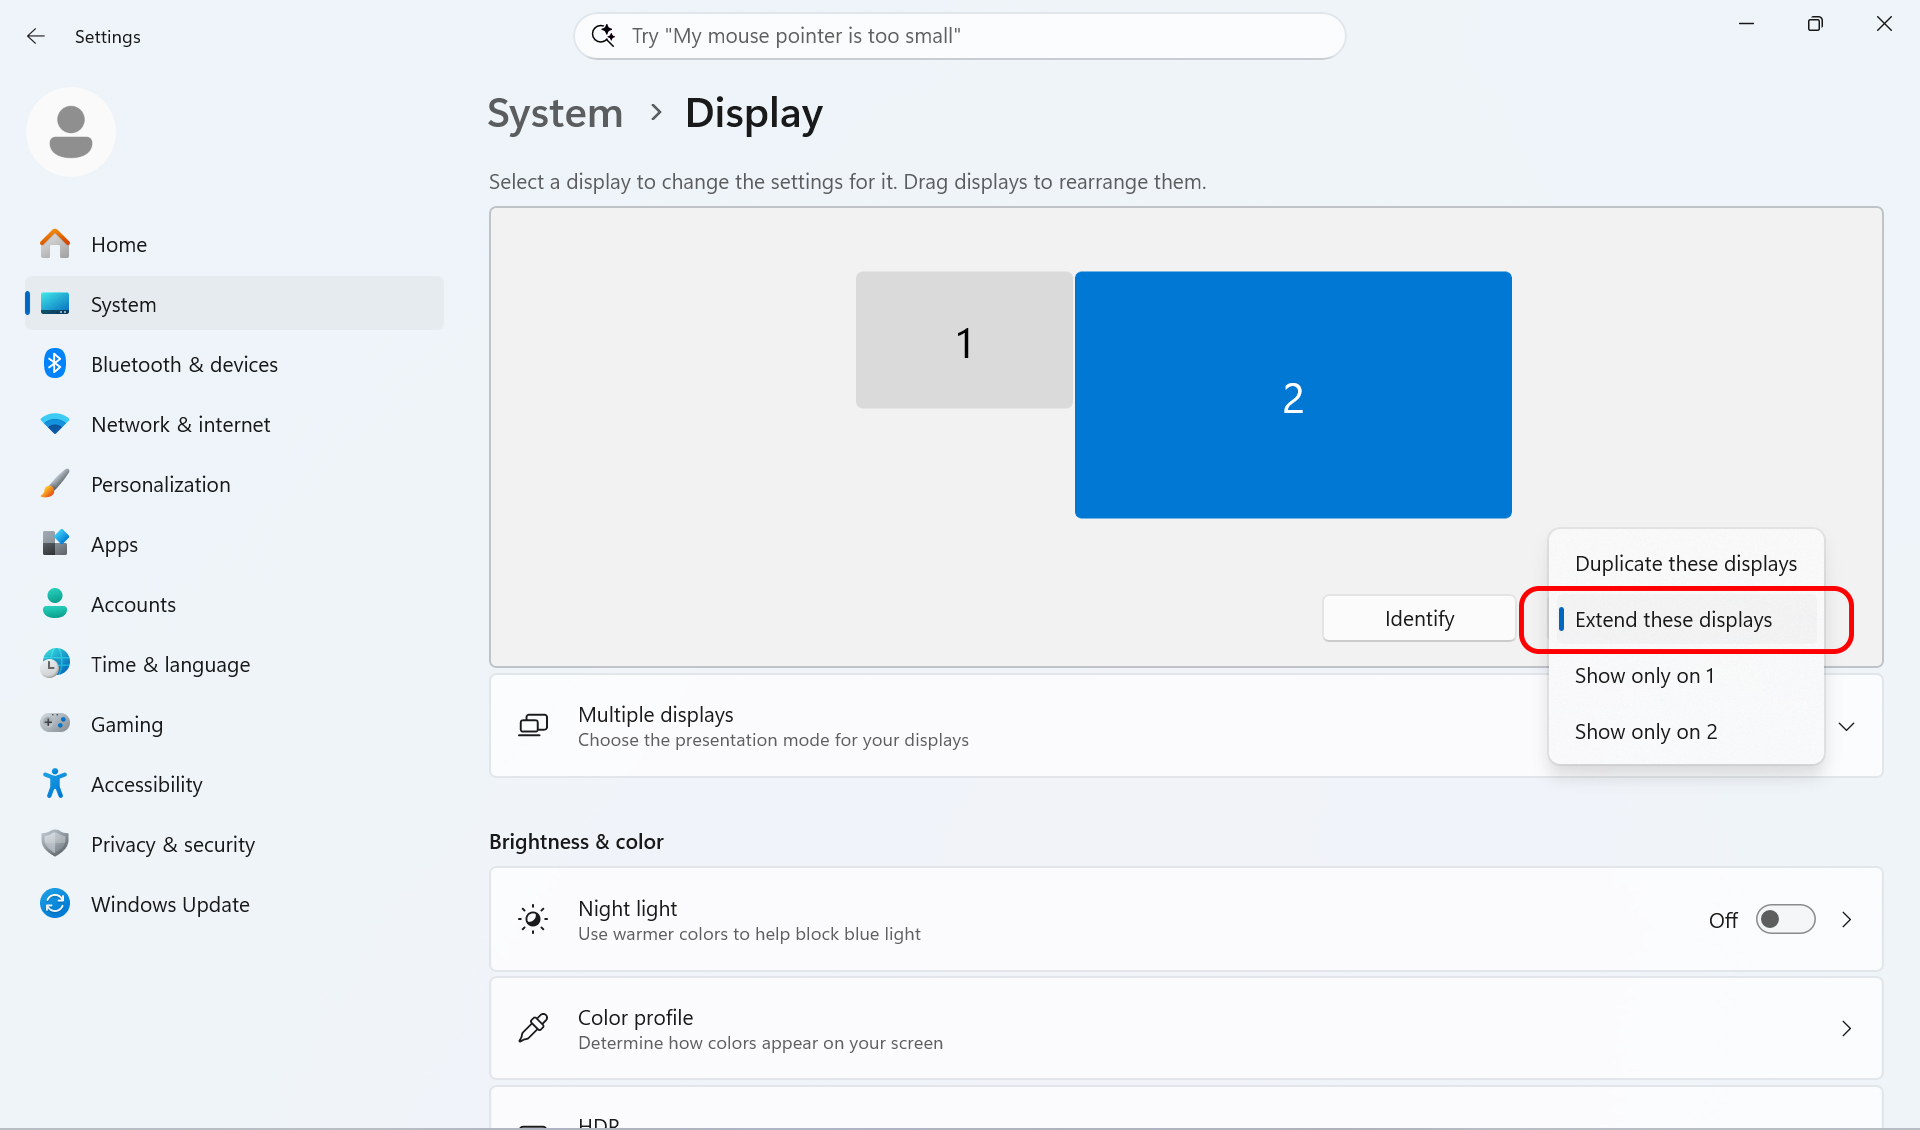
画面共有の解像度は、初期設定では画面共有する機器の現在の出力解像度に従います。4K 出力を有効にするには、Innex Connect Pro+ をソースデバイスの拡張ディスプレイとして設定し、手動で 4K 解像度を選択してください。
なお、解像度を 1080p から 4K に変更すると、リフレッシュレートが 60 Hz から 30 Hz に低下する場合があります。
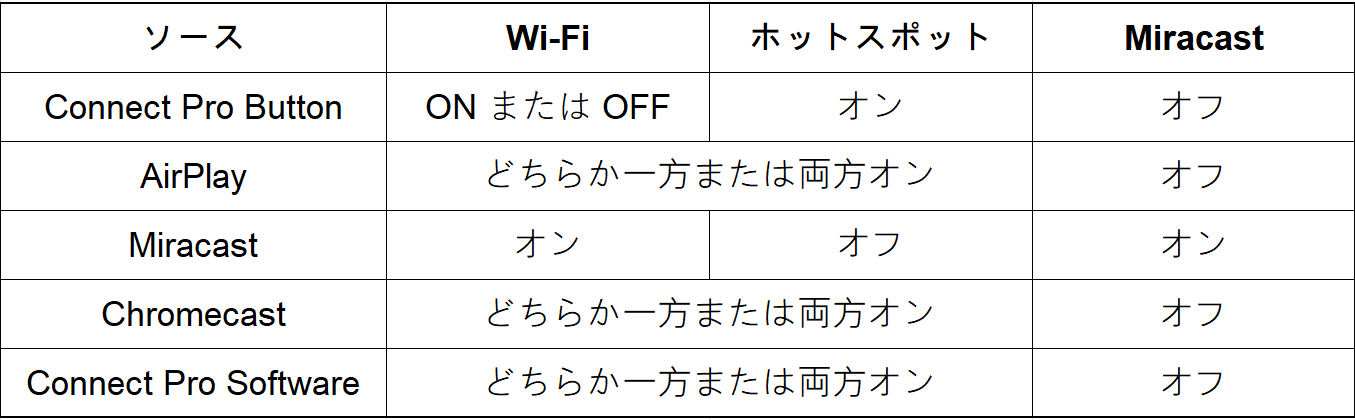
必要な設定は、使用するプロトコルによって異なります。各共有方式で必要となる Wi-Fi およびホットスポットの設定については、以下の表をご参照ください。
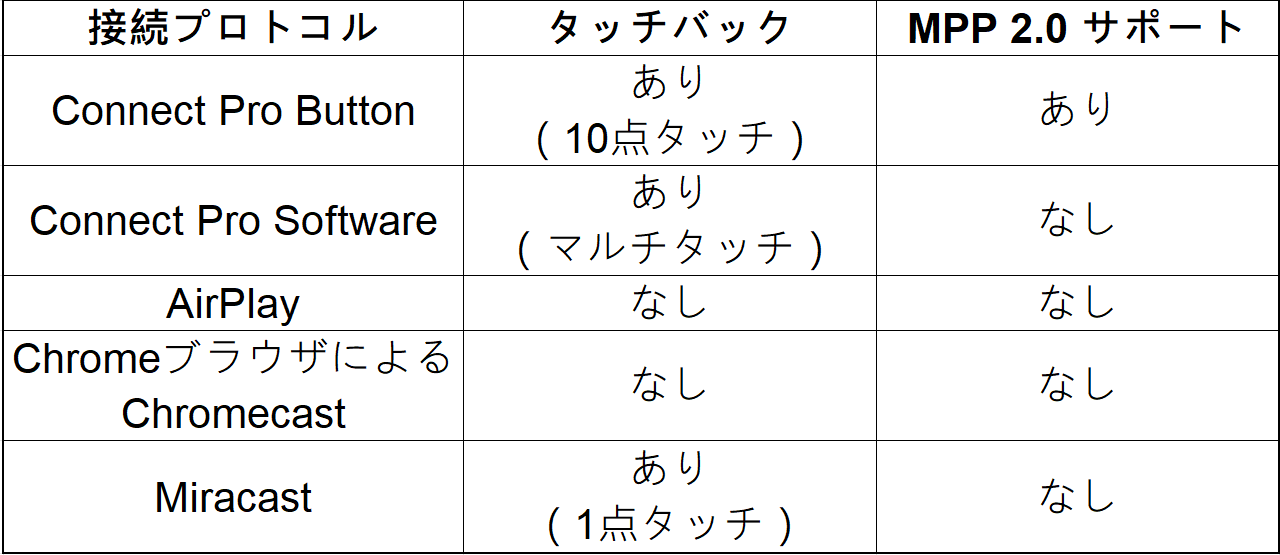
はい。Innex Connect Pro+ が対応するタッチ対応ディスプレイに HDMI ケーブルおよび USB タッチケーブルで接続され、対応プロトコルを使用して画面共有している場合、タッチバック機能を利用できます。
ただし、タッチスクリーンのプロトコルはメーカーごとに異なるため、一部の機器では互換性の問題が発生する場合があります。各画面共有プロトコルにおけるタッチバック対応状況については、以下の表をご参照ください。
画面左上のカメラアイコンをタップしてプレビュー画面を開き、より低い解像度を選択してください。1080p でのストリーミング時に遅延が発生する場合、カメラのデータ転送量がデコーダーの処理能力を超えている可能性があります。720p に切り替えることで、より滑らかで低遅延な映像になる場合があります。
※ 同じ 1080p 解像度でも、カメラによってデータ転送量が異なるため、表示性能に差が生じる場合があります。
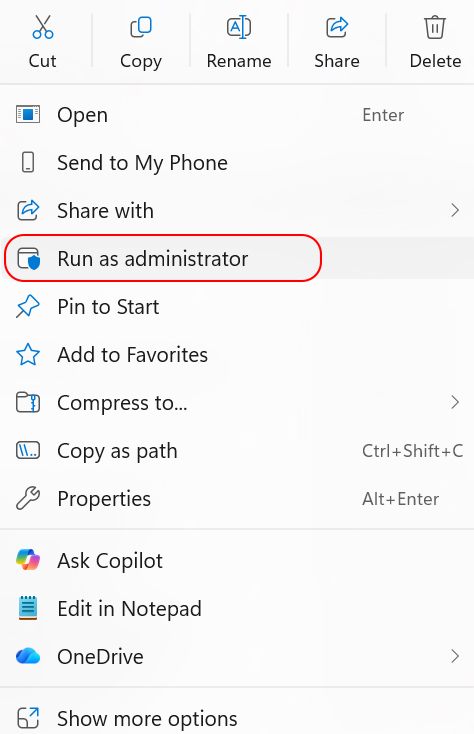
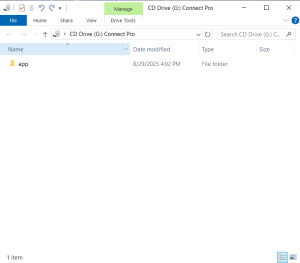
インストーラーが公式ウェブサイトからダウンロードされたものであることを確認してください。インストール時に管理者権限の許可を求められた場合は、完全にインストールするため、必ず許可してください。現在のバージョンは Windows 11 25H2 まで対応しています。問題が解決しない場合は、サポートまでお問い合わせください。
※ 本ソフトウェアは Intel ベースの Windows コンピューターのみ対応しており、ARM ベースのシステムには対応していません。
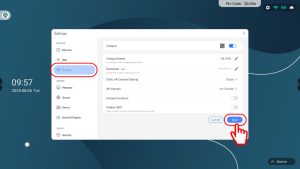
1. 「設定」>「詳細設定」>「PINコード」へ進み、PINコード機能が有効になっていることを確認してください。
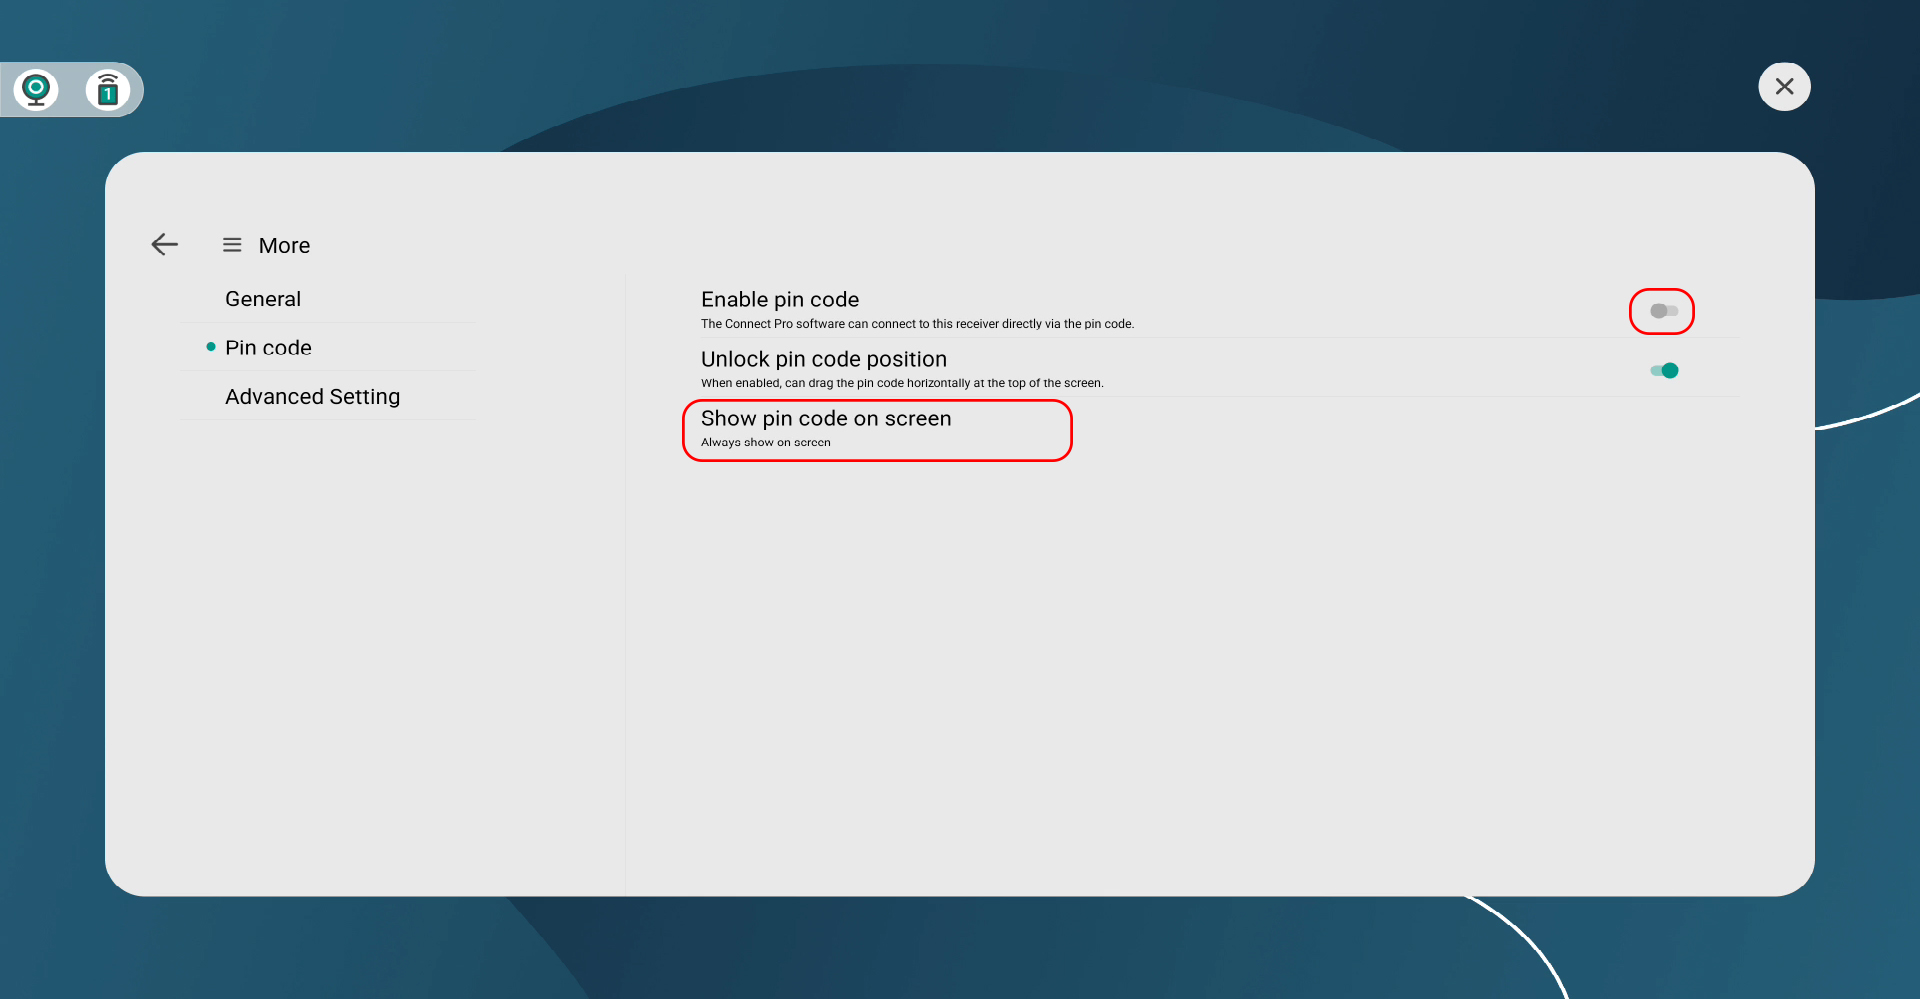
2. PINコード有効になっていても、「画面にPINコードを表示」の設定にて、「表示しない」などが選択されている可能性があります。「詳細設定」>「PINコード」へ進み、一度 PINコードをオフにしてください。その後、「画面にPINコードを表示」の設定を確認し、適切なオプションが選択されていることを確認してください。確認後、再度 PINコードを有効にしてください。
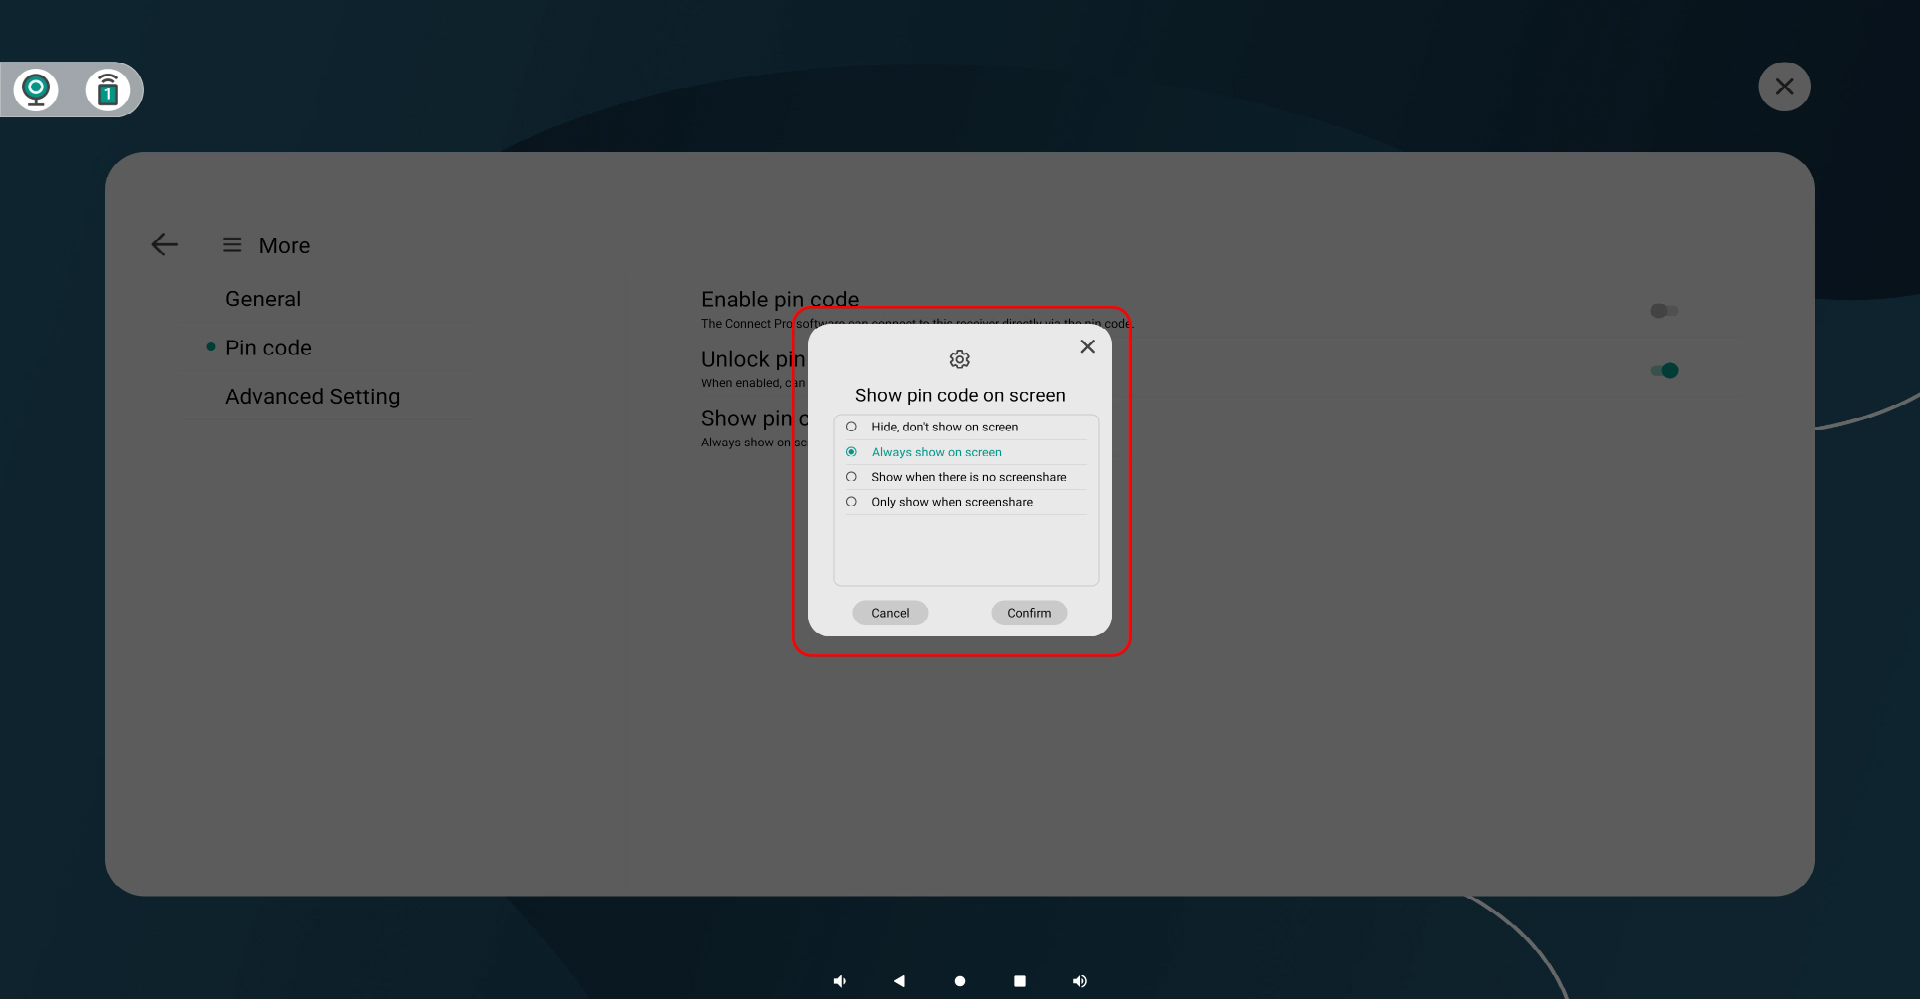
3. ネットワーク接続が不安定な場合、システムが自動的に PINコード機能を無効にすることがあります。再度有効にするには、「設定」>「詳細設定」>「PINコード」へ進み、一度 PINコードをオフにしてから再度オンにし、画面に表示されるか確認してください。
1. コンピューターと Innex Connect Pro+ が同じネットワークに接続されていることを確認してください。
2. Connect Pro+ のホーム画面に表示されているデバイス名が、接続しようとしているデバイス名と一致していることを再度確認してください。
3. ネットワーク環境が不安定な場合、ソフトウェアが Innex Connect Pro+ を検出できないことがあります。その場合は、PINコードを使用して接続するか、ホットスポット経由で接続し、ホットスポット IP アドレスを手動で入力してください。
ホットスポット IP アドレスを使用してコンピューターを Innex Connect Pro+ に接続する場合は、まずコンピューターを Innex Connect Pro+ のホットスポットに接続し、その後ソフトウェアにホットスポット IP アドレスを入力して接続を確立してください。
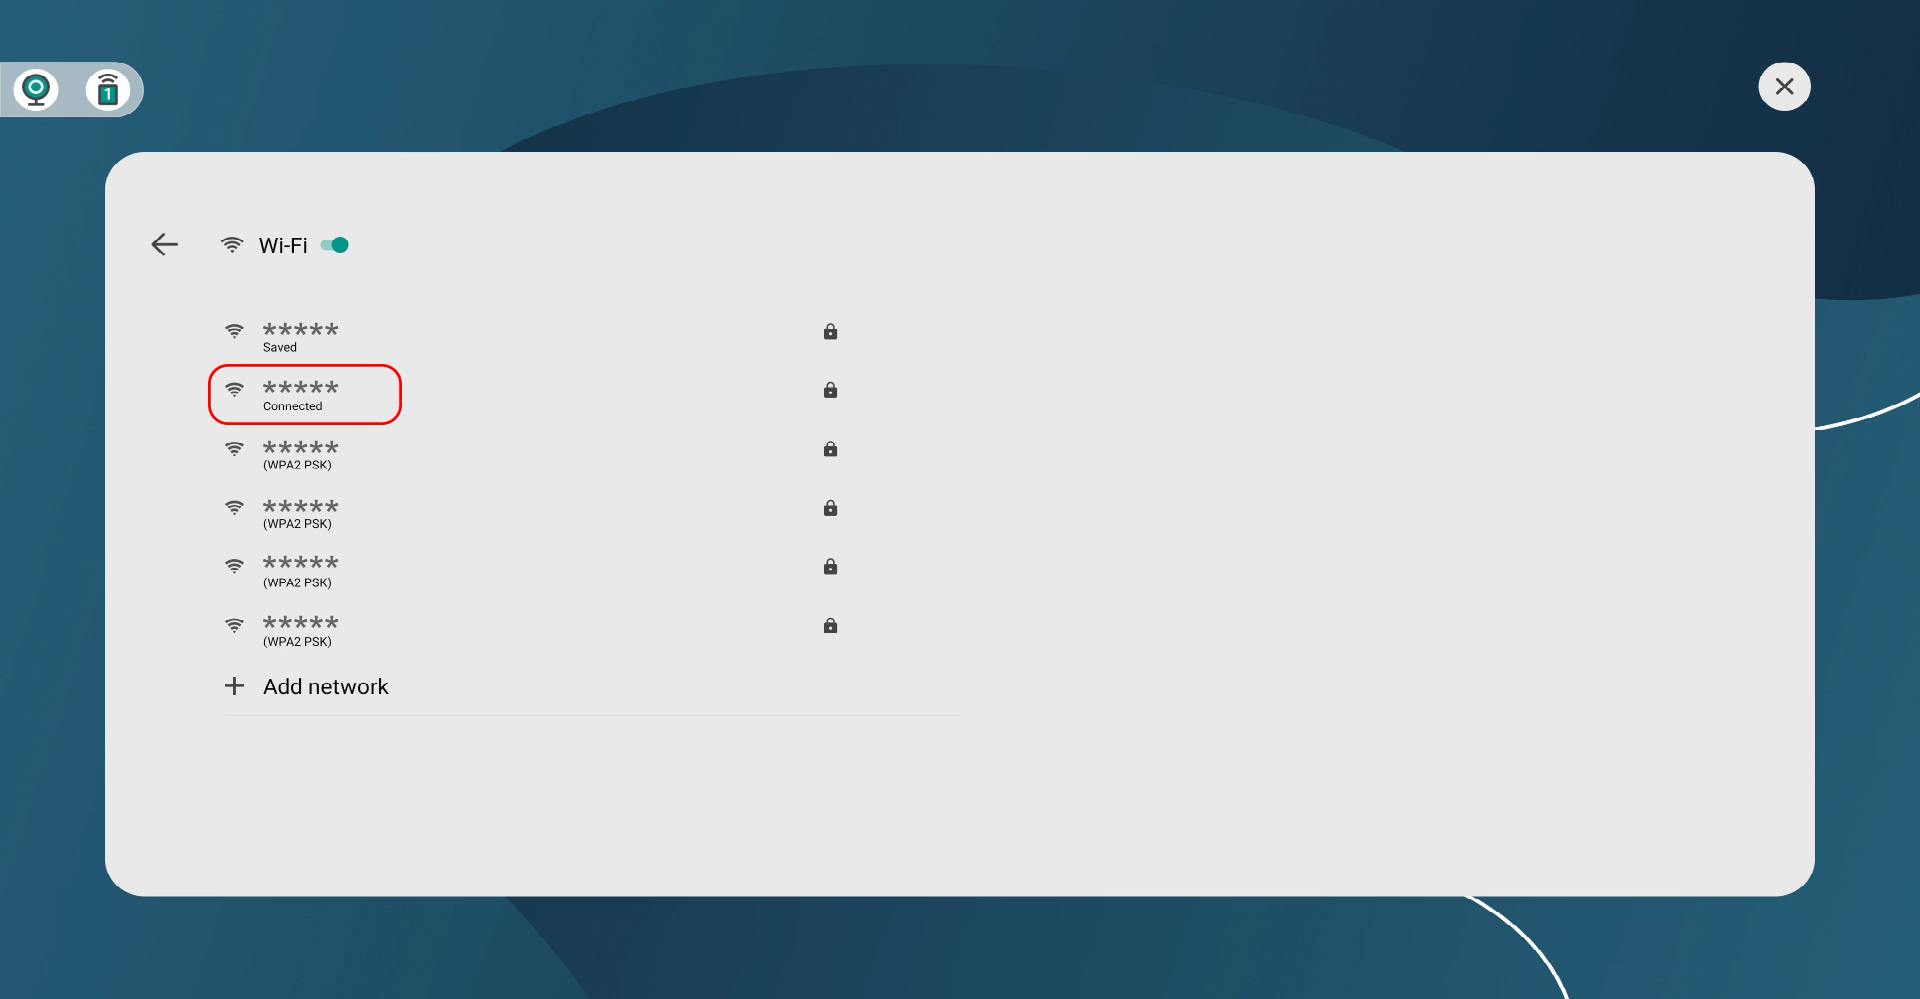
コンピューターと Innex Connect Pro+ が同じローカルネットワークに接続されている場合は、デバイスを検出するために Wi-Fi IP アドレスを入力してください。
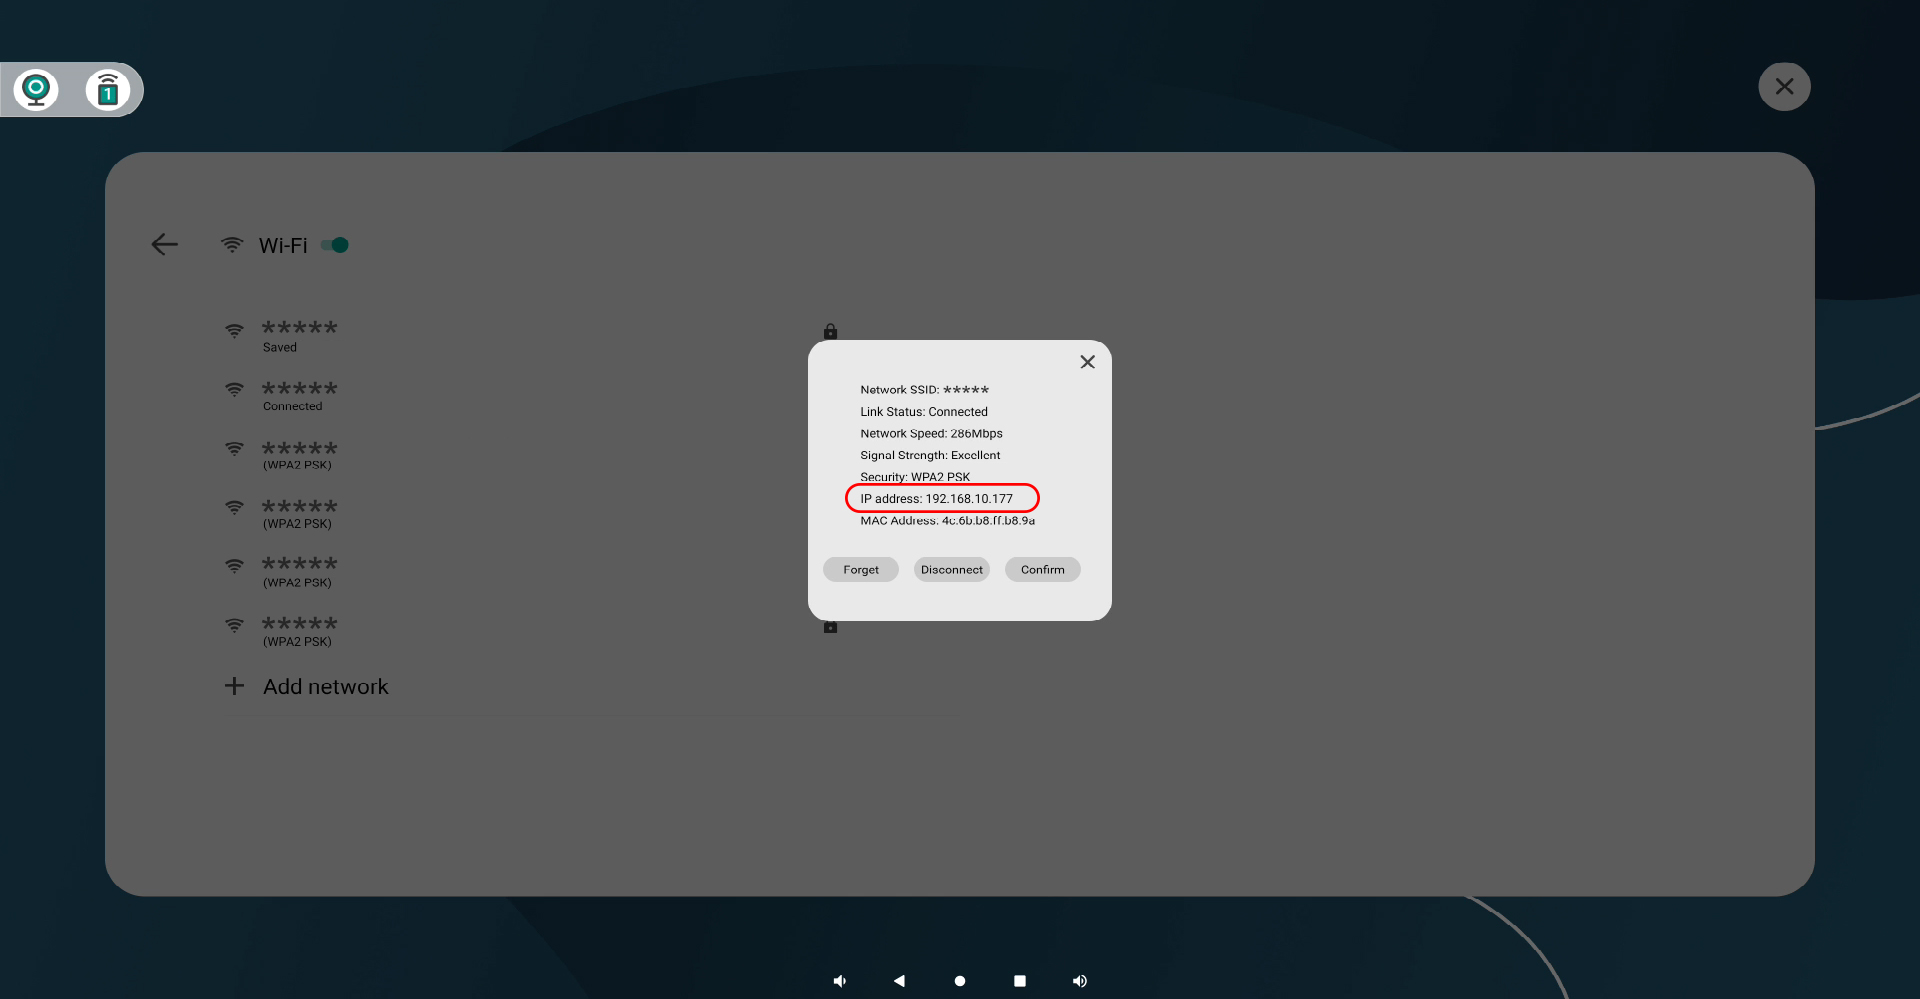
画質はネットワーク遅延(レイテンシー)に大きく左右されるため、安定した動作のためには 10 ms 未満を維持してください。現在のネットワーク環境は、速度テストサイトで確認できます。また、お使いのコンピューターがソフトウェアの最小システム要件を満たしていることも確認してください。
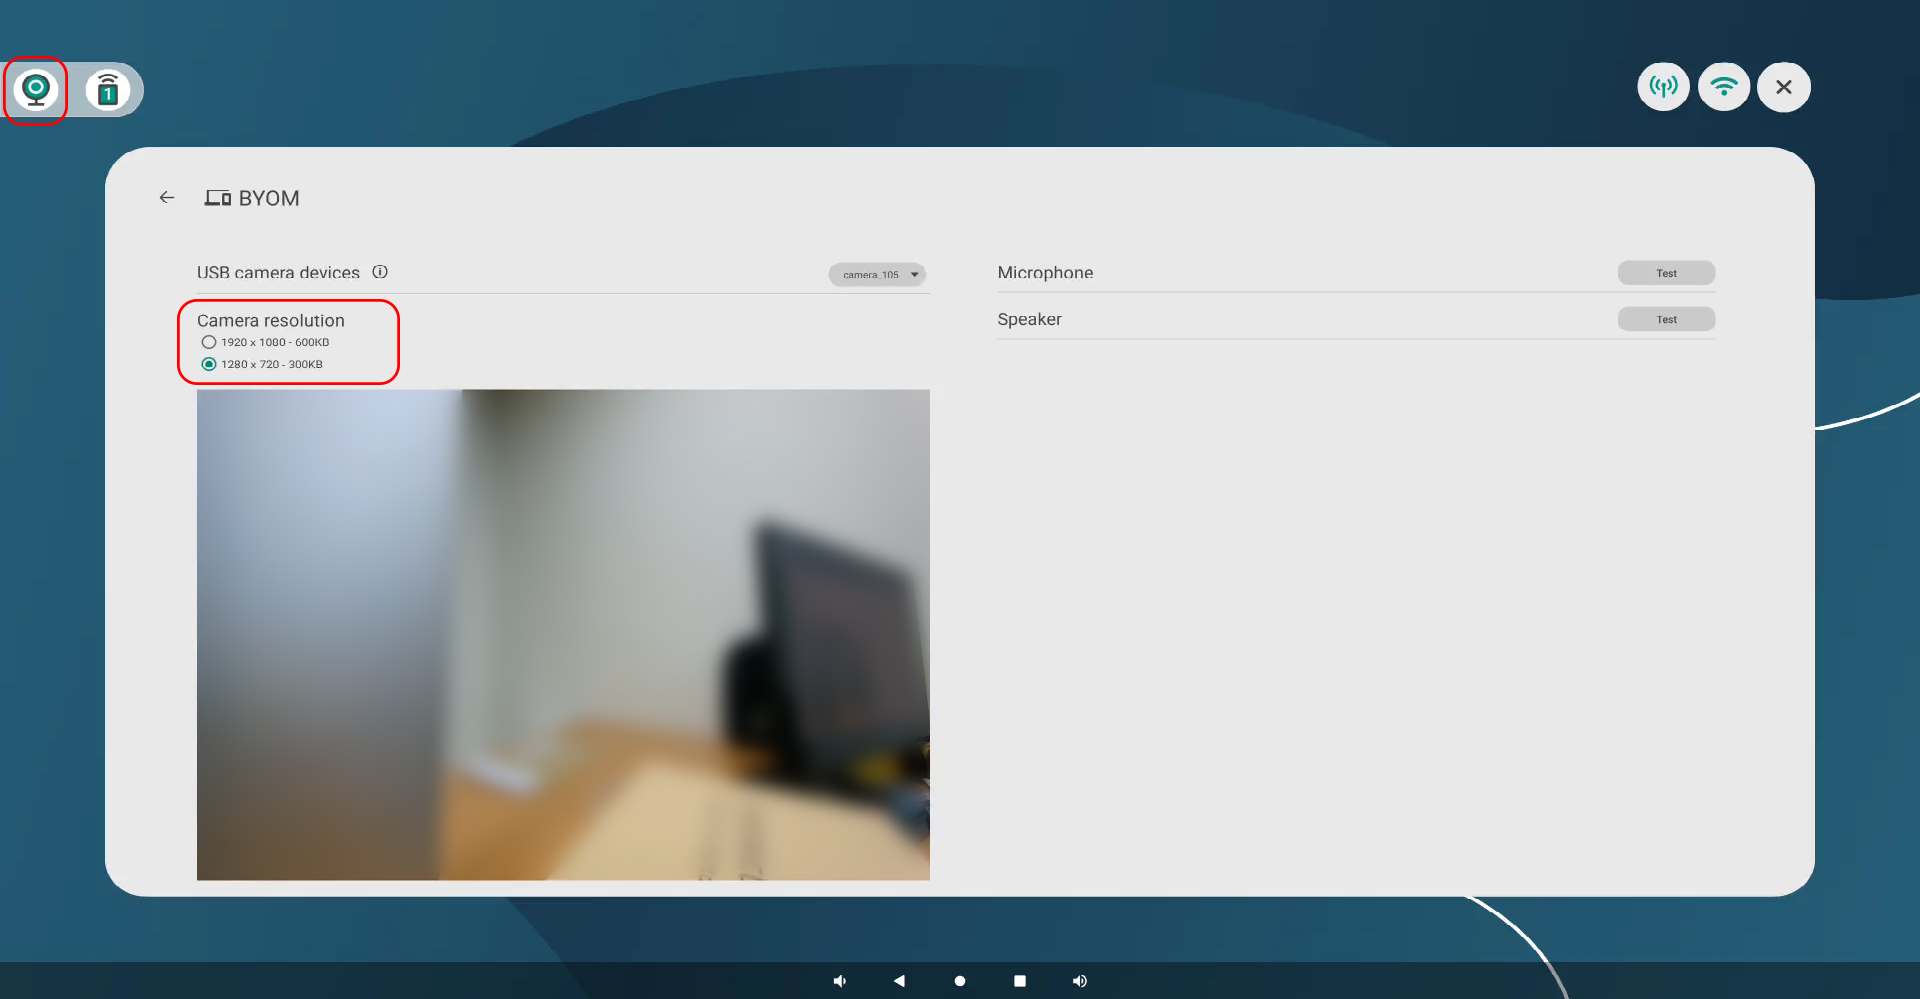
- 映像デバイスが Innex Connect Pro+ に正しく接続されていることを確認してください。
- 画面共有先のデバイスを選択した後、BYOM オプションを有効にしてください。(初期設定では無効になっています。)
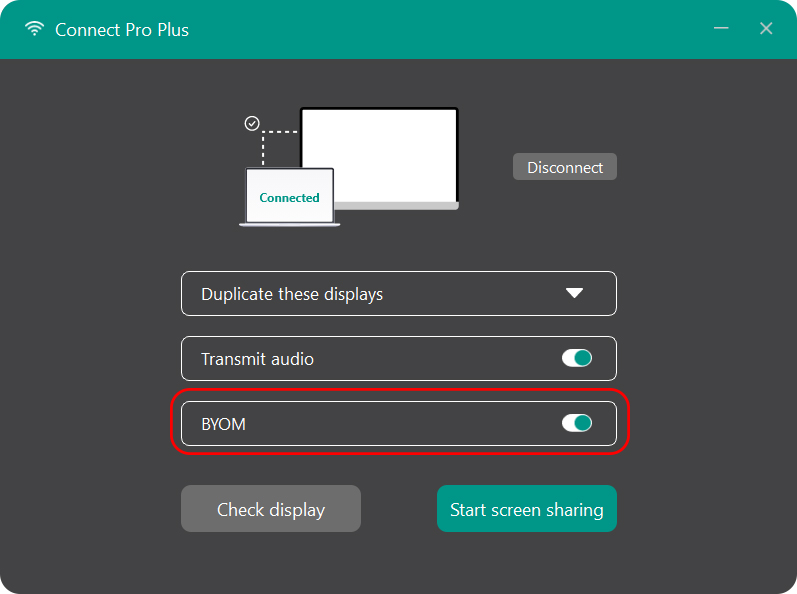
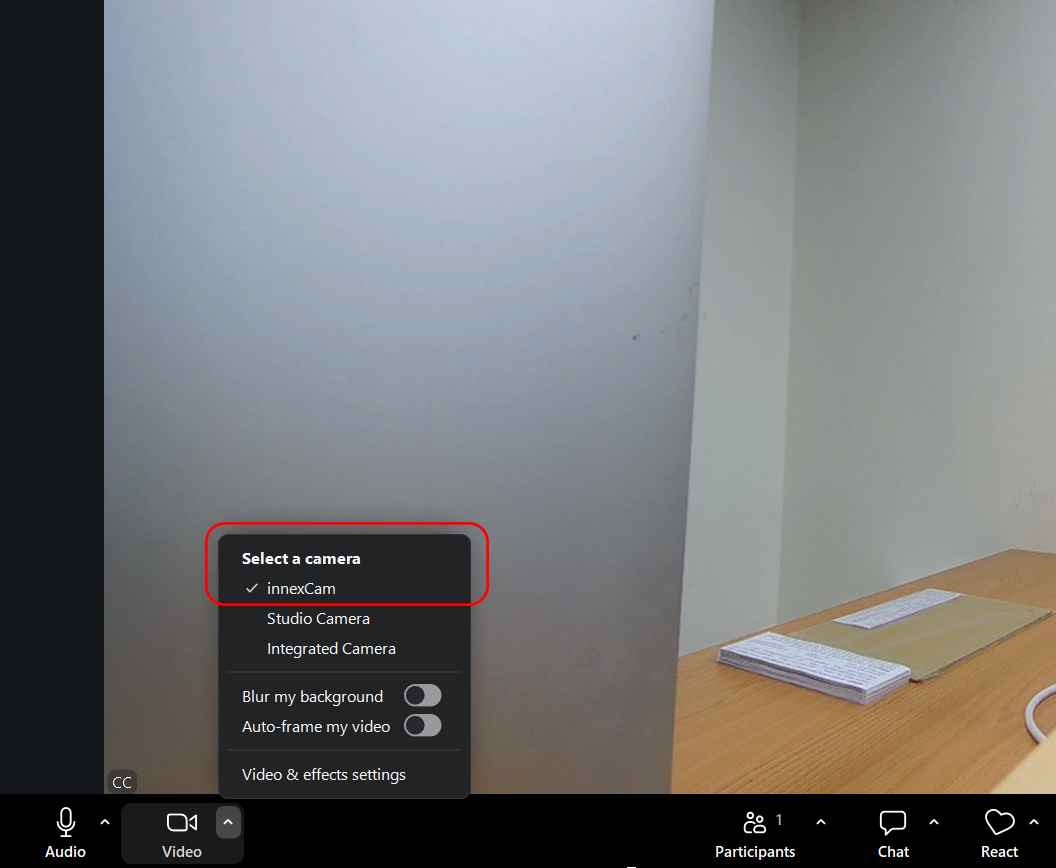
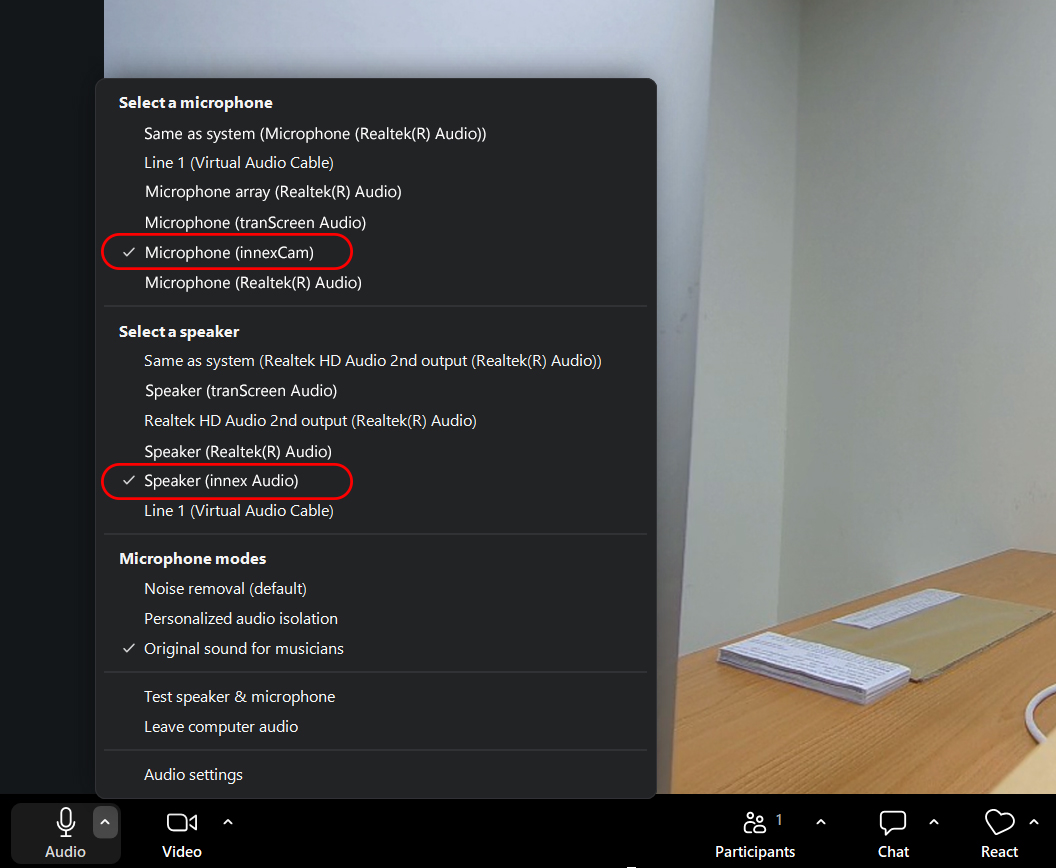
- 接続して画面共有が開始されたら、ビデオ会議アプリを開き、カメラとマイクに「innexCam」、スピーカーに「innexAudio」を選択してください。
- Webカメラなどのデバイスが Innex Connect Pro+ に正しく接続されていることを確認してください。
- 画面共有先のデバイスを選択した後、「BYOM」オプションを有効にしてください。(初期設定では無効になっています。)
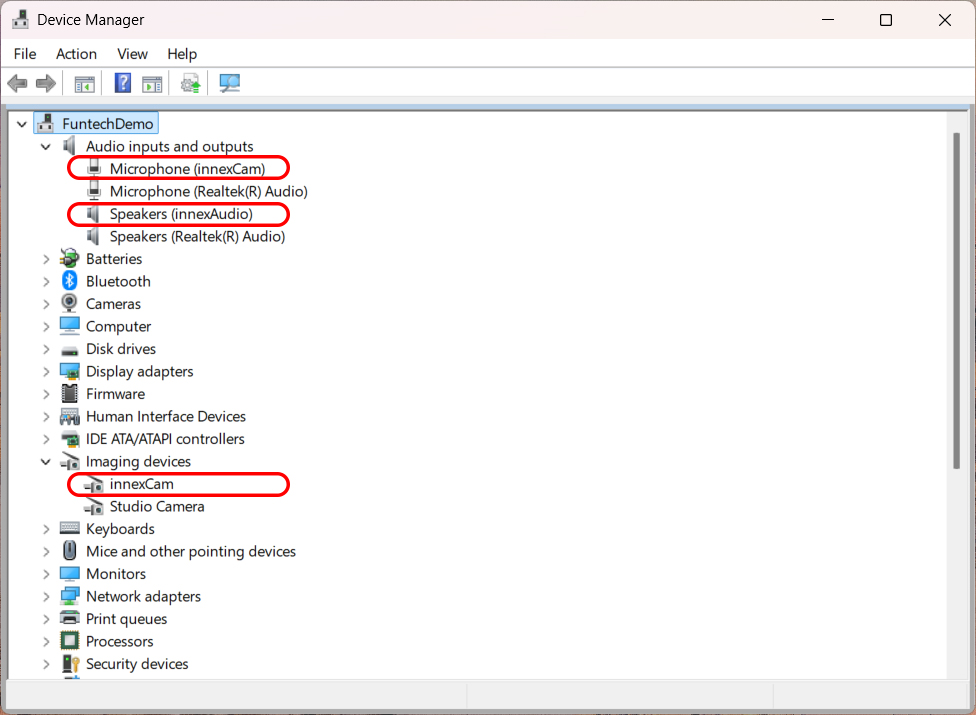
- Windows のデバイスマネージャーを開き、「イメージング デバイス」に「innexCam」、「サウンド、ビデオ、およびゲーム コントローラー」に「innexAudio」が表示されているか確認してください。いずれかのデバイスが表示されない場合は、Connect Pro Software のドライバーが正しくインストールされていない可能性があります。 Connect Pro Software をアンインストールし、管理者権限で再インストールしてください。
- 映像デバイスが Innex Connect Pro+ に正しく接続されていることを確認してください。
- 画面共有先のデバイスを選択した後、BYOM オプションを有効にしてください。(初期設定では無効になっています。)
- 青い画面が表示される場合は、不安定または低品質なネットワーク接続が原因であることが一般的です。ネットワーク状態を確認し、安定した接続であることを確認してください。
Chrome ブラウザでデバイスを検索すると、ウィンドウ下部に「ソース」ボタンが表示されます。このボタンをクリックすると、画面全体をキャストするか、単一のタブをキャストするかを選択できます。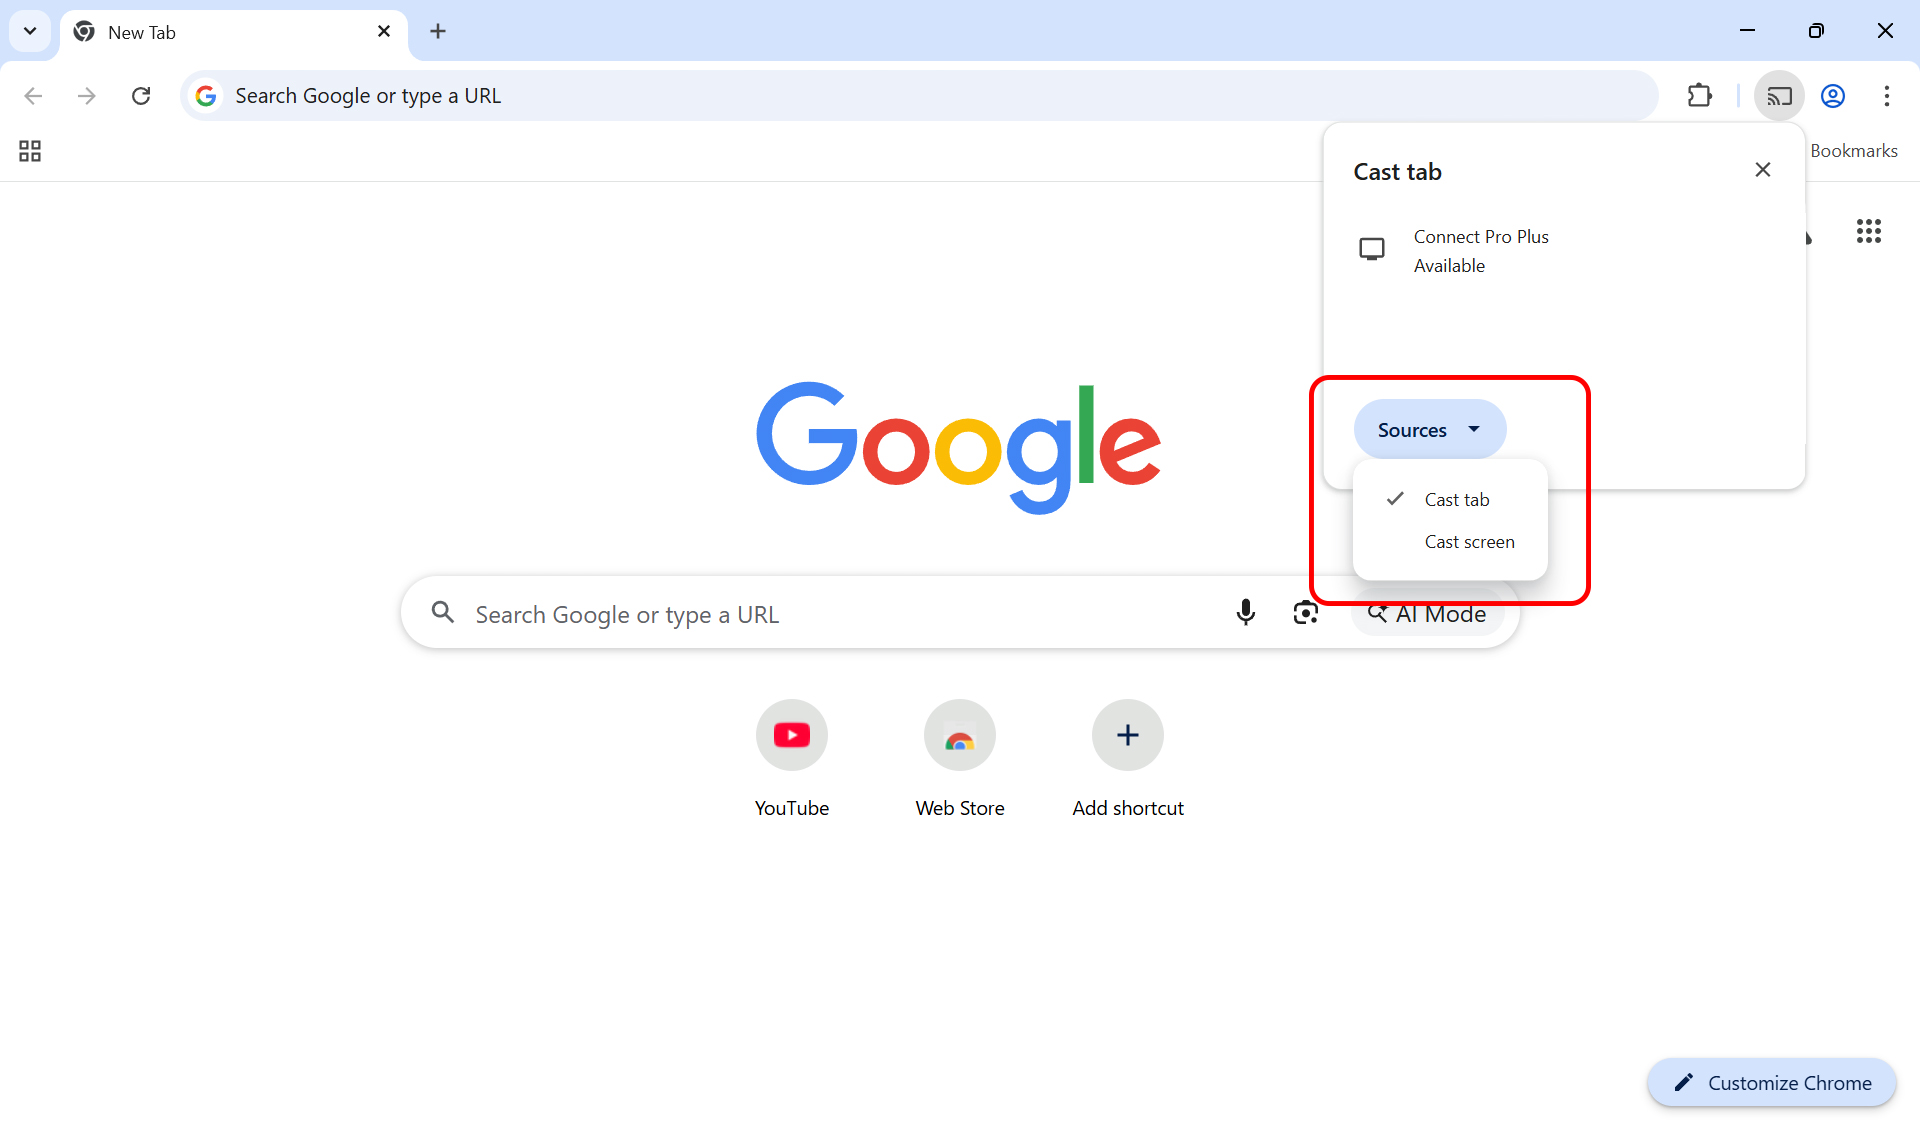
Innex Connect Pro+ は、Chromecast 出力時に 16:9 のアスペクト比を使用します。ノートPC の画面をミラーリングしている場合、多くのノートPC は異なるアスペクト比を使用しているため、映像が画面全体に表示されないことがあります。全画面に表示するには、拡張表示モードを使用するか、ソース側の解像度を 16:9 に変更してください。
ChromecastのネイティブプロトコルはほかのプロトコルとのSplit-Screen表示に対応していません。Chromecastがアクティブな場合、1つのChromecastソースのみ表示できます。
Connect Pro Button をコンピューターに接続すると、赤色の点滅が始まります。これは、コンピューターへの接続および受信機の検索を行っている状態を示します。ボタンが白色の点滅に変わると、画面共有の準備が完了しています。ボタンを押すと画面共有が開始されます。
- お使いのコンピューターの USB-C ポートが DisplayPort Alt Mode に対応していることを確認してください。
- コンピューターに複数の USB-C ポートがあり、そのうちの1つが主に電源入力用として使用されている場合、Connect Pro Button が電源機器として誤認識され、正常に接続できないことがあります。その場合は、先にコンピューターを充電器へ接続してから Connect Pro Button を接続してください。
コンピューターが外部デバイスを正常に検出しているにもかかわらずインジケーターが赤色のままの場合、Connect Pro Button が Innex Connect Pro+ を見つけられていないことを意味します。以下を確認してください。
- Connect Pro Button を Innex Connect Pro+ と再ペアリングしてください。
- Innex Connect Pro+ のホットスポットがオンになっていることを確認してください。
上記を確認してもインジケーターが赤色のままの場合は、現在の環境で無線干渉が発生している可能性があります。問題を解決するため、ホットスポットのチャンネルを変更してください。
はい。Connect Pro Button の側面には USB-C パススルー充電ポートが搭載されています。このポートに純正の充電ケーブルを接続することで、画面共有中でもコンピューターを充電できます。
画面共有を停止する前に Connect Pro Button を取り外した場合、特に USB Type-C パススルー充電ポートに充電ケーブルが接続されている状態では、一時的に画面がカクつくことがあります。
この場合は、Connect Pro Button 背面の充電ケーブルを取り外し、約1分ほどお待ちください。通常、画面表示は正常に戻ります。問題が解決しない場合は、Innex Connect Pro+ を再起動してください。
推奨手順:
- 画面共有を停止する。
- Connect Pro Button から充電ケーブルを取り外す。
- Connect Pro Button をコンピューターから取り外す。
Connect Pro Button やコンピューターの故障を防ぐため、必ずコンピューター付属の純正電源アダプターをご使用ください。電力は Connect Pro Button を経由して供給されるため、一定の電力損失が発生します。そのため、通常より充電速度が遅くなったり、システム上に「低速充電」の警告が表示されたりする場合がありますが、これは正常な動作です。
Connect Pro Button は OTA(Over-the-Air)アップデートに対応しています。ペアリングのために、Innex Connect Pro+ 側面の USB-C ポートへ Connect Pro Button を挿入してください。Innex Connect Pro+ がインターネットに接続されている場合、更新の有無を自動的に確認し、利用可能なファームウェアを自動でダウンロードおよびインストールします。
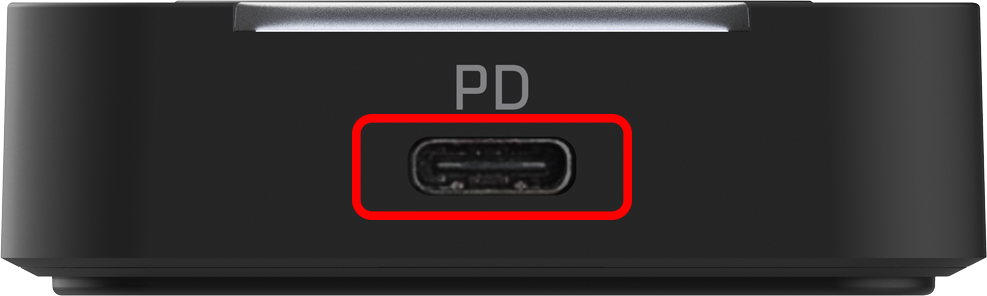
一部の HP 製 PC では、USB Type-C の互換性問題が発生することが確認されています。この問題が発生した場合は、Connect Pro Button 側面の USB Type-C(Power)ポートに電源を接続してください。なお、このポートは電源入力専用です。正常に動作すると、Connect Pro Button のランプが白色に点灯または点滅します。
問題が解決しない場合は、代替手段として PC 上で Connect Pro Software をご利用ください。
この現象は、通常 Windows コンピューターでのみ発生します。
「設定」→「Bluetooth とデバイス」→「自動再生」へ進むか、検索バーに「自動再生」と入力してください。
その後、「すべてのメディアとデバイスで自動再生を使う」をオフにするか、「リムーバブル ドライブ」のドロップダウンメニューから「何もしない」を選択してください。
- 青点灯: 電源がオンの状態
- 青点滅: スリープモードの状態。画面をタップするとスリープモードから復帰
- 青点灯(画面オフ): 画面オフモードの状態。リモコンで再度「画面オフ」ボタンを押すと通常モードに復帰
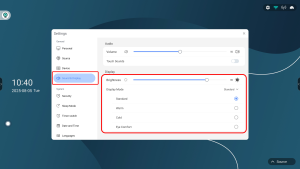
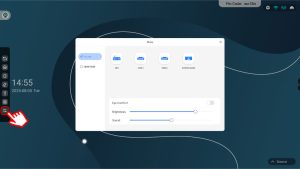
「設定(メイン設定)」>「映像・音声」>「表示」 の順に進んで、各項目を調整してください。
CM55はアスペクト比を変更することはできません。
初期設定ではOPSは、信号片が「OPS」に切り替わらないと起動しません。
OPSを起動するには、以下の手順を行ってください:
- 入力ソースを「OPS」に切り替えます。
- 最初は「信号なし」と表示される場合がありますが、これは正常です。OPSの起動を待っている状態です。数秒お待ちいただくと、OPSの画面が自動的に表示されます。
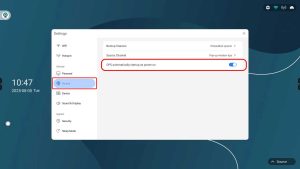
- また、メイン設定の「信号源」>「電源投入時にOPSを自動にオンにする」を有効にすると、CM55の電源投入と同時にOPSも自動で起動するようになります。
画面右上のWi-Fiアイコンをタップすると、Wi-Fi設定が表示されます。
- メイン画面でホットスポットアイコンをタップして有効にします。
- ホットスポット名(SSID)やパスワードを変更するには、[設定]>[ネットワーク]>[ホットスポット]に進んでください。
- SSIDとパスワードの欄を編集した後、「確認」を押して新しい設定を保存します。
デフォルトのパスワードは「1234」です。「設定」>「セキュリティ」で新しいパスワードを入力することで変更できます。
CM55のシステム設定パスワードを忘れてしまった場合は、以下の手順で復旧できます:
- 初期パスワード
– 初期パスワードは「1234」です。 - パスワードをリセットする方法(工場出荷時リセット)
– パスワードを変更して忘れてしまった場合は、工場出荷時リセットを行う必要があります。
– リセット方法:CM55背面の物理リセットボタンを、画面が暗くなるまで長押ししてください。
– 再起動後、システムは工場出荷時の設定に戻り、パスワードも初期値「1234」にリセットされます。
ご注意
- この操作を行うと、すべてのシステム設定が初期状態に戻り、保存されているデータやインストールしたアプリが消去されます。すでに使用開始している場合は慎重に実施してください。
※セキュリティの観点から、「設定」ページは初期状態でパスワード保護されています。
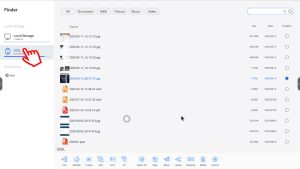
- デスクトップの「Finder」アイコンをタップします。
- 左側のサイドバーにある「ローカルストレージ」欄から、表示されているUSBフラッシュを見つけて選択します。
- USBフラッシュをタップすると、中のデータを閲覧・アクセスできます。
入力ソースは以下の方法で切り替えることができます:
- リモコンを使って直接信号源を変更します。
- 画面右下の「信号源」アイコンをタップし、希望の入力ソースを選択します。
- 画面横のツールバーにある「メニュー」アイコンをタップし、メニューから信号源を選びます。
- 「設定」>「信号源」>「新しい信号源に接続時」で「自動的に表示を切り替え」を選択すると、新しい入力信号が検出された際に自動で切り替わります。
- 「ウィンドウを表示し確認」が選択されている場合は、新しい入力が検出されると確認メッセージが表示され、切り替えを促します。
- ケーブル接続を確認してください:HDMIケーブルがしっかりと接続されており、損傷していないことを確認してください。
- EDID設定を調整してください:信号ソース画面で、サイドツールバーを開き、メニューアイコンをタップします。信号ソースウィンドウが表示されたら、「HDMI EDID」をタップし、EDIDモードを1.4と2.0の間で切り替えて、接続機器との互換性の問題を解決してください。
以下の手順でタッチロックを行い、ミーティングの小休止時などに、内容が変更されてしまうことなどを防ぐことが可能です。
- サイドツールバーから「ツールボックス」を開きます。
- 「タッチロック」をタップし、ワンタイムパスワードを設定します。または、リモコンの「タッチロック」ボタンを押します。
- タッチロックが有効になると、画面が少し暗くなり、左下に鍵アイコンが表示されます。

- 解除するには、鍵アイコンをタップし、設定したパスワードを入力します。

※注意:パスワードを忘れないようご注意ください。忘れた場合は、CM55を再起動する必要があります。
- 音声出力デバイスがCM55に設定されていない(ケーブル接続時):接続したデバイス(例:ノートパソコン)側の音声出力が内蔵スピーカーのままになっている場合があります。サウンド設定を開き、「CM55」または「HDMI Audio」を出力デバイスとして選択してください。
- 音声ケーブルが接続されていない(HDMI + USB接続の場合):一部のデバイスでは、HDMIが映像のみ対応で、音声は別途USB接続が必要な場合があります。HDMIとUSBの両方のケーブルが正しく接続されているか確認してください。
- 音声出力デバイスがCM55に設定されていない(Connect Proボタン接続時):接続したデバイス(例:ノートパソコン)側の音声出力が内蔵スピーカーのままになっている場合があります。サウンド設定を開き、「Connect Pro」を出力デバイスとして選択してください。
- CM55のスピーカー音量が小さい、またはミュートされている:CM55本体の音量設定を確認し、ミュートになっていないか確認してください。
- デバイス側の音量が小さい、またはミュートされている:接続しているデバイスの音量設定を確認し、ミュートになっていないか確認してください。
- コンテンツが保護・制限されている(DRM):著作権保護されたコンテンツは、特定の構成では音声出力が制限される場合があります。別のコンテンツで動作を確認するか、互換性をご確認ください。
- ケーブルまたはポートの問題:別のHDMIケーブルやHDMIポートを試してみてください。
- 電池を確認する:電池が消耗しているか、正しく取り付けられていない可能性があります。新しい電池に交換し、極性(+/-)が正しくセットされているか確認してください。
- 赤外線の妨げがないか確認する:リモコンは赤外線(IR)を使用しており、センサーとの間に遮るものがあると動作しません。リモコンと本体の間に障害物がないことを確認してください。
- リモコンの範囲外で操作していないか確認する:IRリモコンには有効範囲があります。5〜7メートル以内で操作してください。
- 本体が反応していない:本体がフリーズしている可能性があります。デバイスを再起動し、再度お試しください。
リモコンの青いラベルが付いたボタンは、内蔵カメラの操作用です。カメラが起動して使用中でないと動作しません。
はい、可能です。付属のモバイルスタンドは、部屋の中で簡単にディスプレイを移動でき、どこでもコラボレーションスペースにできる便利さから推奨していますが、CM55は壁掛けや市販のサードパーティ製スタンドにも対応しています。
CM55はVESAマウント規格に対応しています。
VESAサイズ:600 × 200 mm
この規格は広く普及しており、多くの市販の壁掛け金具やブラケットと互換性があります。
※注意:取り付けるマウントやブラケットがVESA 600×200に対応していること、そして55インチディスプレイの重量に耐えられる仕様であることを必ずご確認ください。
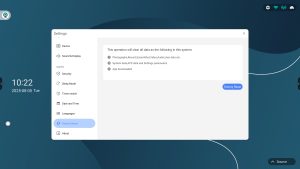
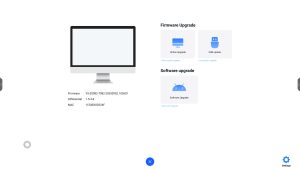
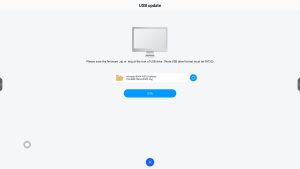
*アップグレードを行うと、デバイスが工場出荷時設定にリセットされ、すべてのユーザーデータが消去されます。事前にデータのバックアップを行ってください。
1. FAT32形式でフォーマットしたUSBドライブを準備します。
2. USBドライブのルートディレクトリに「update」というフォルダを作成します。
3. ファームウェアパッケージを解凍し、ファームウェアファイルをUSBドライブにコピーして、ファイル名を「YS-EMEETING-ES982.img」に変更します。
4. USBドライブをCM55のUSB 2.0ポートに挿入します。
5.アプリ一覧を開き、OTA(Over-the-Air Update)アプリを起動します。
*OTAアプリが見つからない場合:
– アプリ一覧のタイトルを長押しします。
– パスワード入力画面が表示されます。
– パスワード、またはデフォルトパスワード「1234」を入力します。
– OKを押すと、隠されていたOTA(Over-the-Air Update)アプリが表示されます。
6. USBアップデート(USB Update)」を選択します。画面にアップグレードファイルが表示されたら、「OTA(Over-the-Air Update)」を押してアップグレードを開始します。
一部の言語の変更は、再起動後に反映されます。
言語を変更した後は、CM55を再起動して、新しい言語設定を確実に反映させてください。
- 赤点滅 (遅): 接続中
- 白点滅 (速): 接続完了/投影待受け状態
- 白点灯: 画面投影中
- 赤点灯:エラー
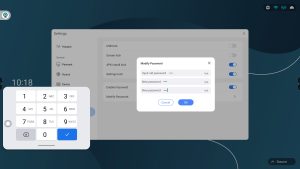
以下の手順で変更できます:
ホーム画面または入力ソースメニューから、「画面共有」アイコンをタップします。
Connect Proの画面右上にある「設定」アイコンをタップします。
「一般」に進み、「パスワードの更新」をタップします。以下の2つのオプションから選択可能です:
- 固定パスワード
– このオプションを選ぶと、「デバイスパスワード」の欄で任意のパスワードを設定でき、毎回同じパスワードで接続できます。
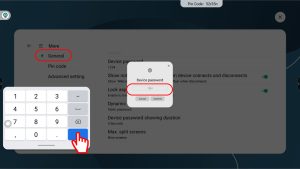
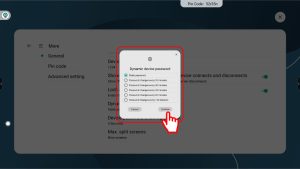
- 一定時間ごとに自動更新されるランダムパスワード
– セキュリティ強化のため、システムがランダムなパスワードを生成し、定期的に自動更新します。更新間隔は10 / 30 / 45 / 60 / 120分から選択可能です。
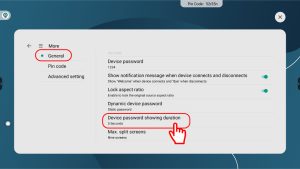
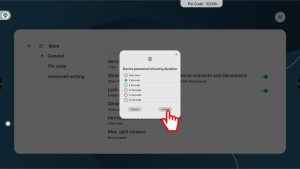
設定メニューでパスワードのトースト通知(画面に一時的に表示されるメッセージ)の表示時間を調整できます。
手順:画面共有の設定 > 「一般」 > 「デバイスパスワード表示時間」 へ進み、表示時間を変更してください。
また、デバイスパスワードはホーム画面にも常時表示されているため、トースト通知が消えても、いつでもホーム画面から確認できます。
デバイス名は、AirplayやChromecastを使用して画面を共有する際に受信側のデバイスを識別するために使用されます。
自分の端末から接続し、画面を投影する際にこの名前が表示されます。
初期設定では、画面共有用のデバイス名はホットスポット名と同じになっています。

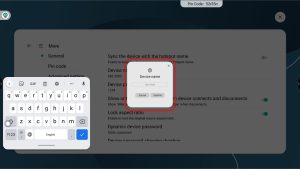
はい、デバイス名はホットスポット名とは別に設定・変更できます。以下の手順で行ってください:
- Connect Proの 設定 を開きます:
「さらに見る」 > 「一般」 に進みます。 - 「デバイス名をWi-Fi AP/ホットスポット名と同期」 をオフにします。
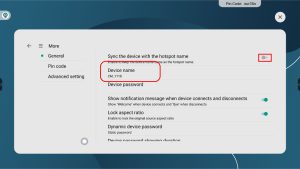
- 「デバイス名」 をタップして、新しいデバイス名を入力・設定します。
初めて接続する場合や新しいデバイスを使用する場合、これは想定された動作です。以下のような流れになります:
- Connect Proボタンをデバイスに挿すと、LEDが赤く点滅し始めます。
- レシーバーと通信して画面共有の準備が整うまで、約15秒ほどかかります。
- 接続が完了すると、LEDが白く点滅し、画面共有の準備ができたことを示します。
- ボタンを押すと、LEDが白く点灯し、画面共有が開始されたことを示します。
お使いのPCのUSB Type-Cポートが、Power Delivery(PD)およびDisplayPort Alternate Mode(DP Alt Mode)に対応しているかご確認ください。
USB Type-CポートがDP Alt ModeまたはPower Deliveryに対応していない場合は、Connect Proソフトウェア、Miracast、Chromecastなどの別の方法で画面を共有してください。
Connect ProボタンのLEDインジケーターが赤く点灯している場合、ペアリングエラーが発生しています。以下の手順に従って、再度レシーバーとペアリングしてください。
- Connect ProボタンをCM55背面のUSB Type-Cポートに接続します。
- 画面にペアリング状況が表示されます。
- LEDインジケーターが赤点灯から白の点滅に変わると、CM55とのペアリングが完了したことを示します。
- ペアリング完了後、ボタンをPCに接続して画面共有を開始できます。
- Connect Proボタンがレシーバーとペアリングされていることを確認してください。LEDインジケーターが赤く点灯したままの場合は、再度ペアリングを行ってください。
- お使いのデバイスのUSB Type-Cポートが、DP AltモードおよびPower Deliveryに対応していることを確認してください。
- Connect ProボタンをUSBハブ経由で他のアクセサリと一緒に接続している場合、十分な電力が供給されず正常に動作しないことがあります。必ずデバイスに直接接続してください。
Connect Proソフトウェアを使用するには、以下の点をご確認ください:
- ソフトウェアが最新バージョンであることを確認してください。
- デバイスとレシーバーが同じネットワーク(VLANを使用している場合は同じサブネット)に接続されていることを確認してください。
- ルーターや企業ネットワークがmDNSをブロックしていないことを確認してください。
- もしルーターや企業ネットワークがmDNSをブロックしている場合は、デバイスをホットスポットに接続してください。
- IPアドレスで接続する場合は、デバイスがレシーバーのホットスポットに接続されている必要があります。
- Netflixなどの一部の動画配信プラットフォームの映像は、コンテンツ保護ポリシーおよび著作権管理(DRM)の関係でConnect Proソフトウェアを通して画面共有できません。
AirPlayを使用するには、以下の点をご確認ください:
- デバイスとレシーバーが同じネットワーク(VLANを使用している場合は同じサブネット)に接続されていることを確認してください。
- ルーターや企業ネットワークがmDNSをブロックしていないことを確認してください。
- もしルーターや企業ネットワークがmDNSをブロックしている場合は、デバイスをホットスポットに接続してください。
- Netflixなどの一部の動画配信プラットフォームの映像は、コンテンツ保護ポリシーおよび著作権管理(DRM)の関係でAirPlayでは共有できません。
- 再起動が有効な場合があります。iPhoneを再起動して再度お試しください。
Miracastを使用するには、以下の点をご確認ください:
- CM55のホットスポット機能がオフになっていることを確認してください。オフにするには、「メイン設定」>「ホットスポット」に進み、トグルスイッチをオフにしてください。
- Miracast機能がオンになっていることを確認してください。有効にするには、「Connect Pro設定」>「Miracast」に進み、トグルスイッチをオンにしてください。
- デバイスが同じネットワークに接続されていることを確認してください。
- 一部のWindowsやAndroidデバイスでは、Miracast機能を手動で有効にする必要があります。有効になっているか確認してください。
- デバイスのグラフィックスおよびWi-Fiドライバーが最新であることを確認してください。特にWindows PCでは、ドライバーが古いとMiracastが正常に動作しない場合があります。
- ウイルス対策ソフトやファイアウォールによる干渉:一部のネットワーク保護設定やファイアウォールのルールが、キャスト接続をブロックすることがあります。
- ネットワーク保護設定やファイアウォールのルール以外にも、物理的な距離、壁、他の機器からの干渉により、Miracastの信号が弱くなる場合があります。
- Miracastを使用して投影を行った後に、デバイス名を変更した場合、次回接続する際に、使用可能なディスプレイのリストに変更前のデバイス名が表示されます。変更前のデバイス名を選択し、接続することにより、デバイス名が更新されます。または、Windowsの設定>Bluetoothとデバイス>ワイヤレスディスプレイとドックから、変更前のデバイス名を選択、「このデバイスを削除します」から削除を選択することで、再度Miracastのデバイス検索を行うことで、変更後のデバイス名が表示されます。
Chromecastを使用するには、以下の点をご確認ください:
- デバイスとレシーバーが同じネットワーク(VLANを使用している場合は同じサブネット)に接続されていることを確認してください。
- ルーターや企業ネットワークがmDNSをブロックしていないことを確認してください。
- もしルーターや企業ネットワークがmDNSをブロックしている場合は、デバイスをホットスポットに接続してください。
- Netflixなどの一部の動画配信プラットフォームの映像は、コンテンツ保護ポリシーおよび著作権管理(DRM)の関係でChromecastでは共有できません。
- 再起動が有効な場合があります。デバイスを再起動して、再度お試しください。
接続中、Connect ProボタンのLEDは赤く点滅します。
接続が確立されると白く点滅し、画面共有の準備が完了したことを示します。
Connect Proボタンが長時間赤く点滅したままの場合は、以下を確認してください。
1. ノートパソコンに外部デバイスとして「Connect Pro」が検出されているか確認してください。通常、検出時にポップアップウィンドウが表示されます。
*ノートパソコンがConnect Proボタンを検出しない場合は、電源アダプターを接続してください。電力供給が不足していると、ボタンが認識されないことがあります。
2. ノートパソコンに接続されると、Connect Proボタンは自動的にレシーバーを検索します。
ネットワーク環境によっては、この処理に30秒以上かかる場合があります。
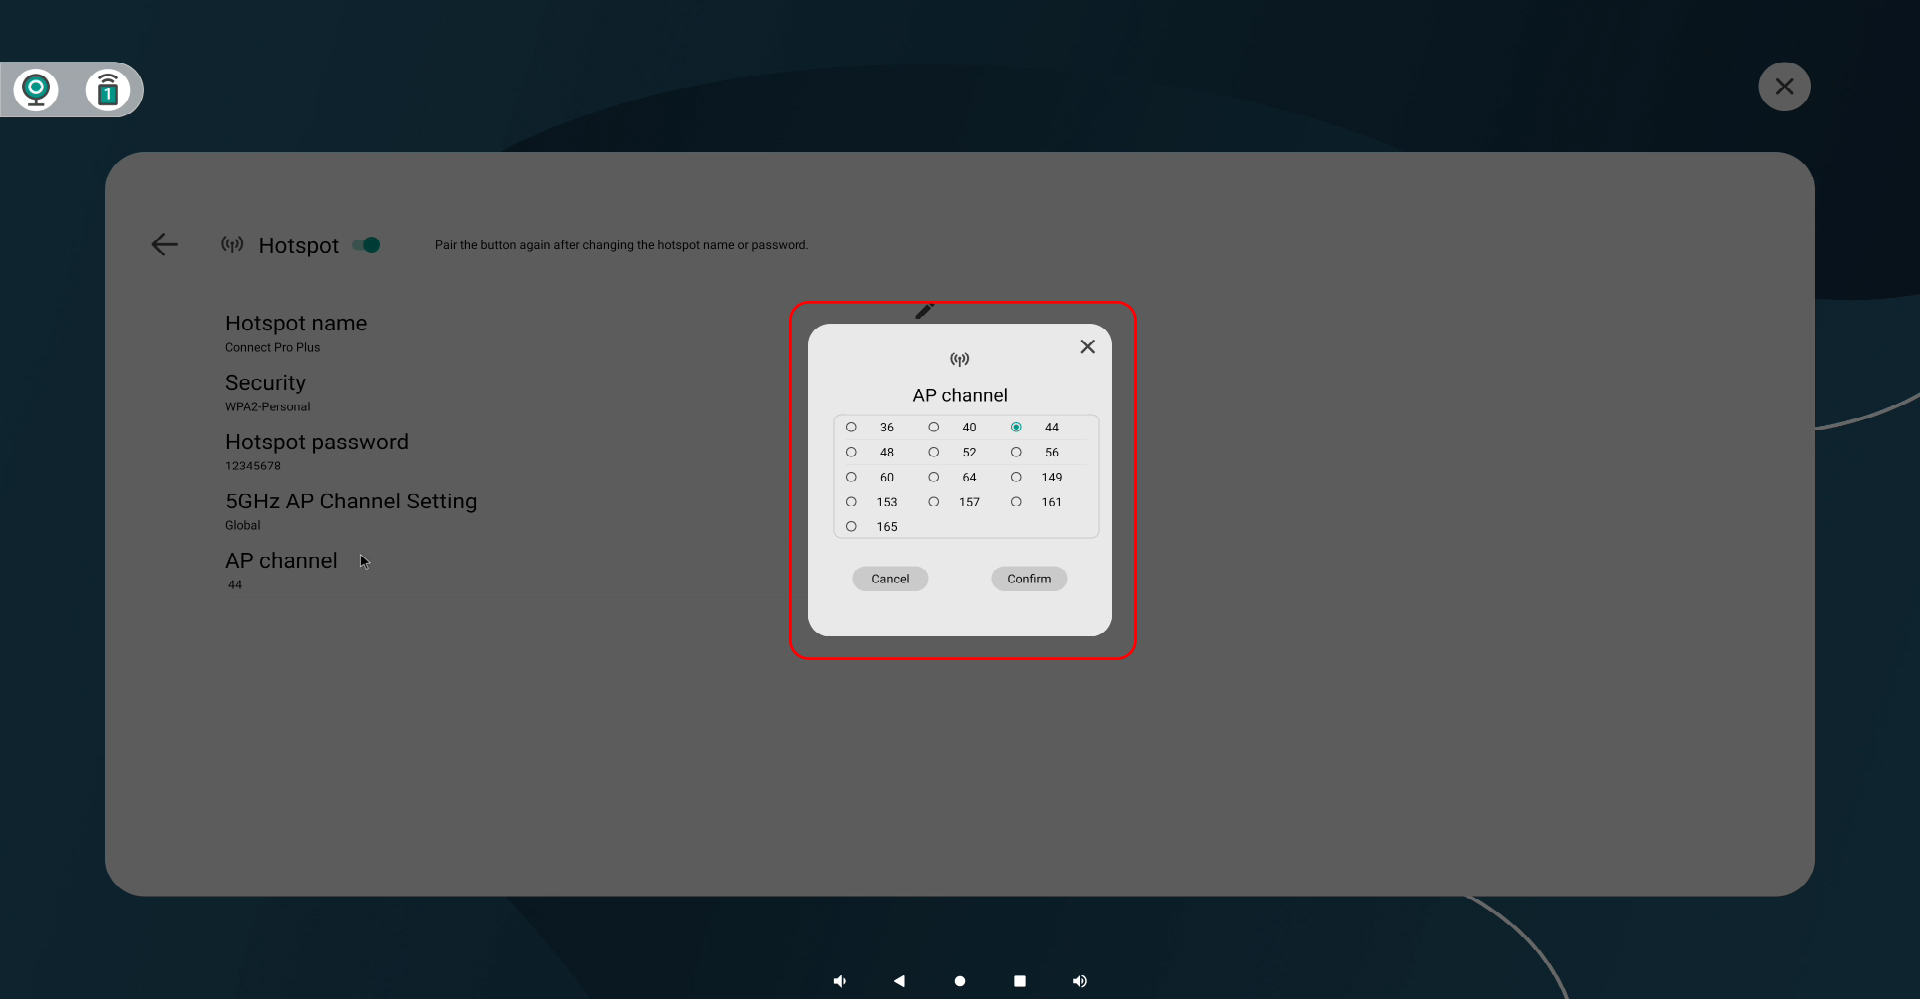
3. 赤い点滅が続く場合は、CM55のホットスポット設定を開き、使用中のチャンネルを確認してください。
- DFSチャンネルはワイヤレス画面共有時に干渉を引き起こすことがあります。
- 安定した接続のために、36 / 40 / 44 / 48 / 149 / 153 / 157 / 165 などの非DFSチャンネルの使用を推奨します。

※初めて使用する場合は、事前に充電が必要です。
- 輸送中の過放電を防ぐため、スタイラスは「出荷モード」で出荷されています。
- スタイラスを充電すると、この出荷モードが解除され、使用可能になります。
スタイラスが十分に充電されているかご確認ください
- 充電には「USB-A to USB-C」ケーブルをご使用ください。「USB-C to USB-C」ケーブルでは正常に充電できない場合があります。
- 充電中はオレンジ色のランプが点灯します。
- フル充電になるとランプが消灯し、使用可能な状態になります。
- フル充電には約1時間かかります。バッテリー保護のため、充電後はケーブルを外してください。
- フル充電状態で、最大約50時間の連続書き込みが可能です。
- 使用しない状態が続くと、自動的にスリープモードに入り、省電力になります。
※サードパーティ製のスタイラスを使用する場合は、MPP(Microsoft Pen Protocol)に対応していることをご確認ください。
- スタイラスには交換用ペン先が2本同梱されています。ペン先がすり減ったり損傷した場合は、同梱の交換用ペン先と取り替えてください。
※注意:スタイラスの後部(ペン尻)は交換できません。交換部品の提供もありません。
一般:
- 共通: 「タッチロック」が有効になっていると操作できません。無効にしてから再度お試しください。

HDMI接続時:
- HDMIで機器を接続する場合、タッチ操作を有効にするには、USB-B to USB-Aケーブルも接続する必要があります。
Connect Pro使用時:
- iOS端末はシステムの制限によりタッチバック操作をサポートしていません。
- AirPlayやChromecastによる画面共有でもタッチバック操作はできません。
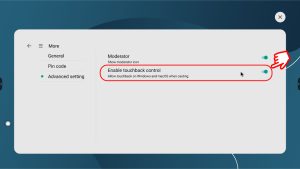
- Connect Proの[詳細設定]で「タッチバックコントロール」が有効になっていることを確認してください。
初期設定では、CM55のホワイトボードツールはスタイラスでの入力のみを受け付けます。
指で書き込みたい場合は、ホワイトボードアプリの下部ツールバーにある「ペンとしてタッチ」オプションを有効にしてください。

CM55ホワイトボードツールで使える複数指を使用したジェスチャーは以下の通りです:
- キャンバスの移動:2本の指でドラッグしてキャンバスを移動します。
- ズームイン/ズームアウト:2本の指でピンチイン・ピンチアウトしてキャンバスや選択したオブジェクト、画像などの拡大・縮小します。
CM55のホワイトボードの動作は、キャンバス上のコンテンツやシステム全体の使用状況によって影響を受けることがあります。例えば、複数のブラウザタブを開いたり動画を再生したりすると、CPUやメモリの使用量が増え、ホワイトボードの動作が遅くなったりラグが発生したりすることがあります。
快適にホワイトボードをご利用いただくために、以下をおすすめします。
- ホワイトボード使用中はバックグラウンドのタスクをなるべく減らす
- 可能な限りホワイトボードを単体アプリとして使用する
- システムのラグによるデータ消失を防ぐため、こまめにスクリーンショットを撮って内容を保存する
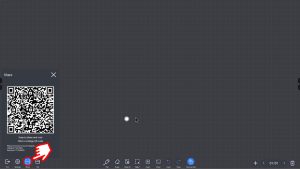
モバイル端末にホワイトボードのデータをエクスポートする場合、以下の手順に従ってください。
- モバイル端末がCM55のホットスポットに接続されていることを確認します。
- ホワイトボードの「共有」アイコンをタップします。
- 画面にQRコードが表示されます。
- モバイル端末でQRコードをスキャンします。
- ホワイトボードの現在の内容が表示されたウェブページが開きます。
- そのページからスクリーンショットを撮るか、直接画像を保存します。
※全てのページの現在キャンバスに表示されている部分を画像として保存します。
タッチスクリーン本体やUSBフラッシュに保存するには、以下の手順に従ってください。
- USBフラッシュに保存する場合、CM55背面のUSBポートにUSBフラッシュを接続します。
- ホワイトボードツール画面左下の「ファイル」アイコンをタップします。
- 「ファイルの保存」をタップします。
- 保存するためのファイル形式を選択します。
- SRC: .WBD形式のファイルで、ホワイトボードツールでのみ開くことができ、編集・加筆などを行うことが可能です。
- 写真: PNG形式のファイルで、全てのページの現在キャンバスに表示されている部分を画像として保存します。
- PDF: PDF形式のファイルで、全てのページの現在キャンバスに表示されている部分を画像として保存します。
タッチ反応が不正確になったり、カーソルが飛んだりする場合は、電源供給や周囲の周波数干渉の影響を受けている可能性があります。以下の点を確認してください。
1. デバイスの電源およびコンセントが正しくアース接続されていることを確認してください。必ず付属の電源コードを使用してください。
2. デバイスの近くでモーターなどの低周波ノイズ源が動作していないか確認してください。スタイラスペンの動作周波数と近い周波数を発する機器がある場合、タッチ精度に影響することがあります。そのような機器がある場合は、電源を切るか、CM55を干渉源から離して使用してください。
ギャラリーモードは、カメラの視野内にいる複数の参加者を自動で検出し、それぞれの人物をクローズアップしたフレームを同時に画面に表示する機能です。これにより、すべての参加者が平等に強調され、より集中しやすく、魅力的なビデオ会議体験が実現します。CM55では、最大5人までの個別表示に対応しています。
オートフレーミングは、CM55に搭載されている機能で、カメラが自動的に参加者を検出し、全員が画面内に収まるようにフレーミングを調整するものです。人が会議スペースに出入りするたびに、カメラが自動でズームやパンを行い、手動操作なしで常に適切なレイアウトを維持します。
スピーカートラッキングは、音声認識技術を利用して話している人を検出し、自動的にカメラがその人物を追跡する機能です。現在話している人にフォーカスするようにリアルタイムでフレーミングを調整するため、プレゼンテーションや活発なディスカッションに最適です。
CM55のファームウェアバージョンを確認
- バージョンが「YS-ES982-T982-20250804.095522」より古い場合は、最新バージョンに更新してください。
※ 更新前に重要なファイルをバックアップしてください。USB OTAアップデート時に設定やデータが初期化される場合があります。 - ファームウェアバージョンが「YS-ES982-T982-20250804.095522」より新しい場合は、以下の手順に従ってください。
1. Connect Proの「設定」→「さらに見る」→「高度な設定」から「モデレーター」をオフにします。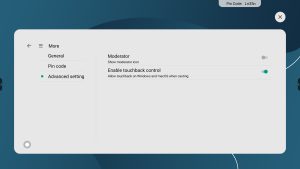
2. 「設定」→「さらに見る」→「PINコード」を開き、PINコードを無効にするか、「画面に表示しない」を選択します。
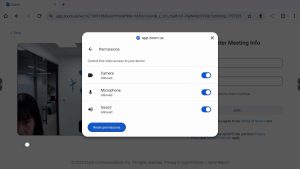
3. カメラやマイクへのアクセスを必要とするWebサイトを開くか更新します。Chromeが自動的にアクセス許可を求めるメッセージを表示するので、**「許可」**を選択してください。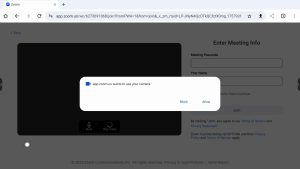
- バージョンが「YS-ES982-T982-20250804.095522」より古い場合は、最新バージョンに更新してください。
4. それでもカメラやマイクが動作しない場合は、ブラウザのアドレスバー左側にある鍵アイコンをクリックし、アクセス許可設定を開いて、サイトの権限が正しく設定されているか確認してください。
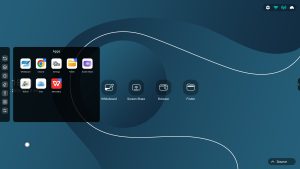
メイン画面の壁紙を変更するには、サイドツールバーから「テーマ」アイコンをタップし、「テーマ」を開きます。
内蔵のテーマから選ぶか、カスタム画像をアップロードして壁紙として設定することができます。

– 映像を投影するためのケーブルがIdeao Hub本体およびパソコンにしっかりと接続されているか確認してください。
– Ideao Hubで投影したい信号源が選択されているか確認してください。画面右上で2本の指をスワイプするとOSDが表示されます。OSDから信号源を手動で切り替えることが可能です。
– ケーブルを変更して投影できるか確認してください。
– パソコンの音声設定で出力先がIdeao Hubになっていることを確認してください。
– Ideao Hubの音量設定を確認してください。画面右上で2本の指をスワイプするとOSDが表示されます。OSDから現在の音量の確認と、音量の変更を行うことができます。
– DVIやD-Sub 15ピンケーブルで接続している場合、音声をIdeao Hubから出力するためには別途オーディオケーブルの接続が必要となります。
– HDMIやD-Sub 15ピンなどUSB Type Cケーブル以外でパソコンと接続した場合、タッチコントロールを行うためには、別途付属のUSB Type A-Bを使ってパソコンとIdeao Hubを接続する必要があります。
外部機器でのタッチコントロールをサポートした機器のみ操作可能です。
iPhoneやその他外部機器からのタッチコントロールをサポートしていない機器は使用できません。
可能です。複数のポートに機器がぞれぞれ接続されていて、切り替えて表示したい場合、画面右上で2本の指をスワイプしてOSDを表示させて表示したい信号源を選択してください。
ディスプレイ設定でIdeao Hubをメインディスプレイに設定してください。
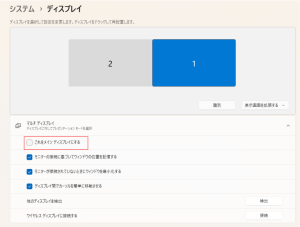
もし、メインディスプレイに設定したくない場合、下記の手順を行って設定してください。
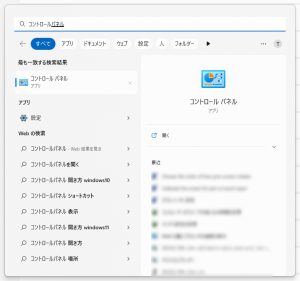
1. スタートメニューをクリックして、「コントロールパネル」と入力し、クリックします。
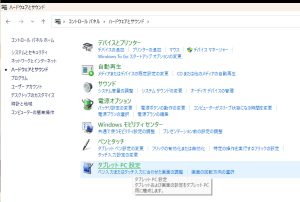
2. コントロールパネルのメニューから「ハードウェアとサウンド」をクリックします。
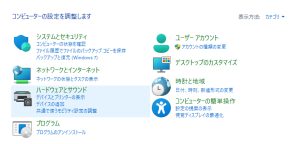
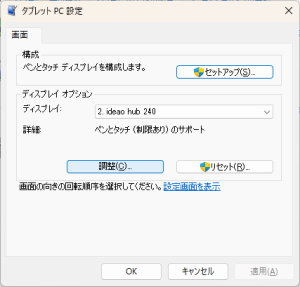
3. 「ハードウェアとサウンド」から「タブレットPC設定」をクリックします。
4. 「セットアップ」をクリックし、「タッチ入力」を選択します。
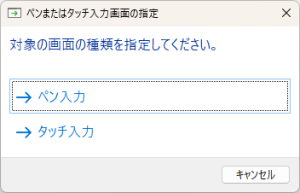
5. 下記のメッセージが画面上に順に現れます。Ideao Hubなどのタッチスクリーン上に表示されたときには画面をタップしてください。タッチスクリーン以外の画面上に現れた時にはキーボードで「Enter」ボタンを押してください。
6. すべてのプロセスが完了すると自動的にセットアップが終了します。
7. パソコンを再起動してタッチコントロールが正常に行えるか確認してください。
最初に、すべてのケーブルを再接続し、Ideao Hubの電源を切ってから再び入れてみてください。問題が続く場合は、Ideao Hubの画面がオンの状態で、直接電源ケーブルを抜いてから、再び電源ケーブルを差し込んでください。
Reactiv SUITEが起動時にクラッシュして、クラッシュレポートが表示されない場合、下記のステップを踏んでください。
- Windowsのイベントビューアーを起動します。

- Windowsログ→アプリケーションにアクセスし、ソースがアプリケーションのエラーを探します。通常、最新のクラッシュデータは一番上に表示されています。

- 全般タブのコンテンツをコピーし、以下のE-mailアドレスまで送信してください。techsupport@vizetto.com

いただいた内容の詳細に応じて対応方法をご連絡いたします。
Note:Microsoft Officeが最新版にアップデートされていることを事前にご確認ください。古いバージョンをご使用されている場合、起動時にクラッシュする恐れがあります。
お使いの機器がIntel i10またはi11 Tiger Lake CPUかをご確認ください。新しいIntelのCPUではReactiv SUITEでクラッシュする問題がございます。暫定的な回避方法は下記の通りとなります。
- エクスプローラーを開き(Win+E)、”コンピューター”をクリックし、”システムのプロパティー”を選択します。

- ”システムの詳細設定”を選択します。

- ”詳細設定”タブの”環境変数”を選択します。

- ”システム環境変数”にある”新規(W)…”を選択します。

- 新しいシステム変数として、下記の値を入力し、OKをクリックします。
変数名: OPENSSL_ia32cap
編数値: ~0x200000200000000
- 正しく変数が追加されたことを確認後に”OK”をクリックします。

- Reactiv SUITEを起動します。
弊社パートナーよりライセンスキーをご購入前の場合、Reactiv SUITEを起動時にフリートライアルを選択することができ、Emailにてトライアルライセンスキーを受け取ることができます。
- 迷惑メールなどのフォルダーに入っていないか確認してください。
- 数分待って、E-mailのフォルダーを更新してみてください。
- それでも受け取れない場合、カスタマーサポートにご連絡ください。
- Reactiv SUITEを起動し、設定画面を開きます。

- ”システム”のタブから”製品ライセンス”を選択し、アクティベーションコードを入力してアクティベーションします。

- Reactiv SUITEを起動し、設定画面を開きます。
- ”システム”のタブから”製品ライセンス”を選択し、アクティベーションコードを入力します。
- ”アクティベーションの解除”をクリックします。

- ライセンスを弊社パートナーよりご購入された場合、ご購入先にご連絡してください。
- 何らかの理由によりご購入先にコンタクトできない場合、カスタマーサポートにご連絡ください。
一つのパソコンでアクティベーションを解除することにより、別のパソコンに同じライセンスキーでアクティベーションを行うことが可能です。
- Reactiv SUITEでは、メインディスプレイの他に、3つのディスプレイを追加することが可能です。
- Reactiv SUITEの設定画面にて”デバイスマネージャー”のタブから”ディスプレイのレイアウト”を選択し、追加するディスプレイの位置を設定します。利用可能なディスプレイを選択し、Reactiv SUITEでコントロールするためのレイアウトを選択します。ディスプレイの位置は、コンテンツの”スロー”アクションの方向となります。コンテンツを右、左、上のいずれかにスローすると、その位置に設定したディスプレイに投影されます。

- Reactivに追加したいディスプレイがWindowsで認識されているか確認してください。Windowsのデスクトップ画面にて右クリックして、”ディスプレイ設定”を選択します。設定画面にてディスプレイが正しく認識されているかご確認ください。
- Windowsでディスプレイが認識されていない場合、ディスプレイの接続を一度取り外して再度接続したり、ケーブルを交換するなど行なってください。
キーボードがUSBドングルを使用するタイプの場合、電子黒板や大型タッチスクリーンの背面にUSBドングルを接続した場合、正常に電波が届かずに正しく作動しない場合がございます。側面や前面にUSBポートがある場合、そちらにUSBドングルを移設してください。
- ShadowSenseタッチスクリーンをご使用の場合、
- 純正のペンと消しゴムを使用してください。
- ShadowSenseタッチスクリーンが接続された状態で、Reactiv SUITEの設定にて、”デバイスマネージャー”のタブから”タッチスクリーン”を選択し
- タッチプロファイルが”IWB”になっていることを確認してください。
- ShadowSenseファームウェアのバージョンがR11.0以降になっていることを確認してください。それ以下の場合、”ファームウェアアップデート”をクリックしてアップデートを行なってください。
- タッチスクリーン側の設定にてスタイラスの選択を行う設定がある場合、ご使用のスタイラスを選択してください。

Reactiv SUITEでワードやパワーポイント、エクセルなどを開くためには、お使いのコンピューターにMicrosoft Officeがインストールされ、アクティベーションされている必要があります。
Microsoft Officeのライセンスが使用版や、失効している場合、Reactiv SUITEで開くことができません。
- Windowsにてエクセルやワード、パワーポイントなどのOfficeアプリのいづれかを開き
- ”ファイル”タブにて”アカウント”をクリックすると、お使いのOfficeがアクティベーションされているか確認することができます。

- アカウントがアクティベーションされていない場合、アクティベーションを行うか、新規にライセンスを購入してください。
IT部門により、Reactiv SUITEが常に全画面表示されるキオスクモードに設定されている場合、解除しない限り戻ることはできません。
キオスクモードに設定されていない場合、設定にて、”ユーザーインターフェイス”タブから”その他の設定”を選択、”フルスクリーンモードのオン/オフ”をクリックして、モードのオン/オフを行うことができます。
設定にて、”ユーザーインターフェイス”タブを選択し、”アクセントカラー”にて変更することが可能です。

設定にて、”ユーザーインターフェイス”タブを選択し、”背景メディア”にてそれぞれ変更することが可能です。

設定にて、”ユーザーインターフェイス”タブを選択し、”背景メディア”にて4種類のデフォルトアニメーションから選択して変更することが可能です。
プレゼンテーションのフォルダーに”folder.jpg”というファイル名で任意のイメージファイルを保存すると、そのイメージがプレゼンテーションのサムネイルになります。
プレゼンテーションフォルダー内のサブフォルダーも同様に”folder.jpg”というイメージファイルを保存し、サムネイルを変更することができます。
プレゼンテーションのフォルダーに”background.jpg”というファイル名で任意のイメージファイルを保存すると、そのイメージがプレゼンテーションの背景になります。
プレゼンテーションフォルダー内のサブフォルダーも同様に”background.jpg”というイメージファイルを保存し、サムネイルを変更することができます。
Reactiv SUITEの設定画面にて、”システム”から”ブラウザー設定”を選択し、クイックラウンチショートカットの追加&削除を行うことができます。アイコンをクリックして新しいアイコンを選択して入れ替えることが可能です。
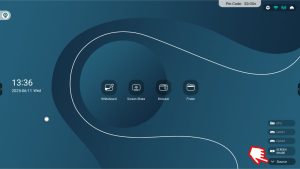
- ホーム画面にて、目的に合わせてReactiv STAGEまたはReactiv SCRIBBLEを選択します。

- ロビー(パブリックまたはプライベートワークスペース)からアイコンをクリックしてプレゼンテーションを開始します。

- ホーム画面にて、目的に合わせてReactiv STAGEまたはReactiv SCRIBBLEを選択します。
- ロビー(パブリックまたはプライベートワークスペース)にて”新規追加”ボタンをクリックして新しいワークスペースを作成することができます。

- 詳細タブ:
- ”タイトル”と”詳細”を入力します。
- フォルダーアイコンを押し、ワークスペースで使用したいファイルをフォルダーに追加します。

- メディアタブ:
- ワークスペースプレビューイメージ(サムネイル)及び背景イメージを変更することができます。

- ワークスペースプレビューイメージ(サムネイル)及び背景イメージを変更することができます。
- ロビー画面にてワークスペースを選択してプレゼンテーションを開始します。
- 詳細タブ:
- ホーム画面にてヘルプボタン”?”をクリックすると、ミニチュートリアルビデオが現れ基本機能と操作に関して確認することが可能です。(英語版のみ)

- プレゼンテーション時は画面右下にある”?”アイコンをクリックします。

- 基本ツールに関するさらなる情報は”Getting started Guide”(英語版のみ)にて確認することができます。
- Reactive SUITE IWBではUSBキーを使用して、自動的にプロジェクトを開始することが可能です。
- ファイルを保存したUSBメモリーをご用意ください。
- USBメモリーをタッチスクリーンのパソコンなどに挿入します。
- 設定>システム>フォルダ>共有フォルダにて”USBドライブを許可”がオンになっていることを確認してください。

- Reactiv SUITEまたはSCRIBBLEを起動し、ロビーにてUSBプロジェクトをクリックして、プレゼンテーションを開始します。

- プレゼンテーション時の変更内容は同じUSBフォルダーに保存されます。
プレゼンテーション前の準備時:
- プレゼンテーションフォルダーを開きます。
- Chromeブラウザーを使用している場合、Reactiv SUITEで使用したいWebページをアドレスバーから選択し、プレゼンテーションフォルダーにドラッグし、URLファイルを作成します。(Webページへのショートカット)
- その他のブラウザーを使用している場合、プレゼンテーションフォルダーにて、右クリックし、”ショートカットの作成”を選択し、URLを貼り付け後に”次へ”をクリックし、ショートカットの名前を入力後に”完了”をクリックします。
プレゼンテーション時:
- ブラウザーアイコンをクリックします

- 開きたいWebページへとナビゲートします。
- ブラウザーのフローティングツールバー上の”Webリンクを追加”ボタンをクリックします。

- Webページがプレゼンテーションフォルダーに追加され、STAGE及びSCRIBBLEにて開くことができます。
セッション時に投影及び保存したデータは、全てオリジナルのファイルがあるフォルダーに保存されます。オンプレミスでも、オフプレミスのストレージでも、ローカルドライでもUSBメモリーでも、ネットワークドライブでもクラウドドライブでも、データはあなたの選択したフォルダーに保存されます。
Reactiv STAGEはノンリニアなストーリーテリングのためのツールで、チームの焦点をコンテンツの管理から、プレゼンテーションのストーリーラインに移すことができるパワフルなツールです。STAGEは日常使っている形式のコンテンツを開き、レンダリングし、マークアップしたり、プレゼンテーションに使用可能です。参加者からのフィードバックや結果を即座に得ることができ、ミーティングやプレゼンテーションの速度や精度が向上します。
プレゼンテーションのデッキにて、画面右下にある”並べて表示する”アイコンをクリックすると、デッキに表示されているコンテンツなどを整列することができます。

プレゼンテーションデッキにて、画面右下にある”全て削除する”をクリックすると、プレゼンテーションデッキから削除することができます。ファイルが削除されるのではなく、画面から削除となり、サムネイルから再び表示することができます。

STAGEのツールバーにある保存ボタンから手書きデータを含めたドキュメントを保存することが可能です。ツールバーが表示されていない場合、コンテンツをクリックするとツールバーが現れます。

Reactiv SCRIBBLEは、ブレーンストーミングおよびレイアウトに使用し、無限のキャンバスを使用して、スケッチ、アイデアの作成、ページのマークアップなど、ビジョンを視覚化できる画期的なツールです。
SCRIBBLEは視覚的なコミュニケーションを行うことにより複雑なアイデアを簡素化し、ミスのない意思決定を迅速に行うことができます。
- ページ分割ツールを使用して、共有したいキャンバス内のどの部分でもページ分割してPDFファイルとして共有することができます。
- 作成したPDFファイルはプレゼンテーションフォルダーに保存されます。

ページ分割を定義したら、ページの作成アイコンをクリック、別のページを分割する場合、再度同じアイコンをクリックします。

例えばオブジェクトや手書きデータ間にスマート挿入機能を使用してスペースを開ける場合、移動するオブジェクトや手書きデータ全体がカバーされている必要があります。選択されているコンテンツはハイライトされています。例えば、下図の場合、”あ”の一部と”お”の全体が正しく囲われていないので、選択されていない状態です。

投げ縄ツールを使用して変更したい部分を選択し、移動やサイズの変更を行うことができます。
キャンバス上をダブルクリックしてスマート挿入ツールを起動し、変更したいオブジェクトなどを囲います。投げ縄を閉じると、囲まれたオブジェクトのキャンバス内での移動や、サイズの変更などを行うことができます。

Reactiv SCRIBBLEはワークスペース全体や、分割した部分のみを最大3台までのセカンダリーディスプレイにミラー表示することができます。
- ページのみをミラー表示する場合、ページをクリックし、ホールドしたままミラー表示したいセカンダリーディスプレイの方向にスローしてください。
- ワークスペース全体を見たー表示させたい場合、キャンバスをクリックし、ホールドしたままミラー表示したいセカンダリーディスプレイの方向にスローしてください。
SCRIBBLEは分割したページのみセカンダリーディスプレイにミラー表示可能です。ドキュメントのみをミラー表示することはできません。ドキュメントのミラー表示にはReactiv STAGEをご使用ください。
ワークスペース全体を見たー表示させたい場合、キャンバスをクリックし、ホールドしたままミラー表示したいセカンダリーディスプレイの方向にスローしてください。
- ミラー表示しているセクションと同じものを、再度同じ方法にスローしてください。それによりミラー表示は解除されます。
- または、違うドキュメントをスローすることで、新しいドキュメントにスイッチすることができます
- セカンダリーディスプレイが設定されている正しい方向にスローしているかご確認ください。
- Reactiv SUITEの設定画面で、セカンダリーディスプレイが正しく設定されているかご確認ください。
- オブジェクトがスクリーンの端にあたり、正しくスローされて、スロー前の元の位置にバウンドして戻っているかご確認ください。スローしたオブジェクトがきちんと端に当たっていないとミラー表示されません。
Reactiv SCRIBBLE
- 変更が加えられるごとに自動的に保存されます。セッション中に保存の心配をする必要はありません。
- また、キャンバスをページ分割してPDFにエクスポートすることも可能です。
会議スペース内の機器とReactivエコシステムをシームレスに接続するための統合されたサービスです。
Reactiv CONNECTを使用してミーティングの参加者はこれらのパーソナル機器を使用して電子黒板とのインタラクションが可能です。Reactiv SUITEにファイルを共有したり、これら機器の画面の共有をおこなったり、電子黒板のキーボードとして使用することが可能です。
ノートパソコンやタブレット、スマートフォンはAirPlayやMiracast、Chromecastを使用して画面の投影を行うことができます。
- どの機器で、どの方法を使用可能か?
Airplay: iPhoneやiPad、iPod touch、Macbook、iMac, Mac miniなどからの画面投影に使用可能です。
Miracast: Samsung製スマートフォンやタブレットなどのMiracastをサポートしたAndroid機器およびMiracastに対応したWindows 10以降を搭載したWindowsパソコンで使用可能です。
Chromecast: Google Chromebookやその他Android製品など、Chromecastに対応した機器で使用可能です。
- Reactiv SUITEでの設定
Reactiv SUITEの設定で使用したい投影方法(Airplay、MiracastまたはChromecast)が有効になっていることをご確認ください。機器が正しく接続されるとSTAGEおよびSCRIBBLEのライブラリーの”機器”タブに表示されます。
- 投影する機器側
機器側で投影に使用する方法を開き、投影先を検索し、投影を開始します。投影先名はReactiv SUITEのステータスバー右上に表示されています。

はい、Reactiv SUITEは、HDMIやDPビデオ入力をUSBストリームに変換する既製のビデオキャプチャカードとUSBビデオキャプチャデバイスをサポートしています。これらのデバイスは、ReactivSUITE内の[設定]->[デバイスマネージャー]->[A/V入力]メニューを使用してプレゼンテーション内に追加することができます。このメニューを使用すると、ビデオ入力とオーディオ入力を1つのストリームに結合してAVソースを作成することができます。

Reactiv SUITEでは管理可能なWebカメラやAV機器の台数制限はありません。
ただし、Reactiv SUITEは、オペレーティングシステムによって検出された数のビデオキャプチャデバイスを処理します。システムのパフォーマンスは、Reactiv SUITEを使用しているPCに依存することに注意してください。 USBバス帯域幅、メモリ帯域幅、およびCPUがこれらのストリームを処理する能力の制限要因になります。
Reactiv SUITEはWindows OSによって検出されたビデオ入力ソースを検出します。Windows OSのデバイスマネージャーにて、Reactiv SUITEで表示したい機器が正しく認識されているか確認してください。認識されていない場合、デバイスを再度インストールしてWindowsが認識していることを確認して、再度試してください。


Windows、またはパソコンにインストールされているウイルス対策ソフトウェアが、特定のデスクトッププログラムのReactiv SUITEへのアクセスをブロックしている可能性があります。これを修正するには、カメラのプライバシー設定を開き、Reactiv SUITEのカメラへのアクセスを許可がされているか確認してください。

次に、例えばカスペルスキーなどのアンチウイルスソフトウェアが、アプリケーションコントロールにてReactiv SUITEへのカメラからの入力を許可しているか確認してください。

Kasperskyは、デフォルト状態ではReactiv SUITEへのWebカメラへのアクセスとオーディオキャプチャデバイスへのアクセスの両方を設定でブロックしています。
会議スペース内のチームメンバーは、個人デバイスからお好みのWebブラウザーを使用してワイヤレスにファイルやフォルダーを共有することができます。Reactiv SUITEの左上隅に表示されているURLにアクセスし、ブラウザーの指示に従って、デジタルワークスペースにファイルを直接アップロードしてください。
詳細に関しては、Getting started GuideのRemote Serviceでも紹介されております。(英語版のみ)

会議スペース内のデバイスを使用して、Reactivのワークスペースへテキストの共有やウェブリンクの共有をワイヤレスに行うことができます。Reactiv SUITEの左上隅に表示されているURLにアクセスし、ブラウザーの指示に従ってテキストやURLリンクのReactiv SUITEやブラウザーへの送信を行なってください。
詳細に関しては、Advanced User ManualのRemote Keyboardを参照してください。
会議スペース内の機器を使用したワイヤレスでのキーボード機能は、ShadowSenseに対応したタッチスクリーンでReactiv SUITE IWBを使用している場合にのみ利用可能です。
- Reactiv SUITEの設定画面から、”デバイスマネージャー”→”タッチスクリーン”へアクセスし、”ShadowSenseが認識されていません”と表示されている場合、この機能を使うことはできません。
- もし、お使いのタッチスクリーンがShadowSenseに対応している場合、ShadowSenseのファームウェアがR11.0以降になってることを確認して下さい。
- もし、ファームウェアがR11.0以下の場合、ファームウェアアップデートを行なってください。

はい、Airplayを使用するためには、投影する機器と投影先の機器が同じネットワークに接続されている必要があります。
- iOS機器はコントロールセンターの”画面ミラーリング”から投影を行います。


- macOSはメニューバーまたは、コントロールセンターの”画面ミラーリング”から投影を行います。

- macOS 11.6.5以前のバージョンをお使いの場合、システム環境設定で”Dockとメニューバー”から”画面ミラーリング”にて”メニューバーに表示”にチェックマークが入っているか確認してください。

- iOSでは、OSが最新の状態になっていることを確認してください。
- 投影元の機器がReactiv SUITEと同じネットワークに接続されているかご確認ください。ork
- Reactiv SUITEの設定にてAirplayがオンになっているかご確認ください。
- macOSの場合、外部からの接続が設定でブロックされていないかご確認ください。
- ”システム環境設定”にて”セキュリティとプライバシー”から”ファイアウォール”のタブを選択し、”ファイアウォールオプション”にて”外部からの接続をすべてブロック”のチェックマークを外し、”内蔵ソフトウェアが外部からの接続を受け入れるのを自動的に許可”にチェックマークを入れてください。

- パソコンがAirplayに見つけられ、投影できるようにReactiv SUITEをインストールしているパソコン側でWi-Fiネットワーク接続がプライベートネットワークになっていることをご確認ください。

- Reactiv SUITEがインストールされているパソコン側のファイアウォールが外部からの接続を許可していることをご確認ください。
- パソコンがAirplayに見つけられ、投影できるようにReactiv SUITEをインストールしているパソコン側でWi-Fiネットワーク接続がプライベートネットワークになっていることをご確認ください。


- Reactiv SUITEがインストールされているパソコン側のファイアウォールが外部からの接続を許可していることをご確認ください。
Reactiv SUITEがインストールされているパソコンのDNS設定(ネットワーク設定内)をご確認ください。例えば、GoogleのフリーDNSである8.8.8.8や8.8.4.4を使用してみてください。
Reactiv SUITEが対応している動画のコーデックはH.264、音声コーデックはAACです。それ以外のコーデックを使用している場合、再生できない場合があります。
Wi-Fiでの接続を行なっている場合、信号が弱すぎたり、ネットワークが過負荷になってないかご確認ください。
- 投影元の機器及びReactiv SUITE側のパソコン両方のネットワーク状態が良好であることをご確認ください。
- ワイヤレスではなく、有線でのネットワークへの接続を行い、状況が改善するかご確認ください。
- いくつかのケースにおいて、iOSなどの機器の場合、Bluetoothをオフにすることにより状況が改善される場合がございます。
画面の投影開始後、音量の調整はReactiv SUITE側で行うことができます。投影元側では音量の調整は行うことはできません。
- Reactiv側のパソコン及び投影元の機器を再起動して再試行を行なってください。
- IT Manual(英語版)を参照してネットワークのコンフィギュレーションやポートの設定などがマニュアル通りになっているかご確認ください。ITマニュアルをダウンロードする。
- お使いのネットワークがmDNSをサポートしているかご確認下さい。このプロトコルがブロックされているとAirplayは正しく動作しません。
- AppleTVやAirplayに対応したソフトウェアや機器などをお持ちの場合、それらに投影できるか確認してください。もし投影可能な場合、Reactiv SUITEにも投影可能です。
いいえ。MiracastはWiDiという技術を使用しており、投影元と受け側が同じネットワークに接続されている必要はありません。会議スペース内にあるMiracastに対応した機器はReactiv SUITEのMiracastサーバーを検出することができ、直接接続することができます。
- Windows10を搭載したパソコンでは、”接続”アイコンからReactiv SUITEの機器名を検索することができます。機器を選択し、投影モードを選択してください。

- AndroidやSamsungの機器のクイック設定の”スマートビュー”からアプリを起動し、Reactiv SUITEを検索して投影することができます。

- Samsung以外の製品の投影方法もマニュアル”How to Mirror Android and iOS Screen on Reactiv SUITE”(英語版)にて紹介しております。マニュアルを見る
- Reacctiv SUITE側のパソコンがWi-Fiを搭載していて、Wi-Fiがオンになっていることを確認してください。Miracastを使用した投影はWiDiを使用するためにWi-Fiの接続が必要です。飛行機モードなどは解除してください。
- Reactiv SUITE側のパソコンの設定から”このPCへのプロジェクション”を選択し、”一部のWindowsとAndroidデバイスは、[OK]と言った場合にこのPCに映すことができます。”を常にオフにするに設定します。

- OS及びWiDiアダプタがMiracastに対応していることをご確認ください。
- Reactiv SUITEがインストールされているパソコンのWindowsの検索ボックスに”dxdiag”と入力します。
- ”情報をすべて保存”をクリックして、ファイルを保存します。
- DxDiag.txtファイルを開き、Miracastが有効になっているか確認します。


- パソコンがMiracastに見つけられ、投影できるようにReactiv SUITEをインストールしているパソコン側でWi-Fiネットワーク接続がプライベートネットワークになっていることをご確認ください。

- Reactiv SUITEがインストールされているパソコン側のファイアウォールが外部からの接続を許可していることをご確認ください。

IT Manual(英語版)を参照してネットワークのコンフィギュレーションやポートの設定などがマニュアル通りになっているかご確認ください。ITマニュアルをダウンロードする。
- Reactiv SUITE側のパソコンでポートの以下の通りのコンフィギュレーションを行なってください。
- ”Windows Defender ファイアウォール”→”詳細設定”→”受信の規則”→”新しい規則”→”ポート”を選択
- ”次へ”をクリック
- ”TCP”を選択し、”特定のローカルポート”にチェックマークを入れ、”7236”を入力します。
- ”次へ”をクリックし、”接続を許可する”にチェックマークを入れます。
- ”次へ”をクリックし、”ドメイン”、”プライベート”、”パブリック”全てにチェックマークを入れ、”次へ”をクリックし、新しい規則の名前を任意で入力します。
もし、それでもMiracastが使えない場合、Microsoftが提供しているWindows標準搭載のMiracastアプリ試してみてください。”接続”をクリックします。

このアプリで、投影元の機器と接続できるか試してみてください。もし接続できない場合、お使いのパソコンがMiracastい対応していない可能性があります。


Miracastの投影は16:9のアスペクト比で固定されているため、それ以外のアスペクト比の機器から投影した場合、端部分に黒いバーが表示されます。
はい。Chromecastを使用するためには、投影する機器と投影先の機器が同じネットワークに接続されている必要があります。
- 投影元のスマートフォンやタブレットがReactiv SUITE側のパソコンと同じネットワークに接続されていることを事前にご確認ください。
- Google Homeアプリを開きます。

- 画面をキャストする機器のタイルを長押しします。
- ”画面をキャスト”をタップします。
 投影(キャスト)が開始されます。
- 投影する機器と投影先の機器が同じネットワークに接続されている必要があります。
- Reactiv SUITE側のパソコンのIPがファイルドロップしたい機器に見つけられるようにReactiv SUITEをインストールしているパソコン側でWi-Fiネットワーク接続がプライベートネットワークになっていることをご確認ください。

- Reacctiv SUITE側のパソコンで、Webブラウザーを起動して、”Localhost\Reactiv”と検索バーに入力して、Reactiv Webサーバーが正常に動作しているか確認してください。

- Reactiv SUITE側のパソコンのReactiv Webサーバーはポート80に依存しており、通常デフォルトで開いている必要があります。ファイアウォールで新しいルールを作成することが可能です。
- ”Windows Defender ファイアウォール”→”詳細設定”→”受信の規則”→”新しい規則”→”ポート”を選択
- ”次へ”をクリック
- ”TCP”を選択し、”特定のローカルポート”にチェックマークを入れ、”80”を入力します。
- ”次へ”をクリックし、”接続を許可する”にチェックマークを入れます。
- ”次へ”をクリックし、”ドメイン”、”プライベート”、”パブリック”全てにチェックマークを入れ、”次へ”をクリックし、新しい規則の名前を任意で入力します。
- 同じネットワークにあるWindows機器からReactiv WebサーバーのIPアドレスにPingコマンドを実行して接続確認を行なってください。
- Windows+Rを入力し、”cmd”とタイプしてEnterを押し、コマンドプロンプトを起動してください。
- コマンドプロンプトにて”ping reactiv_ip_address”と入力します。

Reactiv SUITEは会議スペース内の機器が接続して情報を転送できるように、Webサーバーを作成します。ただし、例えば、パソコンがWi-FiとLANケーブル両方でネットワークに接続されている等、複数のネットワークアダプタに接続されている場合などに、複数のIPアドレスを持っていることがあります。その場合、同じPCに2つのIPアドレスがセク製されています。
もし、ステータスバーに表示されているIPアドレスが間違っている場合、Reactiv SUITEの設定から”システム”→”リモート接続”→”テキスト/ファイル共有”のメニューにて正しいIPアドレスを得ることができます。
