如果可以在軟體選項中看到易思攝影機,但無法看到畫面,有可能是別的軟體「佔用」了視訊(同時開了兩個視訊軟體、影音串流,或相機設定工具等)。請先將所有相關軟體關閉,再重新啟用你要用的視訊通話軟體。
根據USB-IF公布之標準規格,每一種USB接口都有線材長度限制,若超過建議長度,影像傳輸訊號會不穩定。請參考以下建議長度:
USB2.0:5公尺
USB3.0/3.1 Gen 1: 2公尺
USB3.1 Gen 2: 1公尺
- 確保你Mac有辨識到鏡頭,點選左上方關於這台Mac,在概覽中點選系統報告。
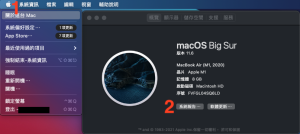
- 在相機中看到有鏡頭相關資訊,如果沒有辨識到,請重新插拔鏡頭。
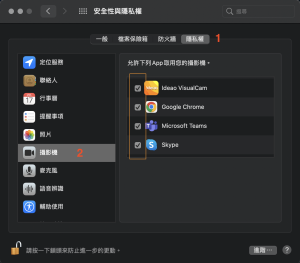
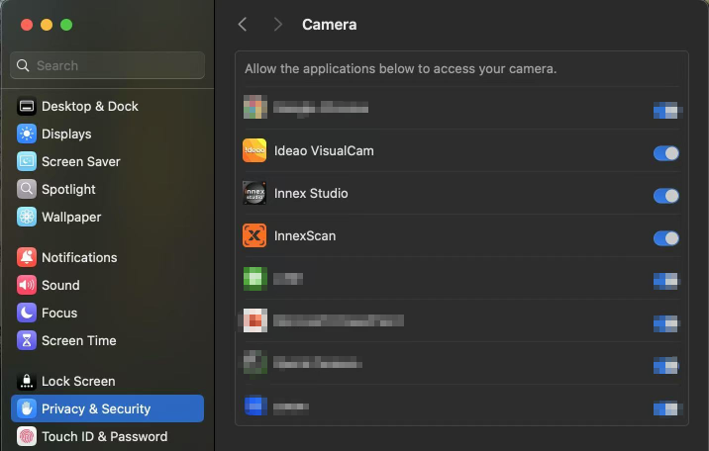
- 到系統偏好設定>安全性與隱私權中,按照以下步驟檢查,到隱私權>攝影機,查看列表,允許要使用的軟體能夠取用你的鏡頭。
可以,Cube採用人形辨識技術,即使帶口罩也能識別。
Cube不需要下載任何軟體來執行AI識別或視訊模式切換,所有功能都能從遙控器上操作。
只有在更新韌體的時候,你需要下載軟體Innex Studio並連接網路才能執行。
有兩種方式可以解決這個問題:
- 設定遮罩,讓AI不顯示特定區域內出現的人物。遮罩功能可以從遙控器上設定。
- 在所有與會者都坐定位之後,從選單中選擇「偵測一次」,就能固定住人物特寫的畫面。但在這個模式之下,如果與會者有離開座位跑出拍攝框的情況,Cube不會即時偵測追蹤。
最多可以同時偵測8個人,並產生8個特寫框。如果有兩個人坐得很近,AI可能會將他們合併在同一個框內,以達到較好的顯示效果。
可以,請下載Innex Studio軟體來更新韌體。
點此連結進入下載頁,根據使用的是Windows或Mac下載不同版本的Innex Studio
https://funtechinnovation.com/zh-hans/downloads/
2. 將Cube連接到電腦,開啟Innex Studio軟體。請確保你的電腦擁有穩定的網路連線,且沒有其他軟體正在使用Cube。
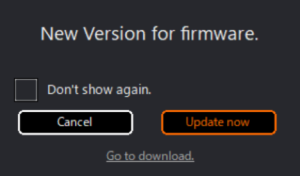
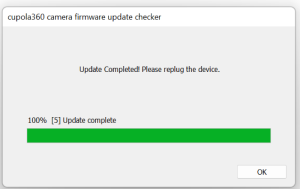
3. 如果我們有釋出更新版本的韌體,就會有視窗跳出提醒你是否要更新,點選右邊的Update Now以更新韌體。
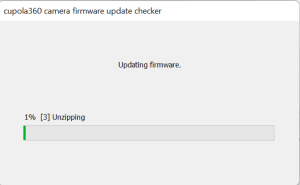
4. 更新會自動開始,請不要離開或關閉視窗,直到進度條跑完100%。
 5. 在更新完成之後會跳出提醒,點選OK。重新插拔一次Cube的USB線來重新啟動Cube。
如果您的電腦阻止USB大容量裝置的訪問,則需要將韌體寫入相機內部儲存空間的韌體更新也將被阻止。請解除電腦對於USB大容量裝置訪問的限制,或者聯絡貴公司的IT管理員進行解除限制。
部分 UC (Unified Communications,統一通訊) 軟體內建有自動構圖(Auto-framing)功能。當此功能開啟時,可能會與 Innex Cube 內建的 AI 功能產生衝突,進而導致版面配置異常變動、自動布局行為不穩定、畫面構圖無法如預期運作。為避免上述情況,請務必先在 UC 軟體中 關閉自動構圖功能,再搭配 Innex Cube 使用。
可以,人臉追蹤可辨識佩戴口罩的臉部特徵。
若要使用 C831 的完整 AI 功能,如人臉追蹤、子母畫面、分割畫面等,需安裝 Innex Studio 軟體,功能請參考網頁https://funtechinnovation.com/zh-hans/software/innex-studio/
Innex Studio 是一款設計給 C831 的視訊控制軟體,內建多項先進的 AI 功能,包括:人臉追蹤(最多可同時追蹤 8人)、自動取景、白板模式、子母畫面、演講者模式等。此外,下載Innex Studio還能自動檢查更新,讓你的攝影機韌體版本永遠是最新的。目前支援Windows版與macOS版,詳情請見 https://funtechinnovation.com/zh-hant/software/innex-studio/
若人臉追蹤功能在 Innex Studio 中運作正常,但在 Zoom 或其他視訊會議軟體中無法啟用,請依照以下步驟操作:
1. 進行視訊會議時,請確保 Innex Studio 持續執行。
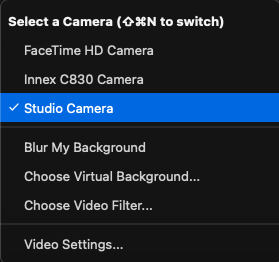
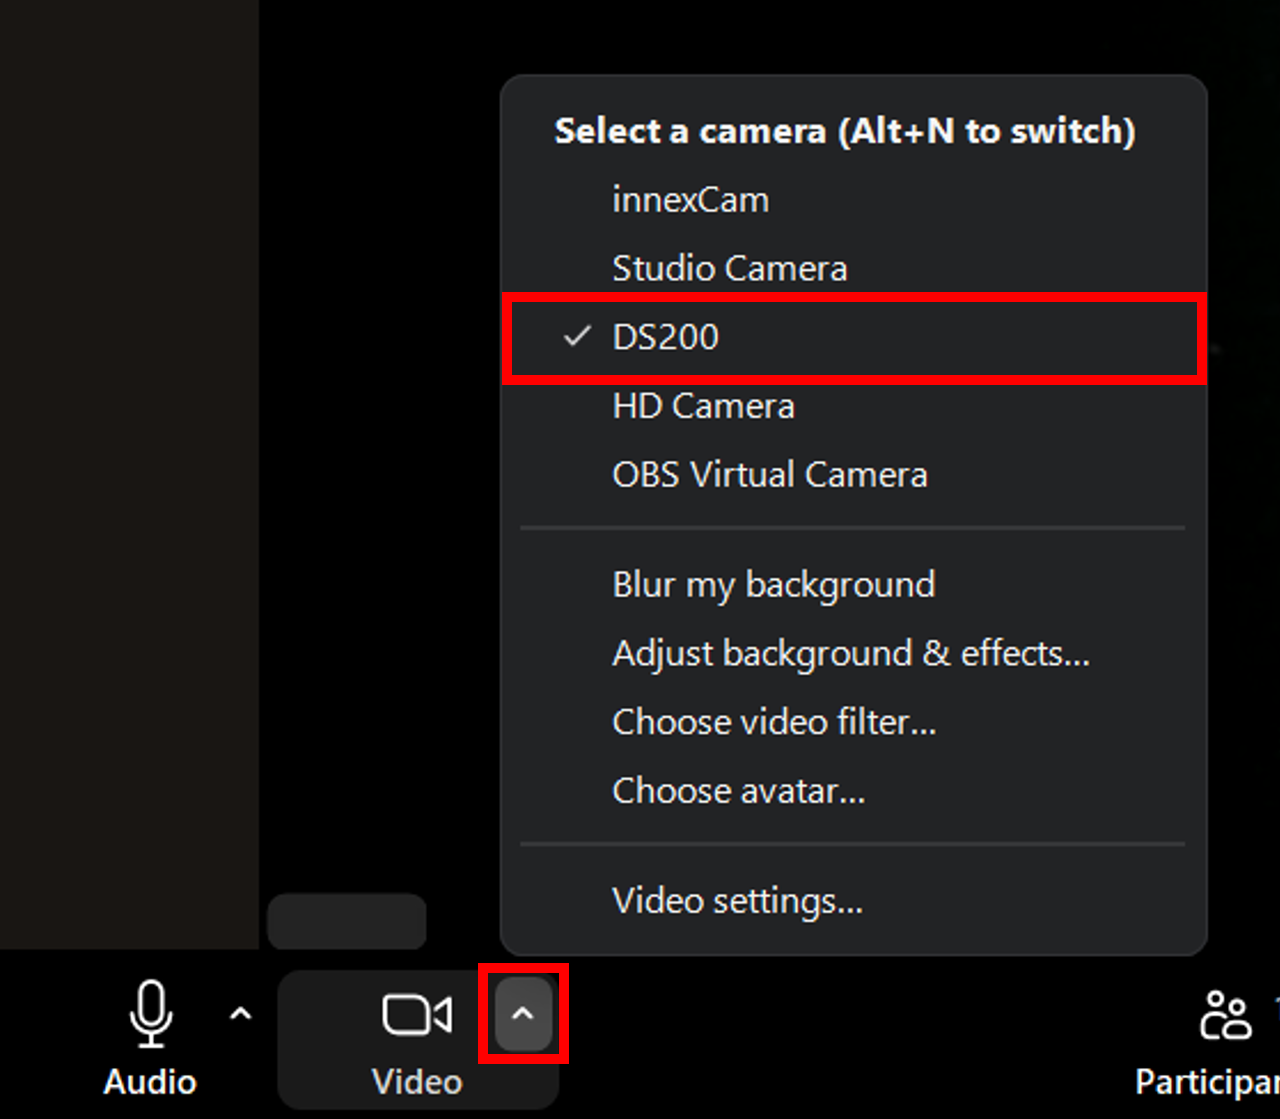
2. 在會議軟體的相機設定中,請選擇 「Studio Camera」,而非 「Innex C831 Camera」。

3. 在 Innex Studio 中選擇你需要的視訊模式。你在 Innex Studio 預覽畫面中看到的影像,會同步分享至所使用的會議軟體中。
4. 欲了解更詳細的操作方式,請參考我們的 YouTube 教學影片。
這種情況僅會發生在 Windows 電腦。請依照以下步驟設定:
1. 進入 「設定」>「藍牙與裝置」。
2. 找到 「自動播放 (AutoPlay)」,或直接在搜尋列輸入「AutoPlay」。
3. 將「對所有媒體和裝置使用自動播放」 關閉。或者,在 「卸除式磁碟機」 的下拉選單中選擇 「不採取任何動作」。
- 如果您的電腦阻止USB大容量裝置的訪問,則需要將韌體寫入相機內部儲存空間的韌體更新也將被阻止。請解除電腦對於USB大容量裝置訪問的限制,或者聯絡貴公司的IT管理員進行解除限制。
部分 UC (Unified Communications,統一通訊) 軟體內建有自動構圖(Auto-framing)功能。當此功能開啟時,可能會與 Innex C831 內建的 AI 功能產生衝突,進而導致版面配置異常變動、自動布局行為不穩定、畫面構圖無法如預期運作。為避免上述情況,請務必先在 UC 軟體中 關閉自動構圖功能,再搭配 Innex C831 使用。
人物與攝影機的距離在 1到5公尺之間是最適合C570智能取景的範圍。當畫面中只有一個人,且距離鏡頭在一公尺以內,可能造成取景功能不夠穩定,畫面容易跳動。此外,背景干擾也可能造成自動取景的不穩定,如:有人從後方走過,玻璃反射人影等等。
若以上情況皆已排除,自動取景仍然跳動,請更新產品的韌體(請參考FAQ的更新方法),或使用遙控器關閉自動取景功能。
可以使用遙控器操作或按壓攝影機上方的按鈕。如使用遙控器操作,在自動取景的模式下,壓「AI/M」的按鈕即可切換至手動模式。
如果需要將自動取景一直保持關閉狀態,從遙控器的設定鍵點出選單>模式>智能取景>改成手動模式。
可以使用遙控器操作。遙控器上的+ – 按鈕操作數位放大、縮小,並使用上下左右方向鍵調整視野。C570支援最多5倍數位放大。
- 到下載頁面C570區下載最新版的韌體Zip檔 https://funtechinnovation.com/zh-hant/downloads/
2. 解壓縮zip檔案
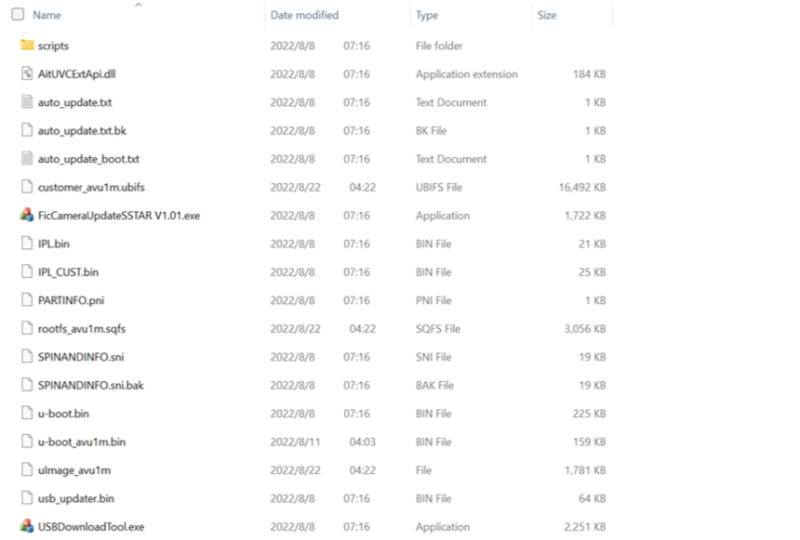
3.將C570連接至電腦
4. 在解壓縮的檔案內,找到這個檔案”FicCameraUpdateSSTAR Vxxx.exe” (xxx為版本號碼)

5. 從下拉選單中點選「innex C570 VID_3429&PID_0004」
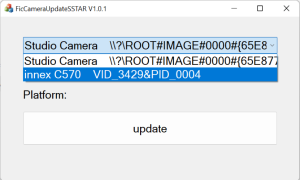
6. 點選「update」更新
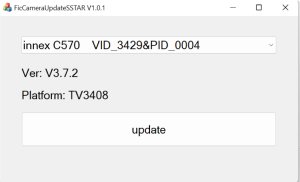
7. 點選「Upgrade Firmware」更新韌體以進行更新
8. 當最後出現「reset」,表示韌體更新成功。請重新插拔攝影機以進行重啟。
可以辨識。
自動取景的倍率取決於解析度。若解析度在720P或以下,放大倍率為3倍。 若在1080P或4K,放大倍率為2倍。多數視訊會議軟體的連線視訊解析度最大支援到720P,所以大多數情況,放大倍率會在3倍。
C570的智能取景是攝影機內建的,不需額外下載軟體操作。
在升級韌體前,請先確認產品的韌體目前的版本。
如何確認目前的韌體版本:
1. 使用遙控器開啟設定。
2. 由側邊菜單選擇前往系統。
3. 確認韌體版本。如果顯示為V672則表示現在已經是最新版本的韌體。
以下是更新韌體的方式:
1. 1. 由此連結下載最新版本的韌體。
2. 將下載完成的檔案解壓縮。
3. 將C570連接至PC。
4. 雙擊運行 USBDownloadToolV2.4.。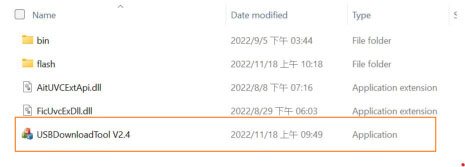
5. 在彈出的設定視窗中,確保 Innex C570 VID_3429&PID_0004 被正確選擇。
6. 點擊 Update Firmware 以開始更新。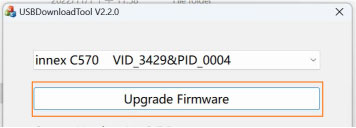
7. 當更新完成時,會顯示出確認的訊息。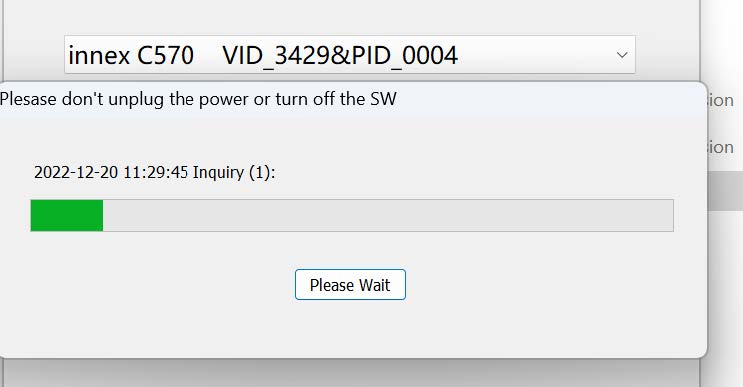
8. 點擊 OK。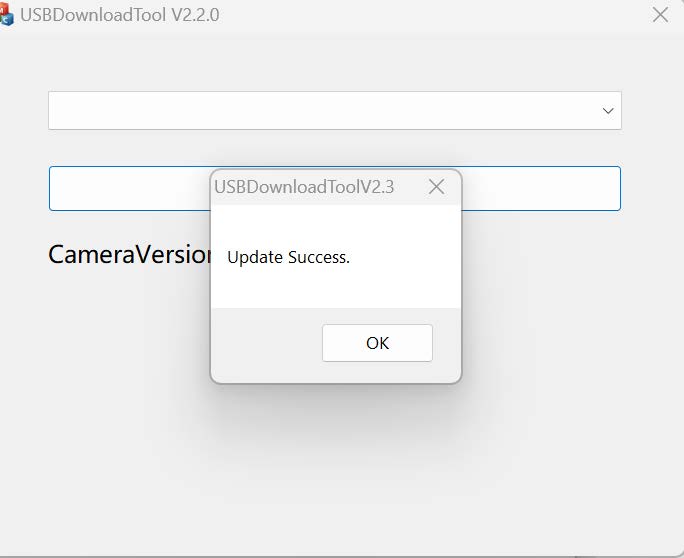
9. 回到設定確認韌體版本是否呈現為最新的版本。
如果作業系統不是 Windows,C570 會保留閃爍設定。然而,在 Windows 系統中,內建的相機應用程式可能會覆蓋攝影機的設定。
例如,即使您將 C570 的電力線頻率設定為 50Hz,但如果 Windows 相機應用程式設定為 60Hz,攝影機每次重新啟動時都會恢復為 60Hz,即使在其他應用程式中使用也是如此。
若要保持正確的電力線頻率,請直接在 Windows 相機應用程式中更新設定。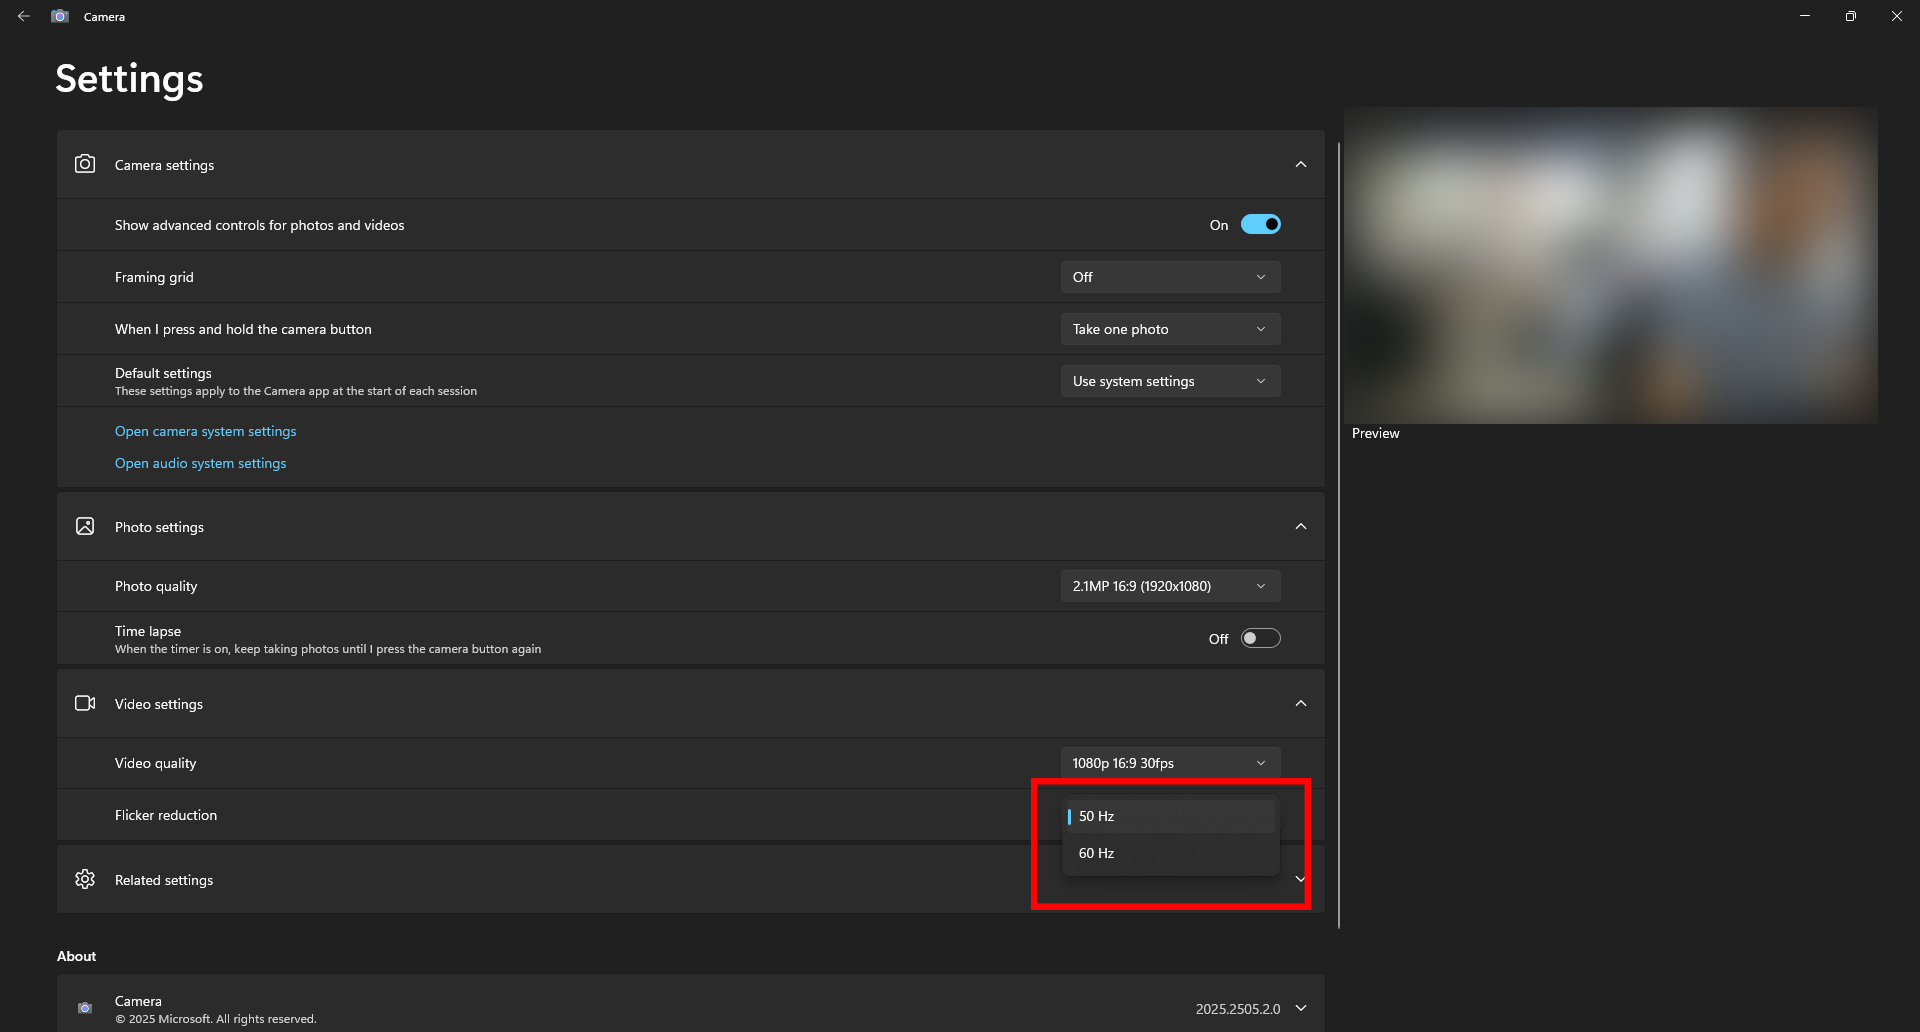
如果您使用的是 Windows 預設的 Camera 應用程式,它會覆蓋攝影機設定並以無 ePTZ 的預設視角啟動。
您可以長按遙控器上的「OK」按鈕以跳轉至 Preset。
在其他應用程式和作業系統中,攝影機應該會以 Preset 視角啟動。
如果在使用 C570 搭配 Android 系統裝置時,麥克風聲音聽起來較遠,可能是因為裝置尚未更新至最新的韌體版本。
請確認您的 C570 是否已更新至最新韌體。您可以在 此處 下載最新韌體。
檢查目前韌體版本的方法:
1. 使用遙控器開啟 設定(Settings)。
2. 在側邊選單中進入 系統(System)。
3. 查看 FW Version。若顯示為 V684 或更新版本,表示您的裝置已是最新版本,無需更新。
如需了解韌體更新的詳細步驟,請參考 「產品韌體的更新方法」。
部分 UC (Unified Communications,統一通訊) 軟體內建有自動構圖(Auto-framing)功能。當此功能開啟時,可能會與 Innex C570 內建的 AI 功能產生衝突,進而導致版面配置異常變動、自動布局行為不穩定、畫面構圖無法如預期運作。為避免上述情況,請務必先在 UC 軟體中 關閉自動構圖功能,再搭配 Innex C570 使用。
人物與攝影機的距離在 1到5公尺之間是最適合C470自動取景的範圍。當畫面中只有一個人,且距離鏡頭在一公尺以內,可能造成取景功能不夠穩定,畫面容易跳動。
此外,背景干擾也可能造成自動取景的不穩定,如:有人從後方走過,玻璃反射人影等等。若以上情況皆已排除,自動取景仍然跳動,請確定韌體已更新至最新版本,或參考此影片(1分28秒)關閉自動取景功能, 讓視角常保持在120度廣角。
下載Innex Camera (VAP Studio)更新韌體和關閉自動取景功能 https://funtechinnovation.com/downloads/
下載軟體Innex Camera(VAP Studio) https://funtechinnovation.com/downloads/
安裝軟體後,將C470連接到電腦。點開Video ->點選Auto-framing -> 會找到預覽畫面下方的取景開關。
或參考此影片(1分28秒)教學(開啟CC字幕)。
有的。如果在你使用的環境下不想開啟或不適用「自動取景」功能,而120度廣角對你來說又太寬了,你可以手動調整視角,用E-PTZ(數位的位移控制與縮放)調整到你想要的視角位置。請下載Innex Camera (VAP Studio)軟體來操作https://funtechinnovation.com/zh-hant/software/innex-camera-vap-studio/
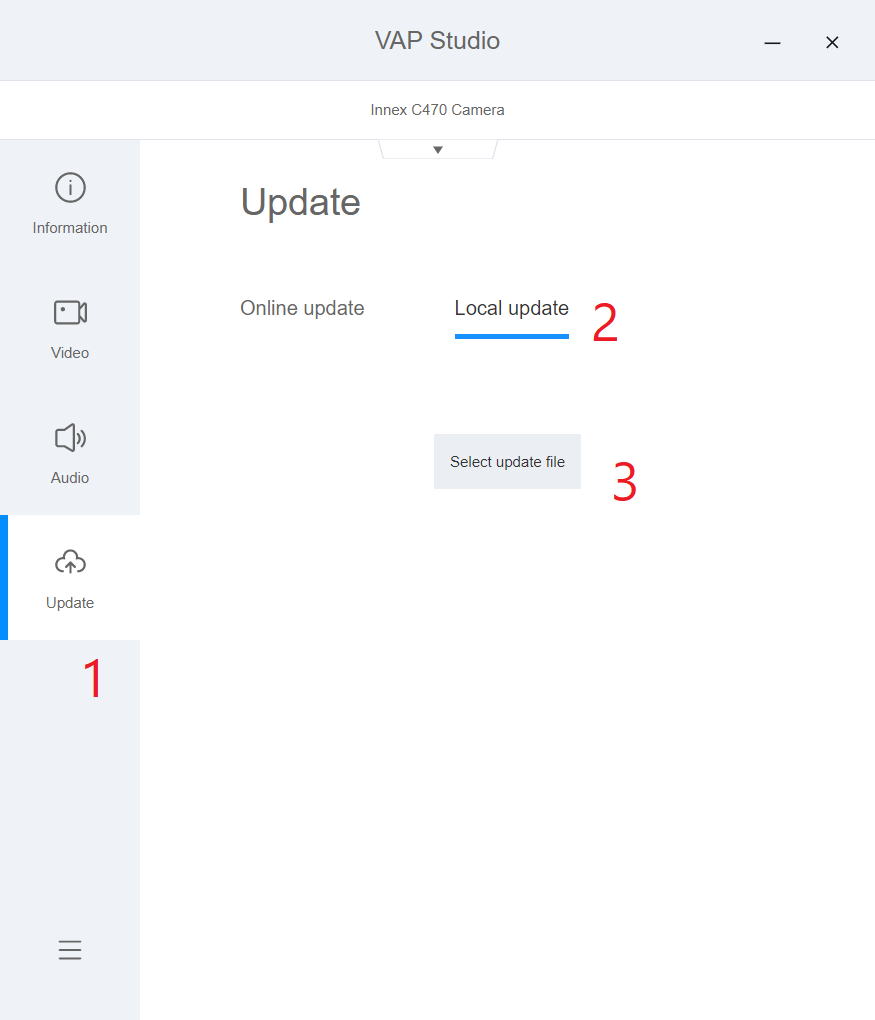
- 到下載頁面C470區下載Innex Camera (VAP Studio)軟體和最新版的韌體(.bin檔案格式) https://funtechinnovation.com/zh-hant/downloads/
- 將C470連接到電腦
- 開啟VAP Studio軟體
- 在“Information”檢查目前韌體版本
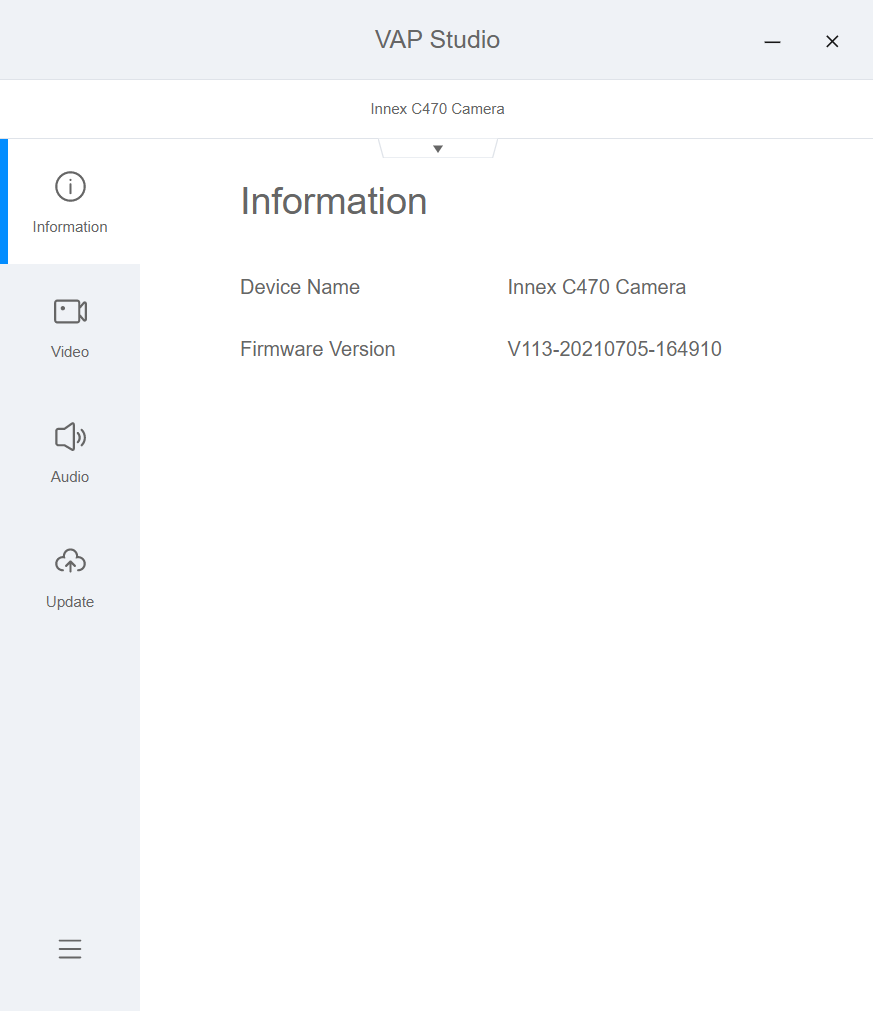
- 如果需要更新韌體,跟著圖示點選(1)update更新, (2)local update本機更新,(3)select update file選擇檔案, 並選擇剛剛下載好的韌體檔案(.bin檔案格式),更新期間請勿任意插拔攝影機或離開軟體畫面。
自動取景的倍率取決於解析度。若解析度在720P或以下,放大倍率為3倍。 若在1080P或4K,放大倍率為2倍。多數視訊會議軟體的連線視訊解析度最大支援到720P,所以大多數情況,放大倍率會在3倍。
可以辨識。
不需要。不像市面上其他攝影機,C470自帶AI追蹤功能開機即用,不需要下載軟體。除非你想把追蹤功能關閉才要下載Innex Camera (VAP Studio)軟體。
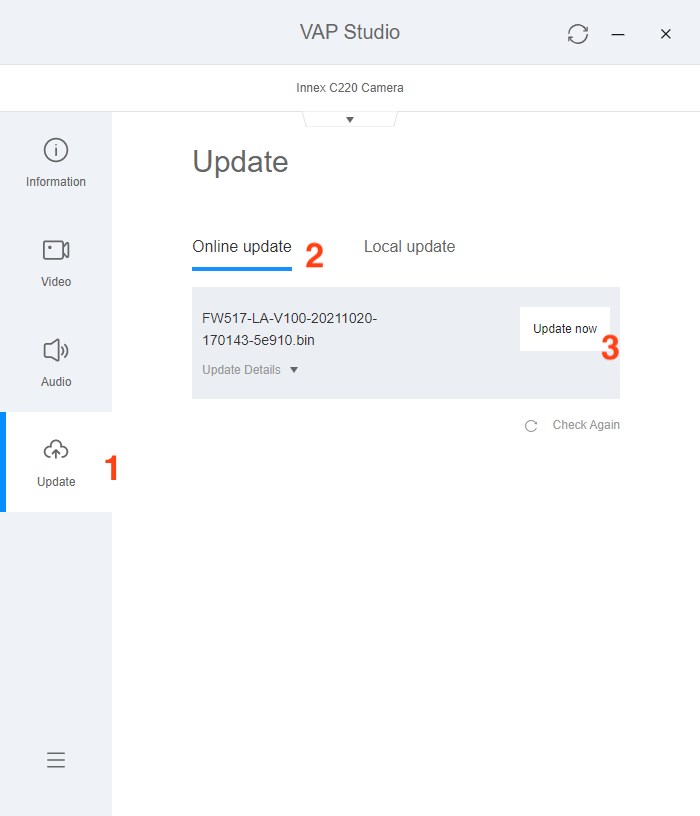
- 到下載頁面C220區下載Innex Camera (VAP Studio)最新版軟體和 https://funtechinnovation.com/zh-hant/downloads/
- 將C220連接到電腦
- 開啟VAP Studio軟體
- 跟著圖示點選(1)update更新, (2)線上更新,(3)立即更新,更新期間請勿任意插拔攝影機或離開軟體畫面。
請注意,當狀態顯示「無法使用驅動」,也不表示C220的音訊需要安裝驅動。
如果你的C220韌體版本是9/27更新以前的版本,在「藍芽或其他裝置」的設定可能會出現「無法使用驅動」的字樣,如下圖箭頭所示: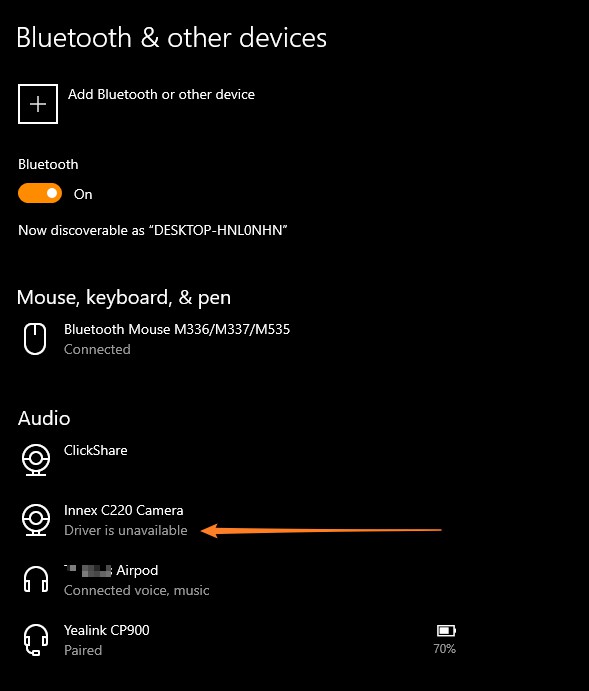 我們已經在新版韌體中解決這個問題,只要更新到2021/9/27後的版本即可。
是的,臉部偵測與追蹤功能適用於戴口罩的臉部。
您需要安裝 Innex Studio 來充分發揮 C830 和 C831 的 AI 功能。
您可前往 funtechinnovation.com/downloads/ 下載。
Innex Studio 是專為 C830 和 C831 設計的軟體,具備強大的 AI 功能,例如實時臉部追蹤的分割畫面(最多8人)、自動取景和白板模式。該軟體還可執行 C830 和 C831 的韌體更新。
Innex Studio 支援 Windows 和 Mac,您可以從 funtechinnovation.com/downloads/ 下載。
在視訊通話期間,請確保 Innex Studio 為開啟狀態。在攝影機設定中,請選擇「Studio Camera」作為您的攝影機,而不是選 Innex C830 Camera 或 Innex C831 Camera。
在 Innex Studio 中選擇您需要的視訊模式,您在軟體中看到的畫面預覽會同步分享到視訊會議軟體中。
如需更多資訊,請觀看 YouTube教學影片 。
如果您的 Innex Studio 版本為 1.3515.1 或更舊版本,且使用的是 Mac OS 14.1 或更新版本,Studio Camera 可能沒有顯示在攝影機列表中。請先更新 Innex Studio 軟體以解決此問題。
確保您的 Mac 已連接網路並啟動 Innex Studio。當畫面出現 New Version For Innex Studio 訊息時,點擊 Update now,並按照指示完成軟體更新。

您也可以從以下連結下載最新版本的 Innex Studio 並手動更新。
https://drive.google.com/drive/folders/1r7kUWcbT6G7Bhi94UZ1eXsRvgOL5udcN?usp=sharing
更新完成後,可能會跳出對話框,顯示 System Extension Blocked 。

點擊 Open System Settings,並允許來自 Innex Studio 的系統軟體載入。

完成設定後,返回 Innex Studio。若出現 System restart required… 訊息,請點擊 OK 並重新啟動 Innex Studio。

如果您在訊息顯示時未按「OK」,您可以稍後手動更改設定。請前往 macOS 的「設定」,選擇「一般」>「登入項目與延伸功能」,向下滾動,點擊「延伸功能」下「Camera Extensions」旁的「!」符號,然後開啟「Innex Studio」。
完成以上流程後,Studio Camera 將會出現在攝影機列表中。若仍未顯示,請重啟您的 Mac 後再次確認。
如果您的軟體版本為1.3515.1或者更舊,且您正在使用的Mac作業系統為14.1或更新,相機清單中可能不會出現”Studio Camera”,您需要將Innex Studio更新到最新版本。
請確認您的電腦連接至網際網路並啟動Innex Studio,當訊息”Innex Studio有更新版本”,請點擊”立即升級”並根據指示完成軟體升級。或者您也可以直接前往以下連結下載最新版本的Innex Studio並手動更新。https://drive.google.com/drive/folders/1r7kUWcbT6G7Bhi94UZ1eXsRvgOL5udcN?usp=sharing
更新完成後,對話框會出現”系統擴展被封鎖”。
點選”開啟系統設定”並於”應用程式Innex Studio的系統軟體被封鎖禁止載入”之選項點選”允許”。
允許後,返回Innex Studio將出現”需要重新啟動系統..”之訊息,請按下確定並重新啟動Innex Studio。
以上步驟完成後,您的相機清單將會出現Studio Camera。如果依然沒有出現,請嘗試將您的Mac電腦重新啟動。
請根據以下步驟使Windows啟動時能夠自動運行軟體。
- 點擊「開始」按鈕,並找到該應用程式。
- 右鍵點擊應用程式,選擇「更多」,然後點擊「開啟檔案位置」。此操作將開啟應用程式捷徑所在的資料夾。
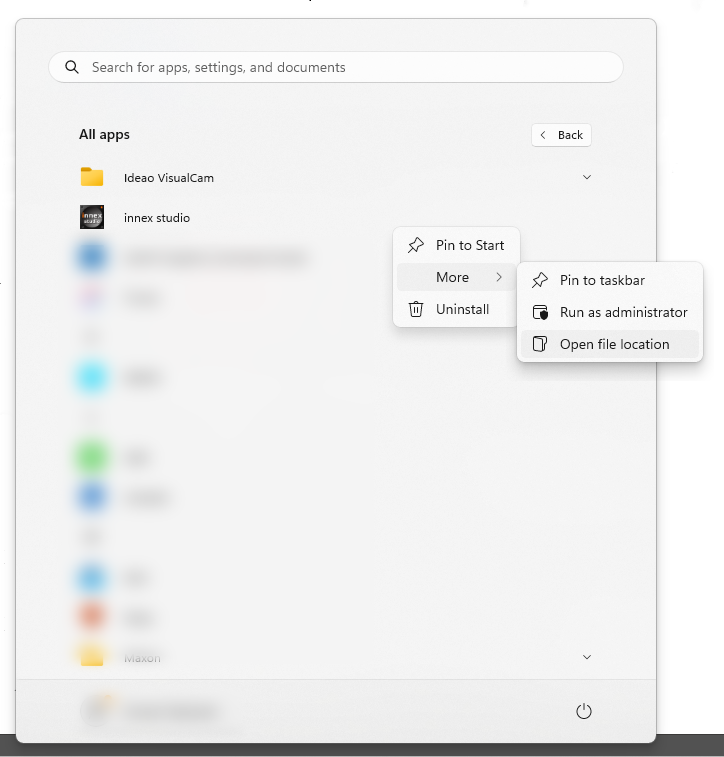
- 在檔案位置視窗中,按下 Windows 鍵 + R,輸入 shell:startup,然後點擊「確定」,此操作將開啟「啟動資料夾」。
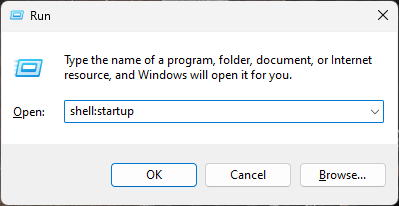
- 將應用程式捷徑從檔案位置複製並貼到「啟動資料夾」。
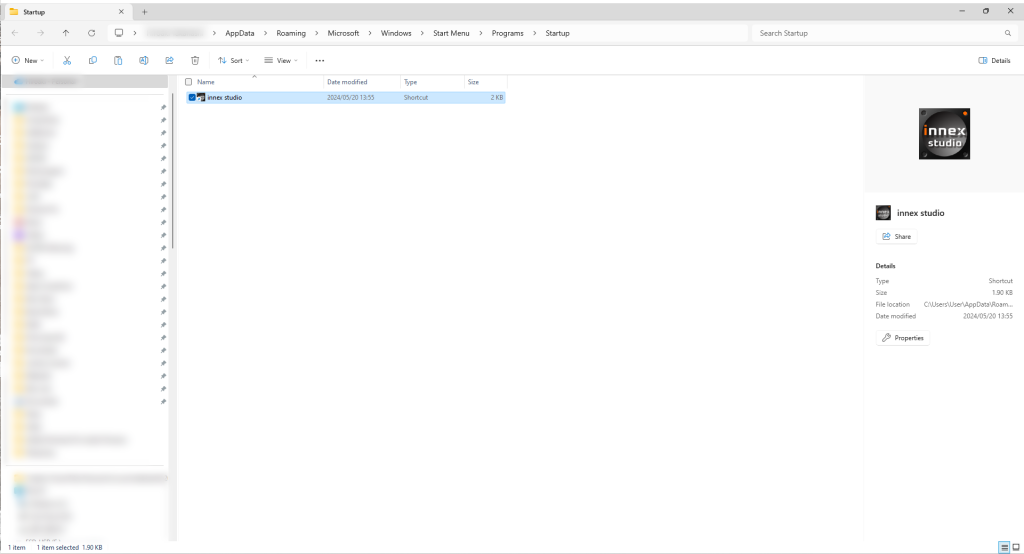
- 前往 Windows 設定 > 應用程式 > 啟動。
- 開啟對應的應用程式開關。
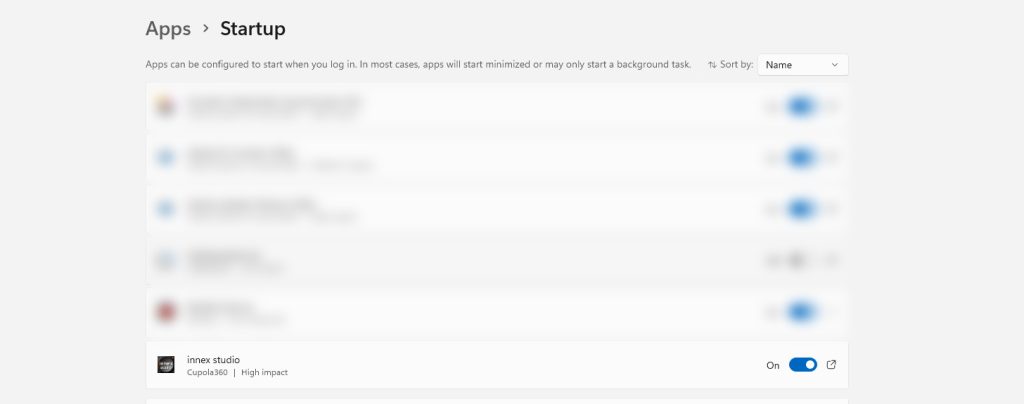
- 請重新啟動電腦,並確認應用程式已自動啟動。
Innex Camera is a camera setting software that handles camera firmware update, image setting, EPTZ and auto-framing setting. It works with Innex C220 and C470. Innex Camera is available for both Windows and Mac – it can be downloaded at https://funtechinnovation.com/software/innex-camera-vap-studio/
- Please update your VAP Studio to the latest version to fix this issue.
-
If you are using Windows computer, please download Microsoft Visual C++ Redistributable (Visual Studio 2015, 2017, 2019, and 2022 x64) from the link here: https://learn.microsoft.com/en-us/cpp/windows/latest-supported-vc-redist?view=msvc-170
and run the VAP Studio software again. Our software is created using Microsoft Visual Studio, so it must be installed in your computer in order to run VAP Studio properly.
- If you still experience the same problem after updating to a version released on or later than 2021 Sep. 27th, please contact technical support by leaving us a message https://funtechinnovation.com/faq/
To adjust image quality for C470 and C220 to better match your environment and preference, you can download and use the Innex Camera (VAP Studio) https://funtechinnovation.com/downloads/
- Connect your camera to your computer.
- Start VAP Studio by clicking on the VAP Studio icon.
- Click the video tab (1), (2) Click on Image and adjust each value by adjusting the slider. (3) If a reset is required, simply click on reset to reset the value to default(4).
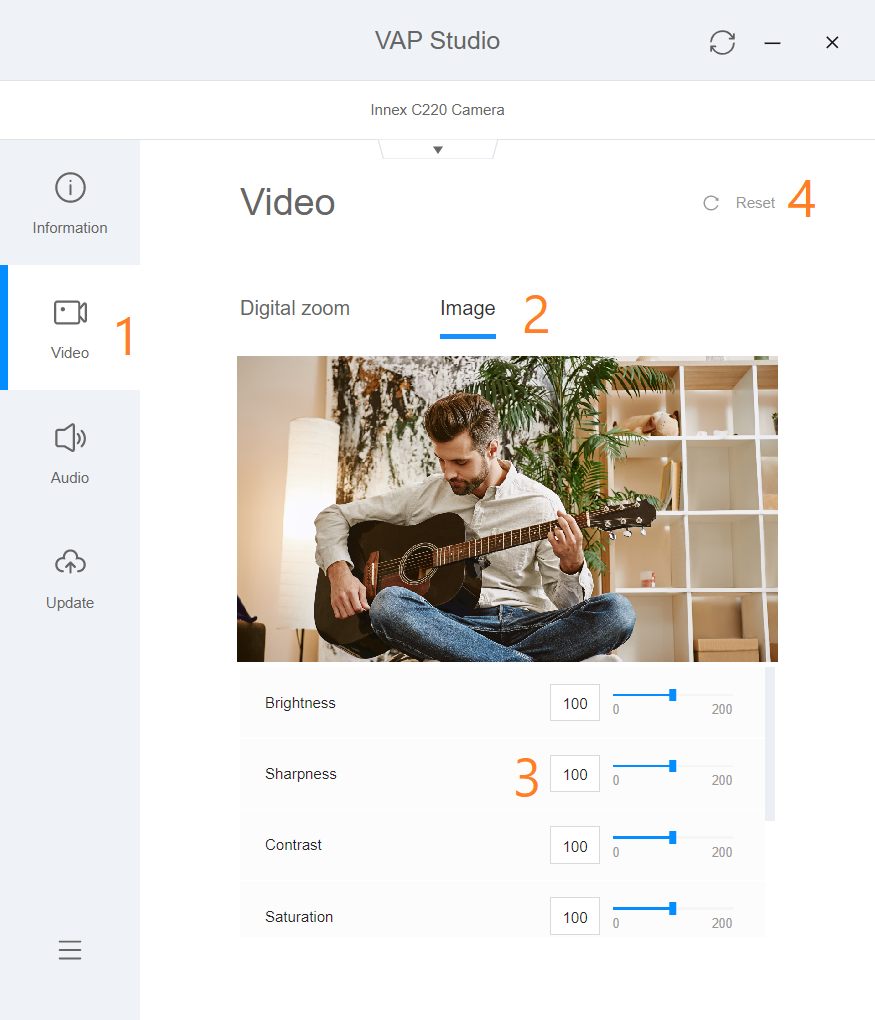
- The image setting adjustment will be saved into the camera and the camera will retain the adjustment even after it’s disconnected from the pc.
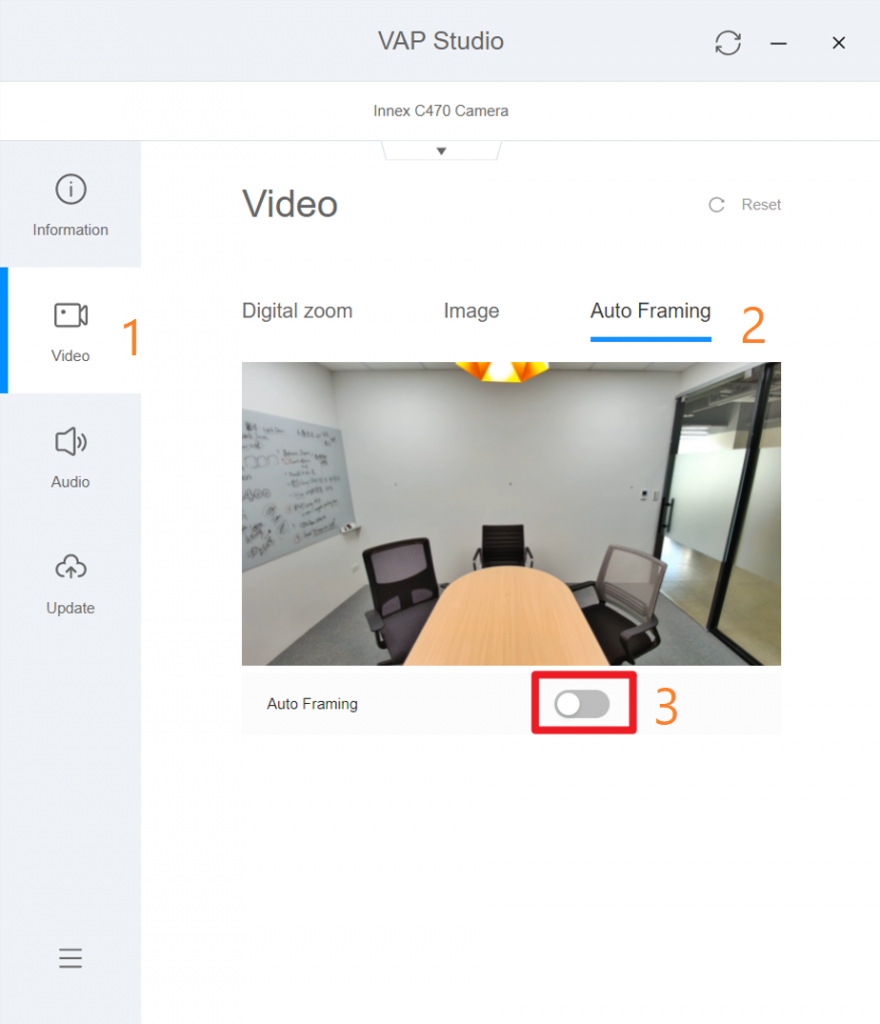
To adjust camera FOV (field of view) and ROI (region of interest) for to better match your environment and preference, you can download and use the Innex Camera (VAP Studio) at https://funtechinnovation.com/downloads/
(Please note that this feature is currently available only with C470)
- Connect your camera to your computer.
- Start VAP Studio by clicking on the VAP Studio icon.
- Disable auto-framing: (1) Click the video tab, (2) Click on Auto Framing tab, (3) Click on auto-framing button so it is slid to the left.
- Adjust with EPTZ: (1) Click on Video, (2) Click on Digital Zoom, (3) Zoom in/out using the plus and minus icon, (4) Pan and tilt using the direction control, (5) Reset to default position (if necessary), (6) Take a photo to validate current FOV and ROI (if necessary), (7) Open folder location to access the photo (if necessary).
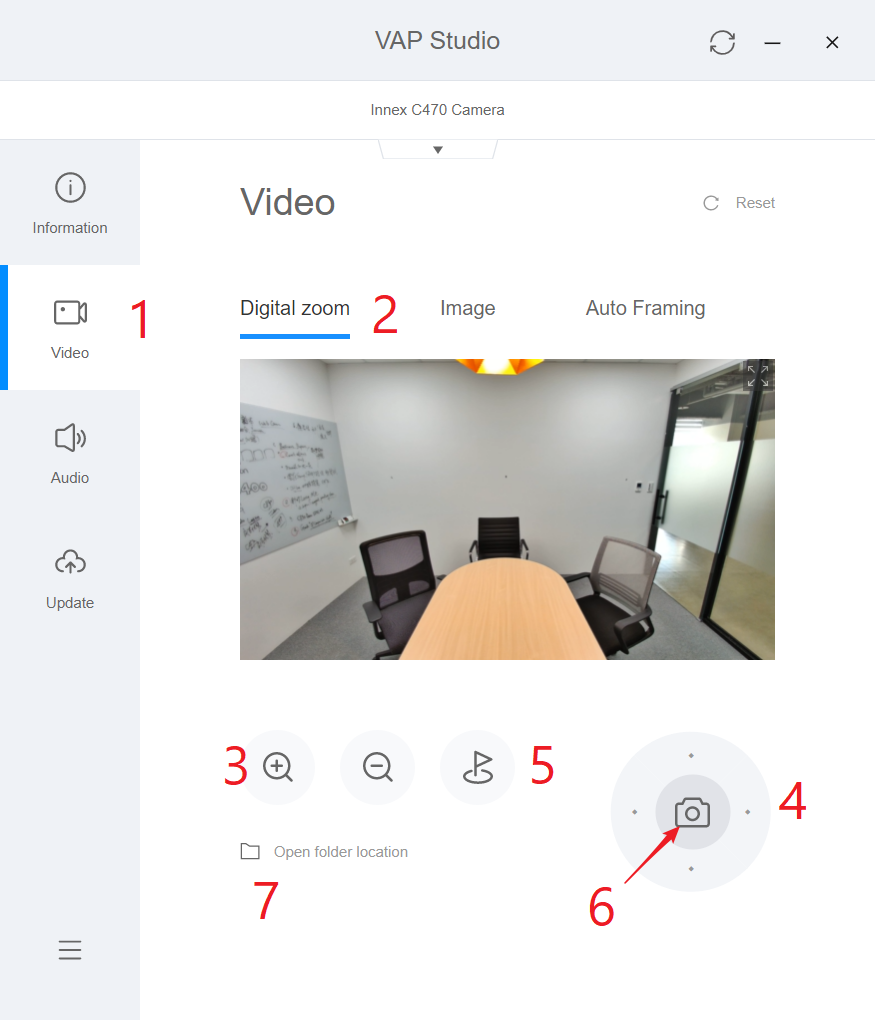
- The camera remembers your preferences after reboot so you only need to set it once.
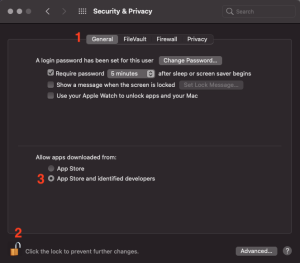
Mac might block the software that is not from the APP Store. Please follow below steps to launch the software
1. Go to System & Preference – Security & Privacy
2. (1) Click General (2) Click the lock to make changes (3) Select App Store and identified developers. And leave this window first.
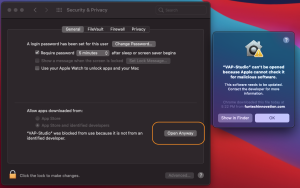
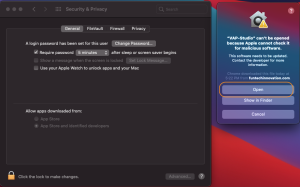
3. Launch the VAP Studio. You’ll see the same pop-up message. Then click (1)”Open Anyway”, (2) Open.
請根據以下步驟使Windows啟動時能夠自動運行軟體。
- 點選啟動按鈕並下滑直至尋找到軟體。
- 點擊右鍵選擇”更多”接著選擇”開啟檔案位置”。此動作會開啟此軟體存儲的檔案夾。
- 在文件夾開啟的情況下,按下Windows鍵+R,輸入”Shell:startup”並選擇確認。這動作將會開啟”啟動”檔案夾。
- 從軟體檔案夾將此軟體的捷徑複製,並於”啟動”檔案夾內貼上。
- 前往設定>應用程式>啟動
- 將開關點選至”開啟”
- 重新啟動電腦並確定軟體於開機時自動運行。
若您的 Innex DS200 未被辨識,請嘗試以下步驟:
1. 檢查系統相容性。確認您的裝置與作業系統支援 Innex DS200。支援的作業系統:
.Microsoft Windows 10、11
.macOS 11 或更新版本”
2. 嘗試使用電腦上的其他 USB 埠。
3. 若 USB 埠供電不足,請將隨附的電源變壓器插入 Innex DS200 的 DC-in 埠,並連接至電源插座。
4. 確認在「隱私權與安全性」設定中,允許應用程式存取相機與麥克風。
5. 確認防毒軟體未阻擋 InnexScan。您可進入防毒軟體的應用程式管理設定,允許 InnexScan 在電腦上執行。以下為範例:
.Avast: https://support.avast.com/en-ph/article/Use-Antivirus-blocked-allowed-apps
.Kaspersky: https://support.kaspersky.com/KART/3.0/en-US/130083.htm
6. 確認除了您要使用的應用程式外,沒有其他軟體正在佔用攝影機。請關閉可能使用攝影機的其他軟體以排除問題。例如,若 InnexScan 仍在使用攝影機,Zoom 可能會無法開啟攝影機。
若您使用視訊會議軟體卻無法取得影像,請確認攝影機未被關閉。通常視訊圖示位於左下角,若為關閉狀態,圖示上會有紅線顯示。點擊圖示即可開啟。
7. 若您的裝置連接了多個攝影機,而應用程式顯示的是其他攝影機影像,請依下列方式操作:
・在 InnexScan 中:點選左下角的「裝置設定」,然後選擇 DS200。
・在視訊會議軟體中:點選視訊圖示旁的「^」符號(通常位於左下角),顯示攝影機清單,並選擇 DS200。
8. 若以上步驟仍無法解決問題,請嘗試以下方式:
.請先連接 Innex DS200 後再啟動軟體。
.使用另一條相同的 USB 連接線將 Innex DS200 連接至您的裝置,並檢查是否能被辨識。
.嘗試在另一台電腦上使用,確認 Innex DS200 是否能被偵測。
.聯繫客服以獲得進一步協助。
1. 在文件模式中選擇多頁掃描。
2. 逐頁掃描,每次掃描後預覽面板會新增一個預覽縮圖。
3. 完成所有頁面掃描後,點選匯出,檔案將儲存在輸出資料夾面板中。
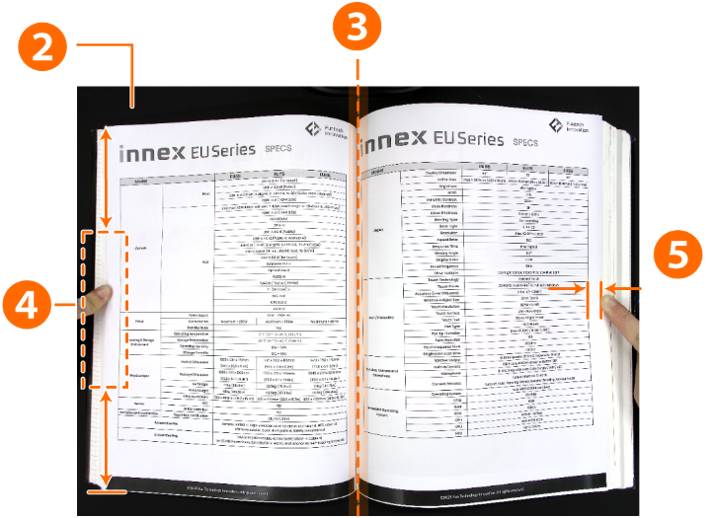
InnexScan 的書本模式可輕鬆擷取書籍的前後封面。操作步驟如下:
1. 確認已在 InnexScan 中的書本模式。
2. 掃描封面:
.在預覽縮圖面板中,點選拍封面。
.放置書籍封面並點擊掃描。
.書封面將被擷取並顯示於預覽中。
3. 掃描封底:
.在預覽縮圖面板中,點選拍封底。
.放置書籍封底並點擊掃描。
.書封底將被擷取並新增至預覽。
4. 匯出完整檔案:
當前後封面與內頁皆完成掃描後,點選匯出儲存完整文件。檔案將包含前後封面與掃描內容。
注意:當選擇拍封面或拍封底時,部分工具列設定可能會暫時停用。
若要在掃描中顯示第二鏡頭影像:
前往設定 > 副攝影機設置,確認已選擇「合併」,並設定第二鏡頭影像的位置。
Windows 系統:
確認在文件模式下,並將掃描選項設為單頁掃描。
Mac 系統:
僅支援於證件模式與視訊模式。在證件模式下,請將裁切選項設為自動裁切。
若要掃描條碼並產生包含掃描資料與對應 JPG 圖檔的 Excel 檔案,請依下列步驟操作:
1. 啟動 InnexScan,選擇條碼識別模式。
2. 在輸出格式中選擇 Excel + JPG,並依需求設定其他選項。
3. 點擊掃描,軟體將依照設定處理每個條碼。
4. 掃描完成後:
.每個條碼將以獨立 JPG 圖檔儲存在輸出資料夾中。
.系統會產生一個 Excel 檔案,列出所有掃描的條碼數值,並提供可點選的連結以開啟對應的圖檔。
使用手指遮擋移除功能的操作準備
1. 確認在 InnexScan 中已勾選手指遮擋選項。
2. 將打開的書籍正面朝上放置在黑色掃描墊上。
3. 書籍中心線必須與螢幕上的垂直橘色線對齊。
4. 將手指放置在書籍展開邊緣的中間位置,以固定頁面。
5. 確保手指與文字或圖片保持至少 10 mm 的距離。
注意:若手指過於接近文字或圖片,軟體可能無法正確偵測並移除。
手指擺放說明
.保持手指筆直,並置於展開書籍邊緣的中央位置。
.避免將手指放在頁面頂端或底端。
.若需使用多根手指,請將手指靠攏放置於中央邊緣,不要分散,以免影響偵測準確度。
功能限制
1. 保持書籍周圍有黑色邊緣。確保掃描畫面中可見黑色區域環繞書籍,以協助軟體區分書籍邊緣與手指。
2. 保持上下邊緣對稱。確保書籍的上下邊緣水平且對稱,以提升手指偵測的準確度。
3. 確保足夠的空白邊界。手指應放置於空白邊界,並與文字或圖片保持至少 10 mm 距離。若手指與內容重疊,可能導致無法正確移除。
4. 避免含有彩色插圖或複雜圖案的頁面。手指隱藏功能在彩色插圖或複雜圖案頁面上可能難以偵測。為獲得最佳效果,建議主要用於文字為主或黑白頁面。
若您在 InnexScan 介面中未看到書本模式選項,請嘗試以下步驟:
1. 確認外接手動按鈕或腳踏鍵是否已正確連接至裝置。書本模式僅在軟體偵測到外接手控按鍵或腳踏板已連接時才會啟用。
2. 重新啟動軟體。若書本模式仍未出現,請重新開啟 InnexScan 以刷新介面。
支援的格式如下:
.影像檔:BMP、JPG、PNG、TIFF
.PDF 檔:PDF (影像)、PDF (可搜尋)、PDF (文字)
.文件檔:Text、Word、Excel、EPUB
.音訊檔 (文字轉語音):MP3、WAV *僅限 Windows 版本
.影片檔:AVI (Windows);MP4、QuickTimeMovie (macOS)
注意:可用的匯出格式可能因選擇的掃描模式而有所不同。
1. 點選軟體左下角的設備選擇。
2. 從清單中選擇您要使用的裝置。
注意:InnexScan 專為 Innex DS200 設計,可能無法在第三方裝置或不支援的硬體上正常運作。
Innex DS200 配備 Class 2 雷射導引,可協助定位文件。安全提醒:請避免直視或注視反射光束,以免造成眼睛傷害。
若您計劃將掃描文件匯出為文字型格式(如 PDF (文字)、PDF (可搜尋)、或 Word),請務必在掃描前選擇與文件內容相符的語言。
請依序檢查以下事項
・確認裝置/操作系統支援攝影機。支援的操作系統如下:
<DC500>
Windows 11、10
macOS 10.10 或以上
Chrome OS
iPadOS 17 或更新版本(配備 USB Type-C 埠的 iPad)
<Ideao VisualCam>
Windows 11/10
macOS 10.15 或以上
<IdeaoCam(Chrome 擴充功能)>
Windows、macOS、Chrome OS
・請確保使用原廠附帶的線材或同等規格的傳輸線。使用過長或未經認證的傳輸線可能導致 DC500無法被裝置識別。
・確保攝影機未透過USB集線器與其他裝置連接至您的裝置,因為這可能導致供電不足,造成DC500無法被識別。請嘗試拔除其他裝置,或將DC500直接連接至裝置以查看是否被識別。
・將DC500連接至不同的USB埠,檢查是否被識別。
・損壞的傳輸線有時也可能會造成此問題。如有同等規格的傳輸線,請嘗試使用這些傳輸線連接,檢查裝置是否能識別 DC500。
・如果嘗試了多條傳輸線後裝置仍無法識別 DC500,請將 DC500 連接到另一台裝置(若有的話),以查看是否能被識別。
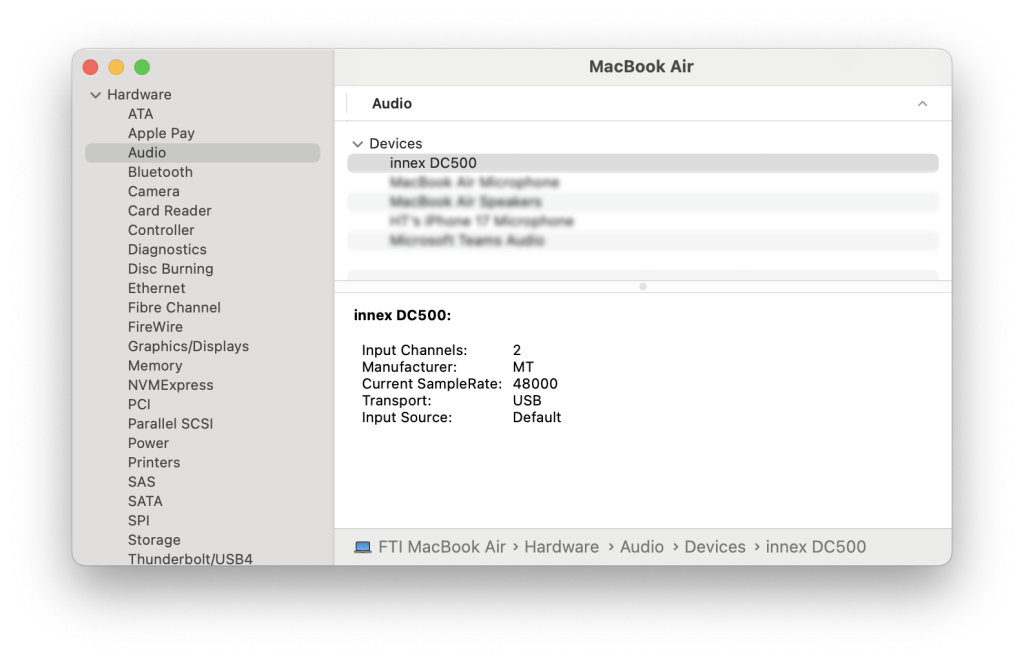
・在 Windows 上開啟「裝置管理員」,或在 Mac 上開啟「系統報告」,檢查裝置是否識別 DC500 為相機。對於使用 Chrome OS 的裝置,開啟設定,選擇「裝置」或「藍牙」,檢查 DC500 是否出現在清單中。若已嘗試上述方法但裝置仍無法識別 DC500, 請與我們聯繫 。

 如果裝置可辨識攝影機,但無法取得影像,請參閱 「我的裝置可辨識攝影機,但在某些軟體中無法從DC500取得影像」。
請依照以下順序檢查。
・確認在「隱私與安全」設定中,裝置允許應用程式存取攝影機和麥克風。
 ・確認防毒軟體未封鎖 Ideao VisualCam。您可以前往防毒軟體的應用程式管理設定中允許 Ideao VisualCam 在您的電腦上執行。以下為相關範例:
Avast: https://support.avast.com/en-ph/article/Use-Antivirus-blocked-allowed-apps
Kaspersky: https://support.kaspersky.com/KART/3.0/en-US/130083.htm
・確保除了您要用來擷取影像的應用程式外,沒有其他應用程式正在使用攝影機。請關閉所有其他可能使用攝影機的軟體進行故障排除。舉例來說,如果Zoom正在使用Ideao VisualCam,那麼無法開啟攝影機是常見的問題。
・如果您使用視訊會議軟體卻無法獲得影像,請確認攝影機未被關閉。一般來說,視訊圖示位於左下角,如果攝影機被關閉,圖示將會有紅線劃掉圖案。按一下該圖示可開啟攝影機。
如果您的裝置連接了多台攝影機,而應用程式中顯示的是另一台攝影機的影像,請依以下步驟操作:
使用Ideao VisualCam:
・點擊螢幕左上角的功能表圖示(圓圈內有三條水平線)。
・點擊選單中的「裝置」。
・選擇 Innex DC500。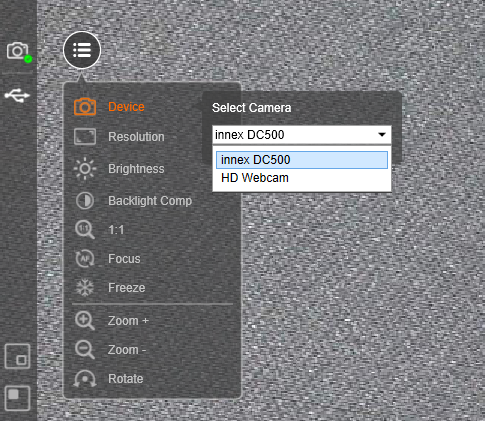 使用視訊會議軟體:
・點擊視訊圖示旁的「^」圖示(通常位於左下角),顯示攝影機清單。
・選擇 Innex DC500。
請按以下順序檢查
・前往「隱私權與安全性」設定,然後點選「麥克風」並確認應用程式已允許存取麥克風。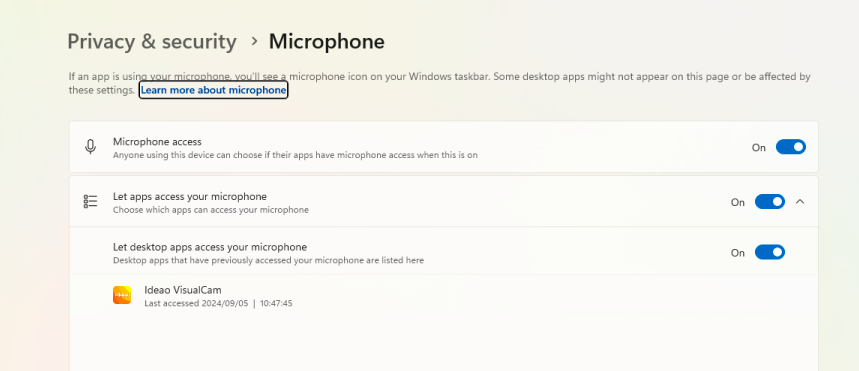
 ・若您正在使用視訊會議軟體,多數情況下,視訊和音訊來源是分開的。因此,即使影像已切換為 Innex DC500,並不代表也選擇了DC500為麥克風。請點擊「音訊」圖示旁的「^」圖示,然後選擇 Innex DC500作為麥克風。
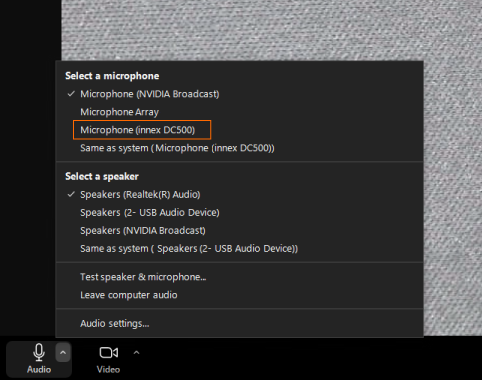 請檢查 Windows/Mac的音訊輸入設定,或視訊會議軟體中的麥克風設定,確認麥克風音量未設為零或過低。
・在 Windows 中開啟「裝置管理員」或在 Mac 上開啟「系統報告」來確認裝置是否識別 DC500 為 USB 音訊裝置。對於使用 Chrome OS 的裝置,開啟設定,選擇「裝置」或「藍牙」,並檢查 DC500 是否出現在清單中。若以上方法皆無效,且您的裝置仍無法識別 DC500, 請與我們聯繫。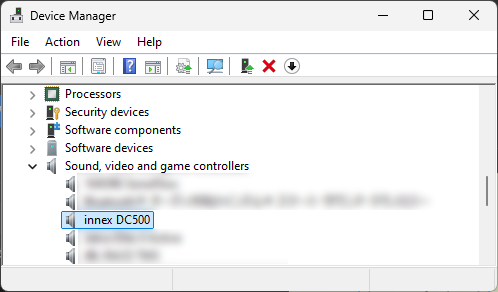
搭配 iPad 使用時需注意以下幾點。
1. 不是所有iPad都支援外接相機,僅配備USB Type-C口的iPad相容。
2. iPadOS 版本需為17或更新版本。
3. 目前並非所有應用程式都支援外接相機。
4. 在iPad上使用攝影機的體驗可能與電腦或Mac會有所不同。
5. 解析度及幀率可能會根據 iPad 和應用程式而有所不同。
6. 有些應用程式可能沒有切換相機的功能。當連接相機後,影像來源可能會自動切換至外接相機。如需切換回內建相機,可能需手動拔除外接相機。
7. 對於不支援外接相機輸入的視訊會議應用程式,您可能需要使用第三方應用程式來顯示相機影像,然後在視訊會議軟體中分享您的畫面。
影像的亮度會受到背景顏色的影響。例如,當背景為深色,而拍攝物體較亮時,攝影機會根據主要背景顏色來調整白平衡,導致影像可能看起會更亮。在 Ideao VisualCam 中,您可以點擊「背光補償」圖示,使用滑桿調整白平衡。對於沒有調整白平衡功能的軟體,請確保背景和物體之間的對比度不要過大。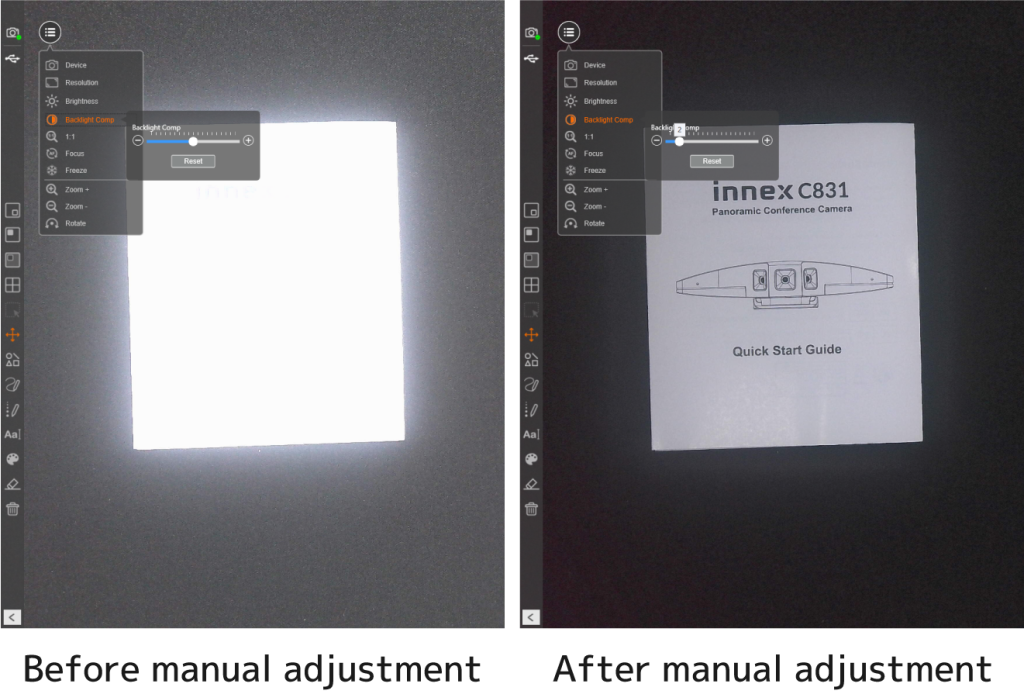
請按以下順序檢查:
・專屬軟體 Ideao VisualCam 支援4K解析度。然而,在某些軟體中,特別是視訊會議軟體中,最大解析度可能未支援 4K。請檢查您使用的軟體支援的最大解析度。
・某些軟體的預設解析度可能不會是4K。請確認軟體的解析度設定沒有過低。 ・數位變焦是透過剪裁原始影像的一部分並進行數位放大,因此容易使影像變得粗糙。我們建議您盡量將攝影機移近物體,這樣可以保持影像清晰且不犧牲解析度。(請確保鏡頭與物體之間的距離至少為10公分,使物體保持對焦)
請依序檢查下列事項:
・請確保攝影機未放置於產生強磁場的設備附近。
・確認電源頻率符合您所在區域的標準。請開啟 Ideao VisualCam,於「裝置選擇」中檢查或更改目前的電源頻率。
- 完全展開 DC400/500 的支架。
- 確保相機鏡頭正對紙張的中心,並保持水平放置。
- 按下畫面左側的功能表按鈕(三條橫線的圖示)。
- 在功能表中選擇「解析度」,並將其設定為 3840 x 2880。
- 如果拍攝畫面未完整覆蓋 A3 紙張,請適當調整相機的角度與位置,直至 A3 紙張的完整內容出現在畫面中。
大部分視訊會議軟體(例如 Google Meet、Zoom、Microsoft Teams 和 Webex)會預設將您的相機影像鏡射顯示。不過,這不會影響對方觀看的畫面,對方看到的影像仍會是正常的非鏡像版本。
如果您仍希望在自己端看到非鏡像的畫面,請依照以下步驟操作。
適用於所有視訊會議軟體的通用解決方案
1. 啟動 Ideao VisualCam,顯示來自Innex DC500 的影像。
2. 在視訊通話中,請確保不要選擇 DC500。
3. 選擇「分享螢幕」或「開始」(依軟體而異),並分享 Ideao VisualCam 的螢幕。
Google Meet: (參見教學)
1.有幾款 Google Chrome 擴充功能可以鏡射您的影像。我們建議您下載「VideoMirror」。 
2. 開始 Google Meet 通話並選擇 Innex DC500 作為攝影機,點擊擴充功能圖示。視訊畫面將被鏡射。
*請注意,VideoMirror 是第三方應用程式,FTI 不提供該應用程式的支援服務。
Zoom: (參見教學) 或其他視訊會議軟體
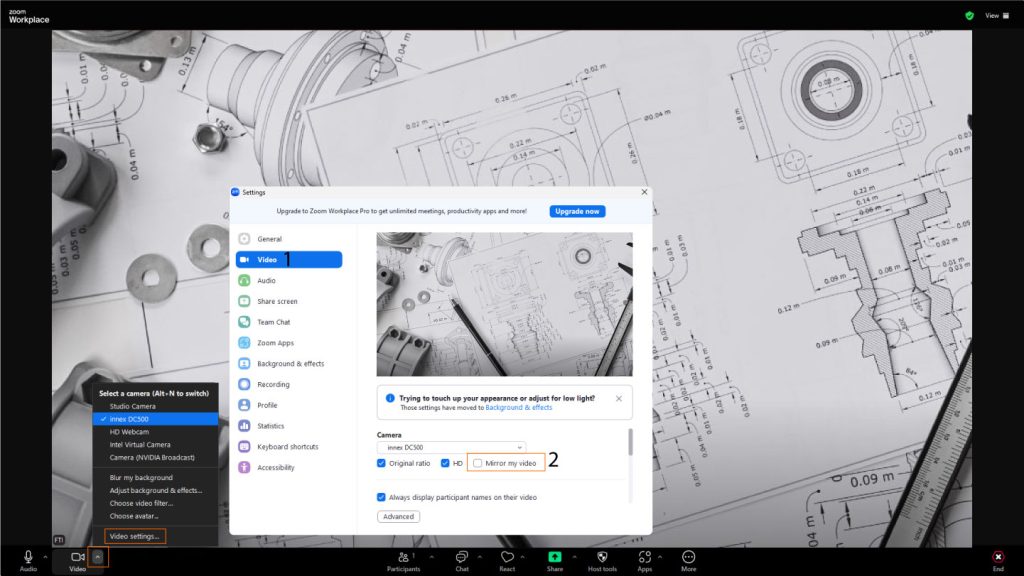
1. 前往 Zoom 的「視訊設定」
2. 取消勾選「鏡射我的視訊」
在視訊會議軟體中,可以通過以下幾種方式同時顯示多個攝影機的影像。
網路攝影機 + 螢幕畫面分享:
1. 在視訊會議軟體中選擇網路攝影機以顯示您的樣貌。
2. 啟動 Ideao VisualCam 並顯示 DC500 的影像。
3. 在視訊會議軟體中點擊「分享」
4. 選擇「Ideao VisualCam」後點擊「分享」以開始分享畫面。
Ideao VisualCam 分割畫面模式
1. 不要在視訊會議軟體中開啟相機。
2. 啟動 Ideao VisualCam 並顯示 DC500 的影像。
3. 點擊螢幕左上角的「分屏」圖示。
4. 點擊螢幕右側的任意部分以顯示「選單」圖示。
5. 點擊選單圖示後,再點擊「切換相機」。
6. 點擊「裝置」,選擇要顯示影像的攝影機。
Ideao VisualCam 畫中畫 (PIP) 模式
1. 不要在視訊會議軟體中開啟相機。
2. 啟動 Ideao VisualCam 並顯示 DC500 的影像。
3. 點擊左側工具欄中的 PIP 圖示顯示來自攝影機的畫面。
將 DC500 的即時影像嵌入到 PowerPoint 簡報
1. 在製作簡報內容時,從「插入」中點選「Cameo」。
2. 選取相機樣式,點擊「預覽」,選擇 DC500 作為影像來源。
3. 開始簡報後,顯示DC500即時影像的同時,您的樣貌也會在視訊會議軟體中呈現。
請依序確認以下事項
・請確保您的裝置或操作系統支援此攝影機。支援的作業系統如下:
<DC400>
Windows 11、10
macOS 10.10 或更新版本
Chrome OS
<Ideao VisualCam>
Windows 11/10
macOS 10.15 或更新版本
<IdeaoCam (Chrome 擴充功能)>
Windows, macOS, Chrome OS
・請務必使用原廠傳輸線或同等規格的傳輸線。使用過長或未經認證的傳輸線,可能會導致您的裝置無法辨識 DC400。
・請確認攝影機不是經由USB集線器與其他裝置一同連接到您的裝置,因為這樣可能會導致電力不足,使您的裝置無法偵測到DC400。建議拔除其他裝置,或將DC400直接連接到您的裝置,以檢查是否可以被偵測到。
・將DC400連接到不同的USB接口,查看是否可以被辨識。
・損壞的傳輸線有時也可能會造成此問題。如有同等規格的傳輸線,請嘗試使用這些傳輸線連接,檢查裝置是否能識別 DC400。
・ 如果嘗試多條USB線後,DC400 仍然無法被您的裝置辨識,請連接至其他裝置 (如果您有的話),檢查是否可以被辨識。
・ 開啟 Windows 的「裝置管理員」或 Mac 的「系統報告」,檢查 DC400 是否被裝置辨識為攝影機。對於執行 Chrome OS 的裝置,請開啟設定,選擇「裝置」或「藍牙」,並檢查 DC400 是否出現在清單中。如果已嘗試以上所有方法,但您的裝置仍無法辨識 DC400, 請與我們聯繫。
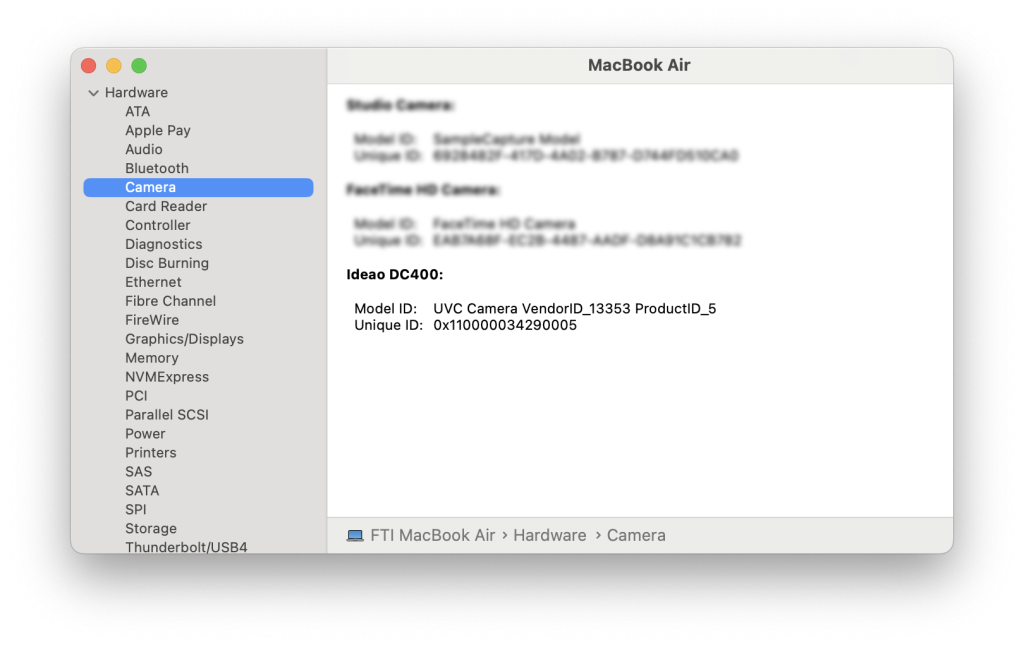 當設備識別到攝影機但無法獲取影像時,請參考「我的設備識別到DC400但無法在某些軟體中獲取DC400的影像。」
請依照以下步驟進行排查。
・ 確保在隱私權與安全性設定中,允許應用程式存取攝影機和麥克風。・ 確保防毒軟體未阻擋Ideao VisualCam。您可以前往防毒軟體的應用程式設定,允許Ideao VisualCam在您的電腦上執行。以下是一些範例:
Avast: https://support.avast.com/en-ph/article/Use-Antivirus-blocked-allowed-apps
Kaspersky: https://support.kaspersky.com/KART/3.0/en-US/130083.htm
確保除了您要用來擷取影像的應用程式外,沒有其他應用程式正在使用攝影機。請關閉所有其他可能使用攝影機的軟體進行故障排除。舉例來說,如果Zoom正在使用Ideao VisualCam,那麼無法開啟攝影機是常見的問題。
如果您無法在視訊會議軟體中取得攝影機的影像,請確認攝影機沒有被關閉。通常,視訊圖示位於左下角。如果圖示被關閉,會有紅色線條標示。請點擊圖示以開啟攝影機。
如果您的裝置連接了多台攝影機,而應用程式中顯示的是另一台攝影機的影像,請依以下步驟操作:
使用Ideao VisualCam:
・點擊螢幕左上角的功能表圖示(圓圈內有三條水平線)。
・點擊選單中的「裝置」。
・選擇 Ideao DC400。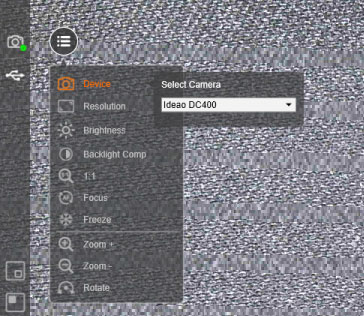 使用視訊會議軟體:
・點擊視訊圖示旁的「^」圖示(通常位於左下角),顯示攝影機清單。
・選擇 Ideao DC400。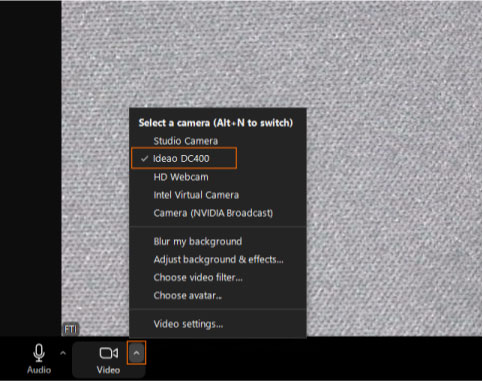
請按以下順序檢查
・前往「隱私權與安全性」設定,然後點選「麥克風」並確認應用程式已允許存取麥克風。・若您正在使用視訊會議軟體,多數情況下,視訊和音訊來源是分開的。因此,即使影像已切換為 Ideao DC400,並不代表也選擇了DC400為麥克風。請點擊「音訊」圖示旁的「^」圖示,然後選擇 Ideao DC400作為麥克風。 請檢查 Windows 的音訊輸入設定,或視訊會議軟體中的麥克風設定,確認麥克風音量未設為零或過低。
・在 Windows 中開啟「裝置管理員」或在 Mac 上開啟「系統報告」來確認裝置是否識別 DC400 為 USB 音訊裝置。對於使用 Chrome OS 的裝置,開啟設定,選擇「裝置」或「藍牙」,並檢查 DC400 是否出現在清單中。若以上方法皆無效,且您的裝置仍無法識別 DC400, 請與我們聯繫。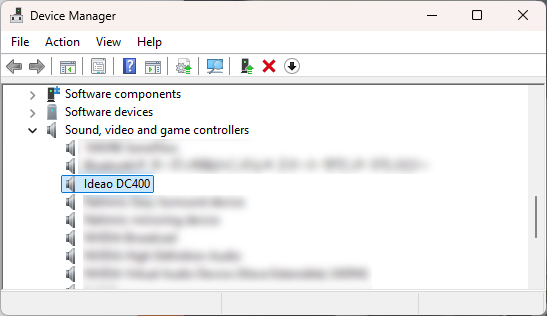

搭配 iPad 使用時需注意以下幾點。
1. 不是所有iPad都支援外接相機,僅配備USB Type-C口的iPad相容。
2. iPadOS 版本需為17或更新版本。
3. 目前並非所有應用程式都支援外接相機。
4. 在iPad上使用攝影機的體驗可能與PC或Mac會有所不同。
5. 解析度及幀率可能會根據 iPad 和應用程式而有所不同。
6. 有些應用程式可能沒有切換相機的功能。當連接相機後,影像來源可能會自動切換至外接相機。如需切換回內建相機,可能需手動拔除外接相機。
7. 對於不支援外接相機輸入的視訊會議應用程式,您可能需要使用第三方應用程式來顯示相機影像,然後在視訊會議軟體中分享您的畫面。
影像的亮度會受到背景顏色的影響。例如,當背景為深色,而拍攝物體較亮時,攝影機會根據主要背景顏色來調整白平衡,導致影像可能看起會更亮。在 Ideao VisualCam 中,您可以點擊「背光補償」圖示,使用滑桿調整白平衡。對於沒有調整白平衡功能的軟體,請確保背景和物體之間的對比度不要過大。
請按以下順序檢查:
・專屬軟體 Ideao VisualCam 支援4K解析度。然而,在某些軟體中,特別是視訊會議軟體中,最大解析度可能未支援 4K。請檢查您使用的軟體支援的最大解析度。
・某些軟體的預設解析度可能不會是4K。請確認軟體的解析度設定沒有過低。・數位變焦是透過剪裁原始影像的一部分並進行數位放大,因此容易使影像變得粗糙。我們建議您盡量將攝影機移近物體,這樣可以保持影像清晰且不犧牲解析度。(請確保鏡頭與物體之間的距離至少為10公分,使物體保持對焦)
請依序檢查下列事項:
・請確保攝影機未放置於產生強磁場的設備附近。
・確認電源頻率符合您所在區域的標準。請開啟 Ideao VisualCam,於「裝置選擇」中檢查或更改目前的電源頻率。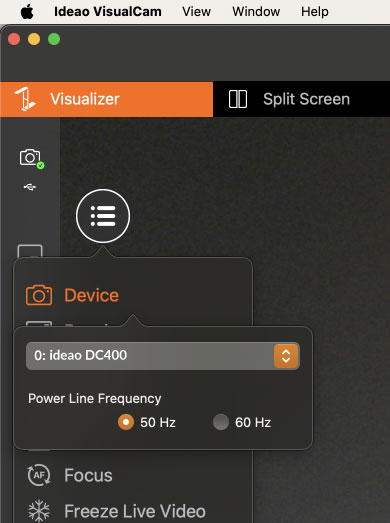
- 完全展開 DC400/500 的支架。
- 確保相機鏡頭正對紙張的中心,並保持水平放置。
- 按下畫面左側的功能表按鈕(三條橫線的圖示)。
- 在功能表中選擇「解析度」,並將其設定為 3840 x 2880。
- 如果拍攝畫面未完整覆蓋 A3 紙張,請適當調整相機的角度與位置,直至 A3 紙張的完整內容出現在畫面中。
為了確保當手在文件周圍移動時,鏡頭不會自動對焦,避免畫面閃爍。
Ideao DC400是一台自動對焦的實物攝影機,但可以透過軟體將其切換為手動對焦。
Windows 電腦:
- 相機app:如果您正在使用 Windows 內建的相機應用程式拍攝或錄影,可按以下步驟切換為手動對焦:
- 進到設定,開啟「進階控制」
- 點擊圓圈圖示,並稍微移動滑桿,即可切換為手動對焦,圖示將從「Auto」變為「M」。
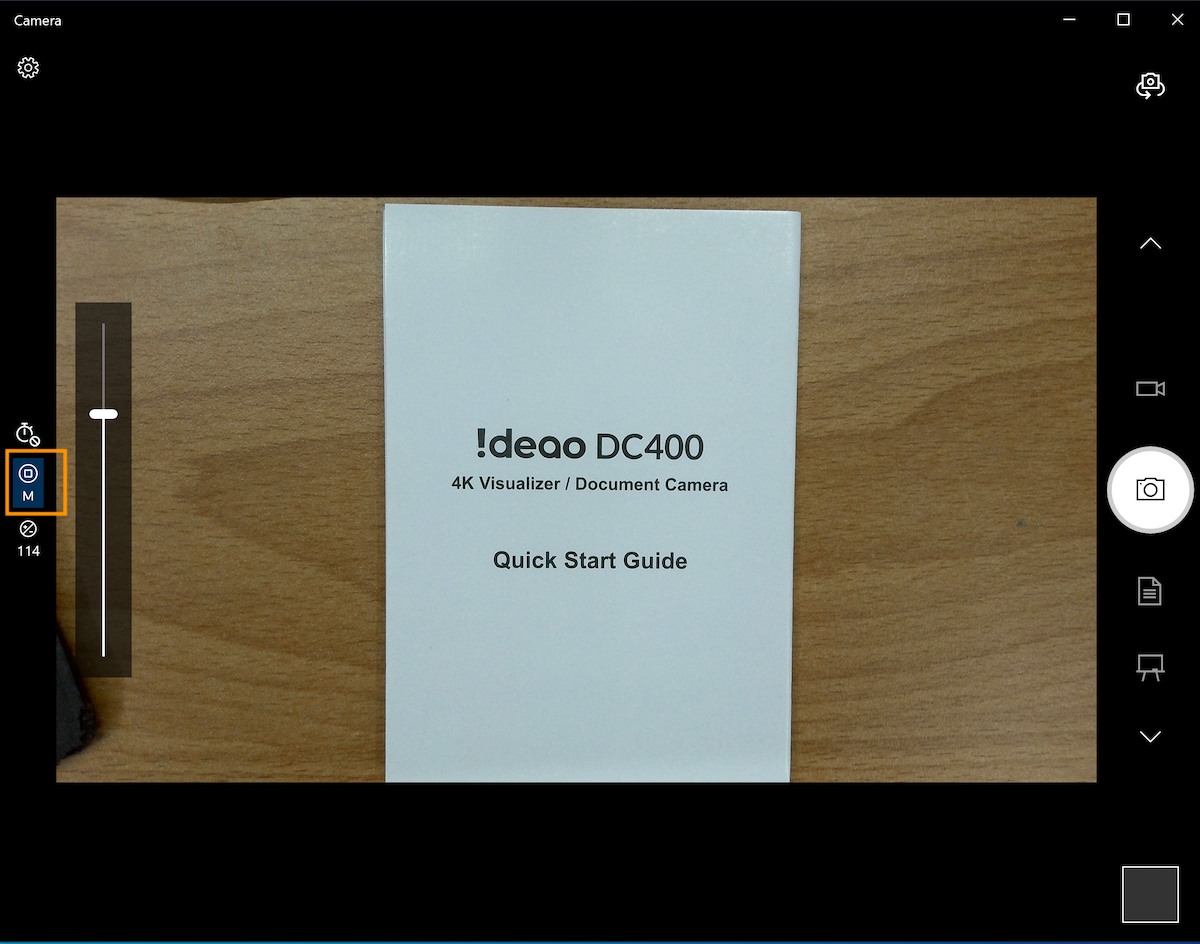
- 按下 DC400 頂部的 AF 按鈕以觸發一次自動對焦。
- 對焦距離將會被固定。當拍攝距離改變時,請按頂部的 AF 按鈕重新對焦。
- 如需重新啟用自動對焦,將滑桿移回「Auto」。
- 進到設定,開啟「進階控制」
- AMCap: 您也可以使用第三方軟體 AMCap 關閉自動對焦。
- 從以下連結下載並安裝 https://amcap.en.softonic.com/download
- 將 DC400 連接至電腦,並開啟 AMCap。
- 在設備中選擇 DC400。前往 視訊 > 屬性 > 相機控制,取消勾選自動對焦(Autofocus)選項,然後點擊「套用」。
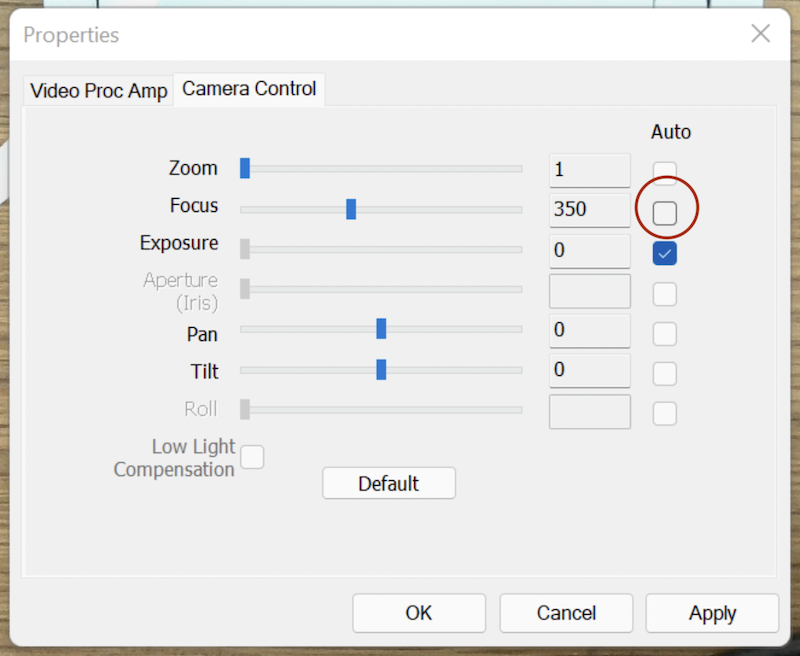
4. 自動對焦功能現在已停用。
5. 當您在如 IdeaoCam 這類應用程式中開啟攝影機時,仍會看到 DC400 自行調整焦點,這是正常現象。一旦焦距設定完成,直到您再次按下 AF 按鈕前,焦距將不會再變動。
Mac 系統:
- Webcam Setting(付費App):前往 App Store 搜尋「Webcam Setting」,或點擊連結下載 https://apps.apple.com/app/webcam-setting/id1610840452?mt=12
- 連接 Ideao DC400 並選擇相機。
- 前往「進階」標籤頁。
- 取消勾選自動對焦(Autofocus)。
- 當您第一次打開相機影像時,DC400 仍會自動調整焦點;一旦焦距設置完成,將不會再次調整,除非您按了AF 按鈕。
* AMCap 和 Webcam Setting 並非由 FTI 開發,FTI 不負責維護這些軟體或保證其功能與可用性。
大部分視訊會議軟體(例如 Google Meet、Zoom、Microsoft Teams 和 Webex)會預設將您的相機影像鏡射顯示。不過,這不會影響對方觀看的畫面,對方看到的影像仍會是正常的非鏡像版本。
如果您仍希望在自己端看到非鏡像的畫面,請依照以下步驟操作。
適用於所有視訊會議軟體的通用解決方案
1. 啟動 Ideao VisualCam,顯示來自Ideao DC400 的影像。
2. 在視訊通話中,請確保不要選擇 DC400。
3. 選擇「分享螢幕」或「開始」(依軟體而異),並分享 Ideao VisualCam 的螢幕。
Google Meet: (參見教學)
1.有幾款 Google Chrome 擴充功能可以鏡射您的影像。我們建議您下載「VideoMirror」。
2. 開始 Google Meet 通話並選擇 IDEAO DC400 作為攝影機,點擊擴充功能圖示。視訊畫面將被鏡射。
*請注意,VideoMirror 是第三方應用程式,FTI 不提供該應用程式的支援服務。
Zoom: (參見教學) 或其他視訊會議軟體
1.前往 Zoom 的「視訊設定」
2.取消勾選「鏡射我的視訊」
在視訊會議軟體中,可以通過以下幾種方式同時顯示多個攝影機的影像。
網路攝影機 + 分享畫面:
1. 在視訊會議軟體中選擇網路攝影機以顯示您的樣貌。
2. 啟動 Ideao VisualCam 並顯示 DC400 的影像。
在視訊會議軟體中點擊「分享」
4. 選擇「Ideao VisualCam」後點擊「分享」以開始分享畫面。
Ideao VisualCam 分割畫面模式
1. 不要在視訊會議軟體中開啟相機。
2. 啟動 Ideao VisualCam 並顯示 DC400 的影像。
3. 點擊螢幕左上角的「分屏」圖示。
4. 點擊螢幕右側的任意部分以顯示「選單」圖示。
5. 點擊選單圖示後,再點擊「切換相機」。
6. 點擊「裝置」,選擇要顯示影像的攝影機。
Ideao VisualCam 畫中畫 (PIP) 模式
1. 不要在視訊會議軟體中開啟相機。
2. 啟動 Ideao VisualCam 並顯示 DC400 的影像。
3. 點擊左側工具欄中的 PIP 圖示顯示來自攝影機的畫面。
將 DC400 的即時影像嵌入到 PowerPoint 簡報
1. 在製作簡報內容時,從「插入」中點選「Cameo」。
2. 選擇相機樣式,點擊「預覽」,然後選擇 DC400 作為影像來源。
3. 開始簡報後,顯示DC400即時影像的同時,您的樣貌也會在視訊會議軟體中呈現。
Manage app settings to allow Ideao VisualCam to run on your computer.
Avast: https://support.avast.com/en-ph/article/Use-Antivirus-blocked-allowed-apps
Kaspersky: https://support.kaspersky.com/KART/3.0/en-US/130083.htm
請根據以下步驟使Windows啟動時能夠自動運行軟體。
- 點選啟動按鈕並下滑直至尋找到軟體。
- 點擊右鍵選擇”更多”接著選擇”開啟檔案位置”。此動作會開啟此軟體存儲的檔案夾。
- 在文件夾開啟的情況下,按下Windows鍵+R,輸入”Shell:startup”並選擇確認。這動作將會開啟”啟動”檔案夾。
- 從軟體檔案夾將此軟體的捷徑複製,並於”啟動”檔案夾內貼上。
- 前往設定>應用程式>啟動
- 將開關點選至”開啟”
- 重新啟動電腦並確定軟體於開機時自動運行。
- 使用電源線與 HDMI 線將 RX100 接收器連接至顯示器。若顯示器沒有支援超過 5V/2A 輸出的 Type-C 連接埠,請使用隨附的轉換線,將其分接為兩個 USB-A 接頭。其中一個 USB-A 接頭必須為 USB 3.0,以提供接收器所需電力。或者,您也可以將 Type-C 線連接至電源轉接器(套件中不含)。
- 若需連接 USB 網路攝影機,請將攝影機的 USB 線插入接收器上的 USB-A 埠。
- 使用內建安裝夾將 RX100 接收器固定於顯示器上。請確保接收器朝向前方,以獲得最佳無線訊號傳輸。建議的最佳無線傳輸距離為 5 公尺以內。
- 將顯示器的輸出來源切換至已連接的 HDMI 埠。
- 將會議喇叭 ST100 連接至筆電的全功能 Type-C 埠。等待投屏按鍵的指示燈變為綠色後,按下按鍵即可開始投屏。再次按下按鍵即可暫停投屏。*若筆電的 Type-C 埠未支援完整功能,請改用 USB-C to HDMI & USB-A 轉接器。
- 要使用會議喇叭 ST100 並無線存取攝影機時,請在視訊會議軟體中選擇「Connect」作為您的麥克風、喇叭與攝影機。
並非所有筆電的 Type-C 連接埠都支援影像訊號輸出。此外,不同品牌與型號之間可能存在相容性問題,導致無法正常運作。作為替代方案,我們已隨附 Type-C 轉 Type-A 與 HDMI 轉接器供使用者使用。
如果您的顯示器沒有支援超過 5V/2A 輸出的 USB-C 接口,您可以將 USB-C 線連接到充電轉接器(USB 充電座)作為替代方案。
請務必使用規格為 5V/2A 或更高 的充電轉接器(一般來說,充電器上會有 USB-C 接口而非 USB-A),以確保為 RX100 接收器提供足夠的電力。否則,RX100 接收器可能無法正常運作。
Connect 喇叭 (ST100) 的音量鍵僅能調整 Windows 系統音量(目前不支援 macOS),在部分視訊會議軟體中無法直接改變喇叭音量。請使用視訊會議軟體內建的音量控制功能來進行調整。
有時候當 Innex Connect 連接到您的裝置時,音量設定可能無法正確同步,這會導致輸出的聲音比預期還小。
如果發生這種情況,請嘗試按一下或兩下音量降低鍵。在某些情況下,這樣做後聲音反而會變大。
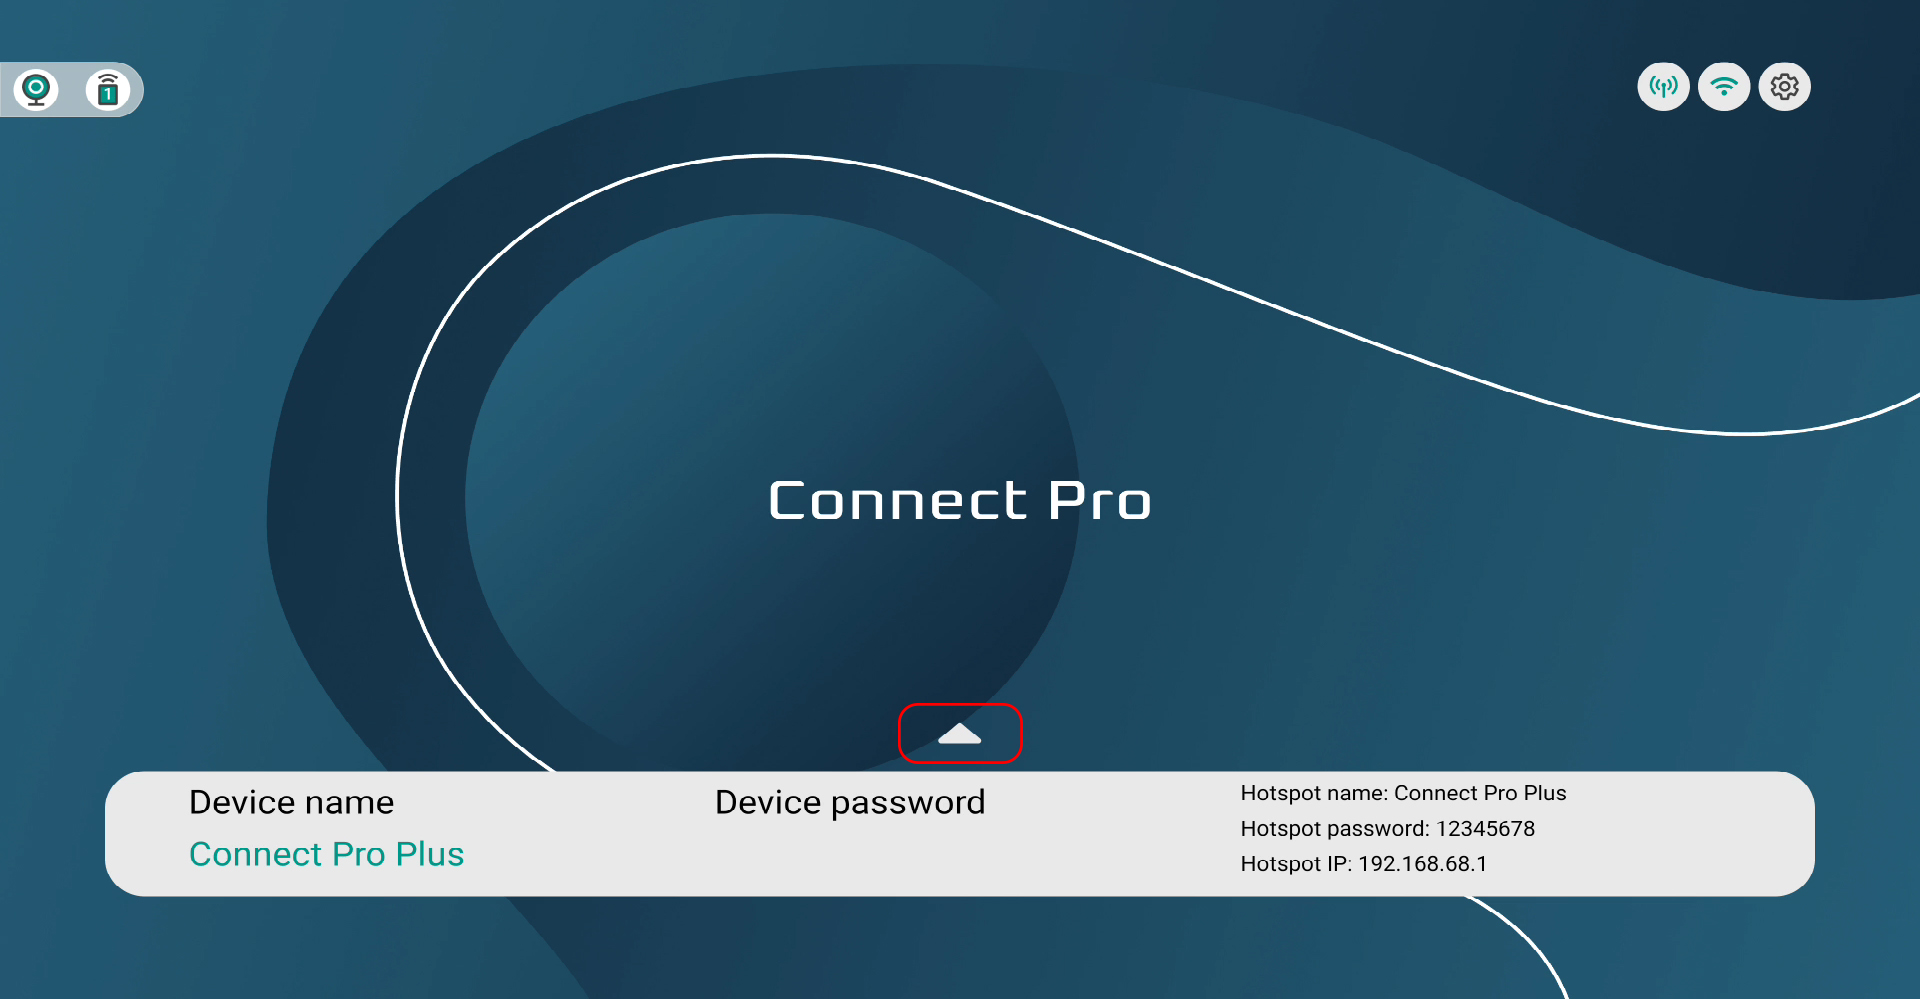
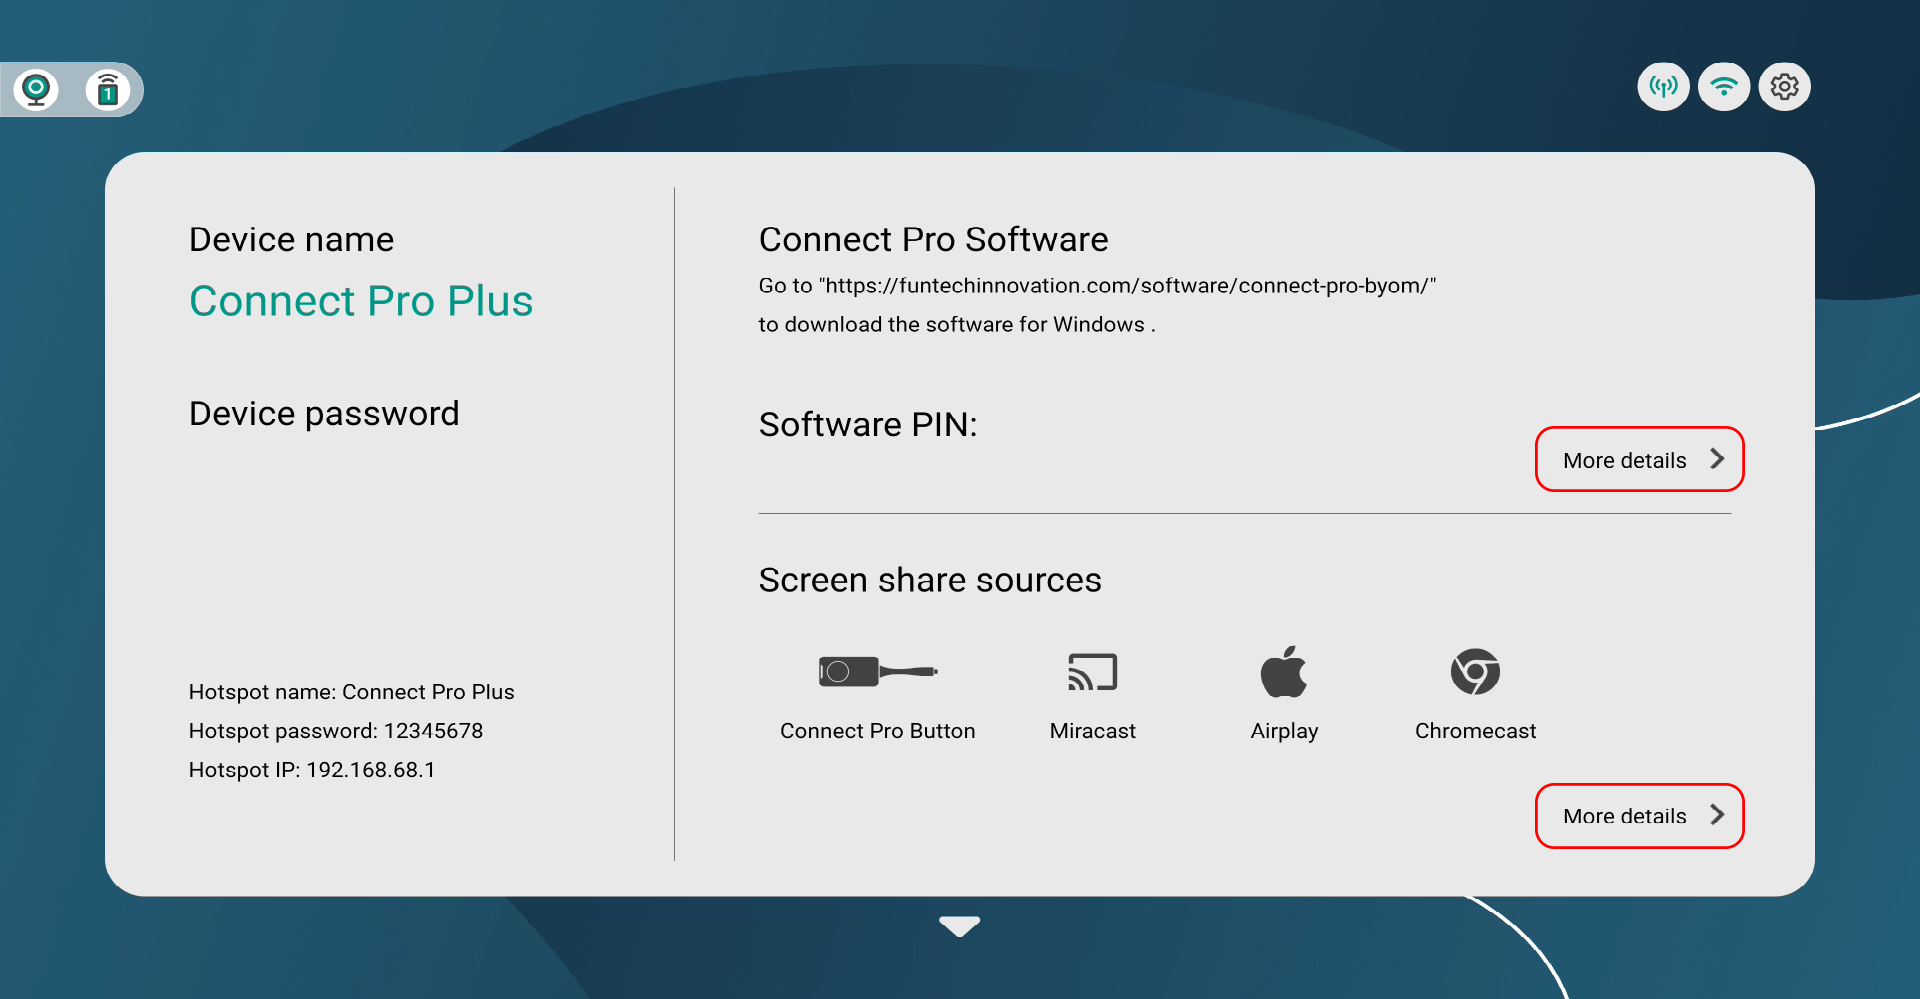
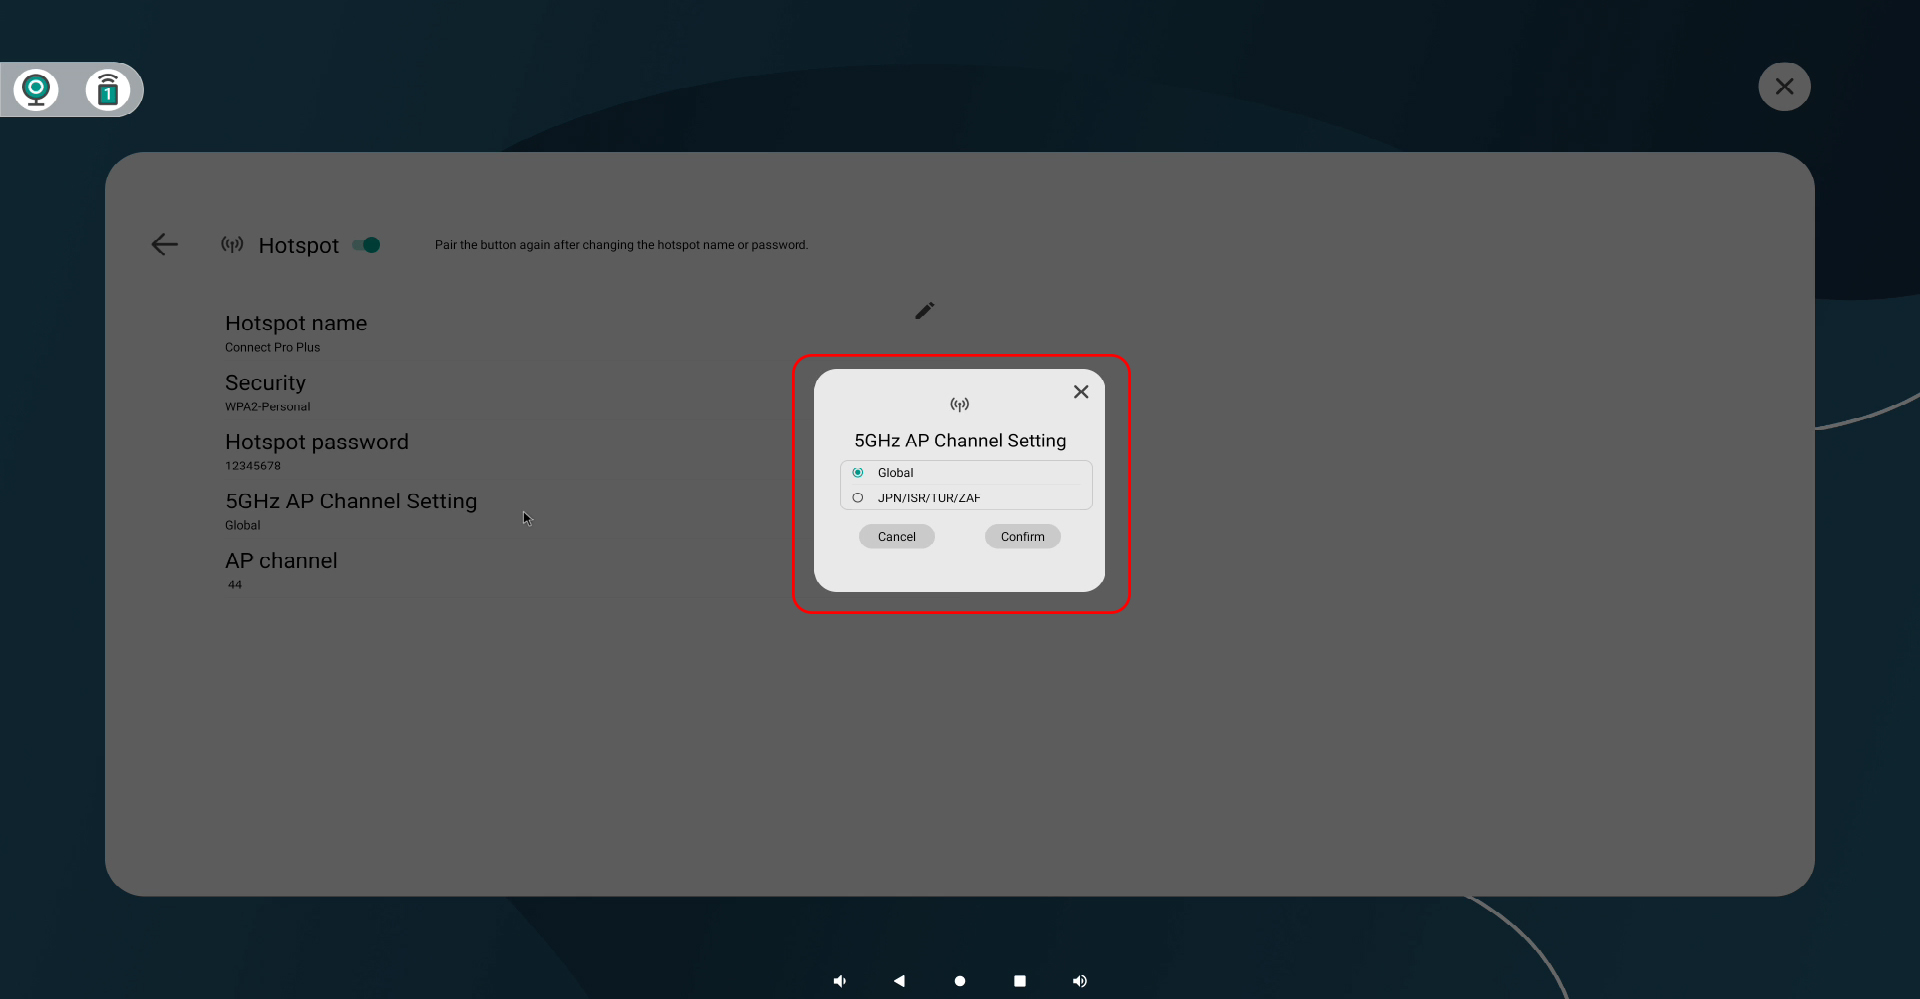
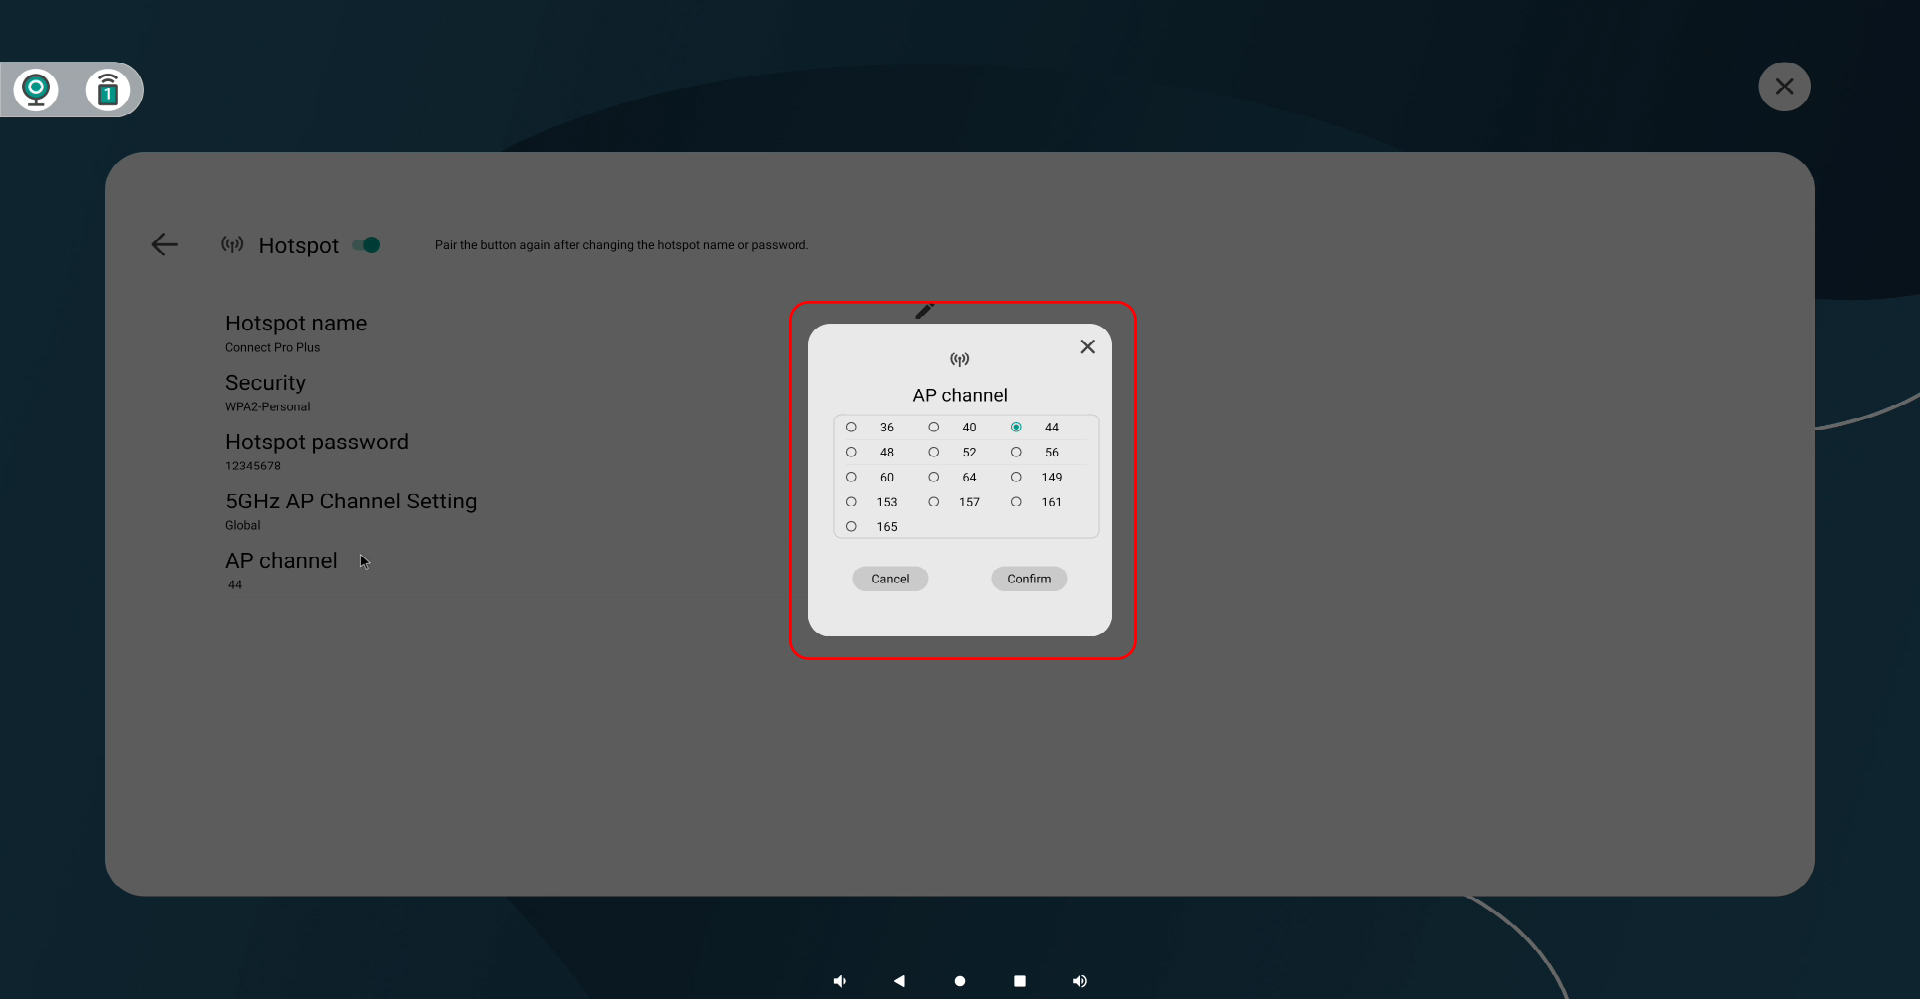
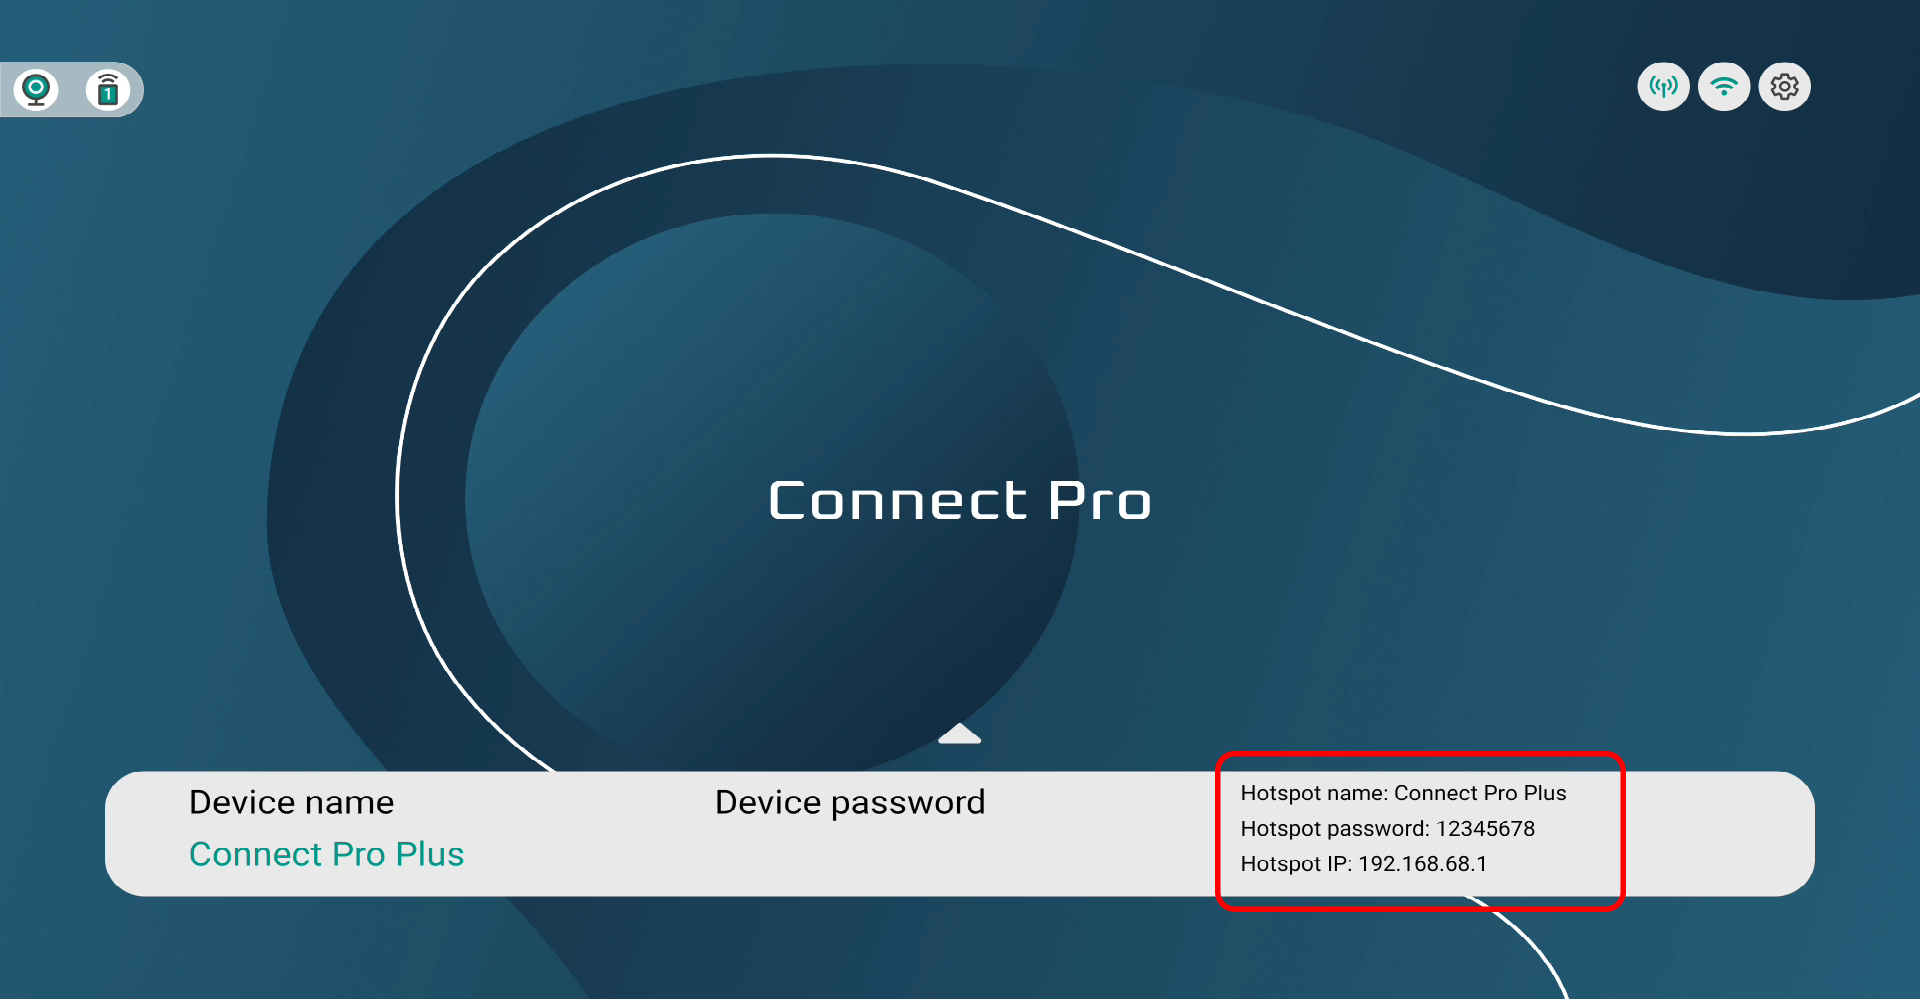
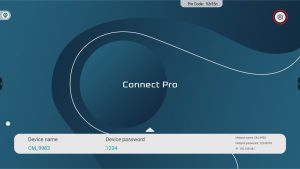
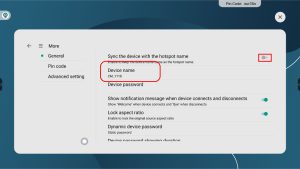
裝置名稱用於辨識您的 Innex Connect Pro+ 接收器。無論是透過 Connect Pro 軟體、AirPlay、Miracast 或 Chromecast 進行連線時,都需要用到此名稱。
若要進行密碼設定,請點擊上方的齒輪圖示,進入「更多設定」。設定好 4 位數密碼後,往後投影前將需要輸入該密碼。

可以。若要設定熱點,請點擊畫面上方的熱點圖示。
注意:更改熱點名稱或密碼後,必須將 Connect Pro Button 與 Innex Connect Pro+ 重新配對。
Innex Connect Pro+ 在正常開機狀態下,指示燈應顯示為藍燈;進行螢幕分享時,則會變為紫燈。
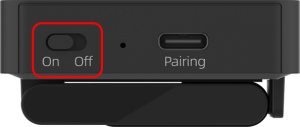
若指示燈未亮起,請先確認機身側邊的電源開關已開啟,並檢查電源線是否已正確連接。
若完成上述檢查後燈號仍未亮起,請與您的經銷商聯繫。
若指示燈持續亮紅燈,這可能表示裝置出現了無法透過一般排除程序解決的硬體故障。
請直接聯繫您的經銷商以取得進一步的技術支援。
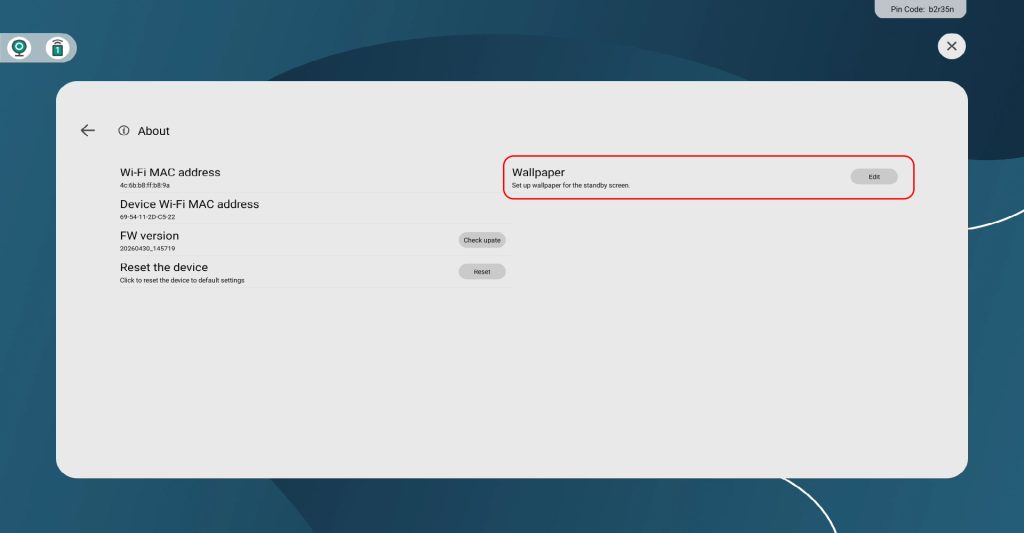
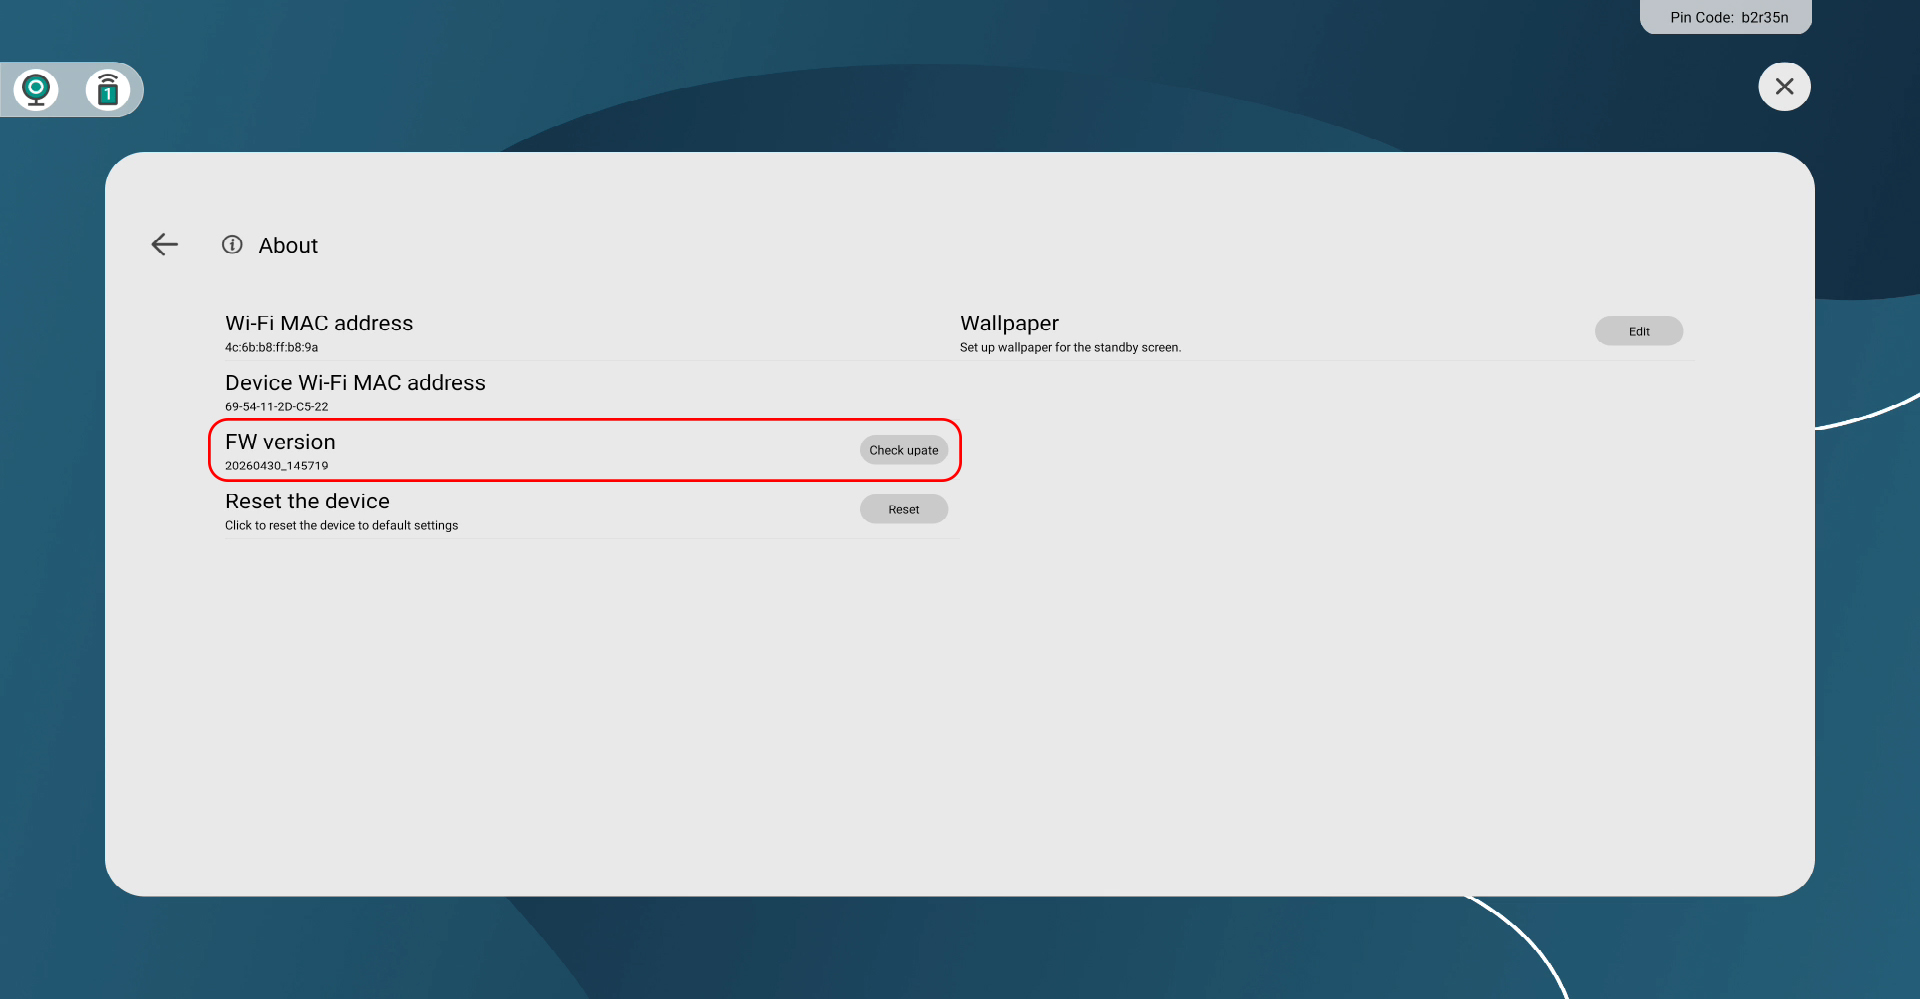
可以。點擊上方齒輪圖示進入設定,接著前往「關於」,點擊編輯桌布更換背景圖片。
我們強烈建議您將裝置保持在最新版本。
Innex Connect Pro+ 支援OTA(Over-the-Air) 線上更新。當裝置連線至網路時,系統將通知您是否有新的韌體版本可用。依照螢幕上的指示進行更新即可。
若要手動檢查更新,請點擊螢幕上方的齒輪圖示,進入「關於」頁面,即可查看是否有可用的韌體更新。
Innex Connect Pro+ 連線至網際網路後會自動驗證並註冊。請確保裝置已正確連接至外部網路,一旦連線建立,系統即會自動開始註冊程序,並在完成後顯示確認訊息。
注意:部分網路防火牆可能會阻擋自動註冊程序。若遇此情況,請嘗試連接其他網路或使用行動熱點。如已連接網際網路但仍無法註冊,請聯絡您的經銷商尋求協助。
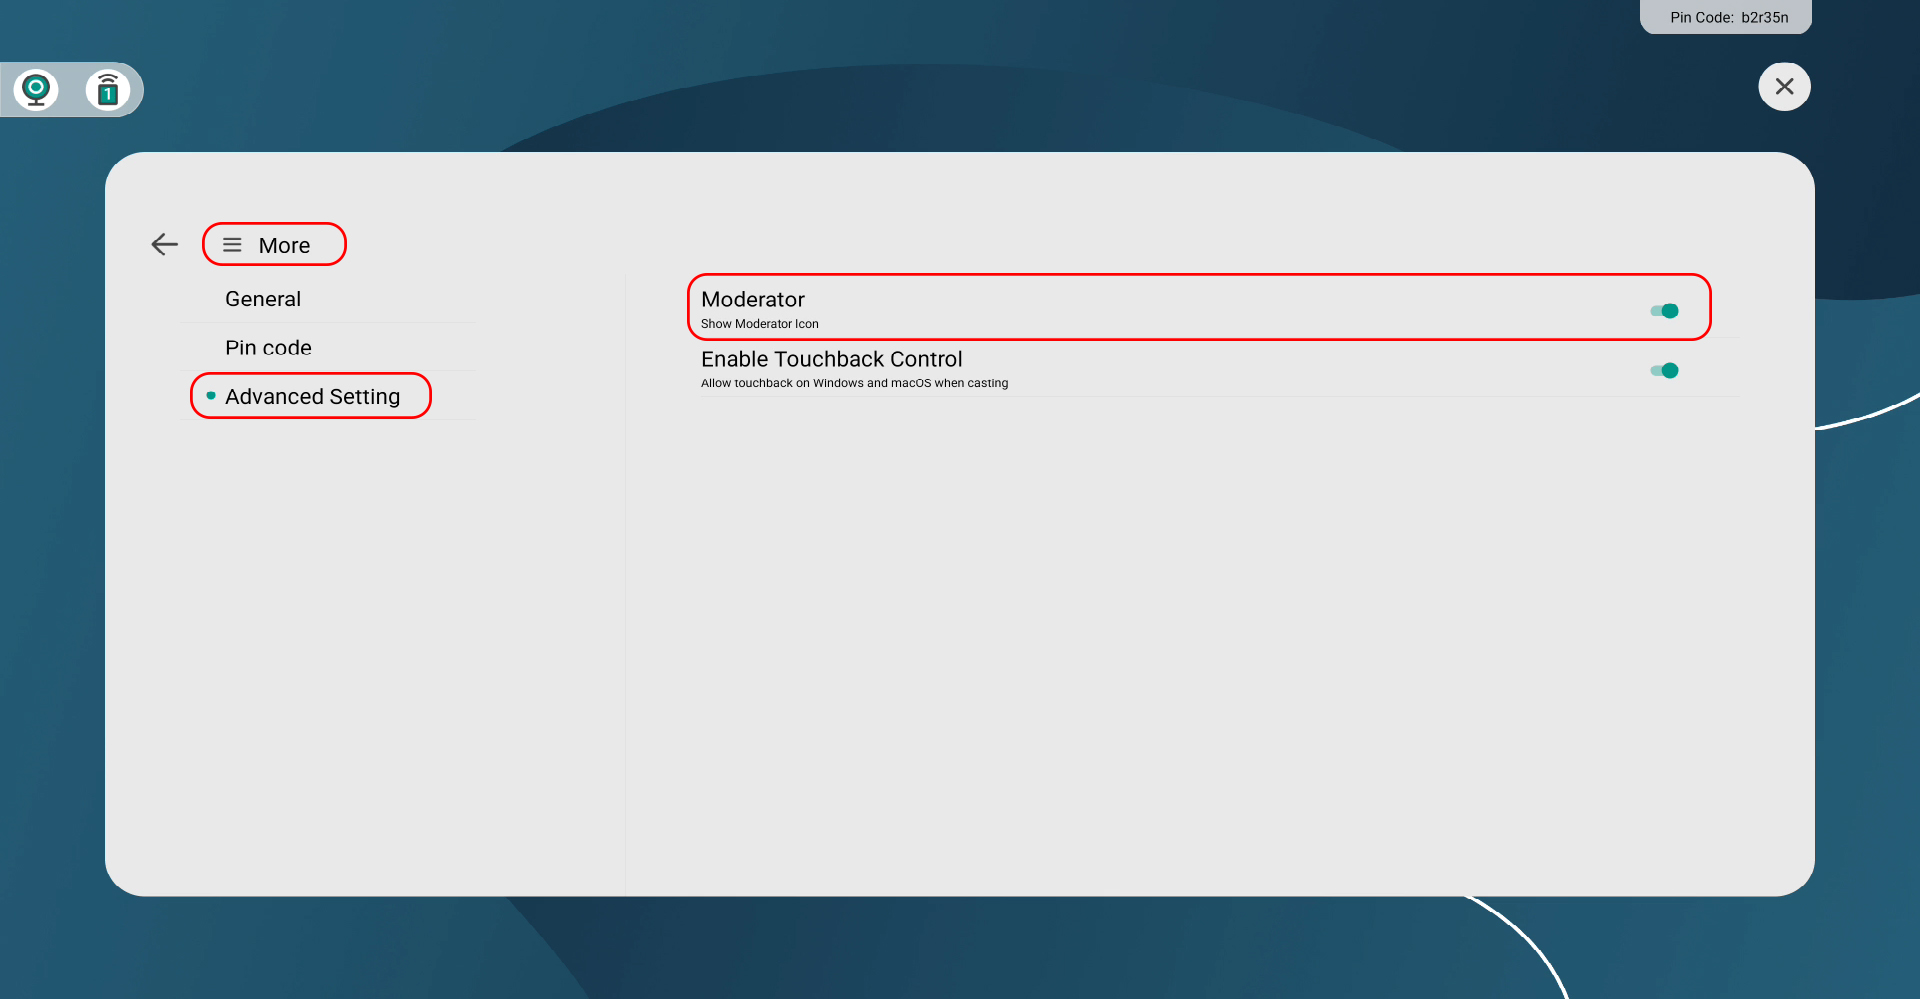
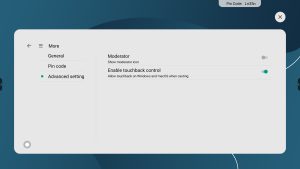
初始設定期間,螢幕上會出現兩個浮動元素:
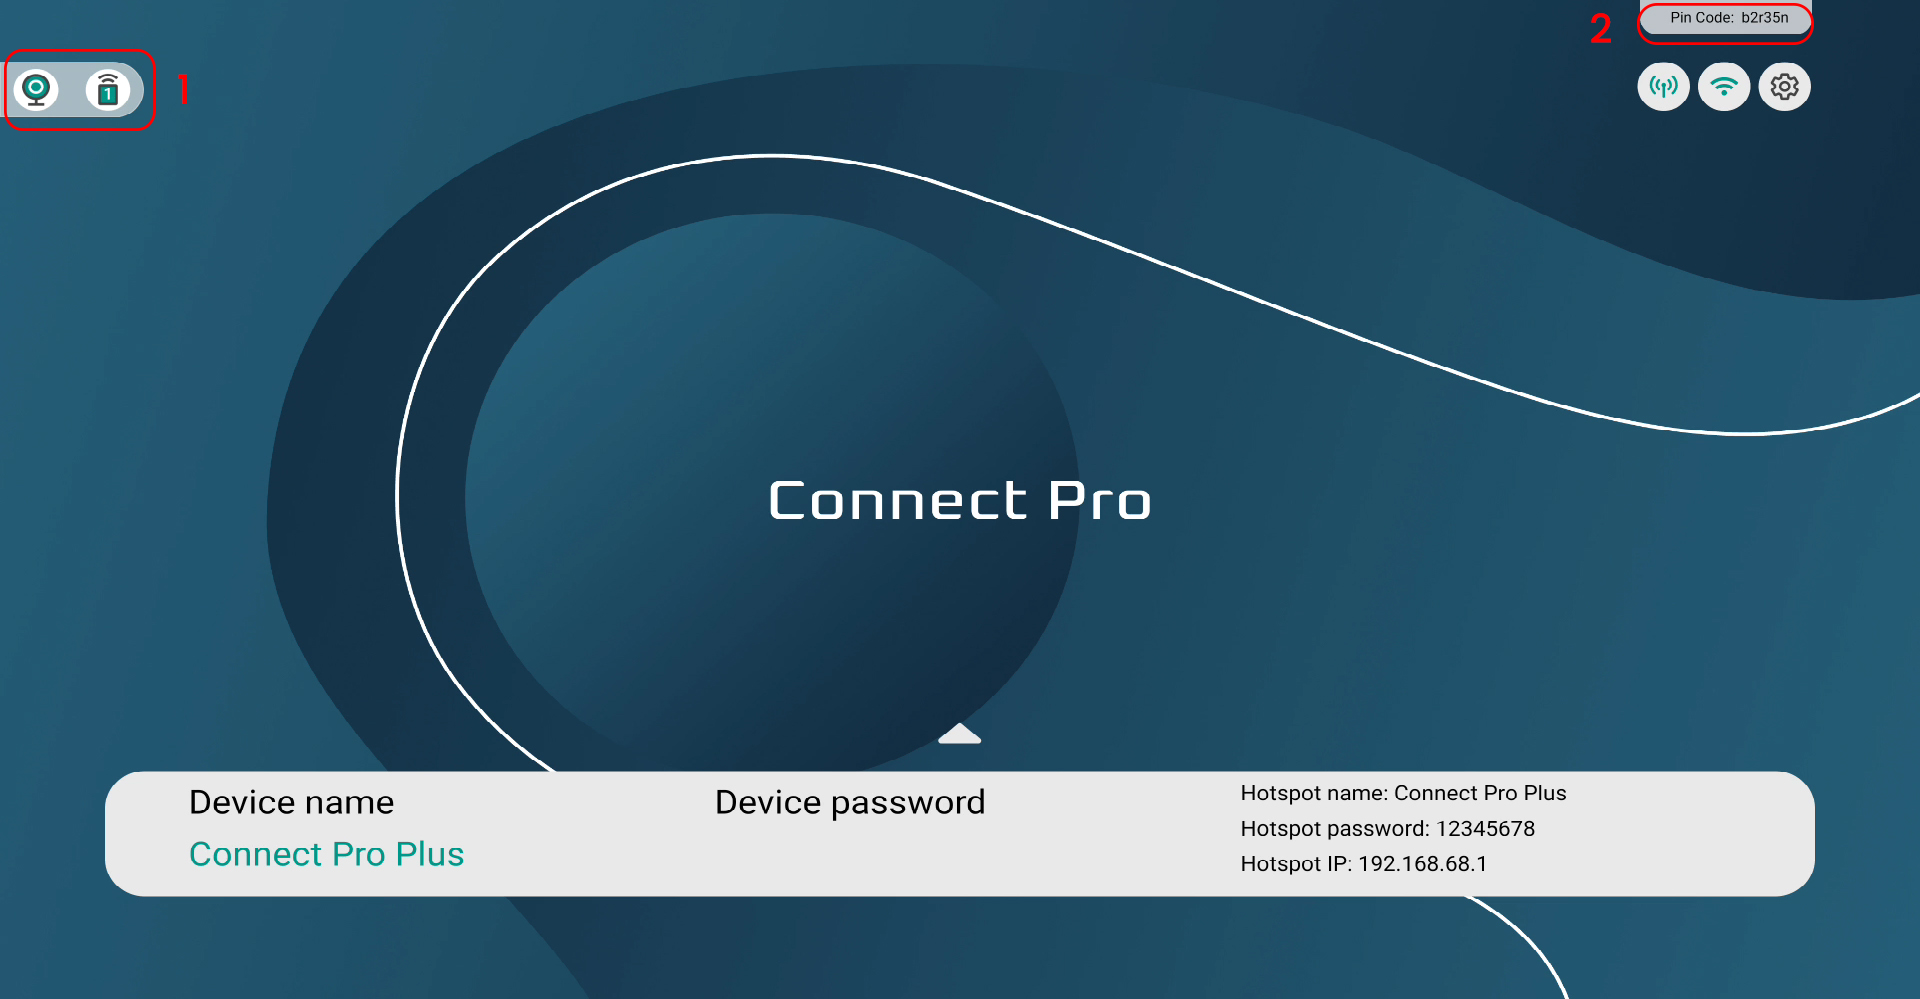
1. 主持人模式 (Moderator):
・BYOM 圖示:當系統偵測到攝影機時會自動亮起(點擊可進入 BYOM 設定)
・裝置圖示:顯示目前已連接的來源裝置數量。
如要隱藏,請進入「更多設定」> 進階選項,關閉「主持人模式」。
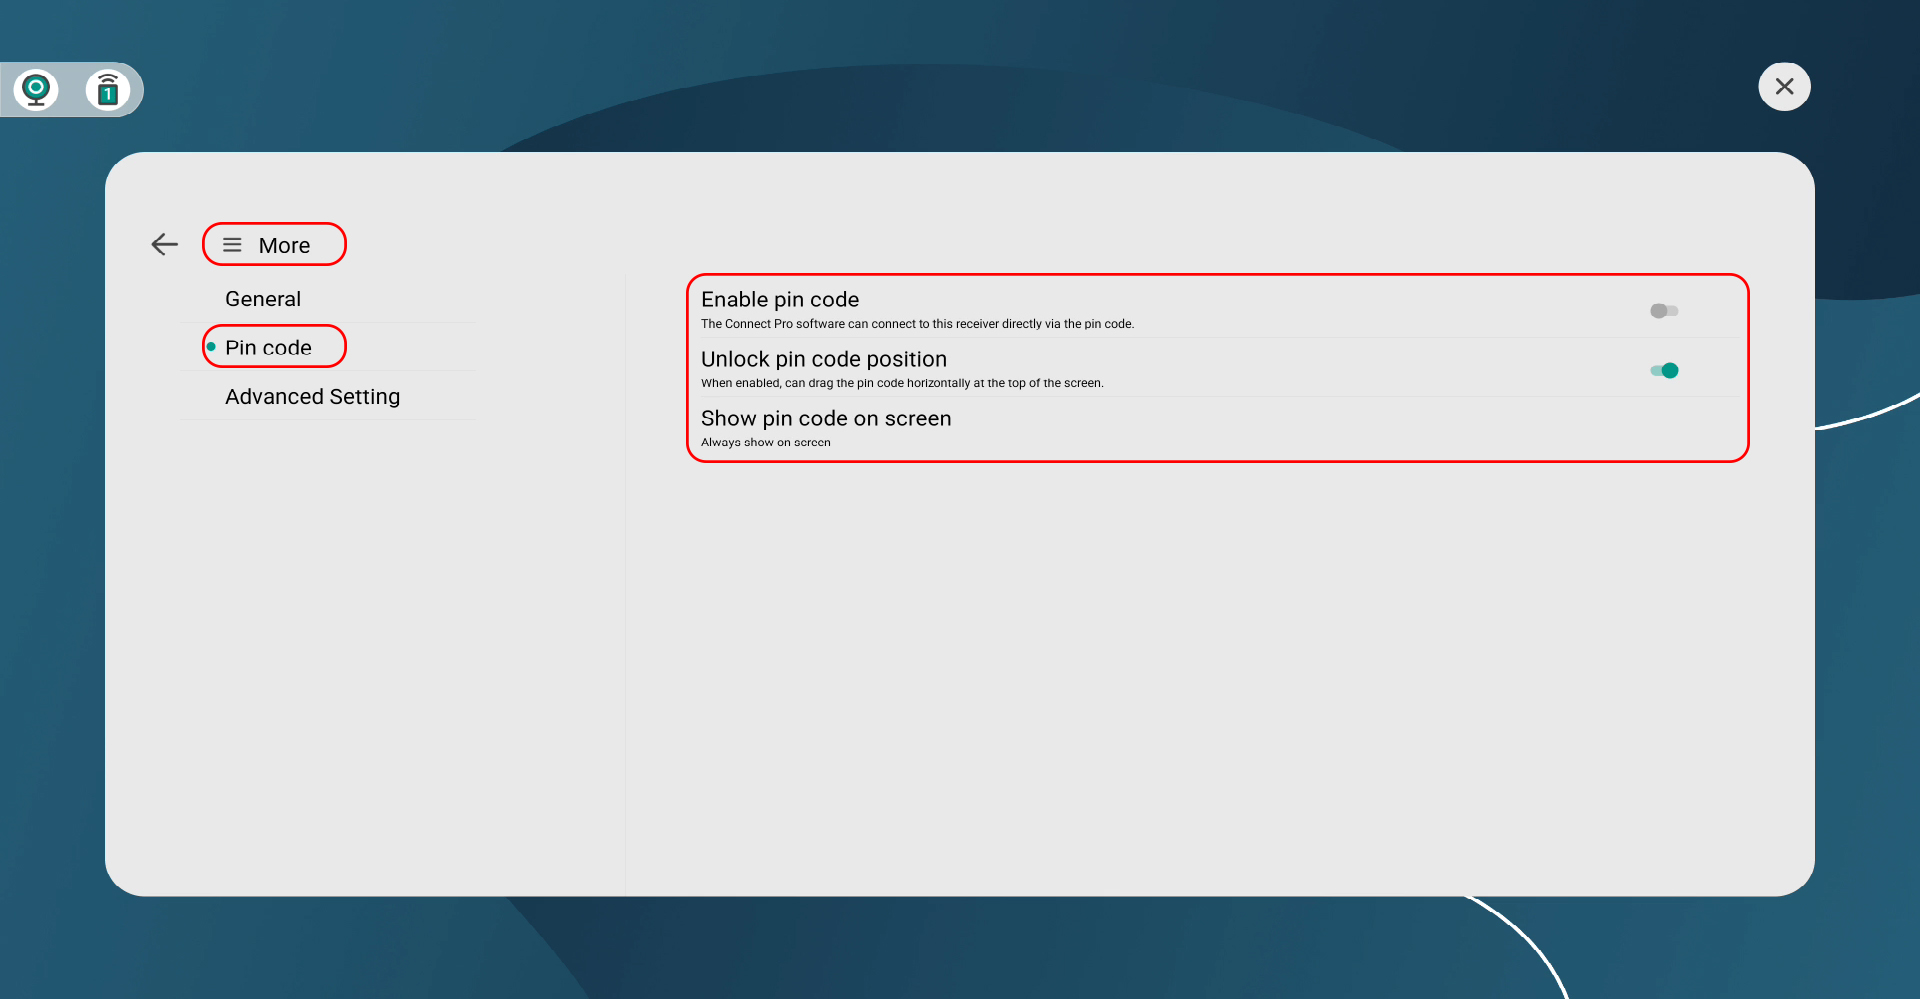
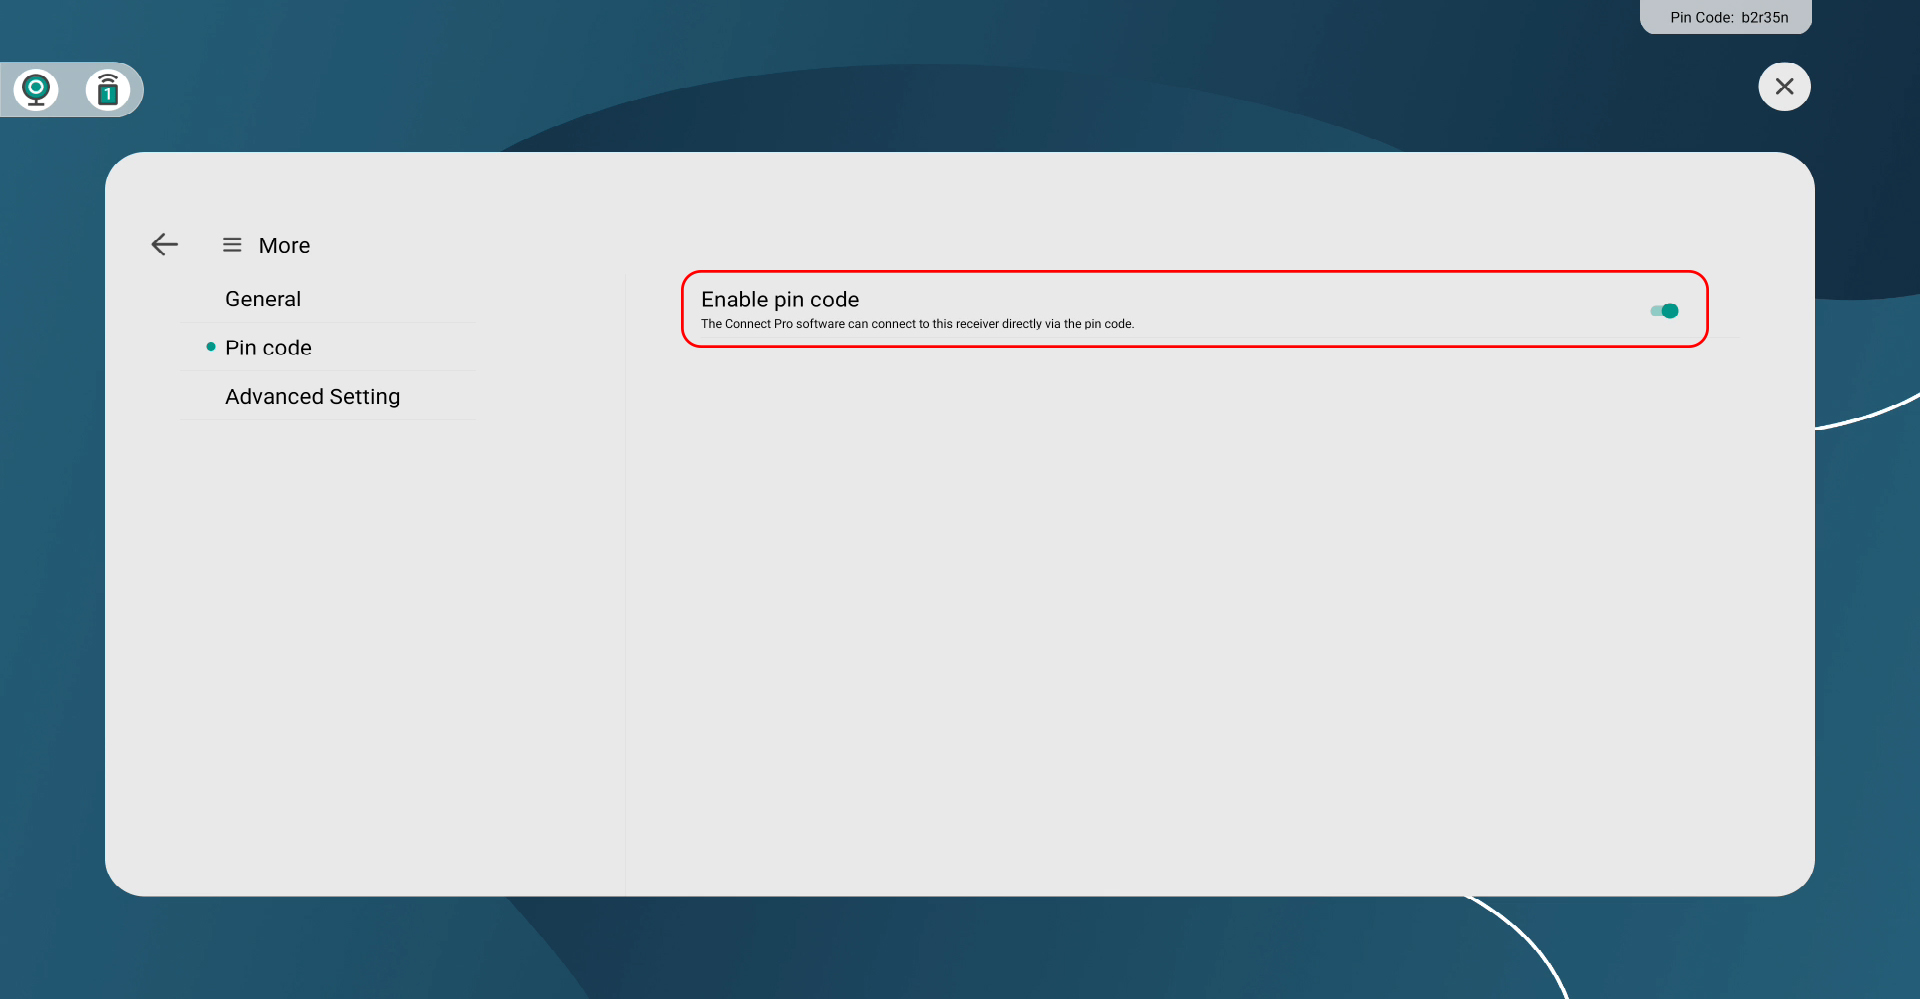
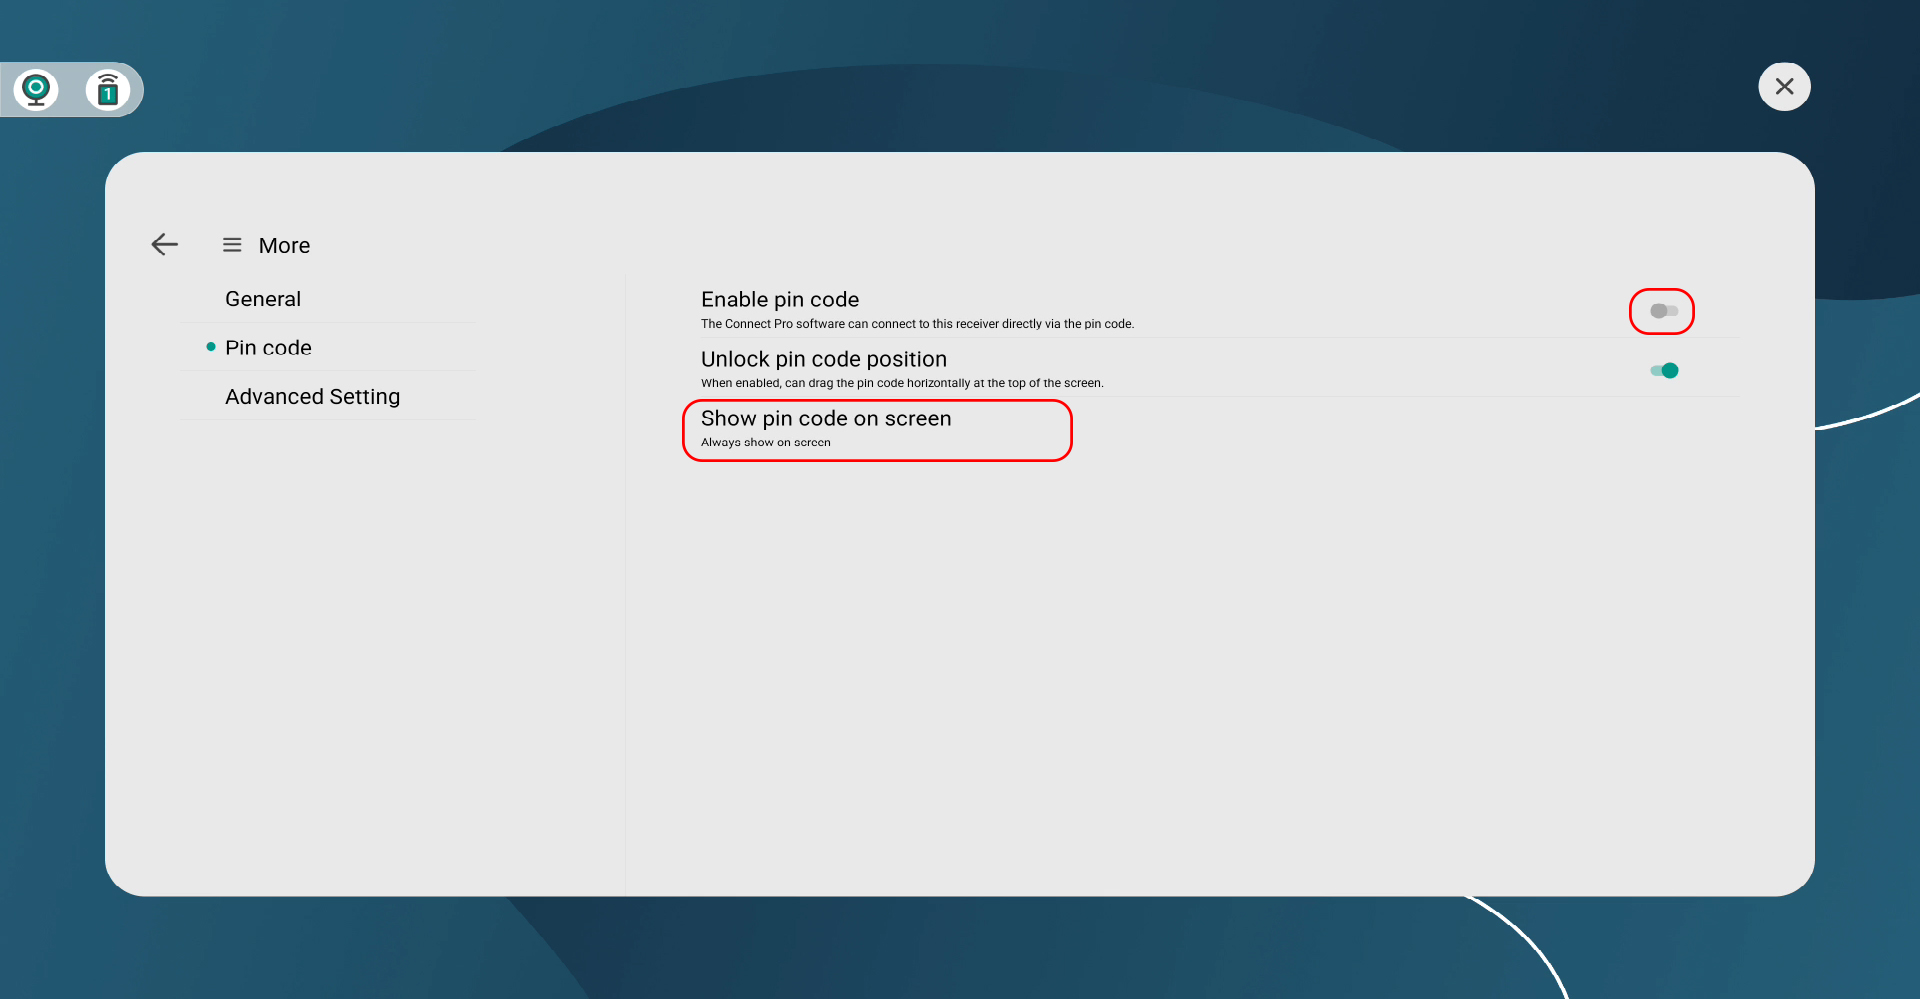
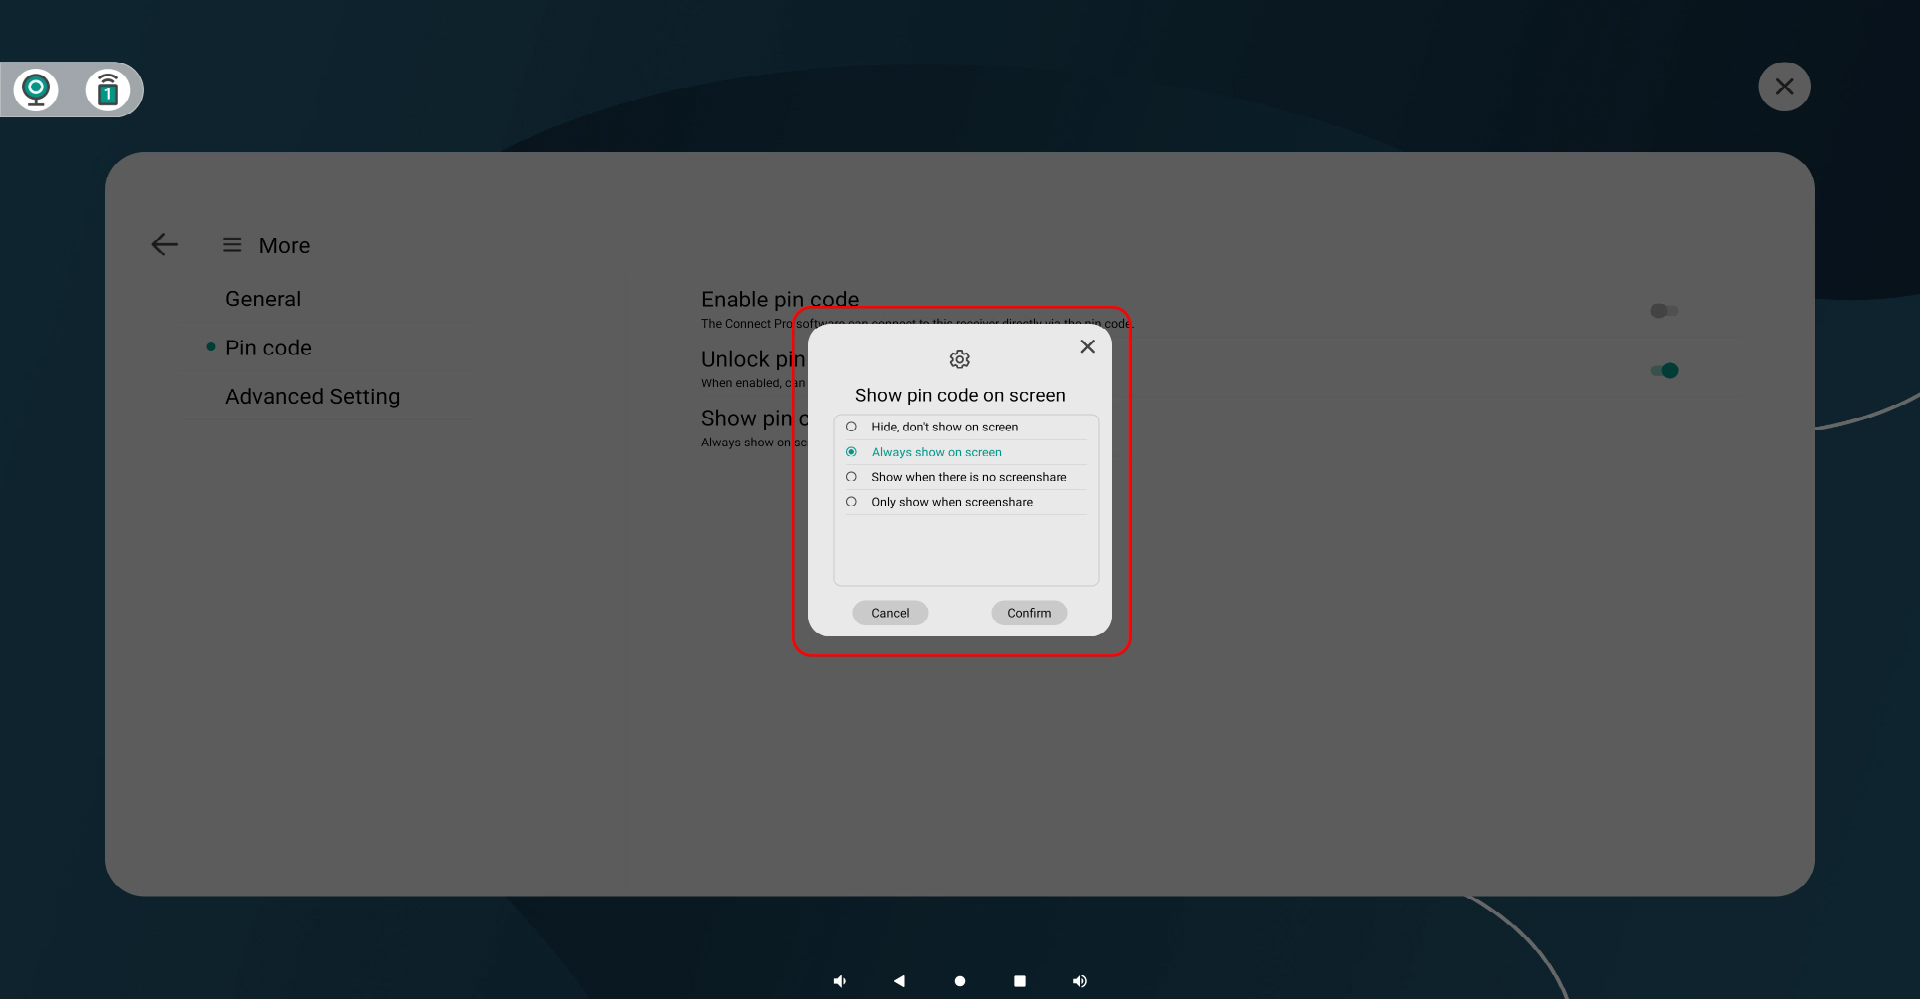
2. PIN碼:
用於 Connect Pro Software 連接。如要隱藏,請進入「更多設定」> PIN 碼 > 關閉 PIN 碼。
*建議在關閉螢幕上的 PIN 碼顯示後,同時檢查「在螢幕上顯示 PIN 碼」的設定。
Innex Connect Pro+ 支援多種無線投影方式,包括:Connect Pro Software、AirPlay、Miracast、Chromecast 以及 Connect Pro Button。
點擊介面底部的三角形圖示,即可開啟說明面板。面板內針對每種連線方式皆提供步驟說明。
- 請先確認您的外接設備是否在相容攝影機清單中。
- 開啟 Innex Connect Pro+ 並將其連接到顯示器。
- 將外接視訊設備連接至 Innex Connect Pro+。
- Innex Connect Pro+ 將自動將最後偵測到的麥克風和喇叭設為系統音訊裝置。
- 若完成上述步驟後仍無法使用該設備,請與您的經銷商聯絡。
這通常是因為 Innex Connect Pro+ 未能正確偵測到顯示器的最高解析度。您可以嘗試重新啟動顯示器,強制系統重新偵測解析度。
為了達到最佳顯示效果,建議依照以下順序操作:
1. 先將 Innex Connect Pro+ 開機。
2. 接上 HDMI 線。
3. 最後再開啟顯示器(螢幕)電源。
請先檢查您的設備是否在相容攝影機清單中。接著,請確認訊號線已正確連接至 Innex Connect Pro+ 背面的 USB-A 連接埠;若該設備需要獨立供電,也請確認電源已開啟。
連線成功後,請點擊畫面左上角的鏡頭圖示以開啟預覽畫面。若同時連接了多個設備,請從下拉式選單中選擇您要使用的裝置。
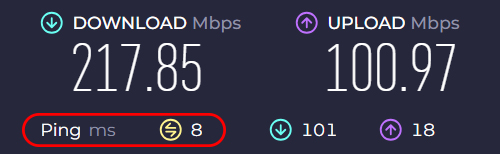
螢幕分享的品質與網路環境息息相關。為了確保效能穩定,請確保網路延遲低於 10 毫秒。您可以透過線上測速網站來檢查目前的網路狀況。

您也可以透過關閉 Wi-Fi,改為僅使用 Innex Connect Pro+ 熱點來提升效能。
選擇正確的所在區域,並切換至較不擁擠的頻道,以減少干擾並提升分享品質。
若是使用 Connect Pro Software 進行連線,請確保您的電腦符合最低系統需求。
- 若嘗試分享螢幕時沒有反應,請先確認您的裝置已正確連接至 Innex Connect Pro+。
- 連線成功後,螢幕左上角會顯示一個數字,代表目前已連結的來源裝置數量。點擊該數字即可查看訊號源清單。若您的裝置未顯示在清單中,代表接收器尚未偵測到該裝置,因此無法顯示畫面。
- 有時連線問題是由網路環境不佳所導致,請檢查網路連線狀態。
- 若您使用 Innex Connect Pro Button,且附近有兩台接收器設定了相同的熱點名稱與密碼,您的畫面可能會投射到錯誤的裝置上。
若 10 公尺內有另一台接收器,請務必為每台設備設定唯一的熱點名稱與密碼以避免干擾。

Innex Connect Pro+ 支援所有主流的螢幕分享協議,幾乎可與任何裝置相容。下表彙整了各協議支援的作業系統、代表性相容裝置以及核心功能特點。
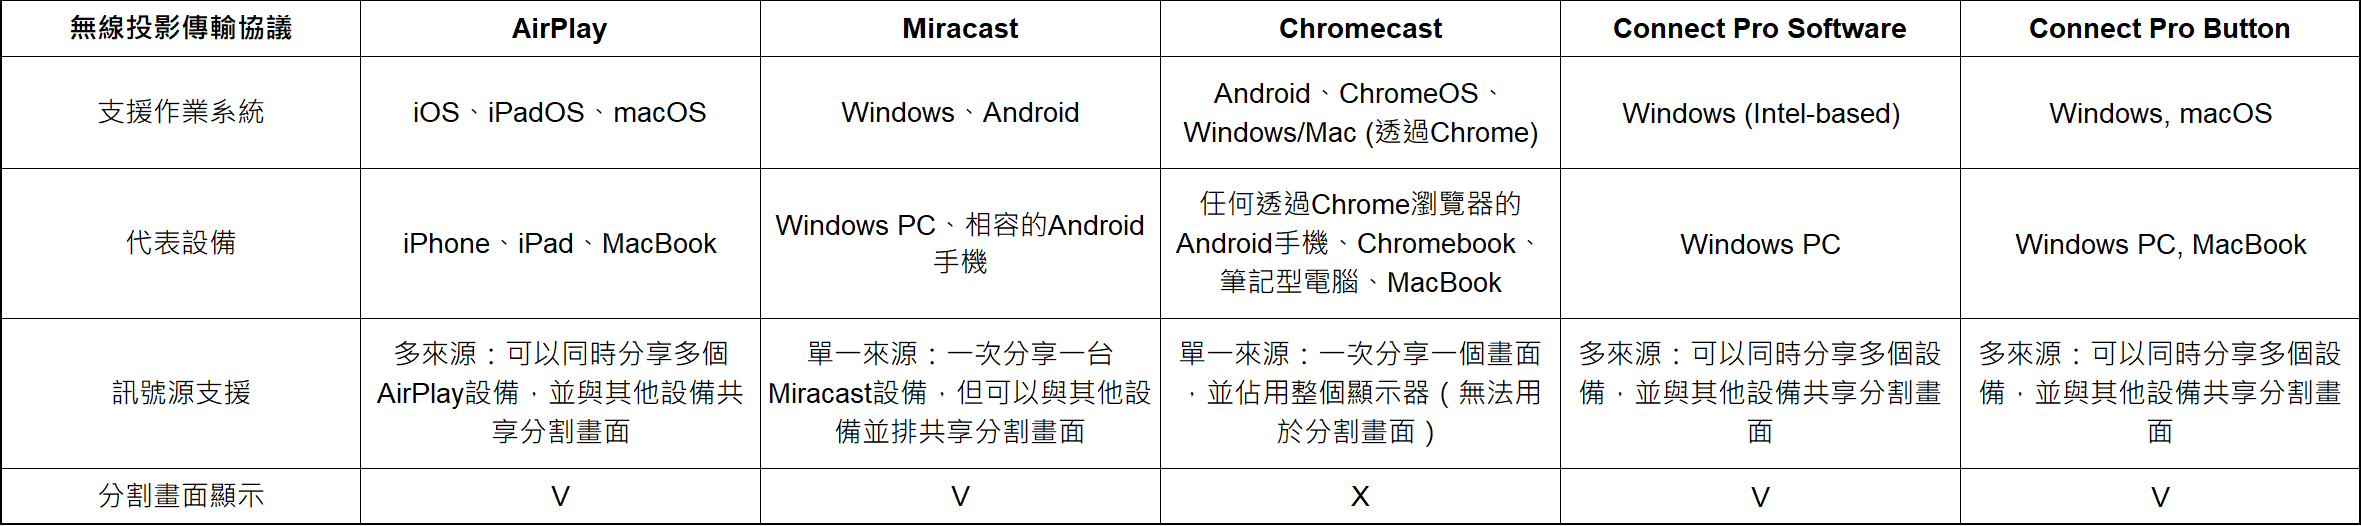
每種方式各有其優勢,具體取決於您是僅需要螢幕分享,還是需要無線視訊會議等進階功能。請參考下方的比較表,根據您的需求選擇最適合的連線方式。
可以。 Innex Connect Pro+ 最高支援 9 個訊號源同時進行分割畫面顯示(系統預設值為 4 個)。
若要調整此設定,請前往更多設定 > 一般 > 最大分割畫面數。
注意:當網路環境過於擁擠時,部分訊號源可能會出現黑畫面或畫面延遲的情況。關於各項連線協議對分割畫面的支援程度,請參考下表。

螢幕分享的解析度預設會與訊號源裝置的目前輸出解析度同步。
若要啟用 4K 輸出,請將 Innex Connect Pro+ 設定為延伸顯示器,並手動選擇 4K 解析度。
注意:將解析度從 1080p 提升至 4K 時,螢幕更新率可能會從 60 Hz 降至 30 Hz。
需求因協定而異。請參閱下表,了解每種分享方式所需的 Wi-Fi 和熱點設定。
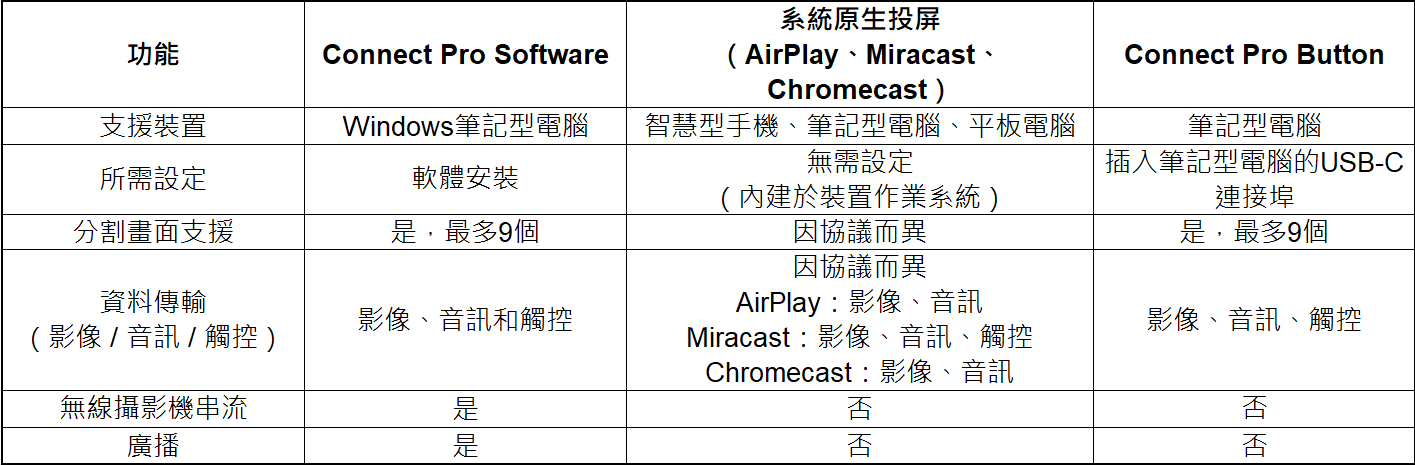
可以。 當 Innex Connect Pro+ 透過 HDMI 線與 USB 觸控訊號線連接至相容的觸控螢幕,且是透過支援的協議進行分享時,即可使用觸控回控功能。
注意:由於各製造商的觸控螢幕協議有所不同,可能會發生部分不相容的情況。請參考下表了解各螢幕分享協議的觸控回控支援情況。
請點擊螢幕左上角的攝影機圖示開啟預覽頁面,並選擇較低的解析度。若在 1080p 模式下串流感到延遲,可能是攝影機的資料傳輸量使解碼器過載。切換至 720p 通常能提供更流暢、低延遲的影像畫面。
*即便同樣是 1080p 解析度,不同攝影機的資料傳輸量也可能有所不同,這可能導致顯示效能表現上的差異。
請確保安裝程式是從我們的官方網站下載。在安裝過程中,當系統彈出提示時,請務必授予系統管理員權限,以確保安裝程序完整。
目前版本支援至 Windows 11 25H2。若問題仍未解決,請聯絡支援團隊。
注意:本軟體僅支援採用 Intel 處理器的 Windows 電腦,不支援 ARM 架構系統。
1. 請前往設定 > 更多設定 > PIN 碼,確保 PIN 碼功能已啟用。
2. 即使 PIN 碼功能已啟用,也可能是「在螢幕上顯示 PIN 碼」的選項設定不符合您的需求。請前往更多設定 > PIN 碼,先將其關閉一次。接著檢查「在螢幕上顯示 PIN 碼」設定,確保選擇了正確的選項,最後再重新開啟 PIN 碼。
3. 當網路連線變得不穩定時,系統可能會自動停用 PIN 碼。若要重新啟用,請前往設定 > 更多設定 > PIN 碼,將 PIN 碼關閉後再打開,並確認 PIN 碼是否出現在螢幕上。
1. 請確保您的電腦與 Innex Connect Pro+ 均連接在同一個網路。
2. 再次確認 Innex Connect Pro+ 主畫面上顯示的裝置名稱與您在軟體中選取的目標裝置是否一致。
3. 若網路狀況不穩定,軟體可能無法偵測到 Innex Connect Pro+。此時請嘗試使用 PIN 碼進行連線,或是直接連線至接收器的熱點,並手動輸入熱點 IP 位址。
若要透過熱點 IP 位址將電腦連線至 Innex Connect Pro+,請先確認您的電腦已連線至 Innex Connect Pro+ 的熱點,接著在軟體中輸入熱點 IP 位址即可建立連線。
若您的電腦與 Innex Connect Pro+ 是連接在同一個區域網路下,請改為輸入 Wi-Fi IP 位址定位裝置。
影像品質深受網路延遲的影響。為了確保效能穩定,請將延遲保持在 10 毫秒 (ms) 以下。您可以透過測速網站來評估目前的網路環境狀況。
此外,也請確認您的電腦符合該軟體的最低系統需求。
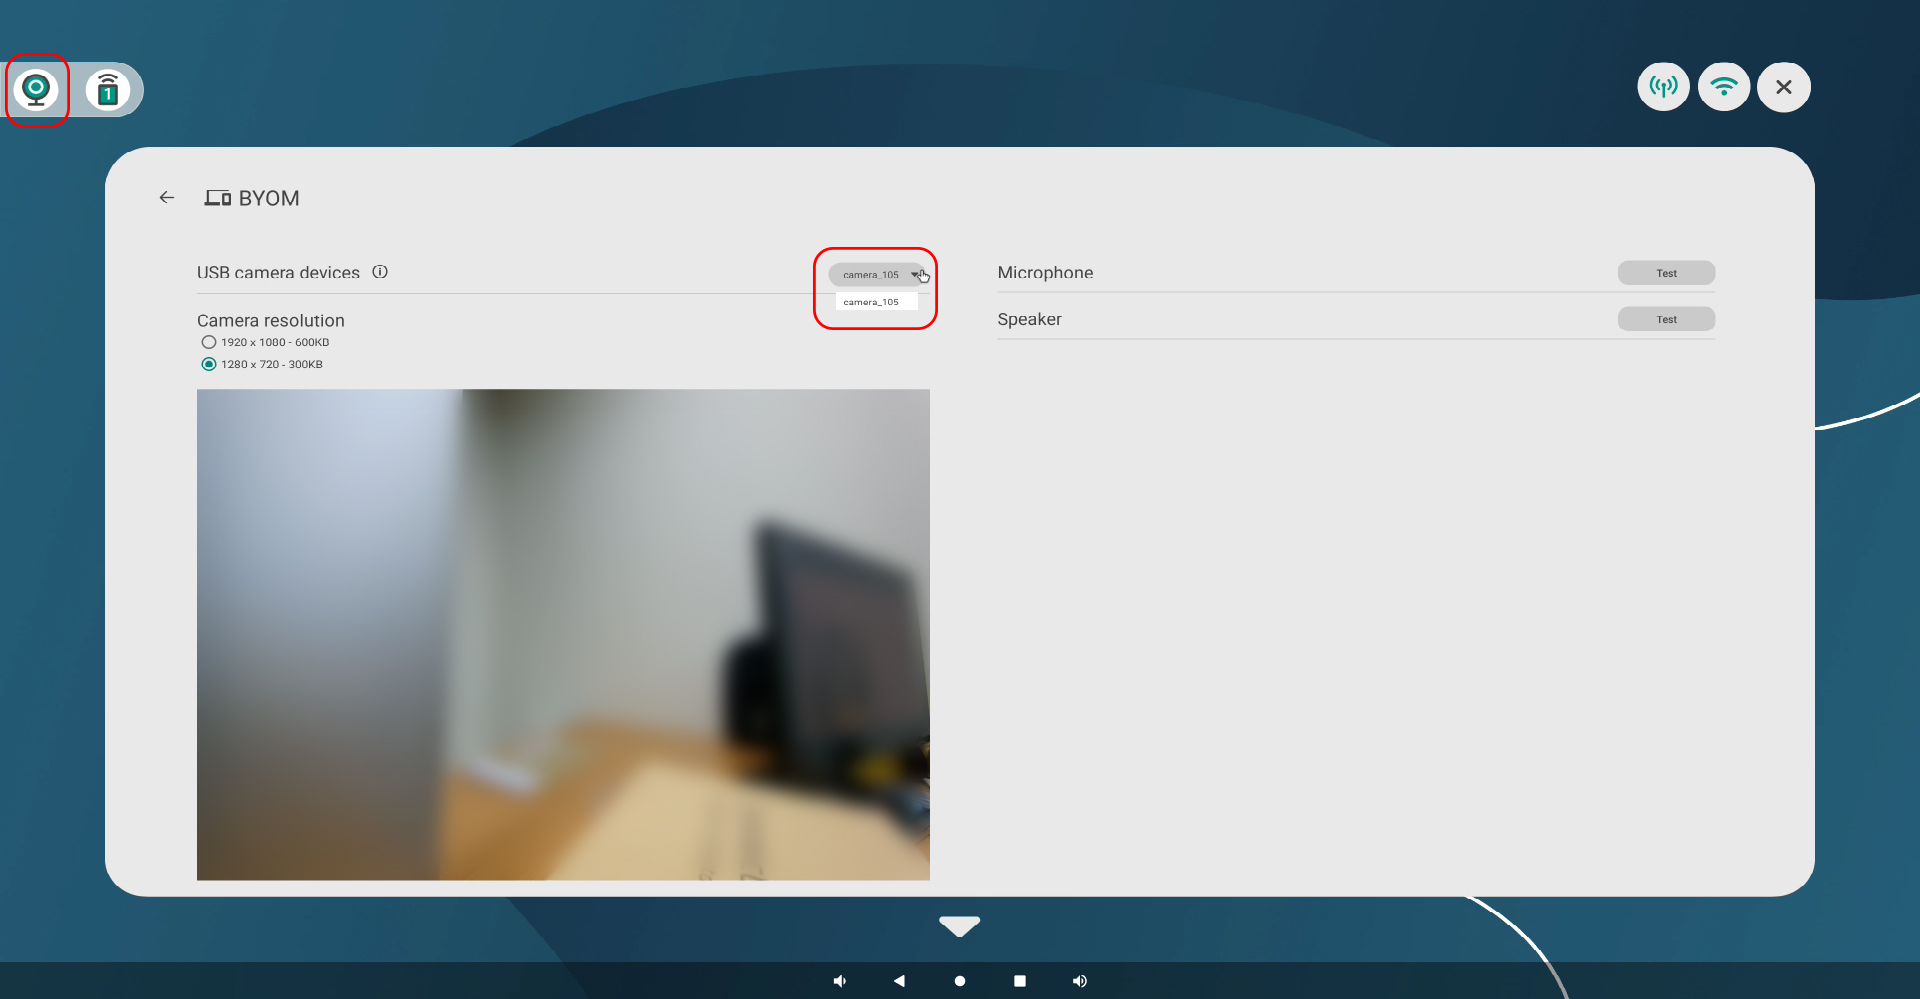
1. 請確保視訊設備已正確連接至 Innex Connect Pro+。
2. 在軟體中選取要分享螢幕的目標裝置後,請勾選並開啟 BYOM 選項(系統預設為關閉)。
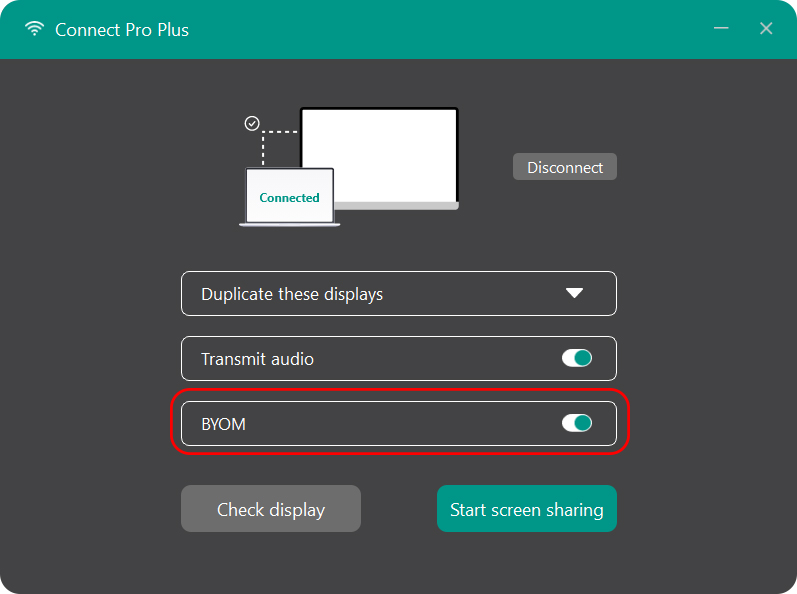
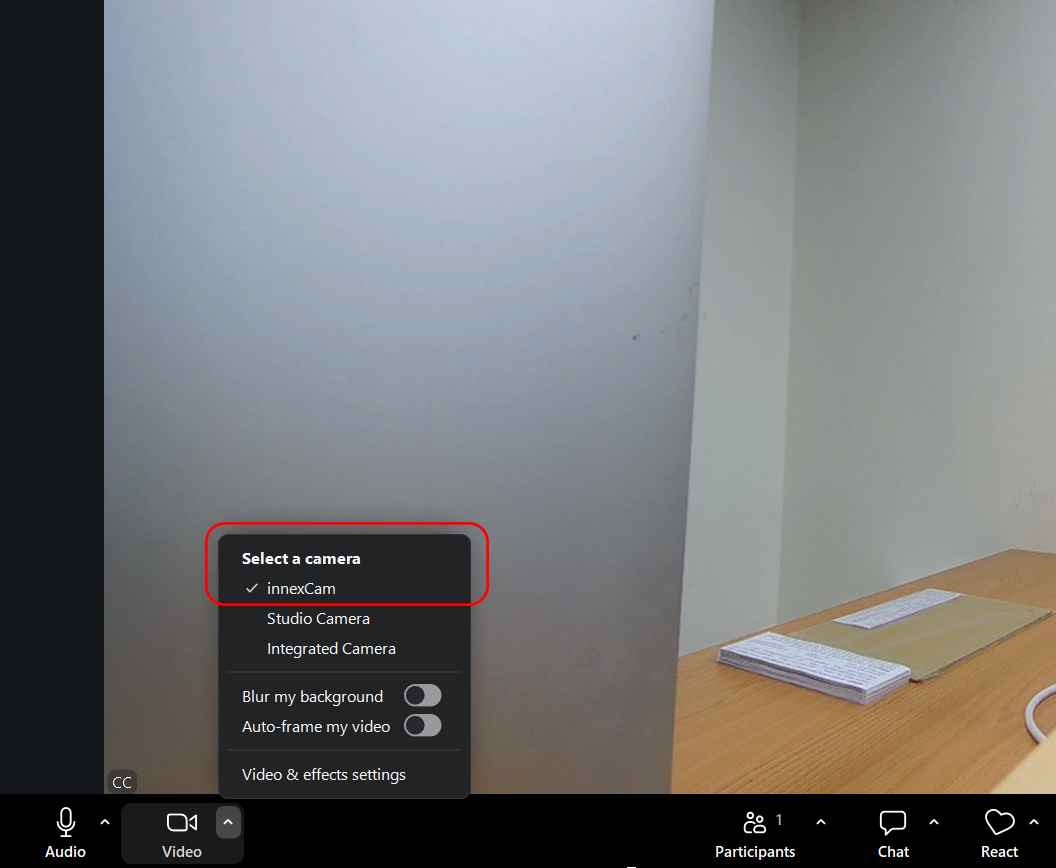
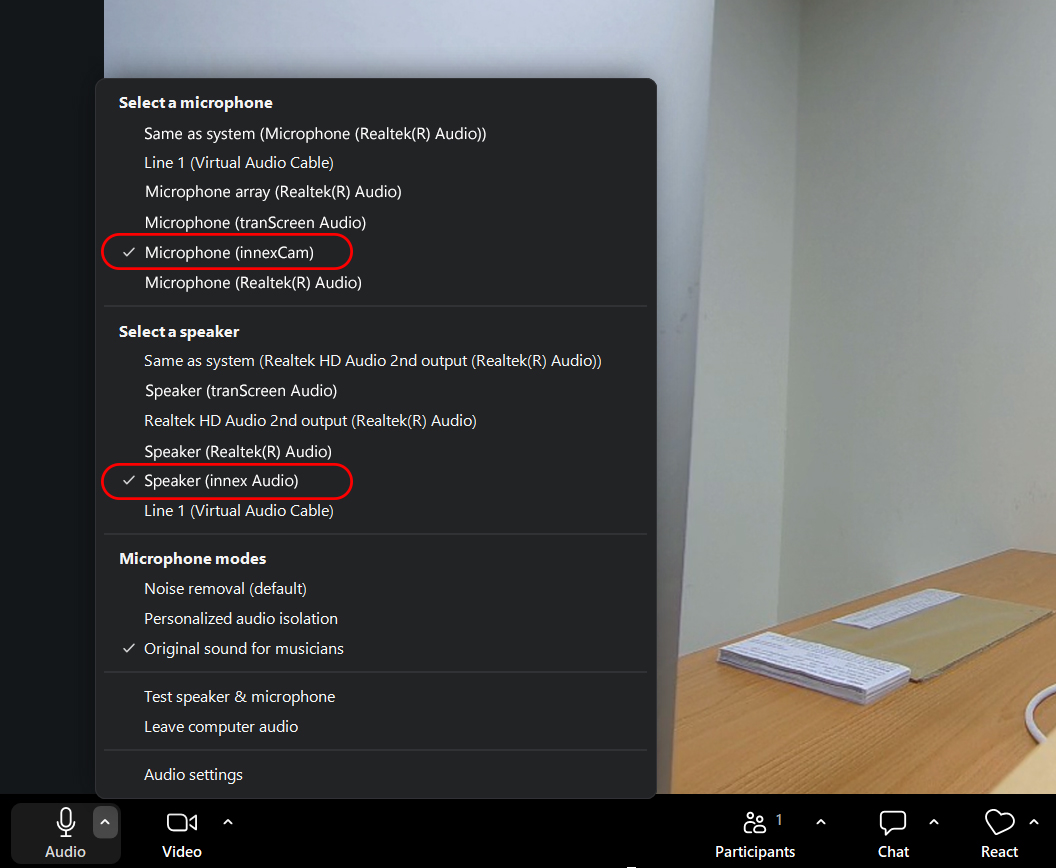
3. 設定視訊軟體: 連線成功並開始分享螢幕後,請開啟您的視訊會議應用程式(如 Zoom、Teams 等),並在設定中將攝影機與麥克風選取為「innexCam」,喇叭選取為「innexAudio」。
1. 確認硬體連接: 請確保視訊設備已正確連接至 Innex Connect Pro+。
2. 啟用 BYOM 功能: 在軟體中選取投影目標裝置後,請確認已開啟 「BYOM」 選項(系統預設為關)。
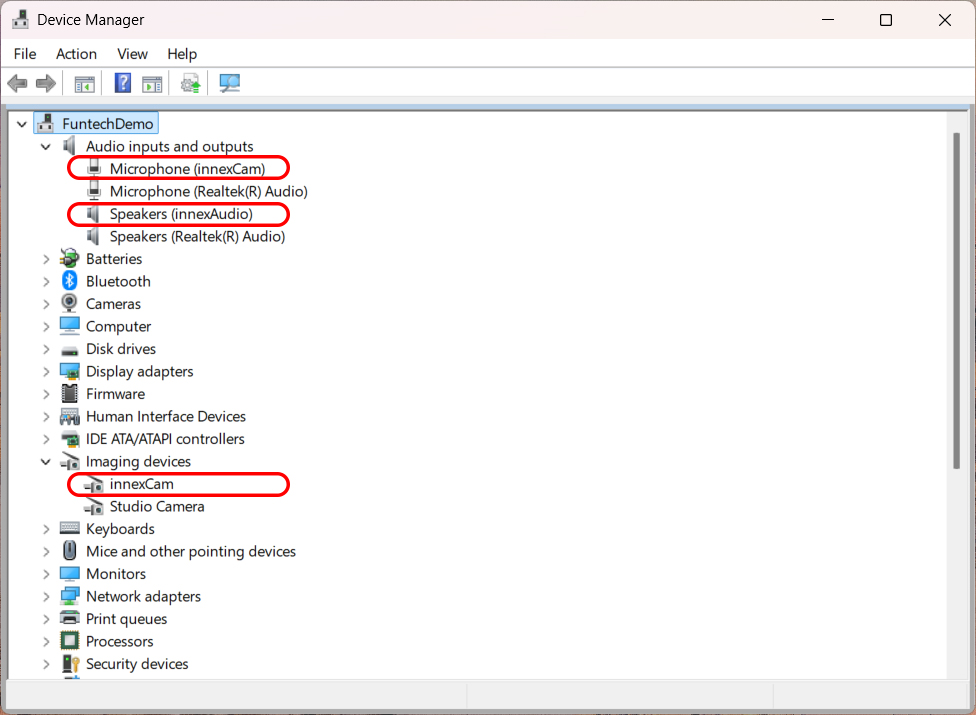
3. 檢查裝置管理員: 開啟 Windows 的「裝置管理員」,檢查「影像裝置」下方是否出現「innexCam」,以及「音效、視訊及遊戲控制器」下方是否出現「innexAudio」。若漏掉任一裝置,可能是 Connect Pro 軟體中的驅動程式未正確安裝。請解除安裝軟體,並使用系統管理員權限重新進行安裝。
1. 確認硬體連接: 請確保您的視訊設備已正確連接至 Innex Connect Pro+。
2. 開啟 BYOM 功能: 在軟體中選取投影目標裝置後,請確認已開啟 BYOM 選項(系統預設為關)。
3. 檢查網路穩定性: 藍畫面通常是由於網路連線不穩定或品質不佳所導致。請檢查目前的網路狀態,並確保連線環境穩定。
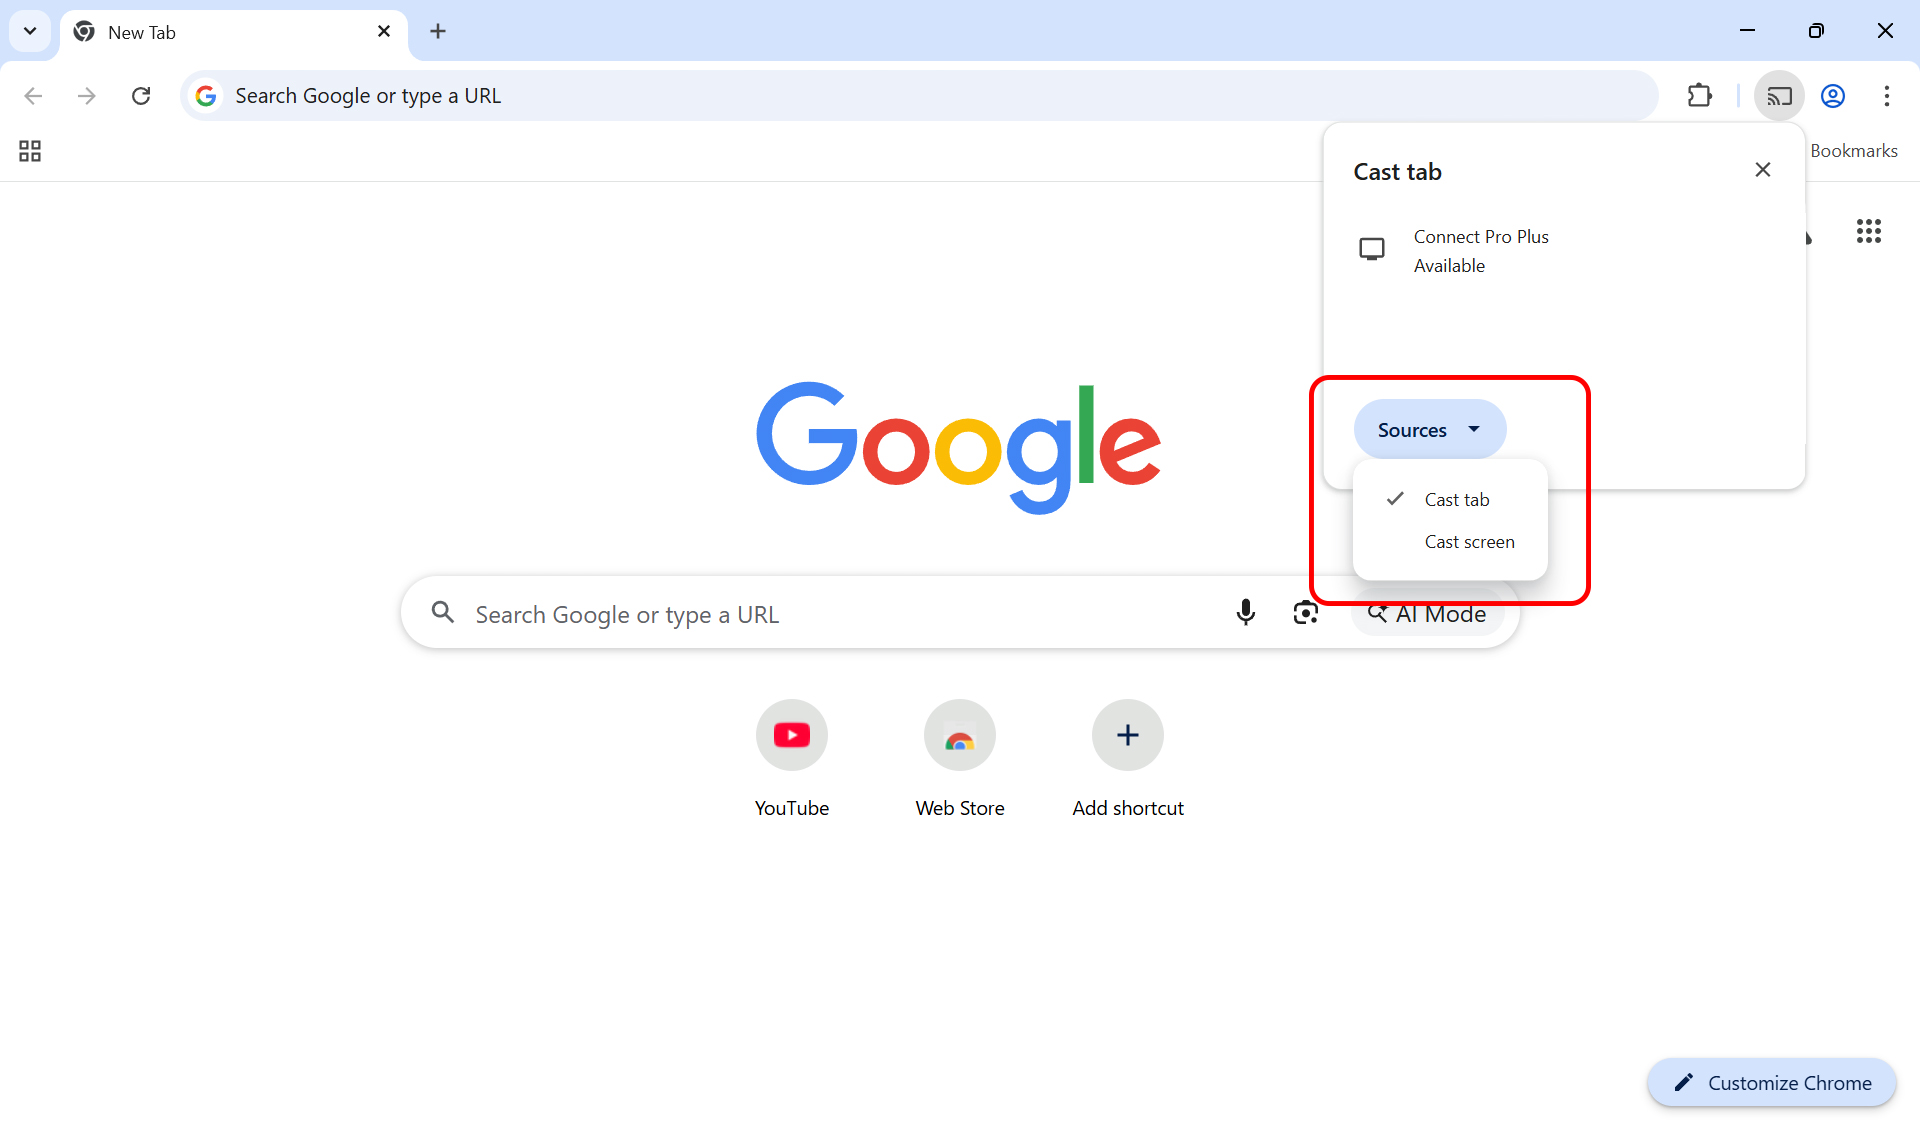
當您在 Chrome 瀏覽器中搜尋裝置時,視窗底部會出現一個「來源」按鈕。點擊該按鈕,即可選擇要投放整個螢幕或是僅投放單一分頁。
Innex Connect Pro+ 的 Chromecast 輸出採用的是 16:9 的畫面比例。如果您正在鏡像筆電螢幕,影像可能無法填滿整個顯示器,因為不同筆電採用的螢幕比例可能不同。
若要讓畫面以全螢幕顯示,請嘗試以下方法:
1. 將投影模式更改為「延伸模式」。
2. 將您的電腦來源解析度手動更改為 16:9。
Chromecast 協定本身並不支援與其他投屏協定進行分割畫面顯示。當 Chromecast 功能啟用時,一次只能顯示一個 Chromecast 訊號來源。
將 Connect Pro Button 插入電腦後,其指示燈會開始閃爍紅燈,這代表按鈕正在與電腦建立連線,並同時搜尋接收器。一旦指示燈轉為閃爍白燈,即表示已準備就緒,可以開始分享螢幕。此時只需按下按鈕,即可開始投影。
請依序確認以下項目:
1. 請確保您電腦的 USB-C 連接埠支援 DisplayPort Alt Mode(影像輸出功能)。
2. 排除供電偵測錯誤: 若您的電腦有多個 USB-C 埠,且其中一個主要用於電源輸入,電腦可能會將 Connect Pro 按鈕誤認為電源供應器,導致連線失敗。遇到此情況時,請先接上筆電充電器,再插入 Connect Pro 按鈕。
若電腦已成功偵測到按鈕,但燈號仍維持紅色,代表按鈕找不到 Innex Connect Pro+ 接收器。請確認:
1. 將 Connect Pro 按鈕與 Innex Connect Pro+ 重新進行配對。
2. 確保 Innex Connect Pro+ 的 Wi-Fi 熱點功能已開啟。
若上述步驟皆已完成但仍顯示紅燈,可能是目前的環境中存在無線訊號干擾。請嘗試在設定中更換熱點頻道以解決此問題。
可以。 Connect Pro Button 側邊設有一個 USB-C 供電傳輸埠 (Pass-through charging port)。您只需將原廠充電線接至此連接埠,即可在分享螢幕的同時為電腦充電。
若在未停止螢幕分享的情況下直接拔除 Connect Pro Button,可能會導致螢幕暫時出現卡頓,尤其是當充電線連接到 Connect Pro Button 的 USB Type-C 供電傳輸埠時。若遇到此情況,請先拔掉接在按鈕背面的充電線,並等待約一分鐘,畫面應會恢復正常。若問題持續發生,請重新啟動 Innex Connect Pro+ 接收器。
建議的操作順序:
1. 停止螢幕分享。
2. 拔除 Connect Pro Button 上的充電線。
3. 最後再將 Connect Pro Button 從電腦上拔除。
由於電力是透過 Connect Pro Button 進行轉接傳輸,過程中產生些微的電力損耗屬正常現象。因此,充電速度可能會比直接連線時稍慢,您的系統也可能因此彈出「慢速充電」的提示,這屬於正常運作狀況,請放心使用。
注意:請務必使用您電腦的原廠電源供應器,以避免損壞 Connect Pro Button 或您的電腦。
Connect Pro Button 支援 OTA 自動更新。
將其插入 Innex Connect Pro+ 側面的 USB-C 連接埠進行配對,當 Innex Connect Pro+ 連接到網際網路時,將自動檢查更新並下載安裝可用的韌體。
目前已知部分 HP 電腦可能存在 USB Type-C 相容性問題。
若您遇到此狀況,請嘗試將充電線連接至 Connect Pro Button 側邊的 USB Type-C 供電接口。請注意此接口僅供電力輸入使用。接通電源後,按鈕指示燈應會轉為顯示白燈,表示已正常運作。若採取上述步驟後問題仍未解決,建議您改用電腦上的 Connect Pro Software 作為替代方案。
這種情況通常只會發生在 Windows 電腦上。您可以透過以下步驟關閉自動彈出功能:前往 Windows 設定 > 藍牙與裝置,找到 「自動播放」 選項;或者直接在工作列的搜尋框輸入 「自動播放」。
關閉 「對所有媒體與裝置使用自動播放」,或在下方 「抽取式磁碟機」 的下拉式選單中選擇 「不採取任何動作」。
- 藍燈常亮:電源已接通,裝置已開機。
- 藍燈閃爍:裝置進入待機模式,請輕觸螢幕喚醒。
- 藍燈常亮但螢幕為黑:裝置處於「僅聲音模式」,請再按一次遙控器上的「僅聲音」按鍵- 即可恢復正常顯示模式。
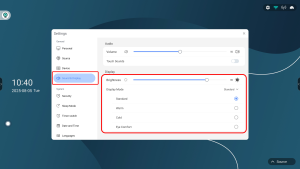
您可在「設定(主設定)」>「聲音與顯示」>「顯示」中調整色溫(顯示模式)與亮度。
CM55 不支援變更螢幕畫面比例。顯示比例為固定設定,無法手動調整。
OPS 模組僅在輸入源切換至「OPS」時才會啟動。請依下列步驟操作:
1. 將輸入源切換至「OPS」。
2. 初期畫面可能會顯示「無訊號」,這是正常現象。系統正在等待 OPS 完全啟動,請稍候幾秒鐘,畫面將自動顯示。
3. 若希望每次開機時自動啟動 OPS,可前往「主設定 > 輸入來源」,啟用「開機時自動啟動 OPS」選項。
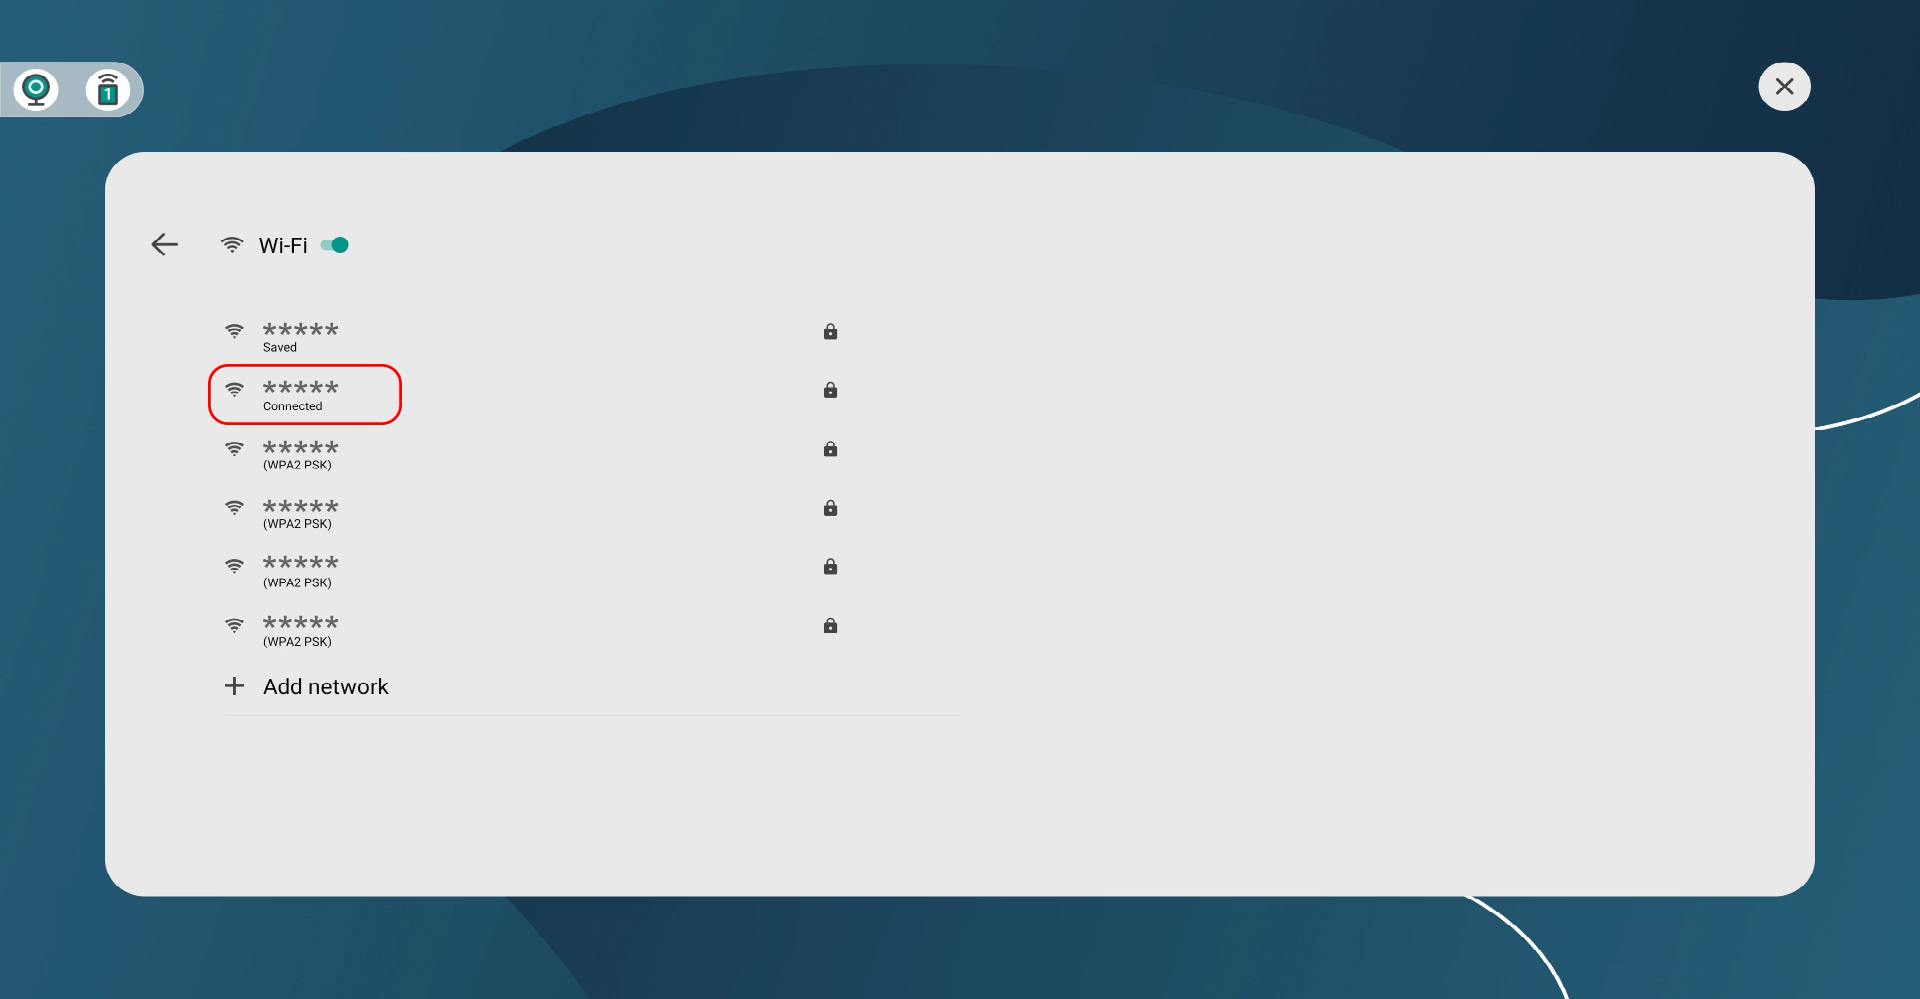
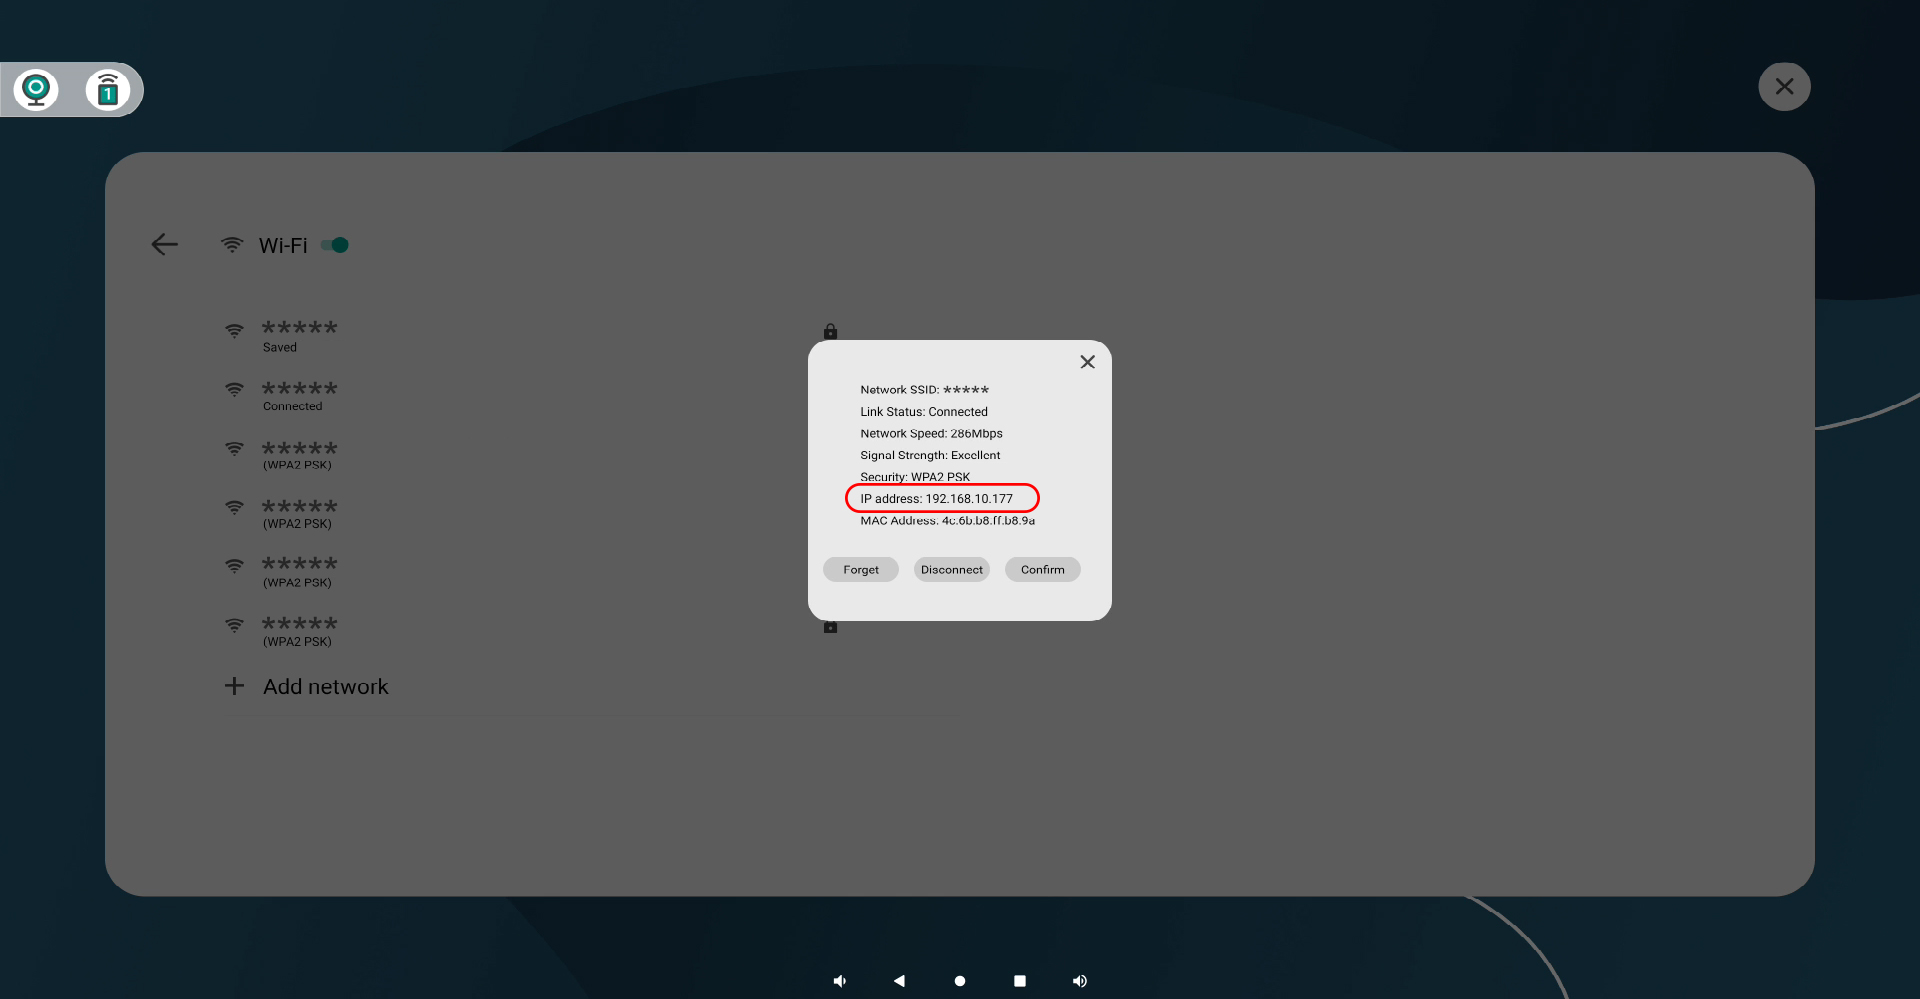
點擊螢幕右上角的 Wi-Fi 圖示,即可開啟 Wi-Fi 設定畫面。
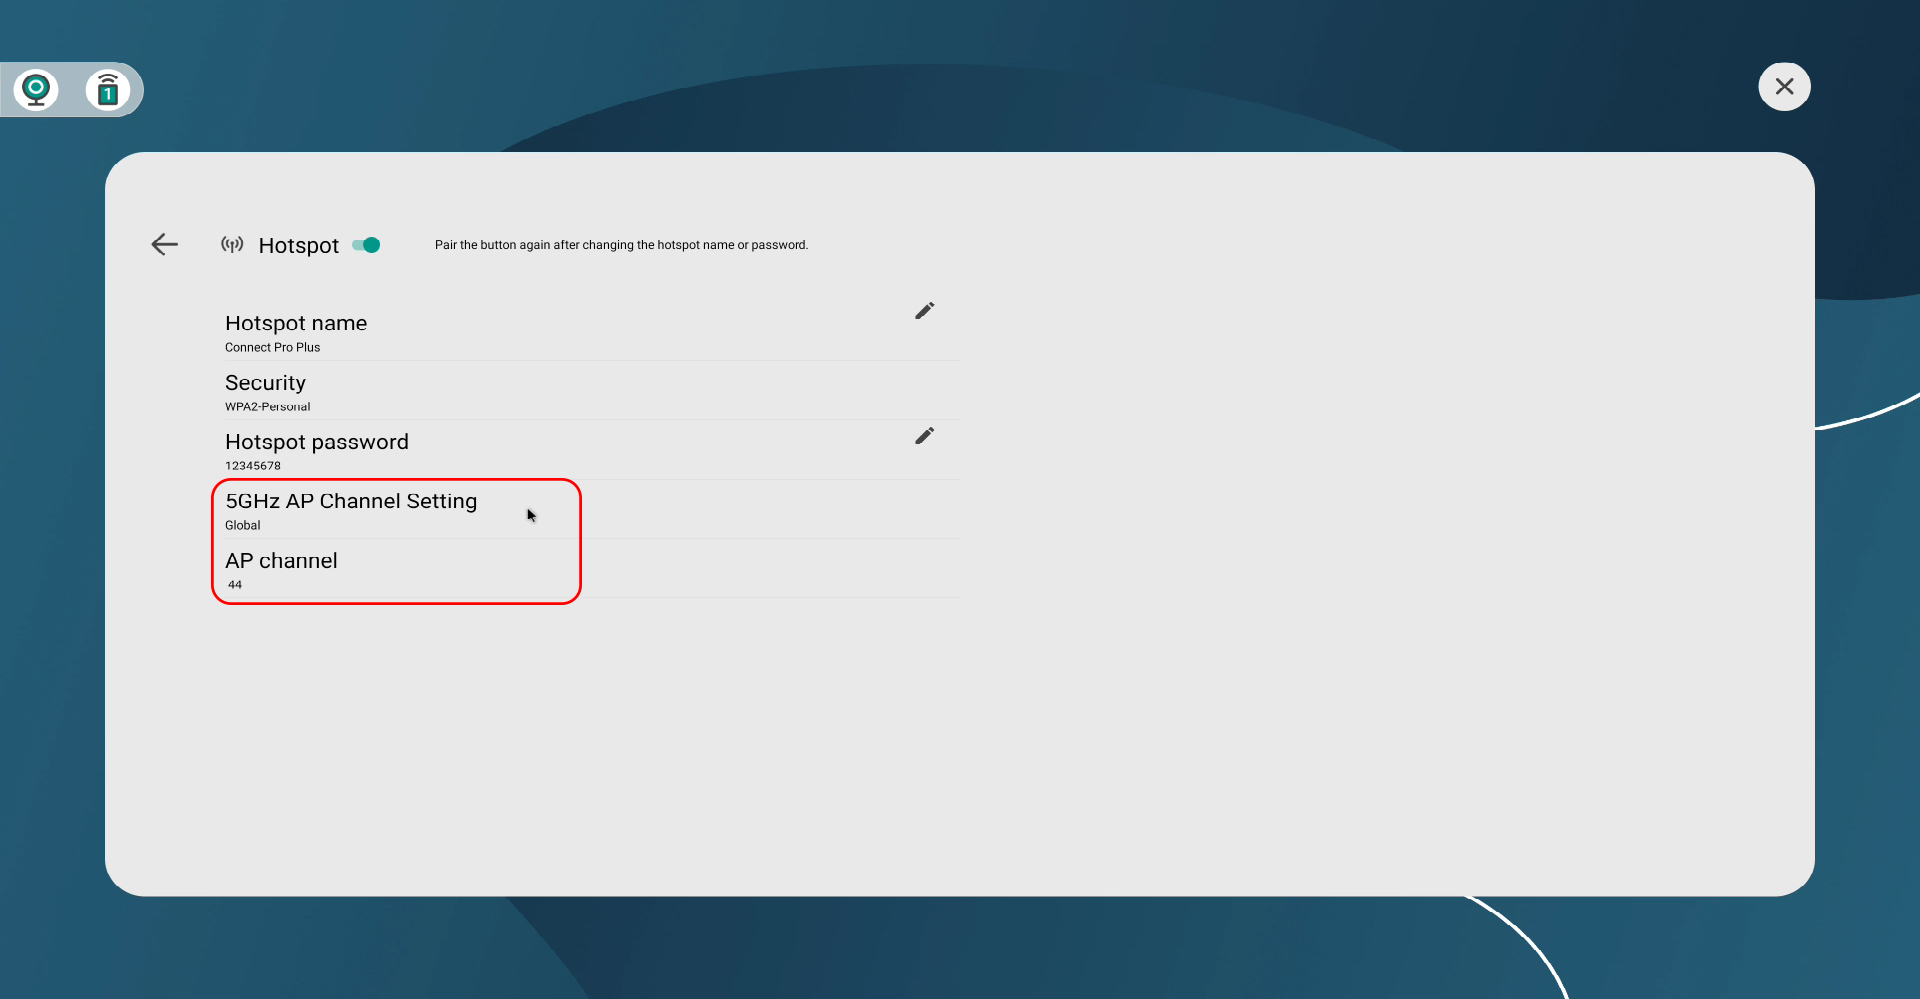
- 在主介面點擊熱點(Hotspot)圖示即可啟用。
- 若需更改熱點名稱(SSID)或密碼,請至 設定 > 網路 > 熱點修改。
- 編輯 SSID 與密碼後,請按 「儲存」 以套用新的設定。
CM55 的預設密碼為 1234。
您可以在 設定 > 安全性 中輸入新的密碼進行修改。
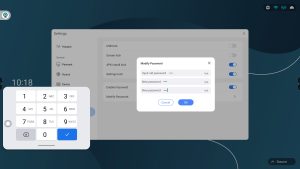
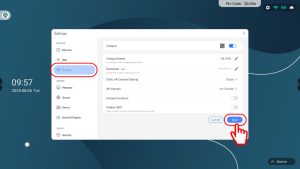
若忘記 CM55 的系統密碼,可依以下方式處理:
1. 預設密碼
- CM55 預設密碼為 1234。
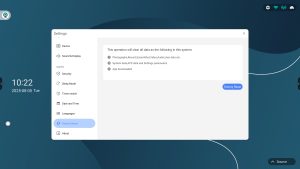
2. 透過恢復原廠設定來重置密碼
- 若您遺忘了自行設定的密碼,只能透過恢復原廠設定來重置。
- 重置方法:長按 CM55 背面的實體重置按鍵,直到螢幕熄滅。
- 裝置重新開機後,系統將恢復原廠設定,密碼也會重置為預設的 1234。
3. 提醒
- 此操作將清除所有系統設定,並恢復至原始出廠狀態。若設備已部署或設定完成,請謹慎操作。
注意:為了安全性,設定頁面預設為受密碼保護。
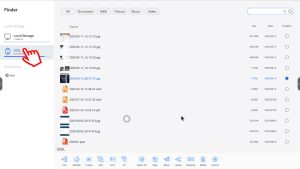
1. 點擊桌面上的 「Finder」 圖示。
2. 在左側欄位下方的裝置中找到 USB 隨身碟。
3. 點擊該 USB 裝置即可瀏覽並開啟其中的檔案。
您可以透過以下方式切換輸入訊號源:
1. 使用遙控器直接切換輸入訊號。
2. 點擊右下角的訊號源圖示,選擇欲切換的訊號源。
3. 點擊側邊工具列的選單圖示,並於選單中選擇輸入訊號源。
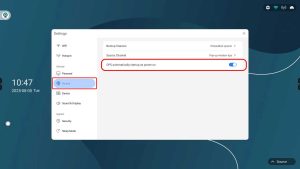
4. 若在 設定 > 來源 > 訊號源中啟用自動切換,裝置會在偵測到新訊號時自動切換。
如果啟用了 「彈出視窗提示」,偵測到新訊號時螢幕會跳出提示訊息,詢問是否要切換。
請依下列方式檢查:
1. 檢查 HDMI 線路:請確認 HDMI 線已牢固插入,且無損壞或接觸不良。
2. 調整 EDID 設定:在訊號源畫面中,開啟側邊工具列並點選選單圖示。當訊號源視窗出現時,點選「HDMI EDID」,並在 1.4 與 2.0 模式間切換,以解決與外接裝置的相容性問題。
1. 從側邊工具列開啟工具列。
2. 點擊觸控鎖定,並設定一次性密碼;或使用遙控器上的觸控鎖定按鍵。
3.啟動觸控鎖定後,螢幕會略微變暗,左下角會顯示鎖定圖示。

4.若要解除鎖定,請點擊鎖定圖示並輸入設定的密碼。

注意:請務必記住密碼。若忘記密碼,將需要重新啟動 CM55 才能恢復操作。
1. 未選擇 CM55為音訊輸出裝置:在外接裝置(如筆電)中,音訊輸出可能仍設定為內建喇叭。請在音效設定中選擇 「CM55」 或 「HDMI Audio」。
2. 使用 HDMI + USB 時未接上音訊線:部分裝置的 HDMI 僅支援畫面,音訊需要額外透過 USB 傳輸。請確認 HDMI 與 USB 都已正確連接。
3. CM55 音量過低或靜音:請檢查 CM55 的音量是否被調低或關閉。
4. 外接裝置音量過低或靜音:請檢查外接裝置的音量設定是否正常。
5. 內容受到 DRM 保護:部分受保護內容(如 Netflix)可能限制特定音訊輸出模式。請嘗試不同內容或確認播放裝置支援性。
6. 線材或連接埠問題:請嘗試更換 HDMI 線材或更換其他輸入埠。
1. 檢查電池:電池可能耗盡或安裝錯誤。請更換新電池並確認正負極方向是否正確。
2. 紅外線被遮擋:CM55 遙控器採用 IR 紅外線,需要清楚的直線視角。請確保遙控器與機器之間沒有遮蔽物。
3. 距離過遠:IR 遙控器有效距離有限,建議在 5–7 公尺內使用。
4. 接收端無反應:裝置可能當機。請重新啟動 CM55 後再試一次。
遙控器上的藍色按鍵是用來操作CM55的內建攝影機。若攝影機未啟用或未在使用中,這些按鍵將無法作用。
我們建議使用原廠附贈的移動式落地腳架,已便在空間中移動並創造協作環境,但 CM55 也支援壁掛安裝或第三方腳架。
CM55 採用 VESA 標準安裝孔位
VESA 尺寸:600 × 200 mm
此為業界通用標準,相容於多數商用壁掛架與腳架
注意:請確認所選腳架或壁掛架支援 VESA 600×200,並具備足夠承重能力以支撐 55 吋顯示器。
※升級前請注意:此方法會將裝置恢復原廠設定,所有使用者資料將被清除。
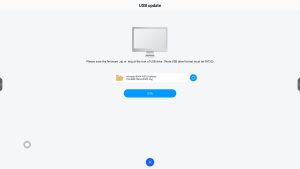
1. 準備一個 FAT32 格式的 USB 隨身碟
2. 在 USB 根目錄建立名為「update」的資料夾
3. 解壓縮韌體套件,將韌體檔案複製到 USB 中,並重新命名為:YS-EMEETING-ES982.img
4. 將 USB 插入 CM55 的 USB 2.0 埠
5. 開啟「應用程式清單」,啟動「OTA(無線更新)」應用程式
※若找不到 OTA 應用程式:
– 長按「應用程式」標題
– 畫面會出現密碼輸入畫面
– 輸入密碼(預設密碼為 1234)
– 按下「確定」後隱藏的 OTA 應用程式將顯示
6. 選擇「USB 更新」,當畫面出現升級檔案後,點選「OTA 更新」即可開始升級流程。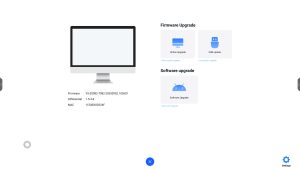
部分語言設定變更需重新啟動系統後才能完全套用。請在變更語言後重新啟動 CM55,以確保新語言設定完整生效。
- 紅燈慢閃:連線中
- 白燈快閃:已連線/等待投放
- 白燈常亮:投放中
- 紅燈常亮:裝置異常
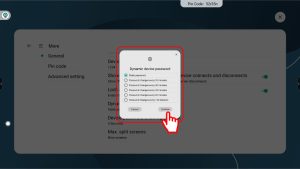
1. 在主畫面或訊號來源選單中點選「螢幕分享」圖示。
2. 點選 Connect Pro 介面右上角的「設定」圖示。
3. 前往「一般設定」並點選「動態裝置密碼」。您可選擇以下兩種模式:
- 固定密碼
– 選擇此模式後,可在「裝置密碼」欄位中自行設定密碼,之後每次連線皆使用相同密碼。
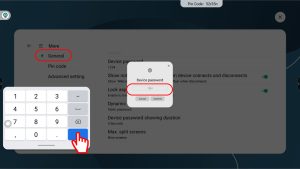
- 動態密碼 (定時更新)
– 系統會產生隨機密碼,並依您設定的時間間隔自動更新,以提升安全性,可選擇更新時間為 10、30、45、60 或 120 分鐘。
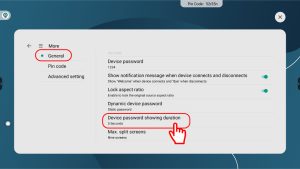
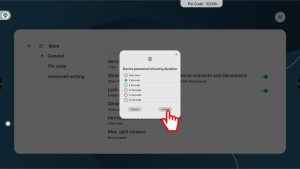
可以。請前往「螢幕分享設定 > 一般 > 裝置密碼顯示時間」中調整通知顯示時間。此外,裝置密碼也會直接顯示在主畫面上,無需等待通知即可查看。
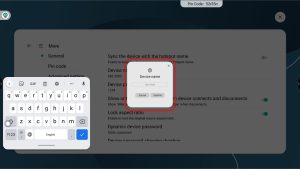
裝置名稱用於辨識主機,讓其他裝置能正確連線並投影畫面。預設情況下,裝置名稱與熱點名稱相同。
您可以依照以下步驟,將裝置名稱獨立於熱點名稱進行更改:
- 開啟 Connect Pro 設定 > 更多 > 一般
- 關閉「同步裝置名稱與熱點名稱」
- 點選「裝置名稱」即可編輯並設定新名稱
這是首次連線或使用新裝置時的正常行為。流程如下:
1. 插入 Connect Pro Button 後,LED 會開始閃爍紅燈
2. Button 與接收端 約需要 15 秒建立連線
3. 連線完成後,LED 會變為閃爍白燈,表示可開始投影
按下按鈕後,LED 會變為常亮白燈,表示正在投放
請確認您的電腦 USB Type-C 埠是否支援以下功能:
- PD(Power Delivery)供電功能
- DP Alt Mode(DisplayPort 替代模式)
若不支援上述功能,請改用其他方式進行螢幕分享,例如使用 Connect Pro 軟體、Miracast 或 Chromecast。
Connect Pro Button 的 LED 指示燈若出現 常亮紅燈,表示配對過程發生錯誤。請依以下步驟重新與接收器配對:
1. 將 Connect Pro Button 插入 CM55 背面的 USB Type-C 連接埠。
2. 螢幕會顯示配對與連線狀態。
3. 當指示燈從 常亮紅燈 轉為 閃爍白燈 時,代表 Button 已成功與 CM55 配對。
4. 完成配對後,您即可將 Button 插入電腦開始無線投放。
使用 Connect Pro Button 時請確認以下事項:
1. 確保 Button 已與接收器成功配對。若 LED 指示燈維持紅燈常亮,請重新執行配對。
2. 確保您的裝置(筆電或平板)的 USB Type-C 連接埠支援 DP Alt Mode 及 電力傳輸(Power Delivery)。
3. 若 Connect Pro Button 透過 USB Hub 並同時接上其他配件,可能因供電不足無法正常運作。請直接將 Button 接到您的裝置上。
使用 Connect Pro 軟體時請確認:
1. 軟體版本是否已更新至最新版本。
2. 裝置與接收器是否連接至相同網路(若使用 VLAN,請確保位於同一子網路)。
3. 路由器或企業網路是否有阻擋 mDNS。
4. 若所在網路阻擋 mDNS,請改為連線到接收器的 熱點(Hotspot)。
5. 若以 IP 位址的方式投放,您的裝置必須連上接收器的熱點。
使用 AirPlay 時請確認以下事項:
1. 裝置與接收器是否連接至相同網路(若使用 VLAN,請確保位於同一子網路)。
2. 路由器或企業網路是否有阻擋 mDNS。
3. 若阻擋 mDNS,請改為連線到接收器的 熱點(Hotspot)。
4. 部分影音平台(如 Netflix)因內容保護與著作權(DRM)限制,無法透過 AirPlay 投放。
5. 有時重新啟動裝置可解決問題,請重新啟動 iPhone 後再試一次。
使用 Miracast 時請確認:
1. 關閉 CM55 的熱點功能:請前往「主設定 > 熱點」,將熱點開關切換為關。
2. 開啟 Miracast 功能:請前往「Connect Pro 設定 > Miracast」,將 Miracast 開關切換為開。
3. 裝置與接收器需連接至相同網路。
4. 部分 Windows 或 Android 裝置需手動啟用 Miracast 功能,請確認您的裝置已啟用 Miracast。
5. 更新裝置的顯示卡與 Wi-Fi 驅動程式。舊版驅動程式可能導致 Miracast 無法正常運作,尤其是在 Windows 電腦上。
6. 防毒軟體或防火牆可能干擾投影連線:某些網路防護設定或防火牆規則可能會阻擋 Miracast 的連線,請檢查相關設定。
7. Miracast 訊號可能受以下因素影響而變弱或中斷:裝置距離接收器過遠;隔牆或障礙物其他裝置產生的無線干擾
8. 若您在使用 Miracast 投影後變更了裝置名稱,下次連線時可能仍會看到舊的裝置名稱。若選取舊名稱並連線,系統會自動更新為新名稱。或者,您也可以前往「Windows 設定 > 藍牙與裝置 > 無線顯示器與擴充基座」,選取舊名稱並點選「移除此裝置」,再重新搜尋 Miracast 裝置,即可顯示新名稱。
使用 Chromecast 時請確認:
1. 裝置與接收器是否連接至相同網路(若使用 VLAN,請確保位於同一子網路)。
2. 路由器或企業網路不得阻擋 mDNS。
3. 若阻擋 mDNS,請改連線到接收器的熱點。
4. 部分影音平台(如 Netflix)因內容保護與著作權(DRM)限制,無法透過 Chromecast 投放。
5. 有時重新啟動裝置可排除問題,請重新啟動裝置後再試。
在連線過程中,按鍵 LED 會顯示 閃爍紅燈。建立連線後 LED 會變為 閃爍白燈,表示已準備好分享畫面。若持續閃紅燈,請檢查:
1. 電腦是否偵測到名為「Connect Pro」的新外接裝置,通常會跳出提示視窗。
※若無法偵測,請嘗試將電腦連接電源,供電不足可能導致偵測失敗。
2. 成功偵測後,按鍵會自動掃描並搜尋接收器。依照網路環境不同可能需 30 秒以上。
3. 若仍持續閃紅燈,請前往熱點設定確認 CM55 使用的頻道。
※建議使用非 DFS 頻道,如 36、40、44、48、149、153、157、165,以提升穩定性。

首次使用前,請先為觸控筆充電。
- 為避免電池過度放電,觸控筆出廠時處於「運輸模式」。
- 充電後會自動解除運輸模式,並啟用觸控筆功能。
請確認觸控筆已完全充電:
- 請使用 USB-A 對 USB-C 傳輸線充電。若使用 USB-C 對 USB-C 傳輸線,可能無法正常充電。
- 充電時,筆身橘色指示燈會亮起。
- 完全充電後,指示燈會熄滅,表示可正常使用。
- 完整充電約需 1 小時。為保護電池壽命,請在完全充電後拔除電源。
- 完全充電後可連續書寫約 50 小時。
- 若長時間未使用,觸控筆將自動進入休眠模式以節省電力。
若您使用的是第三方觸控筆,請確認其支援 MPP(Microsoft Pen Protocol)。
產品包裝內附有兩個備用筆尖。若筆尖磨損或損壞,請更換為備用筆尖。
注意:筆尾(橡皮擦端)無法更換,亦無提供替換。
一般情況:請確認「觸控鎖定」功能已關閉。若已啟用,請先解除鎖定。

HDMI 連接時:請同時連接 USB-B 對 USB-A 傳輸線,CM55 才能支援觸控回傳功能。
使用 Connect Pro 時:
- iOS 裝置因系統限制不支援觸控回傳。
- 使用 AirPlay 或 Chromecast 進行螢幕分享時亦不支援觸控回傳。
- 請確認已在「Connect Pro > 進階設定」中啟用觸控回傳控制。
CM55 白板工具預設僅接受觸控筆輸入。若要使用手指書寫,請在白板應用程式下方工具列中啟用「以觸控作為筆」選項。

- 移動畫布:使用兩指拖曳,即可移動畫布位置。
- 縮放畫布:使用兩指開合手勢,即可放大或縮小畫布。
CM55 白板效能可能會受到畫布內容複雜度與系統整體資源使用情況影響。例如,同時開啟多個瀏覽器分頁或播放影片,可能會佔用大量 CPU 與記憶體資源,導致白板延遲或卡頓。
為確保更順暢的白板體驗,建議:
- 使用白板時減少背景程式運作
- 儘量將白板作為單一應用程式使用
- 定期截圖保存內容,避免因系統延遲導致資料遺失
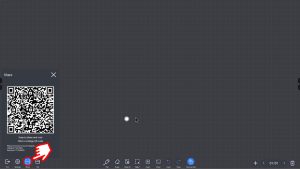
如何擷取或儲存白板內容?
若您想在討論後保留白板內容,請依下列步驟操作:
1. 確認您的行動裝置已連接至 CM55 的熱點。
2. 在 CM55 上點選「分享」功能。
3. 螢幕上會顯示一個 QR Code。
4. 使用手機掃描該 QR Code。
5. 系統會開啟一個網頁,顯示目前的白板內容。
6. 您可以直接在該頁面上截圖或下載白板內容,以保留討論紀錄。
觸控表現可能會受到電源或鄰近頻率干擾的影響。請檢查以下項目:
1. 確認電源與插座已妥善接地,並使用原廠隨附的電源線。
2. 檢查附近是否有馬達、電器設備或其他低頻干擾源(例如與觸控筆工作頻率相近的裝置)。若有,請關閉該設備或將 CM55 移至遠離干擾源的位置。
人物特寫模式是一項智慧攝影功能,可自動偵測畫面中的多位與會者,並同時在螢幕上顯示每位參與者的特寫畫面。此功能能讓每位與會者都獲得相同的畫面焦點,提升視訊會議的專注度與互動性。在 CM55 上,人物特寫模式最多可同時支援 5 位參與者。
自動取景(Auto-framing)功能可自動偵測會議室內的人員位置,並調整攝影機畫面,確保所有與會者都在畫面中。當有人進出會議空間時,攝影機會自動縮放與平移,無需手動調整。
講者追蹤(Speaker Tracking)是一項智慧攝影功能,透過先進的聲音辨識技術,自動偵測並追蹤正在發言的人。攝影機會即時調整畫面構圖,聚焦於當前講話者,特別適合簡報或互動討論場合。
請先確認 CM55 的韌體版本:
- 若版本低於「YS-ES982-T982-20250804.095522」,請更新至最新版本。
※更新前請備份重要資料,USB OTA 更新可能會重置設定與資料。 - 版本高於「YS-ES982-T982-20250804.095522」,請依下列步驟操作:
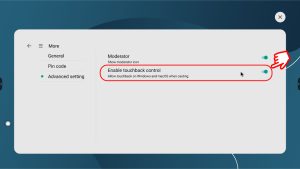
1. 開啟 Connect Pro 設定 > 更多 > 進階設定 >「主持人模式」,並將其關閉。
2. 前往「設定 > 更多 > 密碼鎖定」,關閉密碼鎖定或選擇「不顯示於畫面」。

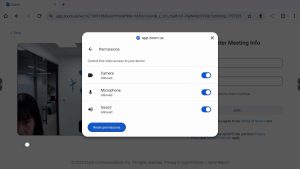
3. 開啟或重新整理需要使用相機/麥克風的網站,Chrome 將自動跳出權限提示,請選擇「允許」。
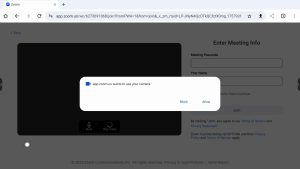
4. 若仍無法使用,請點選瀏覽器網址列左側的「鎖頭」圖示,檢查該網站是否已獲得相機與麥克風的存取權限。
從側邊工具列點選「應用程式」圖示 > 開啟「主題」應用程式,您可以選擇內建主題,或上傳自訂圖片作為桌布。

- 請確認訊號線兩端連接正常且穩固,試著重新插拔。
- 請確認有選擇到正確的訊號源。用雙指從右上角往下滑,叫出螢幕選單,選擇正確的訊號源。
- 請嘗試使用不同的線。
- 如果依然無法投影到Hub上,請聯系我們。
- 請確認從你的電腦設定上, 選擇Ideao Hub作為你的音訊設備。
- 確保Ideao Hub沒有靜音。用雙指從右上角往下滑,叫出螢幕選單,調整音量大小。
- 如果你使用DVI 或VGA (D-Sub)線連接,他們本身只能傳輸視訊影像,但沒有傳輸音訊的功能。此時,需要另外在Hub與電腦之間連接一條音訊線,才能使用Hub的喇叭。(如果使用USB Type-C或HDMI線,就不需額外連接音源線)
如果是使用USB Type-C以外的線連接,如HDMI、DVI、VAG (D-SUB)等線, 會需要另外接一條USB BA的線作為觸控訊號傳輸。USB-B端連接在Hub上,USB-A端連在電腦上,連接完後就能使用觸控了。
可以。要切換顯示到另一個設備上,用雙指從右上角往下滑,叫出螢幕選單,再選擇要切換的訊號源即可。
在顯示器設定中,選擇Ideao Hub作為主要顯示器
若你不想將Ideao Hub作為主要顯示器,請按照以下步驟設定:
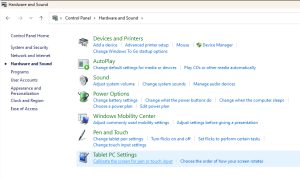
1. 在「開始」選單,進入控制台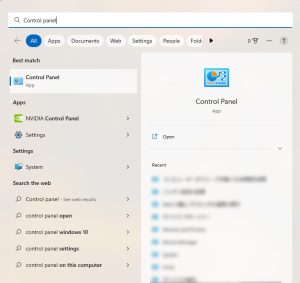
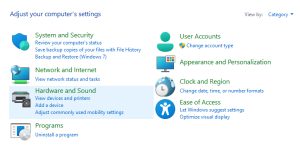
2. 在控制台中, 找到「硬體與音效」選項
3. 選擇 「平板電腦設定」
4. 選擇設定 > 觸控輸入
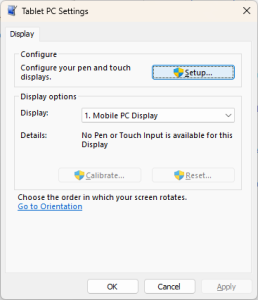
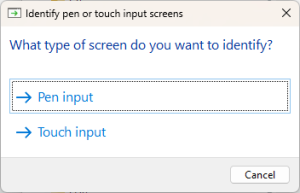
5. 接著會出現白畫面顯示「請使用一根手指輕觸這個螢幕,以便將它識別為觸控螢幕。如果這不是平板電腦螢幕,請按Enter移至下一個螢幕,若要關閉工具,請按Esc」。如果此畫面顯示在Ideao Hub上,請輕觸Hub,若否,按Enter切換,直至該提示出現在Hub上。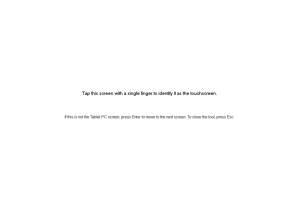
6. 設定完成後視窗會自動關閉
7. 重啟電腦,完成觸控螢幕設定。
If Reactiv SUITE crashes on Startup and fails to show a crash report, perform the following steps:
- Open Event Viewer in Windows

- Go to Windows Logs > Application. Look for the Error where the source is Application Error. The latest crash entry will be on the top

- Copy the contents of the General Tab and send it to techsupport@vizetto.com

Based on the content of these details we can determine the next course of action.
NOTE: Ensure that you have an updated version of Microsoft Office. Outdated versions may result in errors during startup.
Check to see if you are using the new Intel i10 Ice Lake or i11 Tiger Lake CPU. The new Intel CPU chips have an issue and will cause Reactiv SUITE to crash. A temporary workaround is listed below so you can continue to use Reactiv SUITE:
- Open “File Explorer” (Win+E), right-click on “This PC”, and select “Properties”

- Select “Advanced System Settings”

- Select “Environment Variables” in the “Advanced” tab

- Select “New…” under “System variables”

- Input the text below and select “OK”
Variable name: OPENSSL_ia32cap
Variable value: ~0x200000200000000

- Confirm that the variable has been added successfully, then select “OK”

- Start Reactiv SUITE
If you didn’t already purchase a key from one of our partners, simply fill the Free trial form when you launch Reactiv SUITE, and you will receive your Trial License Key by email.
- Check your Junk Email folder
- Wait a few minutes and refresh your email
- If you still don’t receive it, you can contact us
- Go to Settings

- In Product License, activate by entering your activation code

- Go to settings
- In Product License, enter your license
- Click on Deactivate

- If you bought your license from one of our partners, contact their customer support
- If not possible, contact our customer support
Once a license is deactivated, you can use the same key and activate it again on another PC.
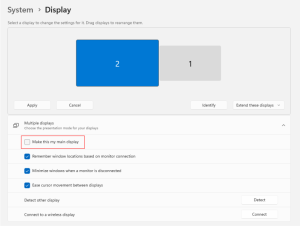
- Connect up to 3 additional displays to the Reactiv SUITE PC
- In Reactiv SUITE settings > Device Manager > Display Layout, configure the position of your secondary displays. Just select the available display and drop it into the position on the layout for Reactiv SUITE to take control. The location of the display represents the ‘throw’ direction of the content. Just throw content right, left or up, and the content will appear on the appropriate display as per the layout map

- Verify Windows recognizes the secondary display. In Windows, right-click on your desktop, select “displays settings”, and confirm that the secondary display is detected
- If the secondary display is not detected by Windows, try to disconnect and reconnect the display, or change the cables
If your keyboard relies on a “Bluetooth USB dongle”, the IWB might block the Bluetooth signal, if possible, try to put the USB dongle on an available USB port on the side of the IWB instead of a behind the IWB.
- If your IWB has a ShadowSense touch screen
- Make sure that you are using the pen and eraser that was originally delivered
- Go in settings > devices manager > Touch Screen:
- Make sure your touch profile is set to “IWB”
- Make sure that the ShadowSense Firmware is R11.0 or higher, otherwise, update the firmware by clicking on “firmware update” and following the instructions
- In the Touch screen settings, if you see multiple choice for the Stylus (that option is only available for some specific IWB), select the one you are using
-

Reactiv SUITE requires Microsoft Office to be installed and activated on the computer running the software in order to open documents such as Word, PowerPoint, or Excel.
Ensure that you are not running a 30-day free trial and your license is valid and not expired.
- In Windows, open any Office app (Excel, PowerPoint, Word…)
- Go “Files” > “account” > and verify that the product is activated

- If the account is not activated, you will need to contact your IT department to activate it or to purchase a new license
Reactiv SUITE IWB is by default configured to be in full screen “Kiosk Mode” by your IT department.
Otherwise, go in Settings > User Interface > Additional Settings and click on toggle “Fullscreen mode”.
In Reactiv SUITE Settings > User Interface > Accent Color.

Yes, in the Settings > User Interface > Background Media.

No, but we are working on additional options to choose from which will be available soon.
Move any image into the presentation folder, and rename it “folder.jpg” – that picture will become the presentation thumbnail.
Any sub-folder, inside the presentation, can also be customized by placing a “folder.jpg” file within it.
Move any picture into the presentation folder and rename it “background.jpg”, that picture will become the presentation background in STAGE.
Any sub-folder, inside the presentation, can also be customized by placing a “background.jpg” file within it.
Go in Settings > System > Browser Settings to add or remove Quick Launch shortcuts. To change the shortcut Icon, click on the icon and locate on your PC the new icon you would like to replace it with.
- On the Home screen, select Reactiv STAGE or Reactiv SCRIBBLE

- From the Lobby (Public or Private Workspaces), you can start a presentation just by clicking on any of the icons

- On the Home screen, select Reactiv STAGE or Reactiv SCRIBBLE
- From the Lobby (Public or Private Workspaces), you can add new workspaces by clicking on the ‘+’ icon

- In Details:
- Enter a title and a description
- Add a folder with the desired files to use in the Workspace by clicking on the Folder button

- In Media:
- Add images as the preview and background media by clicking on +

- Add images as the preview and background media by clicking on +
- Click on Save. Select your Workspace on the Lobby screen and start presenting
- In Details:
- On the home screen, click on the help button, ‘?’ to see mini video-tutorials explaining the basic gestures and features

- In a presentation, click on the interrogation mark in the bottom right corner to see mini video-tutorials

- For more information on basic tools, refer to the Getting Started Guide
- Use your USB key to automatically start a project
- Prepare your files in a USB flash drive
- Plug your USB flash drive into the Interactive Whiteboard
- Ensure that USB drive is enabled in SETTINGS

- Start Reactiv STAGE or SCRIBBLE and go to the lobby
- Click on the USB Project icon to start presenting

- Now, all changes will be saved back into the same USB folder
-
Before your presentation/at your desk:
- Open your presentation folder
- If you are using Chrome, navigate to the webpage you would like to use in Reactiv SUITE, select the address in the address bar, click and drag it into your presentation folder, and create a URL file (shortcut to a webpage)
- If you are using another browser, in your presentation folder: Right-click > New > Shortcut > past your webpage address > next > name your shortcut and click finish
In Reactiv SUITE/during your presentation:
- Click on the browser icon

- Navigate to the webpage you would like to work on
- Click on the “add to presentation” button located on the browser floating toolbar

- The webpage will now be in your presentation folder so you can open it in STAGE and SCRIBBLE
Everything you present and save, during a session, will be saved back to the exact same folder as the originating file. On-premises or off-premises storage, Local drive, USB flash drive, network drive, or Cloud, data will only be saved to the location of your choice.