根据USB-IF公布之标准规格,每一种USB接口都有线材长度限制,若超过建议长度,影像传输信号会不稳定。请参考以下建议长度:
USB2.0:5公尺
USB3.0/3.1 Gen 1: 2公尺
USB3.1 Gen 2: 1公尺
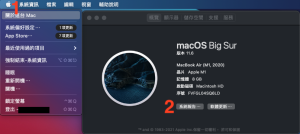
- 确保你Mac有辨识到镜头,点击左上方关于这台Mac,在概览中点击系统报告。
- 在相机中看到有镜头相关信息,如果没有辨识到,请重新插拔镜头。
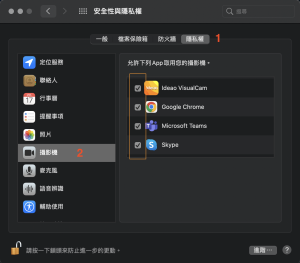
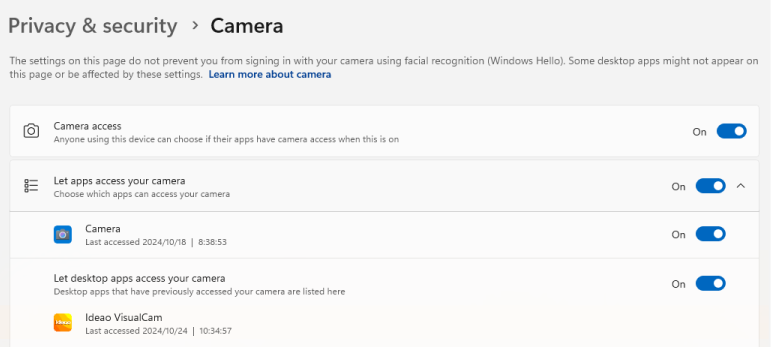
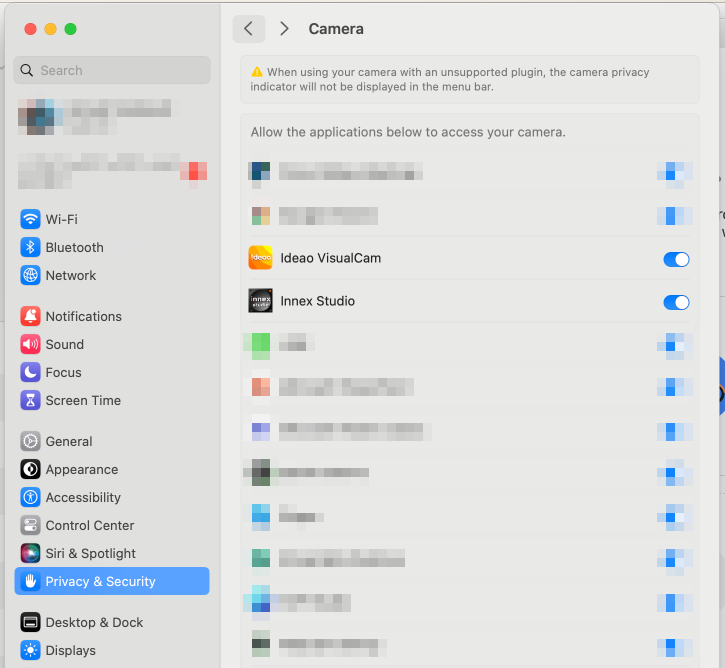
- 到系统参数选项>安全性与隐私权中,按照以下步骤检查,到隐私权>摄像头,查看列表,允许要使用的软件能够取用你的镜头。
可以,Cube采用人形辨识技术,即使带口罩也能识别。
Cube不需要下载任何软件来执行AI识别或视频模式切换,所有功能都能从遥控器上操作。
只有在更新固件的时候,你需要下载软件Innex Studio并连接网路才能执行。
有两种方式可以解决这个问题:
- 设定遮罩,让AI不显示特定区域内出现的人物。遮罩功能可以从遥控器上设定。
- 在所有与会者都坐定位之后,从选单中选择「侦测一次」,就能固定住人物特写的画面。但在这个模式之下,如果与会者有离开座位跑出拍摄框的情况,Cube不会即时侦测追踪。
最多可以同时侦测8个人,并产生8个特写框。如果有两个人坐得很近,AI可能会将他们合并在同一个框内,以达到较好的显示效果。
可以,请下载Innex Studio软件来更新固件。
点此连结进入下载页,根据使用的是Windows或Mac下载不同版本的Innex Studio
https://funtechinnovation.com/zh-hans/downloads/
2. 将Cube连接到电脑,开启Innex Studio软件。请确保你的电脑拥有稳定的网路连线,且没有其他软体正在使用Cube。
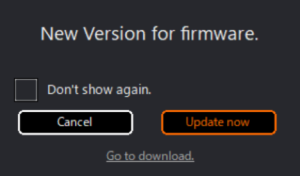
3. 如果我们有释出更新版本的固件,就会有视窗跳出提醒你是否要更新,点选右边的Update Now以更新固件。
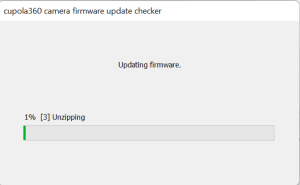
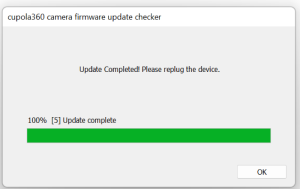
4. 更新会自动开始,请不要离开或关闭视窗,直到进度条跑完100%。
 5. 在更新完成之后会跳出提醒,点选OK。重新插拔一次Cube的USB线来重新启动Cube。
如果您的电脑阻止USB大容量装置的访问,则需要将固件写入相机内部储存空间的固件更新也将被阻止。请解除电脑对于USB大容量装置访问的限制,或者联络贵公司的IT管理员进行解除限制。
人物与摄影机的距离在1到5公尺之间是最适合C570智能取景的范围。当画面中只有一个人,且距离镜头在一公尺以内,可能造成取景功能不够稳定,画面容易跳动。此外,背景干扰也可能造成自动取景的不稳定,如:有人从后方走过,玻璃反射人影等等。
若以上情况皆已排除,自动取景仍然跳动,请更新产品的韧体(请参考FAQ的更新方法),或使用遥控器关闭自动取景功能。
可以使用遥控器操作或按压摄影机上方的按钮。如使用遥控器操作,在自动取景的模式下,压「AI/M」的按钮即可切换至手动模式。
如果需要将自动取景一直保持关闭状态,从遥控器的设定键点出选单>模式>智能取景>改成手动模式。
可以使用遥控器操作。遥控器上的+ – 按钮操作数位放大、缩小,并使用上下左右方向键调整视野。C570支援最多5倍数字放大。
- 到下载页面C570区下载最新版的固件Zip档 https://funtechinnovation.com/zh-hans/downloads/
2. 解压缩zip档案
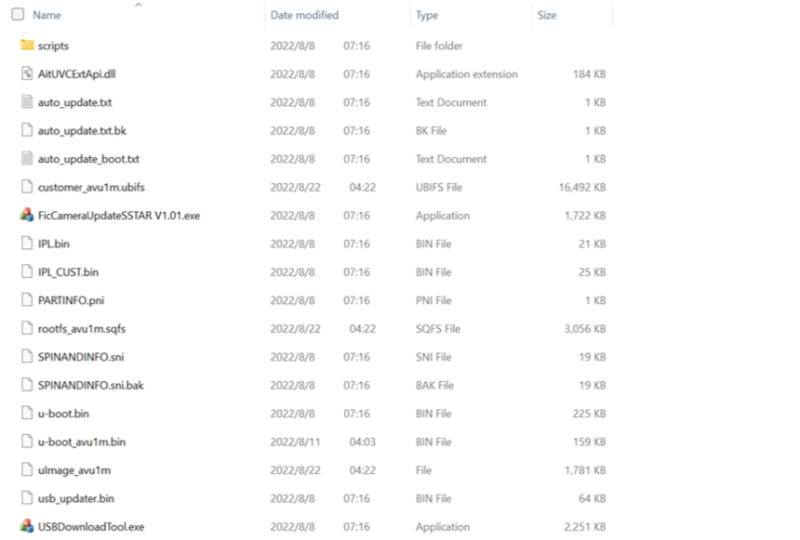
3.将C570连接至电脑
4. 在解压缩的档案内,找到这个档案”FicCameraUpdateSSTAR Vxxx.exe” (xxx为版本号码)

5. 从下拉选单中点选「innex C570 VID_3429&PID_0004」
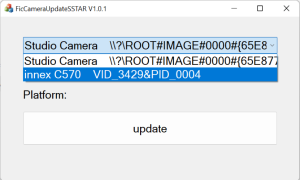
6. 点选「update」更新
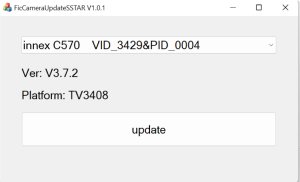
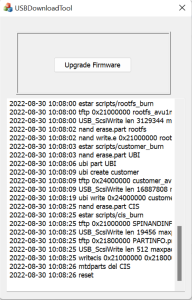
7. 点选「Upgrade Firmware」更新韧体以进行更新
8. 当最后出现「reset」,表示固件更新成功。请重新插拔摄影机以进行重启。
可以辨识。
自动取景的倍率取决于解析度。若解析度在720P或以下,放大倍率为3倍。若在1080P或4K,放大倍率为2倍。多数视讯会议软件的连线视频解析度最大支援到720P,所以大多数情况,放大倍率会在3倍。
C570的智能取景是摄影机内建的,不需额外下载软件操作。
在升级固件前,请先确认产品的固件目前的版本。
如何确认目前的固件版本:
1. 使用遥控器开启设定。
2. 由侧边菜单选择前往系统。
3. 确认固件版本。如果显示为V672则表示现在已经是最新版本的固件。
以下是更新固件的方式:
1. 1. 由此连结下载最新版本的固件。
2. 将下载完成的档案解压缩。
3. 将C570连接至PC。
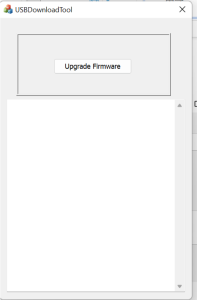
4. 双击运行 USBDownloadToolV2.4.。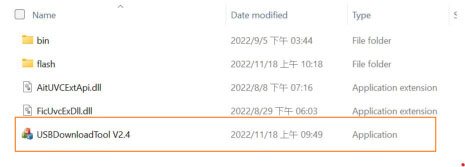
5. 在弹出的设定视窗中,确保 Innex C570 VID_3429&PID_0004 被正确选择。
6. 点击 Update Firmware以开始更新。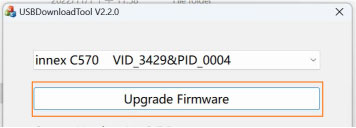
7. 当更新完成时,会显示出确认的讯息。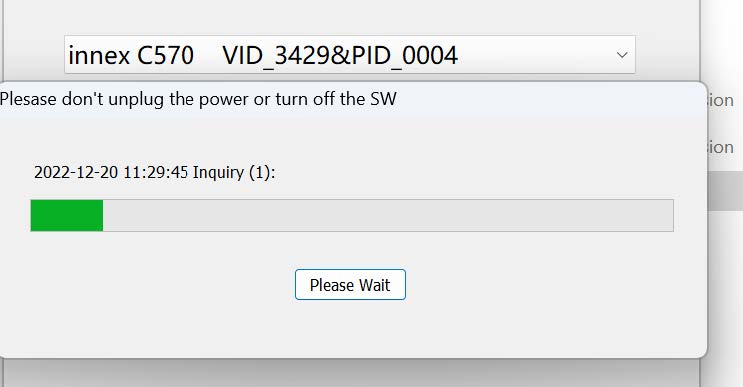
8. 点击 OK。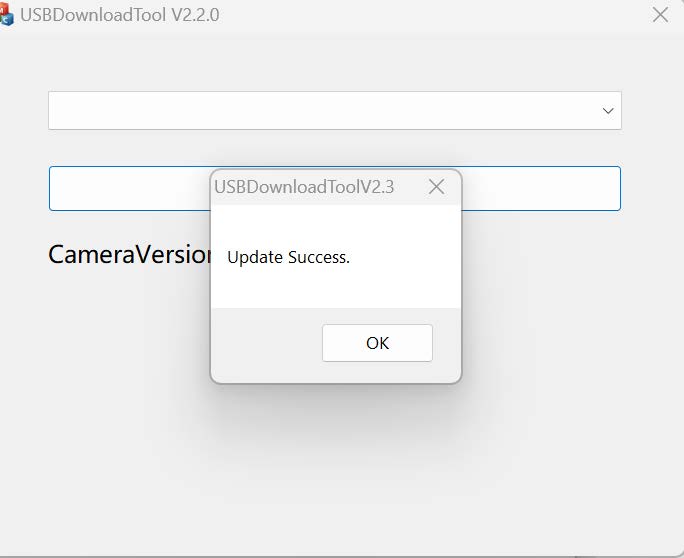
9. 回到设定确认固件版本是否呈现为最新的版本。
如果作业系统不是 Windows,C570 会保留闪烁设定。然而,在 Windows 系统中,内建的相机应用程式可能会复盖摄像头的设定。
例如,即使您将 C570 的电力线频率设定为 50Hz,但如果 Windows 相机应用程式设定为 60Hz,摄像头每次重新启动时都会恢復为 60Hz,即使在其他应用程式中使用也是如此。
若要保持正确的电力线频率,请直接在 Windows 相机应用程式中更新设定。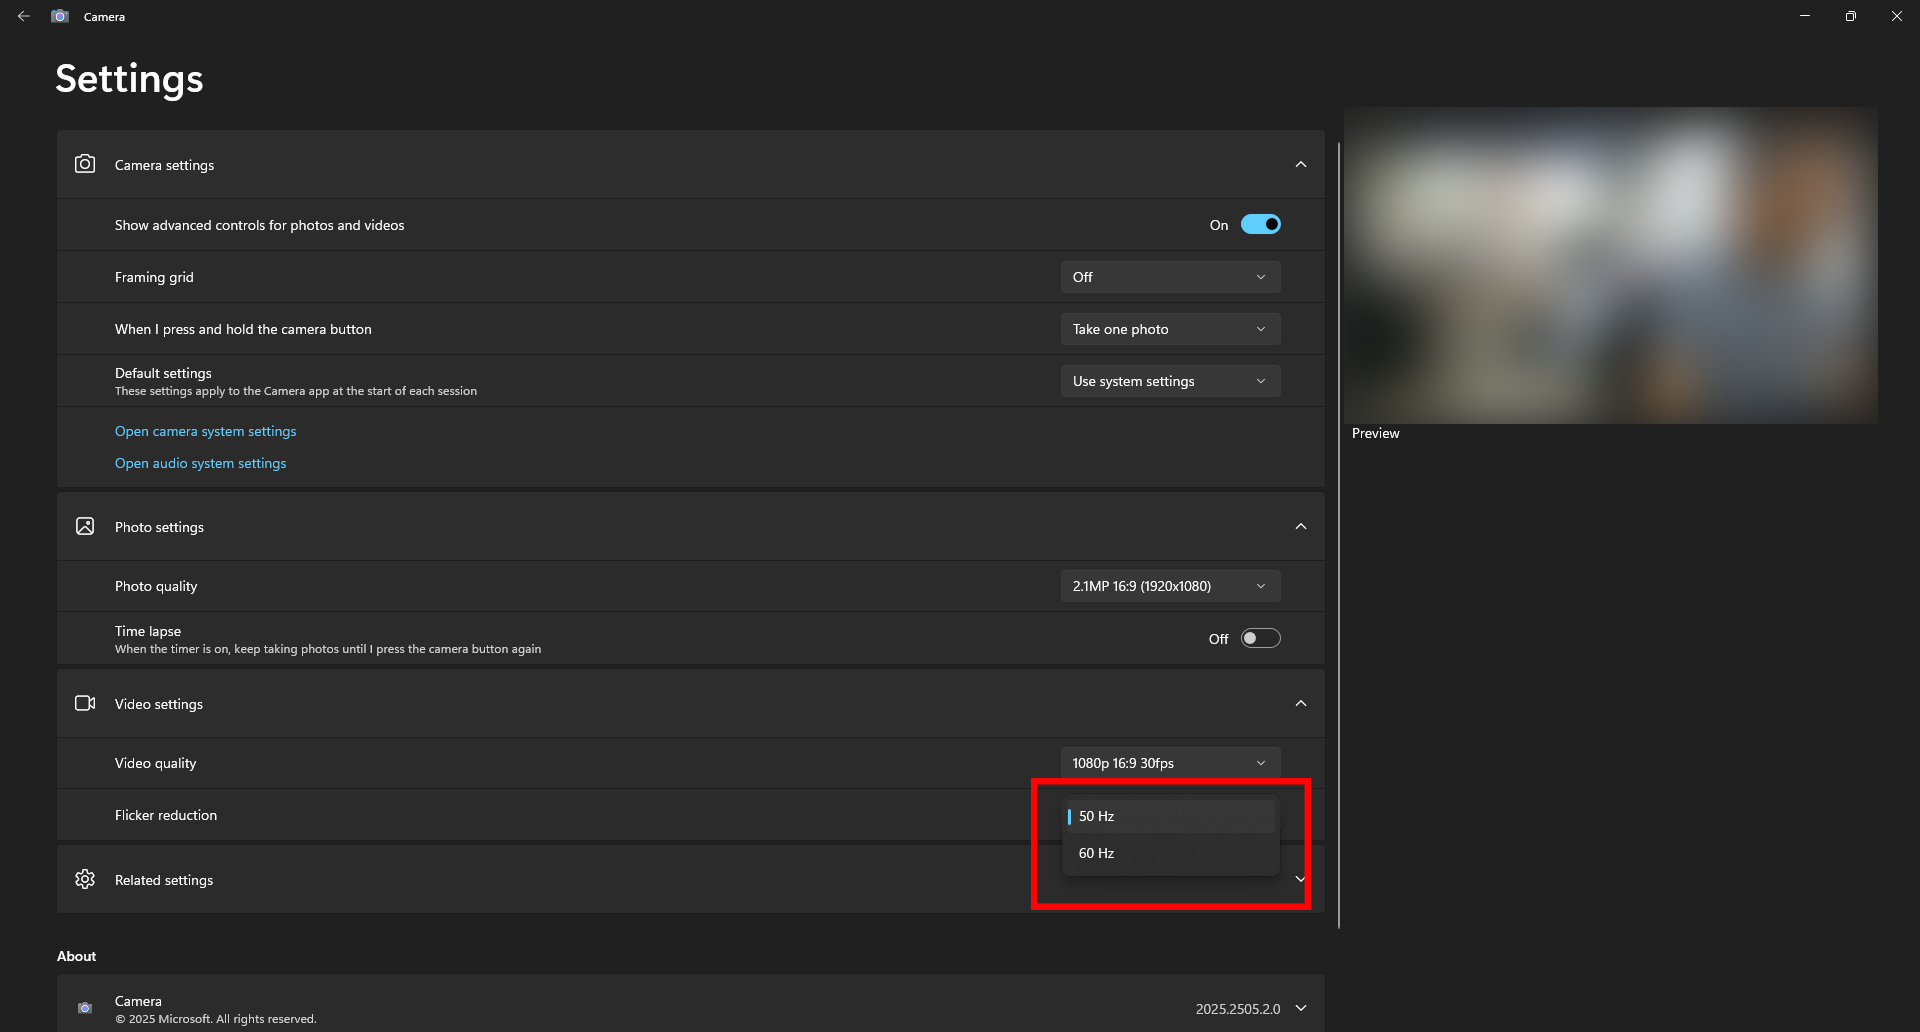
如果您使用的是 Windows 预设的 Camera 应用程式,它会复盖摄像头设定并以无 ePTZ 的预设视角启动。
您可以长按遥控器上的「OK」按钮以跳转至 Preset。
在其他应用程式和作业系统中,摄像头应该会以 Preset 视角启动。
人物与摄影机的距离在1到5公尺之间是最适合C470自动取景的范围。当画面中只有一个人,且距离镜头在一公尺以内,可能造成取景功能不够稳定,画面容易跳动。
此外,背景干扰也可能造成自动取景的不稳定,如:有人从后方走过,玻璃反射人影等等。若以上情况皆已排除,自动取景仍然跳动,请确定韧体已更新至最新版本,或参考此影片(1分28秒)关闭自动取景功能, 让视角常保持在120度广角。
下载Innex Camera (VAP Studio)更新固件和关闭自动取景功能 。
下载软件Innex Camera(VAP Studio)
安装软件后,将C470连接到电脑。点开Video ->点选Auto-framing -> 会找到预览画面下方的取景开关。
或参考此影片(1分28秒)教学(开启CC字幕)。
有的。如果在你使用的环境下不想开启或不适用「自动取景」功能,而120度广角对你来说又太宽了,你可以手动调整视角,用E-PTZ(数位的位移控制与缩放)调整到你想要的视角位置。请下载Innex Camera (VAP Studio)软件来操作
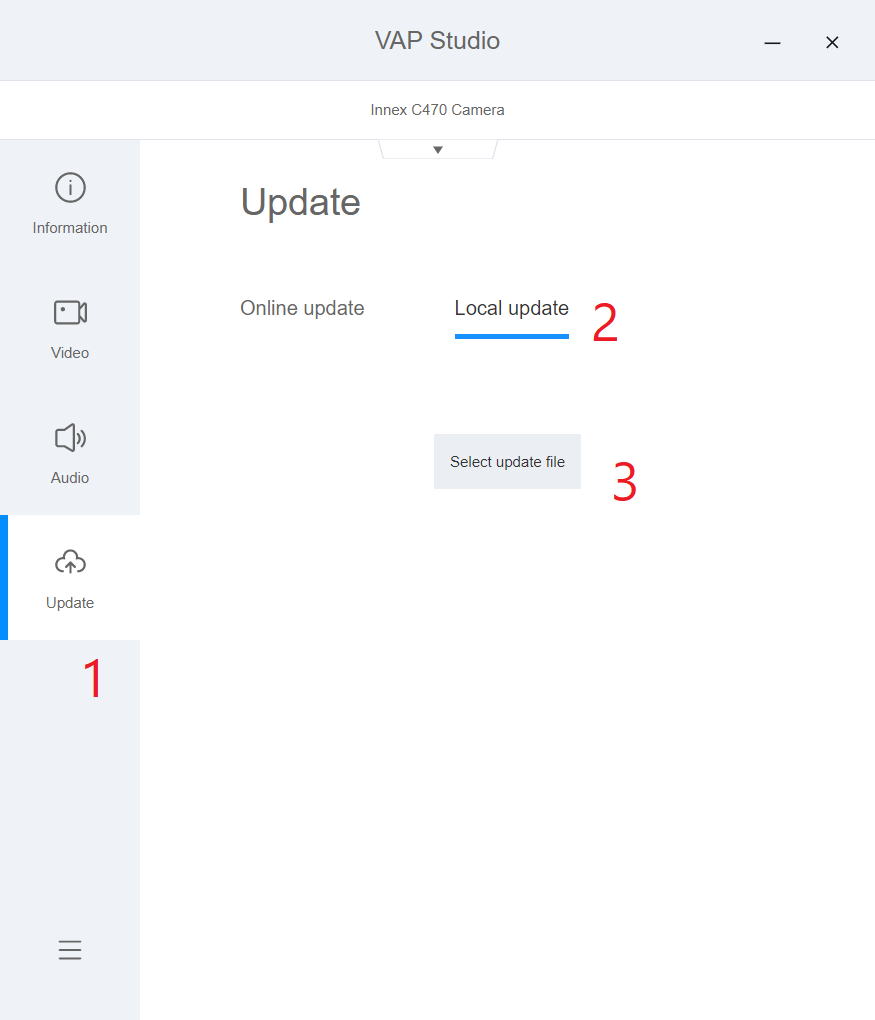
- 到下载页面C470区下载Innex Camera (VAP Studio)软体和最新版的韧体(.bin档案格式)https://funtechinnovation.com/zh-hans/downloads/
- 将C470连接到电脑
- 开启VAP Studio软体
- 在“Information”检查目前韧体版本
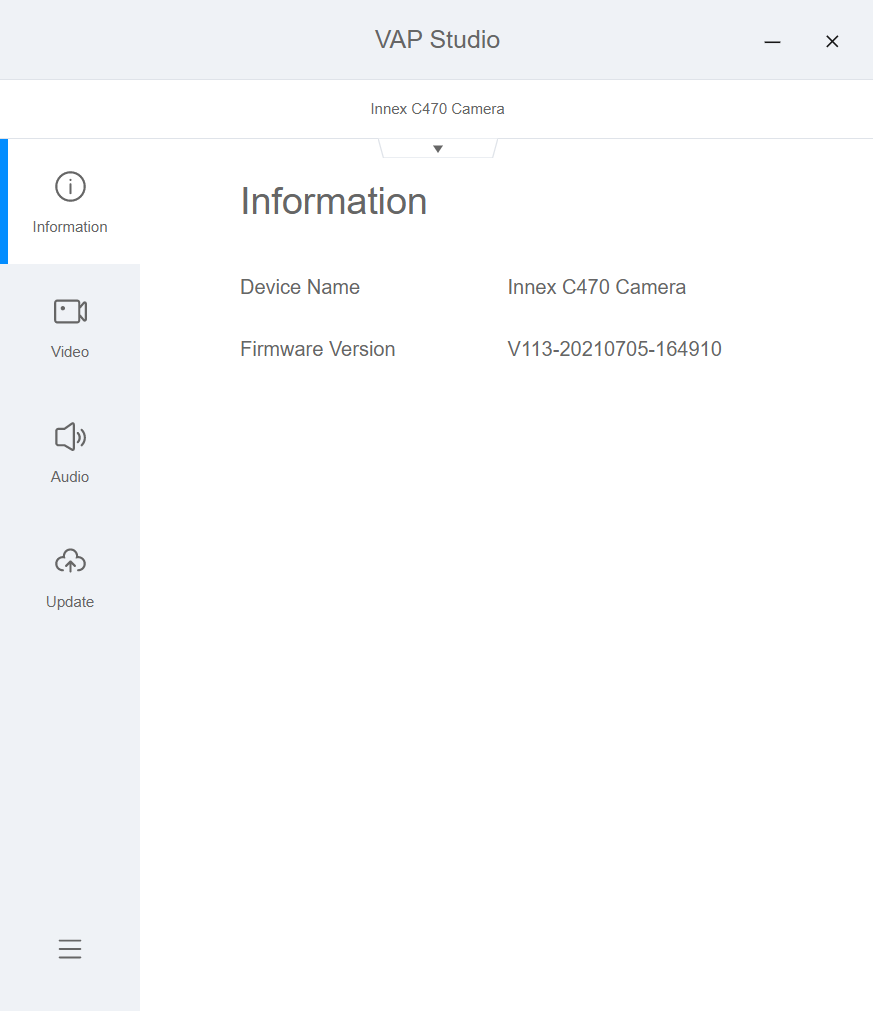
- 如果需要更新固件,跟着图示点选(1)update更新, (2)local update本机更新,(3)select update file选择档案, 并选择刚刚下载好的固件档案(.bin档案格式),更新期间请勿任意插拔摄影机或离开软件画面。
自动取景的倍率取决于解析度。若解析度在720P或以下,放大倍率为3倍。若在1080P或4K,放大倍率为2倍。多数视讯会议软件的连线视讯解析度最大支援到720P,所以大多数情况,放大倍率会在3倍。
可以辨识。
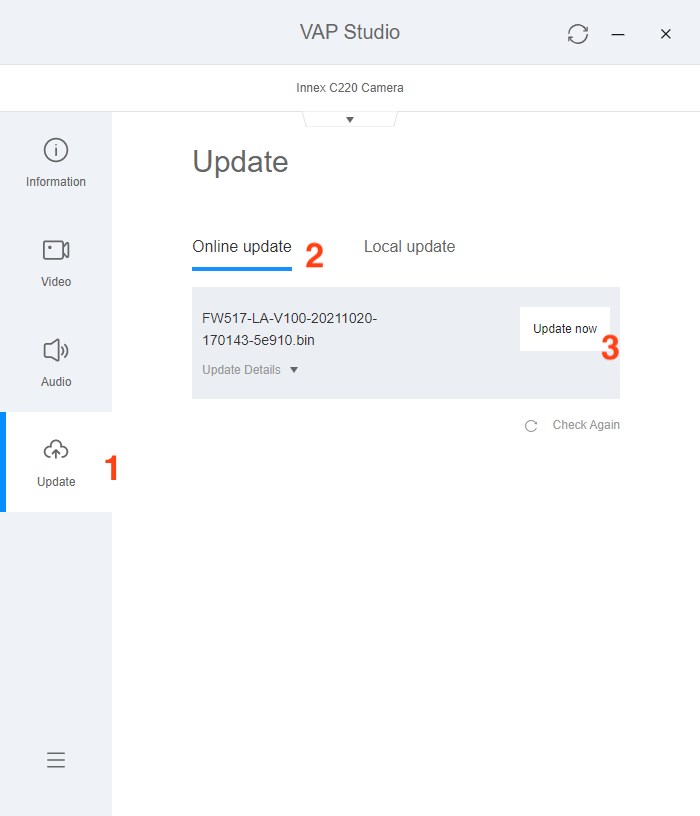
- Go to C220 download section on https://funtechinnovation.com/downloads/ to download the Innex Camera (VAP Studio).
- Connect your C220 to your computer.
- Start VAP Studio by clicking VAP Studio Icon.
- Click the update tab (1), and click online update (2), then click update now (3).
Please note that the status indicated as “Driver is unavailable” does not mean there is any issue with C220’s audio.
If your C220 has firmware prior to the 2021 Sept. 27th release, it might be shown as “Driver is unavailable” in Audio under Bluetooth & other devices setting. 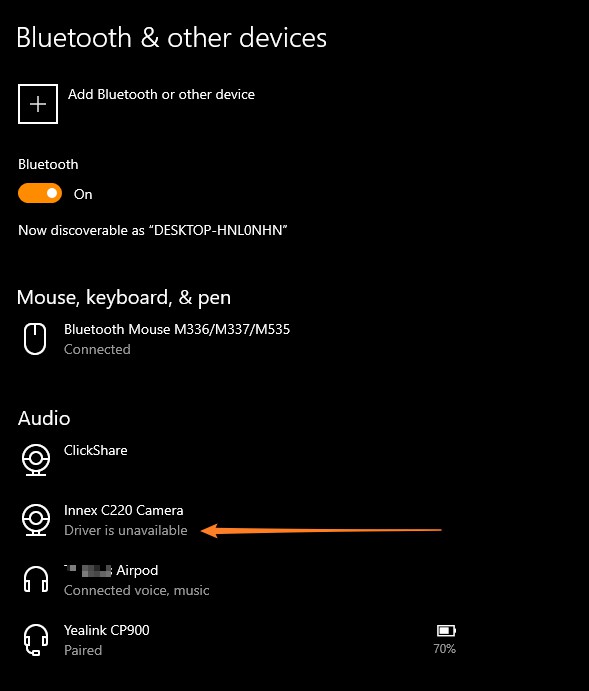 Simply update C220 with firmware released on or later than 2021 Sept. 27th to get rid of this status.
人脸检测与追踪功能适用于戴口罩的面部。
您需要安装 Innex Studio 才能充分发挥 C830 和 C831 的 AI 功能。
您可以访问 funtechinnovation.com/downloads/ 下载。
Innex Studio 是专为 C830 和 C831 设计的软件,具备强大的 AI 功能,例如实时面部追踪的分割画面(最多支持 8 人)、自动取景和白板模式。该软件还支持执行 C830 和 C831 的固件更新。
Innex Studio 支持 Windows 和 Mac,您可以从 funtechinnovation.com/downloads/ 下载。
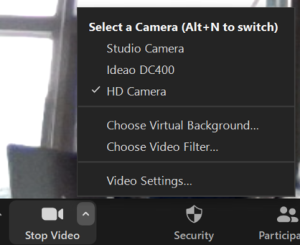
在视频通话期间,请确保 Innex Studio 是开启状态。在摄像头设置中,请选择 「Studio Camera」 作为您的摄像头,而不是选择 Innex C830 Camera 或 Innex C831 Camera。
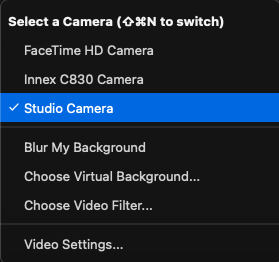
在 Innex Studio 中选择您需要的视频模式,您在软件中看到的画面预览将同步分享到视频会议软件中。
如需更多信息,请观看 YouTube 教程视频 。
如果您的 Innex Studio 版本是 1.3515.1 或更早版本,并且使用的是 Mac OS 14.1 或更新版本,可能会导致 Studio Camera 没有显示在摄像头列表中。请更新 Innex Studio 软件以解决此问题。
确保您的 Mac 已连接网络并启动 Innex Studio。当屏幕出现 New Version For Innex Studio 消息时,点击 Update now,并按照指示完成软件更新。

您也可以从下方链接下载最新版本的 Innex Studio 并手动进行更新。
https://drive.google.com/drive/folders/1r7kUWcbT6G7Bhi94UZ1eXsRvgOL5udcN?usp=sharing
更新完成后,可能会弹出对话框显示 System Extension Blocked。

点击 Open System Settings,并允许来自 Innex Studio 的系统软件加载。

完成设置后,返回 Innex Studio。如果出现 System restart required… 消息,点击 OK 并重新启动 Innex Studio。

如果您在讯息显示时未按「OK」,您可以稍后手动更改设定。请前往 macOS 的「设定」,选择「一般」>「登录项与扩展」,向下滚动,点击「扩展」下「Camera Extensions」旁的「!」符号,然后开启「Innex Studio」。
完成以上步骤后,Studio Camera 应该会出现在摄像头列表中。如果仍未显示,请重启您的 Mac 后再次确认。
您可以通过以下步骤设置,使软件在 Windows 开机时自动运行。
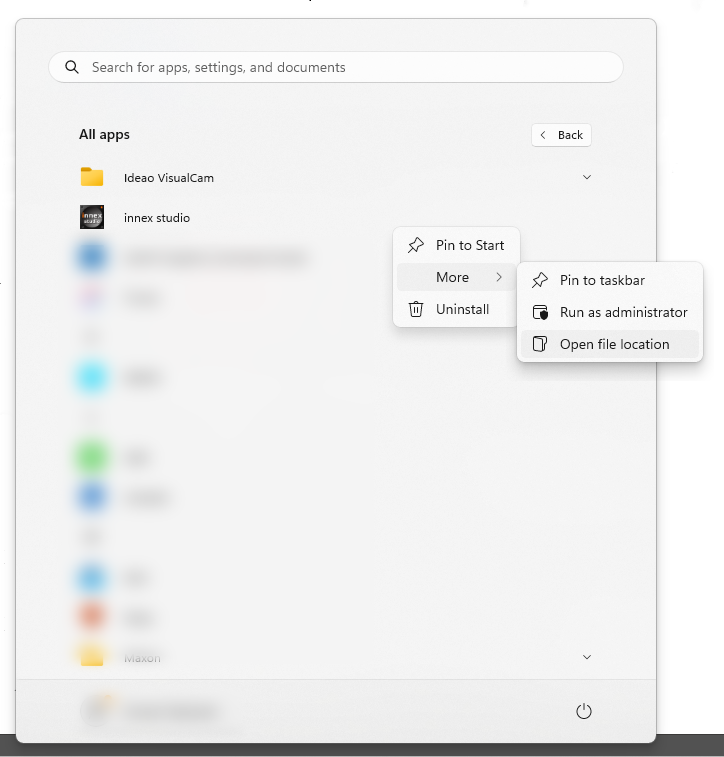
- 点击 「开始」按钮,并找到该应用程序。
- 右键点击应用程序,选择 「更多」,然后点击 「打开文件位置」,此操作将打开应用程序快捷方式所在的文件夹。
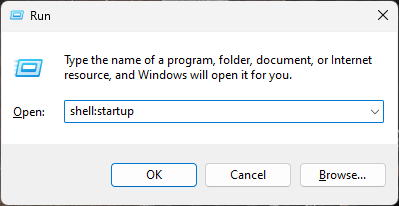
- 在文件位置窗口中,按下 Windows 键 + R,输入 shell:startup,然后点击 「确定」,此操作将打开 「启动文件夹」。
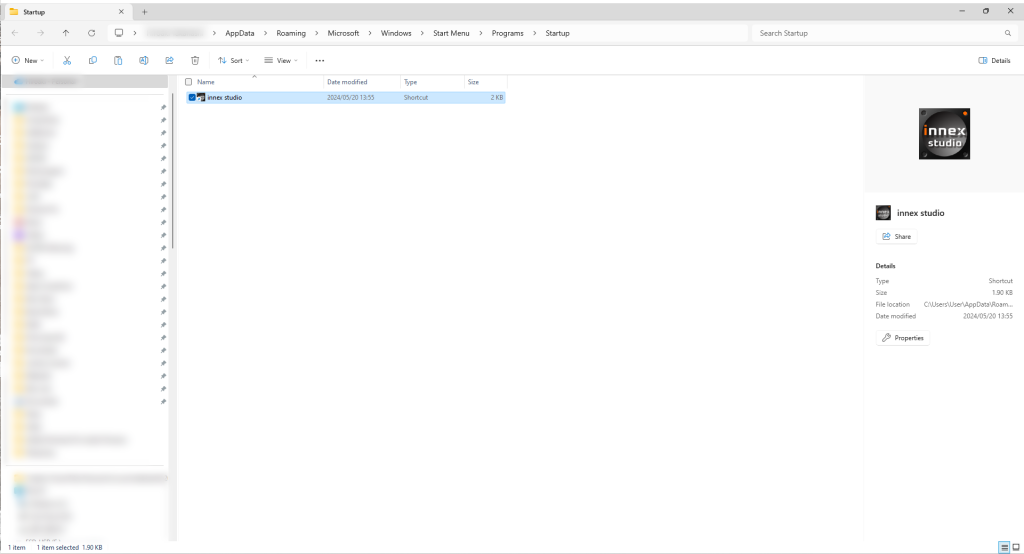
- 将应用程序快捷方式从文件位置复制并粘贴到 「启动文件夹」。
- 前往 Windows 设置 > 应用 > 启动
- 找到对应的应用程序,并打开开关。
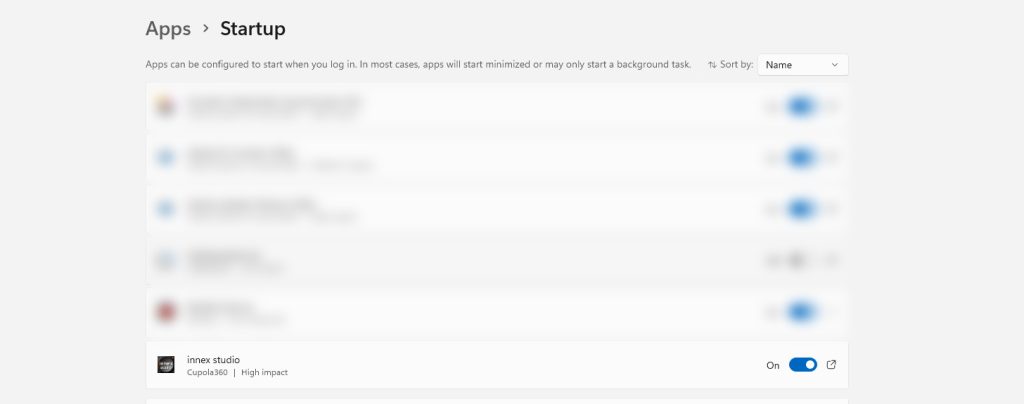
- 完成后,重启电脑,确认应用程序是否已自动启动。
Innex Camera is a camera setting software that handles camera firmware update, image setting, EPTZ and auto-framing setting. It works with Innex C220 and C470. Innex Camera is available for both Windows and Mac – it can be downloaded at https://funtechinnovation.com/software/innex-camera-vap-studio/
- Please update your VAP Studio to the latest version to fix this issue.
-
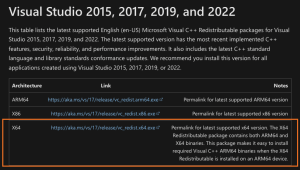
If you are using Windows computer, please download Microsoft Visual C++ Redistributable (Visual Studio 2015, 2017, 2019, and 2022 x64) from the link here: https://learn.microsoft.com/en-us/cpp/windows/latest-supported-vc-redist?view=msvc-170
and run the VAP Studio software again. Our software is created using Microsoft Visual Studio, so it must be installed in your computer in order to run VAP Studio properly.
- If you still experience the same problem after updating to a version released on or later than 2021 Sep. 27th, please contact technical support by leaving us a message https://funtechinnovation.com/faq/
To adjust image quality for C470 and C220 to better match your environment and preference, you can download and use the Innex Camera (VAP Studio) https://funtechinnovation.com/downloads/
- Connect your camera to your computer.
- Start VAP Studio by clicking on the VAP Studio icon.
- Click the video tab (1), (2) Click on Image and adjust each value by adjusting the slider. (3) If a reset is required, simply click on reset to reset the value to default(4).
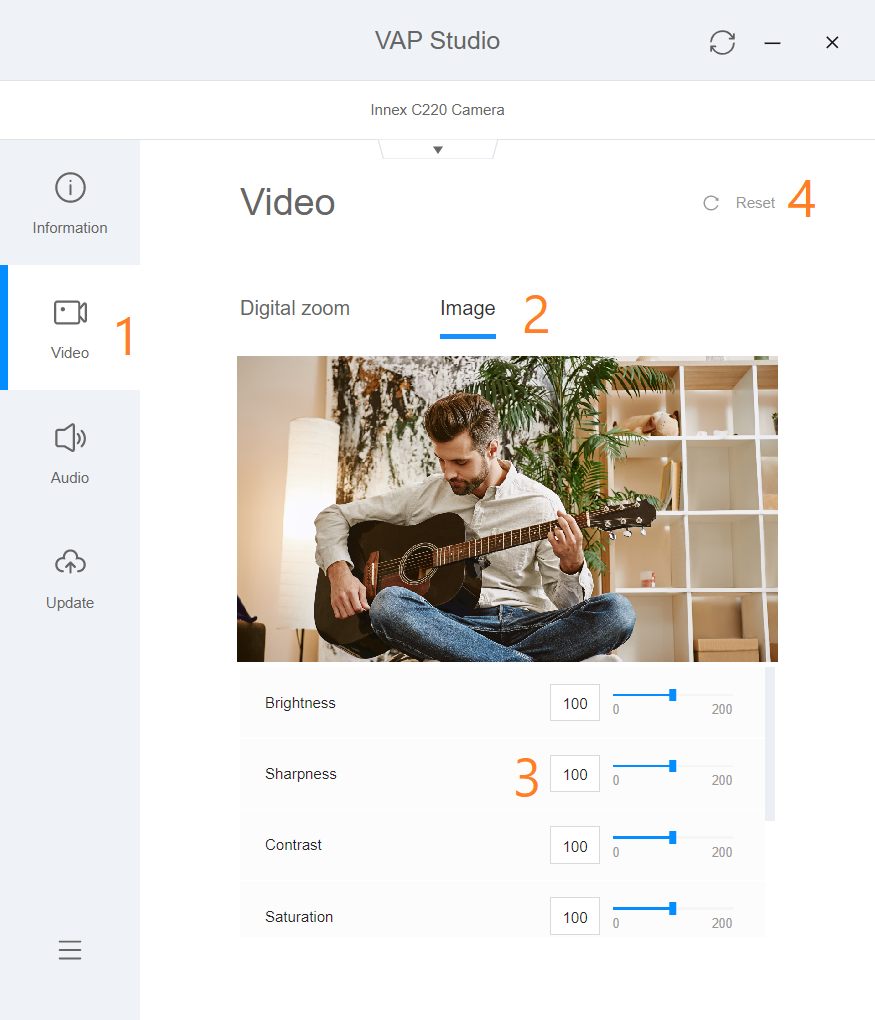
- The image setting adjustment will be saved into the camera and the camera will retain the adjustment even after it’s disconnected from the pc.
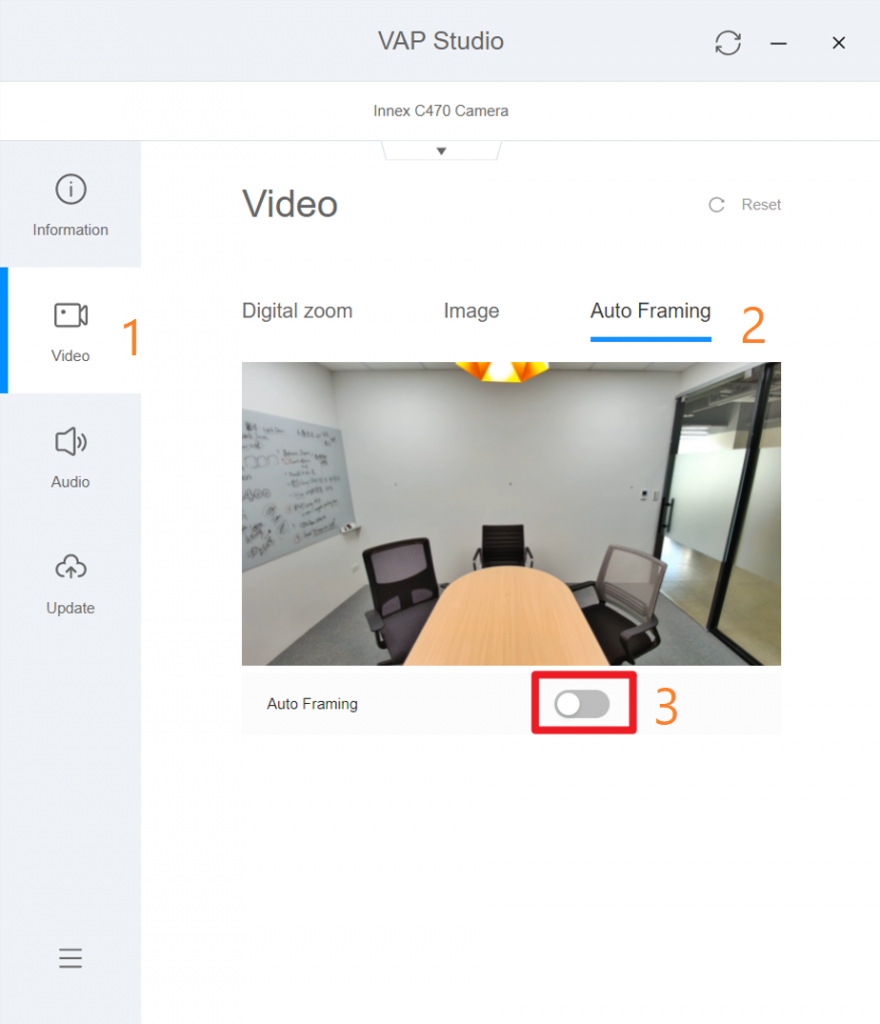
To adjust camera FOV (field of view) and ROI (region of interest) for to better match your environment and preference, you can download and use the Innex Camera (VAP Studio) at https://funtechinnovation.com/downloads/
(Please note that this feature is currently available only with C470)
- Connect your camera to your computer.
- Start VAP Studio by clicking on the VAP Studio icon.
- Disable auto-framing: (1) Click the video tab, (2) Click on Auto Framing tab, (3) Click on auto-framing button so it is slid to the left.
- Adjust with EPTZ: (1) Click on Video, (2) Click on Digital Zoom, (3) Zoom in/out using the plus and minus icon, (4) Pan and tilt using the direction control, (5) Reset to default position (if necessary), (6) Take a photo to validate current FOV and ROI (if necessary), (7) Open folder location to access the photo (if necessary).
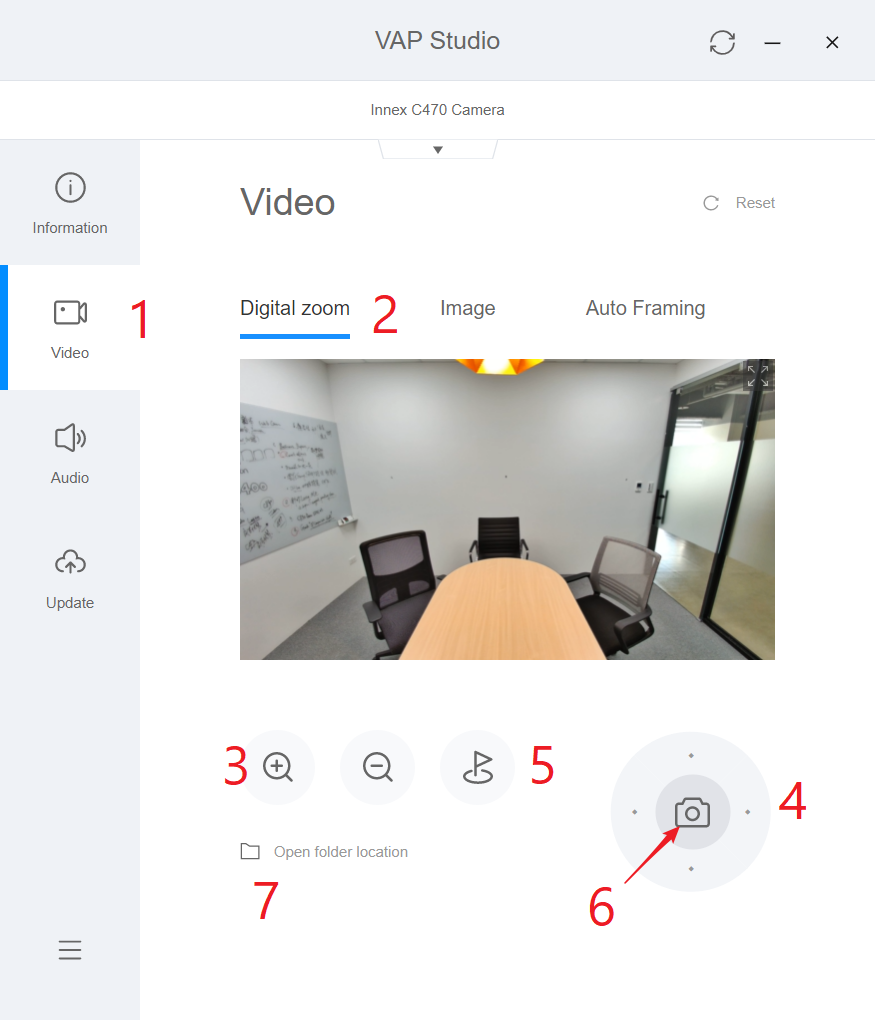
- The camera remembers your preferences after reboot so you only need to set it once.
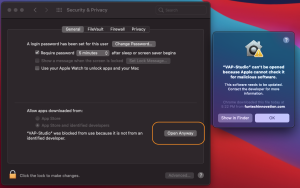
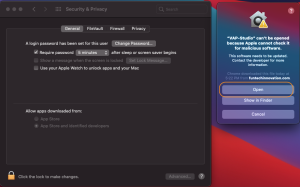
Mac might block the software that is not from the APP Store. Please follow below steps to launch the software
1. Go to System & Preference – Security & Privacy
2. (1) Click General (2) Click the lock to make changes (3) Select App Store and identified developers. And leave this window first.
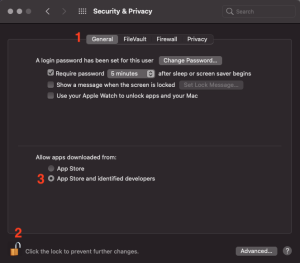
3. Launch the VAP Studio. You’ll see the same pop-up message. Then click (1)”Open Anyway”, (2) Open.
请根据以下步骤使Windows启动时能够自动运行软体。
- 点选启动按钮并下滑直至寻找到软体。
- 点击右键选择”更多”接着选择”开启档案位置”。此动作会开启此软体存储的档案夹。
- 在文件夹开启的情况下,按下Windows键+R,输入”Shell:startup”并选择确认。这动作将会开启”启动”档案夹。
- 从软体档案夹将此软体的捷径复制,并于”启动”档案夹内贴上。
- 前往设定>应用程式>启动
- 将开关点选至”开启”
- 重新启动电脑并确定软体于开机时自动运行。
请依序检查以下事项
・确认装置/操作系统支援摄影机。支援的操作系统如下:
<DC500>
Windows 11、10
macOS 10.10 或以上
Chrome OS
iPadOS 17 或更新版本(配备 USB Type-C 埠的 iPad)
<Ideao VisualCam>
Windows 11/10
macOS 10.15 或以上
<IdeaoCam(Chrome 扩充功能)>
Windows、macOS、Chrome OS
・请确保使用原厂附带的线材或同等规格的传输线。使用过长或未经认证的传输线可能导致 DC500无法被装置识别。
・确保摄影机未透过USB集线器与其他装置连接至您的装置,因为这可能导致供电不足,造成DC500无法被识别。请尝试拔除其他装置,或将DC500直接连接至装置以查看是否被识别。
・将DC500连接至不同的USB埠,检查是否被识别。
・损坏的传输线有时也可能会造成此问题。如有同等规格的传输线,请尝试使用这些传输线连接,检查装置是否能识别 DC500。
・如果尝试了多条传输线后装置仍无法识别 DC500,请将 DC500 连接到另一台装置(若有的话),以查看是否能被识别。
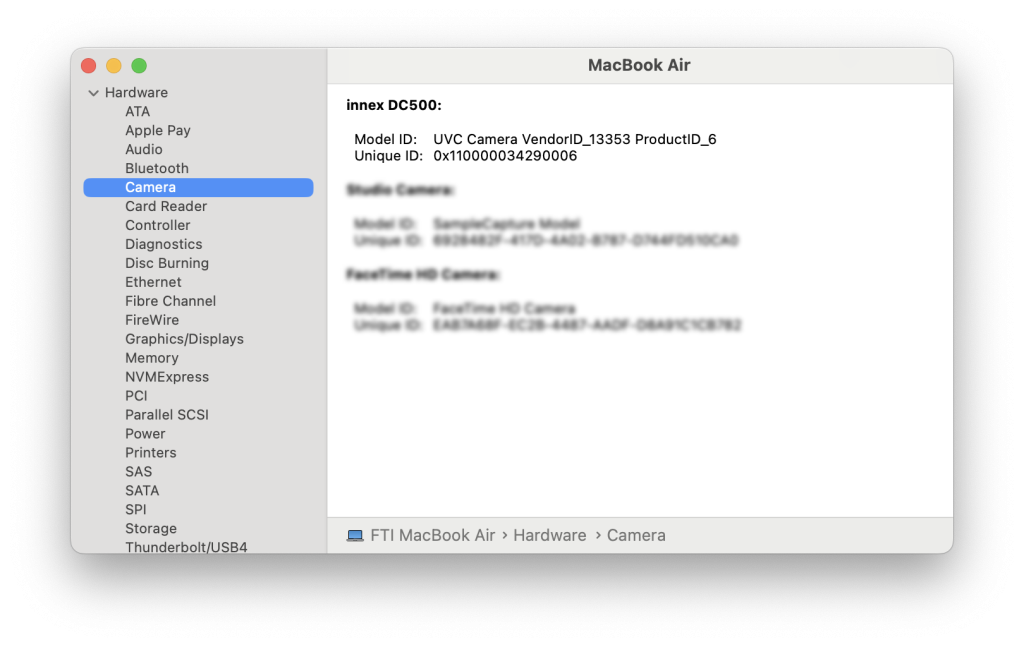
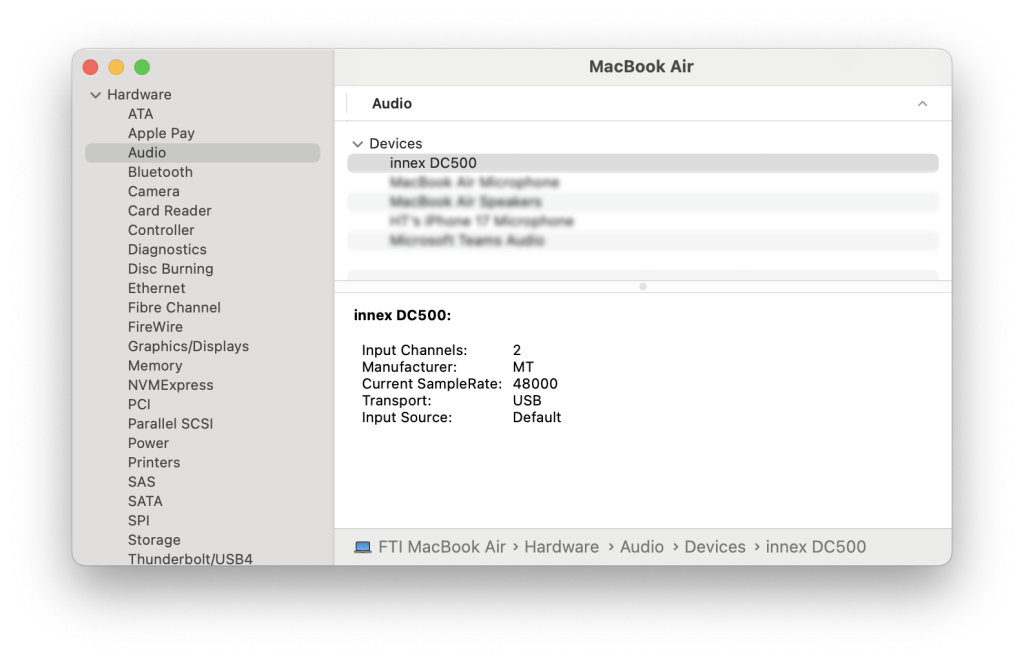
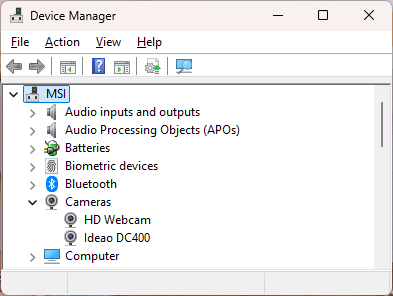
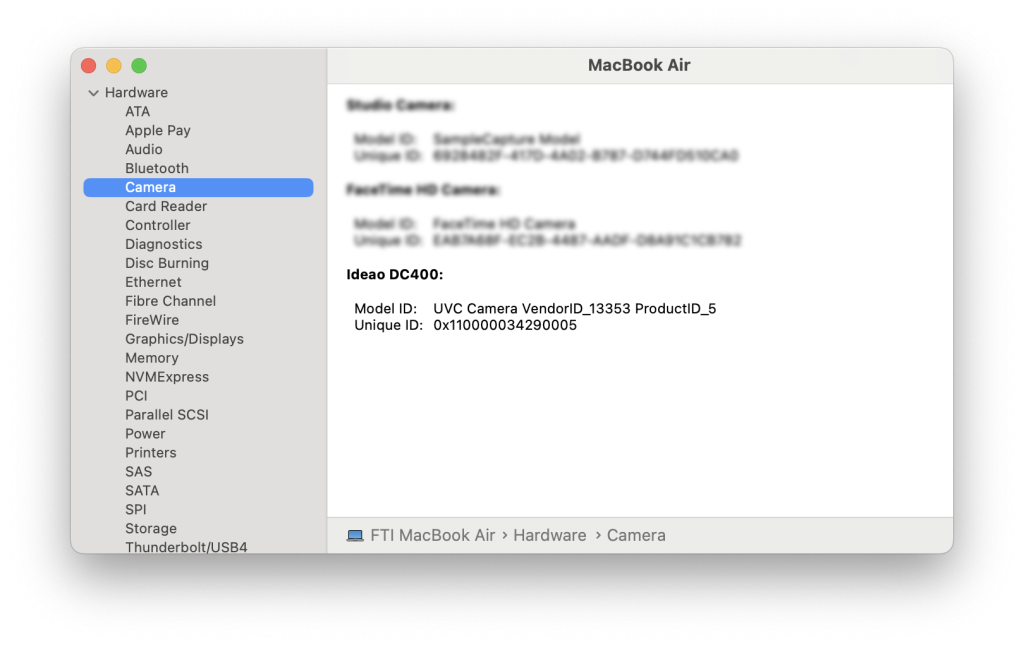
・在 Windows 上开启「装置管理员」,或在 Mac 上开启「系统报告」,检查装置是否识别 DC500 为相机。对于使用 Chrome OS 的装置,开启设定,选择「装置」或「蓝牙」,检查 DC500 是否出现在清单中。若已尝试上述方法但装置仍无法识别 DC500, 请与我们联系 。

 如果装置可辨识摄影机,但无法取得影像,请参阅 「我的装置可辨识摄影机,但在某些软体中无法从DC500取得影像」。
请依照以下顺序检查。
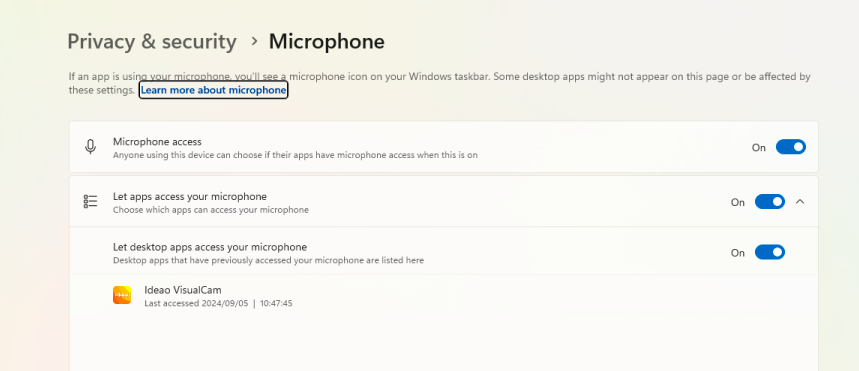
・确认在「隐私与安全」设定中,装置允许应用程式存取摄影机和麦克风。
 ・确认防毒软体未封锁 Ideao VisualCam。您可以前往防毒软体的应用程式管理设定中允许 Ideao VisualCam 在您的电脑上执行。以下为相关范例:
Avast: https://support.avast.com/en-ph/article/Use-Antivirus-blocked-allowed-apps
Kaspersky: https://support.kaspersky.com/KART/3.0/en-US/130083.htm
・确保除了您要用来撷取影像的应用程式外,没有其他应用程式正在使用摄影机。请关闭所有其他可能使用摄影机的软体进行故障排除。举例来说,如果Zoom正在使用Ideao VisualCam,那么无法开启摄影机是常见的问题。
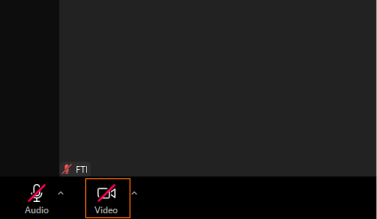
・如果您使用视讯会议软体却无法获得影像,请确认摄影机未被关闭。一般来说,视讯图示位于左下角,如果摄影机被关闭,图示将会有红线划掉图案。按一下该图示可开启摄影机。
如果您的装置连接了多台摄影机,而应用程式中显示的是另一台摄影机的影像,请依以下步骤操作:
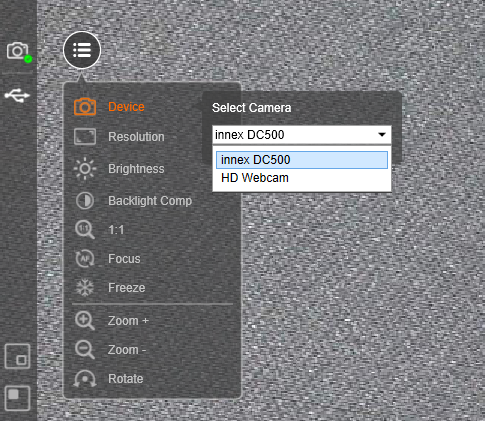
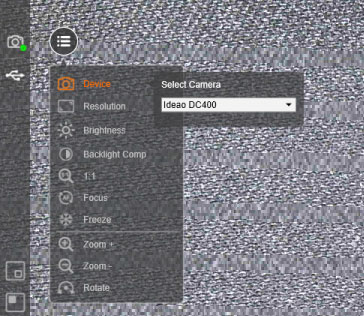
使用Ideao VisualCam:
・点击萤幕左上角的功能表图示(圆圈内有三条水平线)。
・点击选单中的「装置」。
・选择 Innex DC500。
 使用视讯会议软体:
・点击视讯图示旁的「^」图示(通常位于左下角),显示摄影机清单。
・选择 Innex DC500。
请按以下顺序检查
・前往「隐私权与安全性」设定,然后点选「麦克风」并确认应用程式已允许存取麦克风。
 ・若您正在使用视讯会议软体,多数情况下,视讯和音讯来源是分开的。因此,即使影像已切换为 Innex DC500,并不代表也选择了DC500为麦克风。请点击「音讯」图示旁的「^」图示,然后选择 Innex DC500作为麦克风。
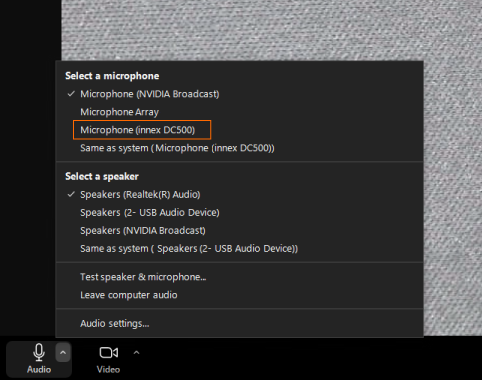 请检查 Windows/Mac的音讯输入设定,或视讯会议软体中的麦克风设定,确认麦克风音量未设为零或过低。
・在 Windows 中开启「装置管理员」或在 Mac 上开启「系统报告」来确认装置是否识别 DC500 为 USB 音讯装置。对于使用 Chrome OS 的装置,开启设定,选择「装置」或「蓝牙」,并检查 DC500 是否出现在清单中。若以上方法皆无效,且您的装置仍无法识别 DC500, 请与我们联系。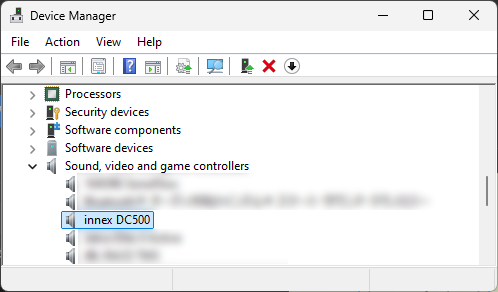
搭配 iPad 使用时需注意以下几点。
1. 不是所有iPad都支援外接相机,仅配备USB Type-C口的iPad相容。
2. iPadOS 版本需为17或更新版本。
3. 目前并非所有应用程式都支援外接相机。
4. 在iPad上使用摄影机的体验可能与电脑或Mac会有所不同。
5. 解析度及帧率可能会根据 iPad 和应用程式而有所不同。
6. 有些应用程式可能没有切换相机的功能。当连接相机后,影像来源可能会自动切换至外接相机。如需切换回内建相机,可能需手动拔除外接相机。
7. 对于不支援外接相机输入的视讯会议应用程式,您可能需要使用第三方应用程式来显示相机影像,然后在视讯会议软体中分享您的画面。
影像的亮度会受到背景颜色的影响。例如,当背景为深色,而拍摄物体较亮时,摄影机会根据主要背景颜色来调整白平衡,导致影像可能看起会更亮。在 Ideao VisualCam 中,您可以点击「背光补偿」图示,使用滑杆调整白平衡。对于没有调整白平衡功能的软体,请确保背景和物体之间的对比度不要过大。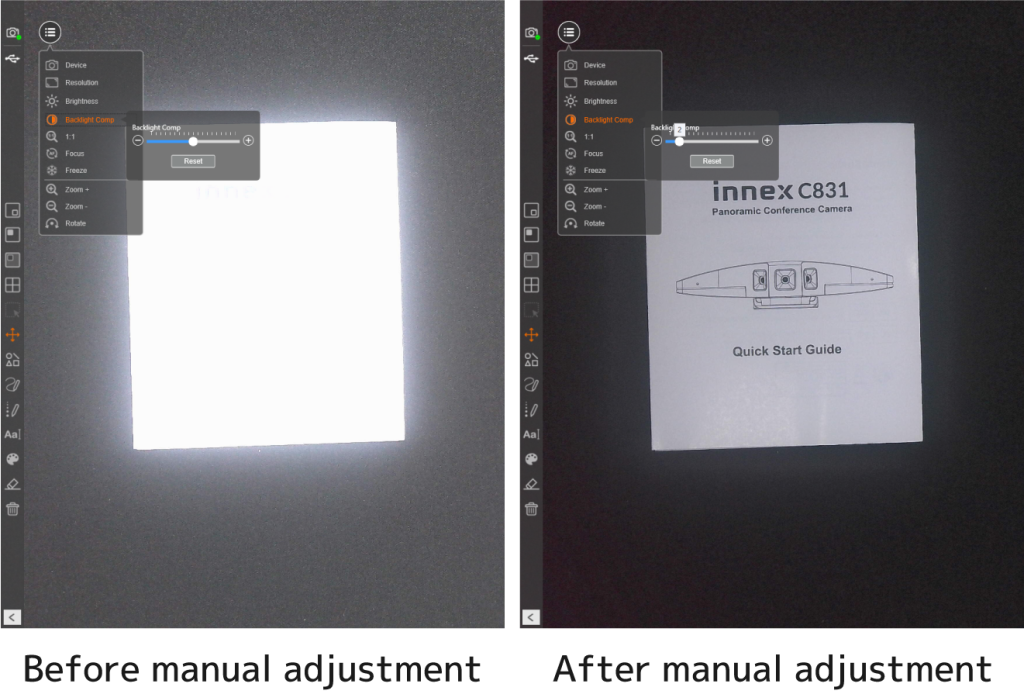
请按以下顺序检查:
・专属软体 Ideao VisualCam 支援4K解析度。然而,在某些软体中,特别是视讯会议软体中,最大解析度可能未支援 4K。请检查您使用的软体支援的最大解析度。
・某些软体的预设解析度可能不会是4K。请确认软体的解析度设定没有过低。
 ・数位变焦是透过剪裁原始影像的一部分并进行数位放大,因此容易使影像变得粗糙。我们建议您尽量将摄影机移近物体,这样可以保持影像清晰且不牺牲解析度。 (请确保镜头与物体之间的距离至少为10公分,使物体保持对焦)
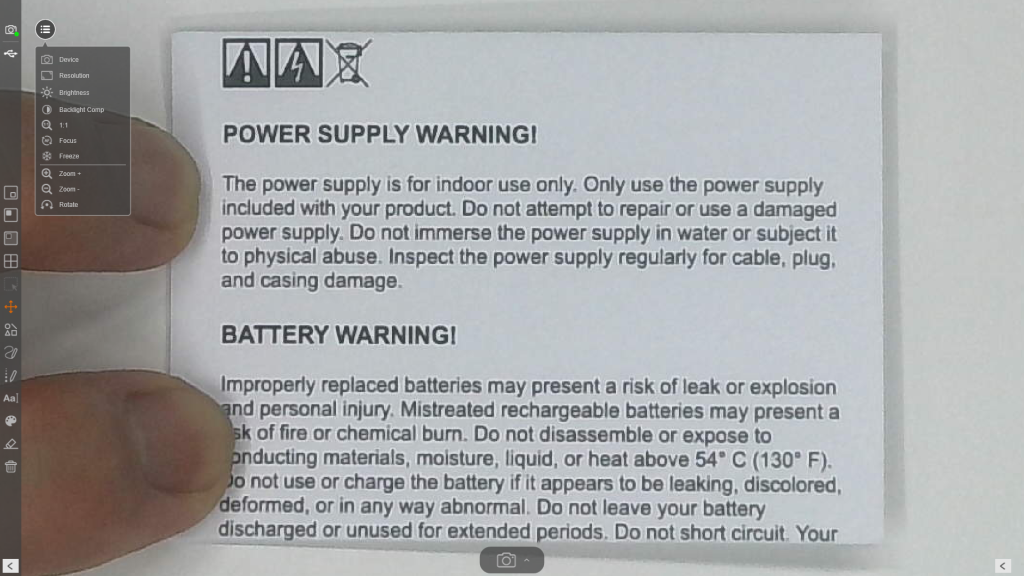
请依序检查下列事项:
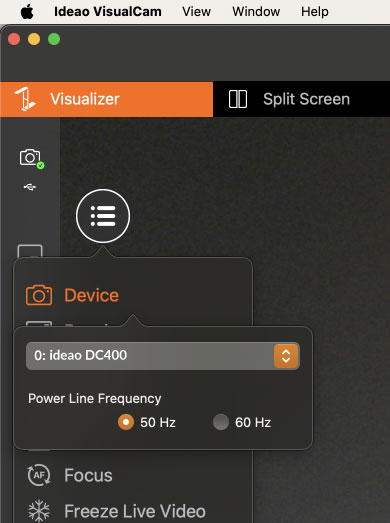
・请确保摄影机未放置于产生强磁场的设备附近。
・确认电源频率符合您所在区域的标准。请开启 Ideao VisualCam,于「装置选择」中检查或更改目前的电源频率。

- 完全展开 DC400/500 的支架。
- 确保相机镜头正对纸张的中心,并保持水平放置。
- 按下画面左侧的功能表按钮(三条横线的图示)。
- 在功能表中选择「解析度」,并将其设定为 3840 x 2880。
- 如果拍摄画面未完整覆盖 A3 纸张,请适当调整相机的角度与位置,直至 A3 纸张的完整内容出现在画面中。
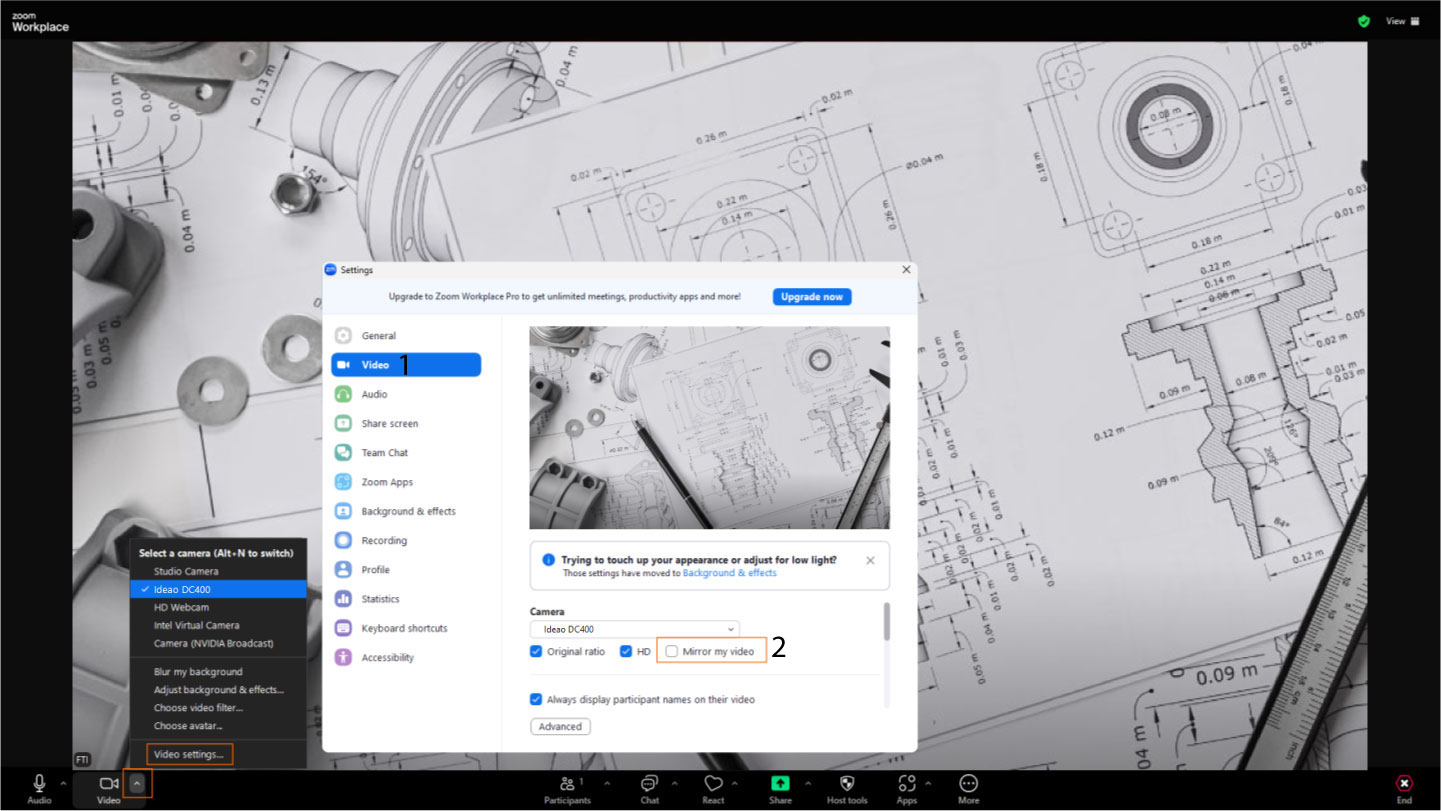
大部分视讯会议软体(例如 Google Meet、Zoom、Microsoft Teams 和 Webex)会预设将您的相机影像镜射显示。不过,这不会影响对方观看的画面,对方看到的影像仍会是正常的非镜像版本。
如果您仍希望在自己端看到非镜像的画面,请依照以下步骤操作。
适用于所有视讯会议软体的通用解决方案
1. 启动 Ideao VisualCam,显示来自Innex DC500 的影像。
2. 在视讯通话中,请确保不要选择 DC500。
3. 选择「分享萤幕」或「开始」(依软体而异),并分享 Ideao VisualCam 的萤幕。
Google Meet: (参见教学)
1.有几款 Google Chrome 扩充功能可以镜射您的影像。我们建议您下载「VideoMirror」。
2. 开始 Google Meet 通话并选择 Innex DC500 作为摄影机,点击扩充功能图示。视讯画面将被镜射。
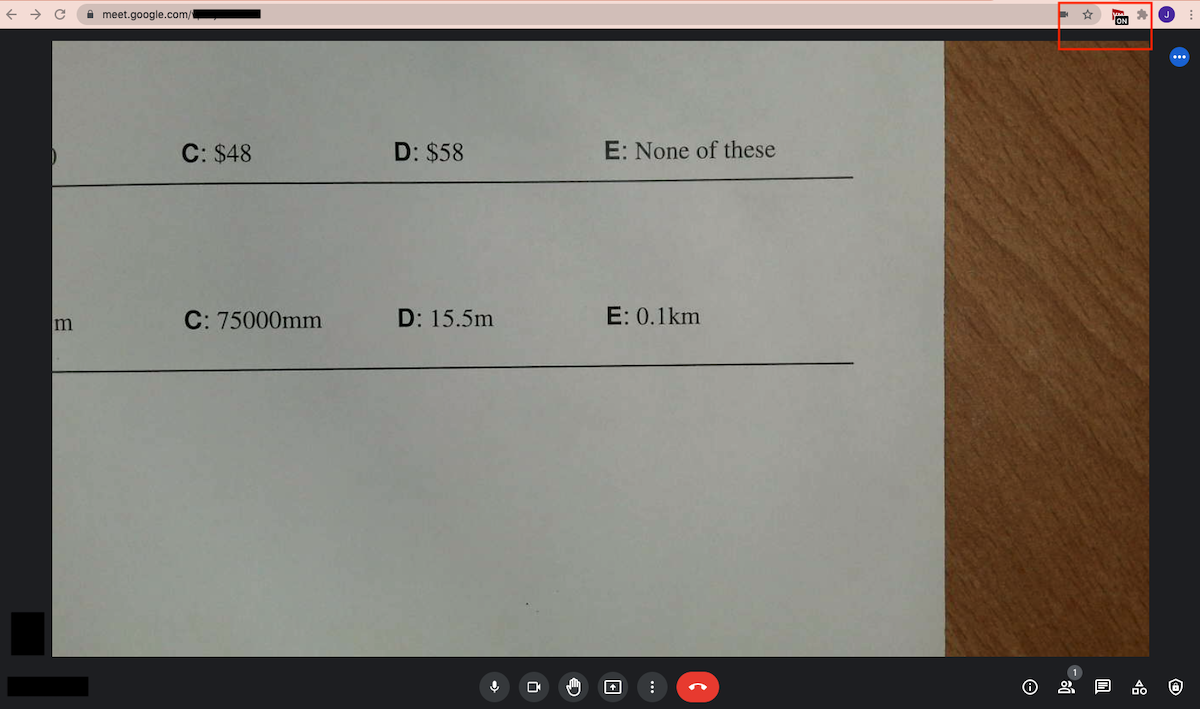
*请注意,VideoMirror 是第三方应用程式,FTI 不提供该应用程式的支援服务。
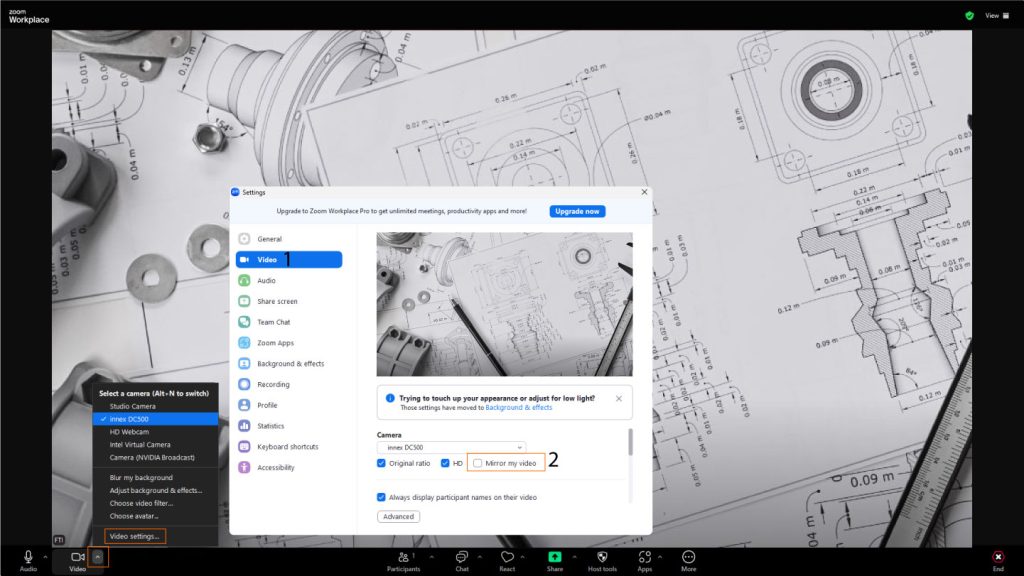
Zoom: (参见教学) 或其他视讯会议软体
1. 前往 Zoom 的「视讯设定」
2. 取消勾选「镜射我的视讯」
在视讯会议软体中,可以通过以下几种方式同时显示多个摄影机的影像。
网路摄影机 + 萤幕画面分享:
1. 在视讯会议软体中选择网路摄影机以显示您的样貌。
2. 启动 Ideao VisualCam 并显示 DC500 的影像。
3. 在视讯会议软体中点击「分享」
4. 选择「Ideao VisualCam」后点击「分享」以开始分享画面。
Ideao VisualCam 分割画面模式
1. 不要在视讯会议软体中开启相机。
2. 启动 Ideao VisualCam 并显示 DC500 的影像。
3. 点击萤幕左上角的「分屏」图示。
4. 点击萤幕右侧的任意部分以显示「选单」图示。
5. 点击选单图示后,再点击「切换相机」。
6. 点击「装置」,选择要显示影像的摄影机。
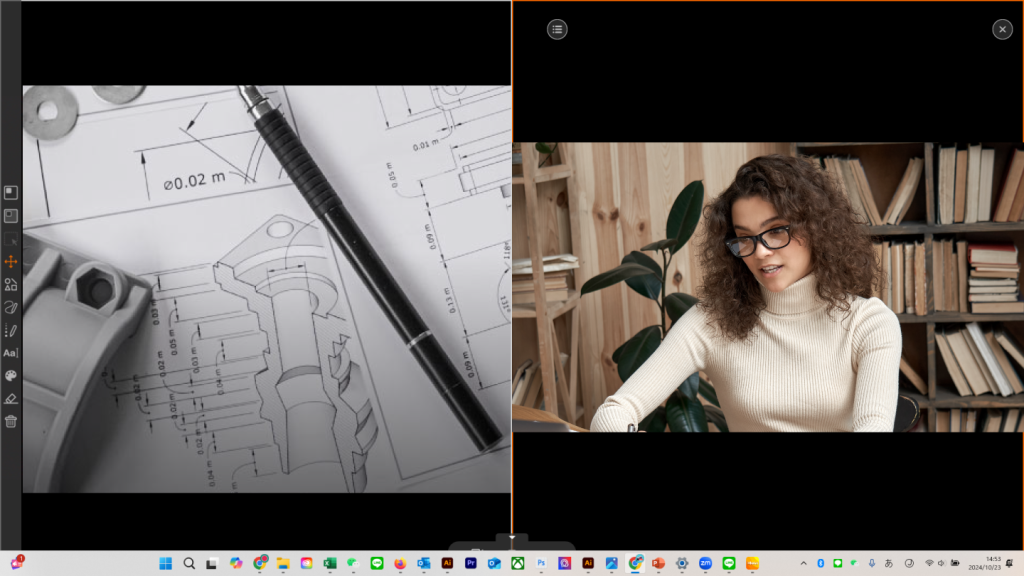
Ideao VisualCam 画中画 (PIP) 模式
1. 不要在视讯会议软体中开启相机。
2. 启动 Ideao VisualCam 并显示 DC500 的影像。
3. 点击左侧工具栏中的 PIP 图示显示来自摄影机的画面。
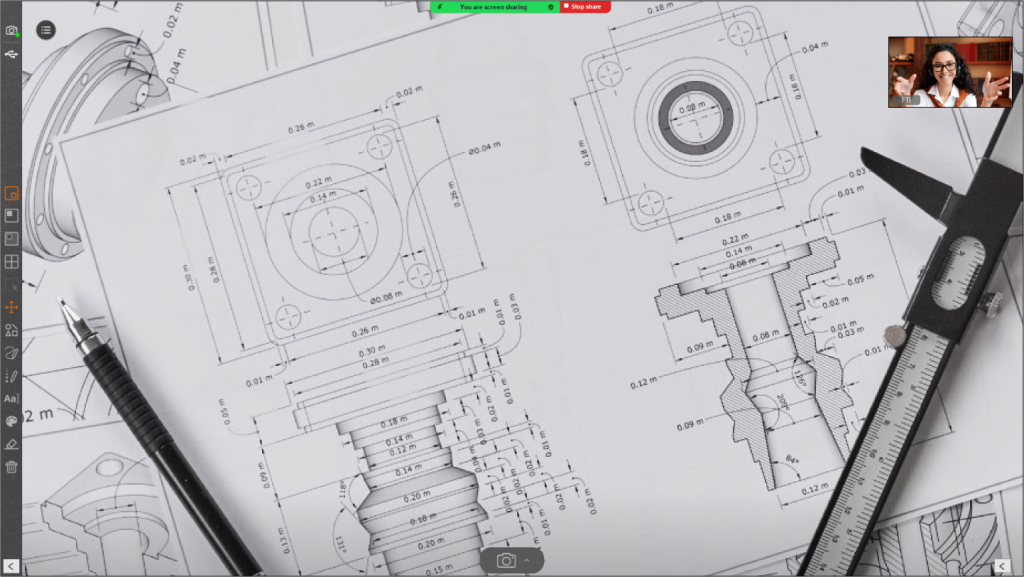
将 DC500 的即时影像嵌入到 PowerPoint 简报
1. 在制作简报内容时,从「插入」中点选「Cameo」。
2. 选取相机样式,点击「预览」,选择 DC500 作为影像来源。
3. 开始简报后,显示DC500即时影像的同时,您的样貌也会在视讯会议软体中呈现。
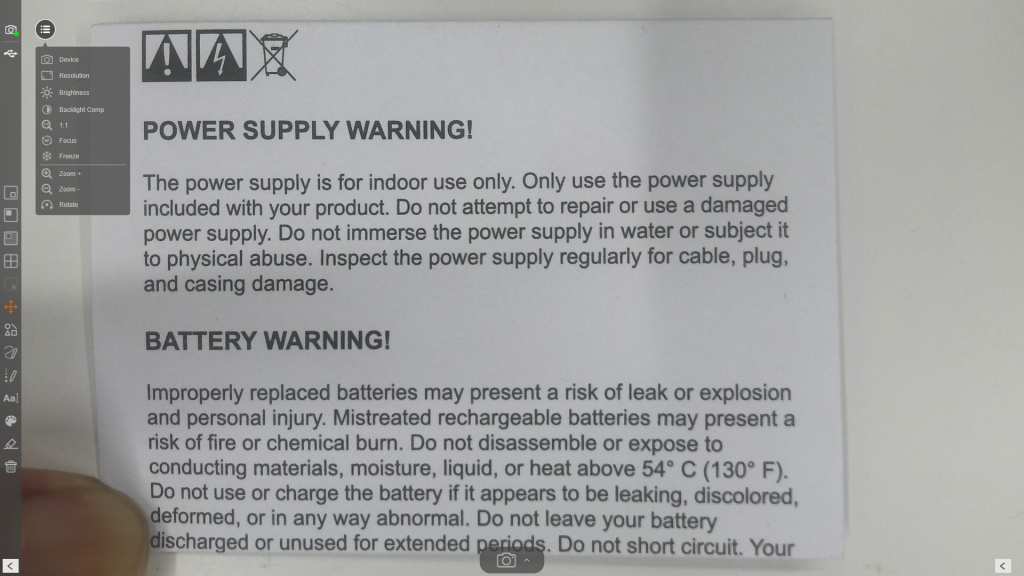
请依序检查以下几点:
- 镜头上的透明保护贴已经移除
- 镜头距离拍摄物品之间至少有10公分,确保最佳对焦效果
- 轻触镜头上方的AF按钮,自动对焦
DC400的对焦设定是刚开机时会对焦一次,接着就会固定焦距,这个设计是为了避免因为手的活动干扰对焦距离,造成影片过度跳动。
建议在每一次改变拍摄高度或物品高度时,要重新按一次AF按钮重新对焦。
要呈现4K影像会有几个因素,电脑作业系统支持、显示器4K以上,还有使用的软件限制。
多数视讯会议软件如Zoom, 微软Teams, 谷歌Google Meet and Webex目前的软件限制会将视讯画面限缩在720P以下。
- 请确USB线的双边已经牢牢连接固定在DC400与电脑上。
- 试着接另一个USB孔
- 如果还是没办法解决,请联系我们。
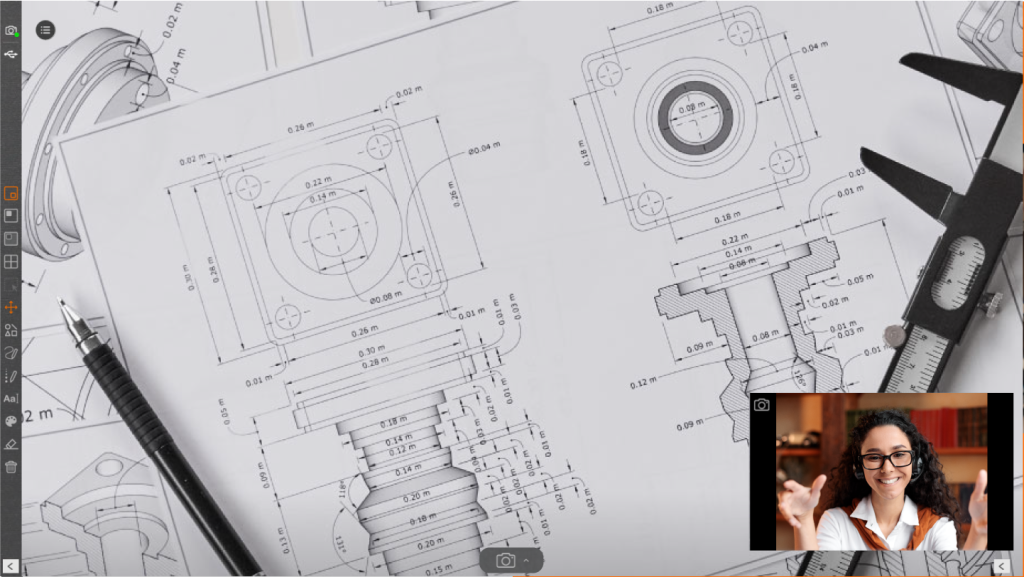
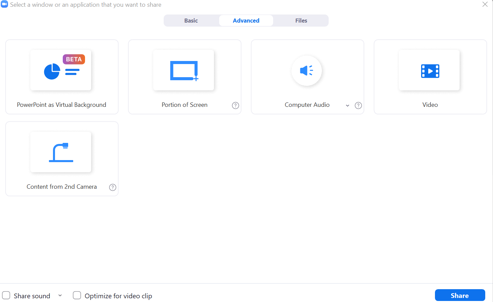
- 打开镜头,选择拍摄你脸部的摄影机
- 点选分享画面
- 选择进阶、第二摄影机的内容,再按分享
 4. 如果你的电脑有多个摄影机,点选左上角的切换摄影机以选到你要的影像。
大多数的视讯会议软件预设为镜像,像是Google Meet, Zoom, Teams、Webex等。但镜像效果并不会影响对方观看的效果,即使在自己电脑端看到是镜像,对方也能看到正常影像。
要在自己电脑上看到正常影像,有以下几种方式:
通用(适用于所有视讯软体)
- 下载软体IdeaoVisual Cam https://funtechinnovation.com/zh-hans/software/innex-studio/
- 打开软体,选择Ideao DC400
- 点分享画面/分享萤幕(名称会根据各个软体而有些许不同)并选择分享Ideao VisualCam的软体视窗.
- 可以在软件内翻转、旋转、放大、批注画面。
Google Meet : (看教学影片)
- Google Meet内没有可以镜射影片的选项,需要下载扩充功能,市面上有数个扩充可以做到,但我们推荐下载功能最简单的「VideoMirror」。
- 在Google Meet会议中选择DC400,点选VM扩充功能的图标,图标上会显示ON,并且看到影片已经能恢复正常了。
* 请注意VideoMirror并不是由FTI开发的扩充功能,我们仅作建议参考,关于扩充功能本身的支援,请联系开发者。
Zoom : (看教学影片)
- 到开启视讯旁的小图标,选择视讯设定
- 取消选择「镜射我的视讯」

Ideao DC400是一台自动对焦的实物摄影机,但如果希望把自动对焦的功能关掉,可以透过以下几种方式设定。
Windows用户:
- Camera应用程式:如果你在使用Camera这个内建的应用程式拍照录影,可以按照以下步骤进行设定
- 到设定,最上方开启”Pro mode”。
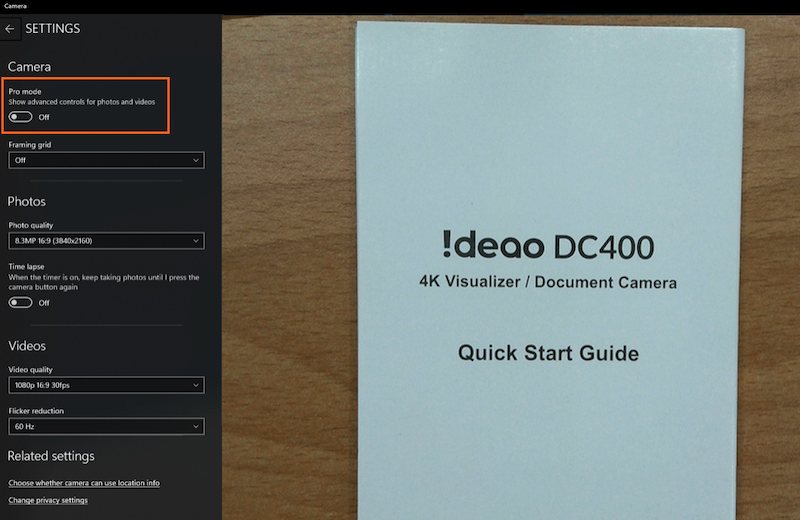
- 点选圆圈的按钮,会出现焦距设定,轻轻拉动至任一处。按钮的图示将会从「Auto」变为「M」,即为手动对焦。
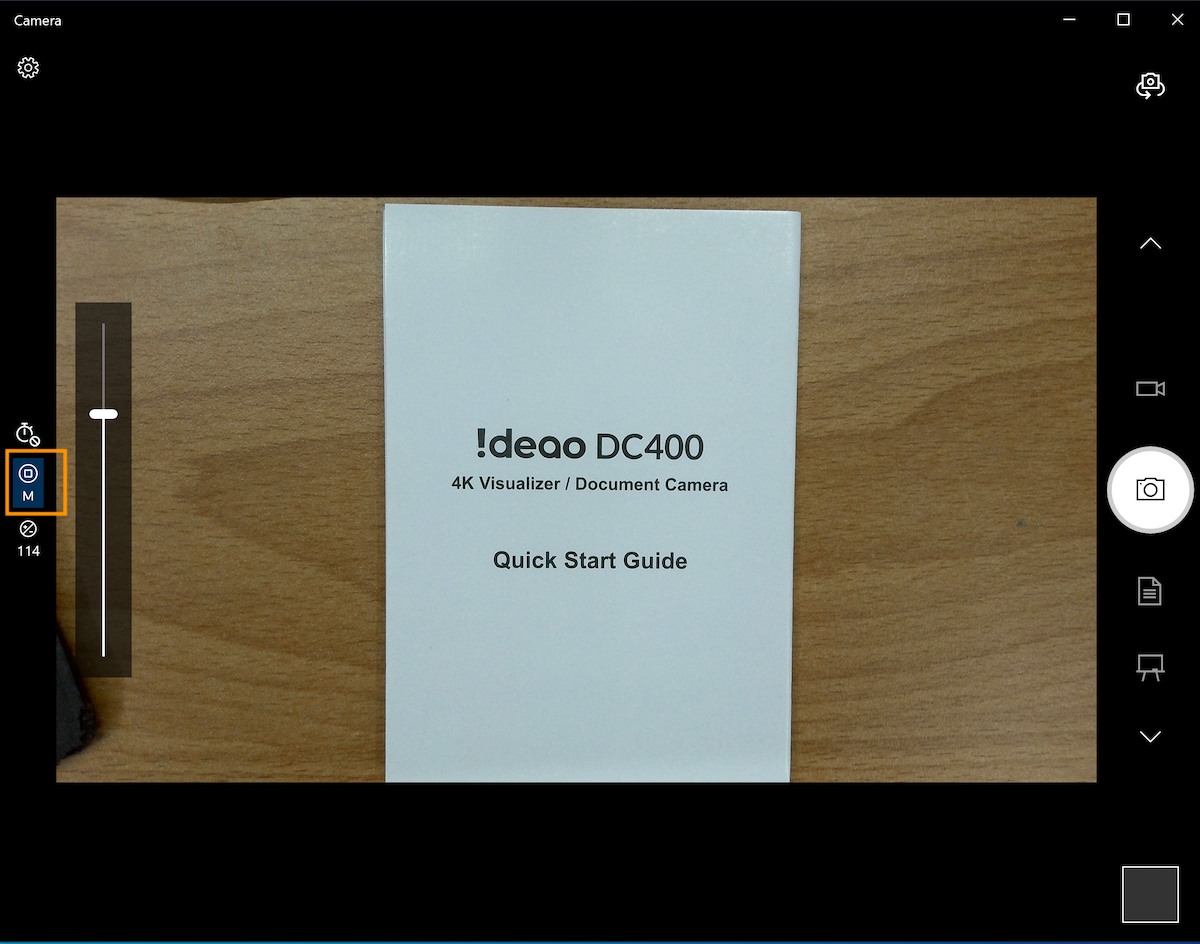
- 现在DC400已经转为手动对焦。轻触DC400上的AF按钮以针对目前拍摄物品进行对焦。
- 按完AF键后,对焦距离就会固定。
- 如果再次调整拍摄高度,DC400将不会自动对焦,你可能会看到模糊的画面。此时须重新对焦,再次轻触AF键即可进行对焦。
- 如果希望将DC400重新设置回自动对焦模式,将M圆圈的设定拉到最底部,让图示还原为「Auto」即可。
- 到设定,最上方开启”Pro mode”。
- AMCap:可以下载第三方软件AMCap来停用自动对焦。
- 从这个连结下载并安装AMCap软体https://amcap.en.softonic.com/download
- 连接DC400到电脑,并开启AMCap软体。
- 从设备妆点选DC400。到Video > Properties设定,选Camera Control分页,将对应自动对焦「Auto Focus」的打勾的方块点选以取消。然后按应用Apply。
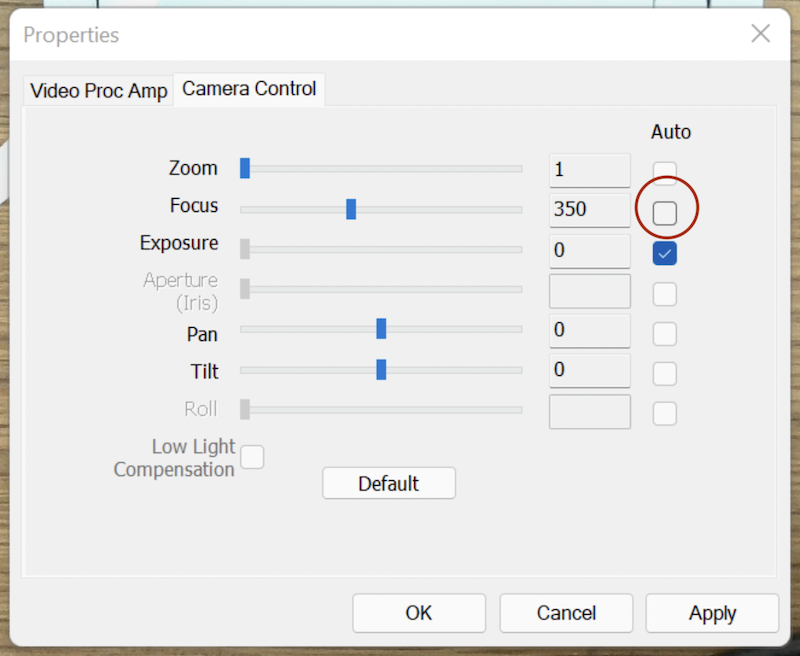
3. 经过设定,自动对焦就会停用。
4. 当你在Ideaocam或其他软件中开启DC400镜头,DC400仍然会在刚开机的情况下进行自动对焦-这是正常的。当DC400自动调整到适当的焦距,此焦距就会被固定住。当你再次移动镜头距离时,会因为DC400没有自动对焦而看到模糊画面。此时只要轻触DC400上的AF按键即可再次对焦。
Mac用户:
- Webcam Setting : 可以到苹果的App Store搜寻“Webcam Setting”, 或点击连结以下载安装https://apps.apple.com/app/webcam-setting/id1610840452?mt=12
- 连接DC400并从Camera的选单中选择DC400
- 点选Advanced分页
- 将Autofocus的方块取消点选
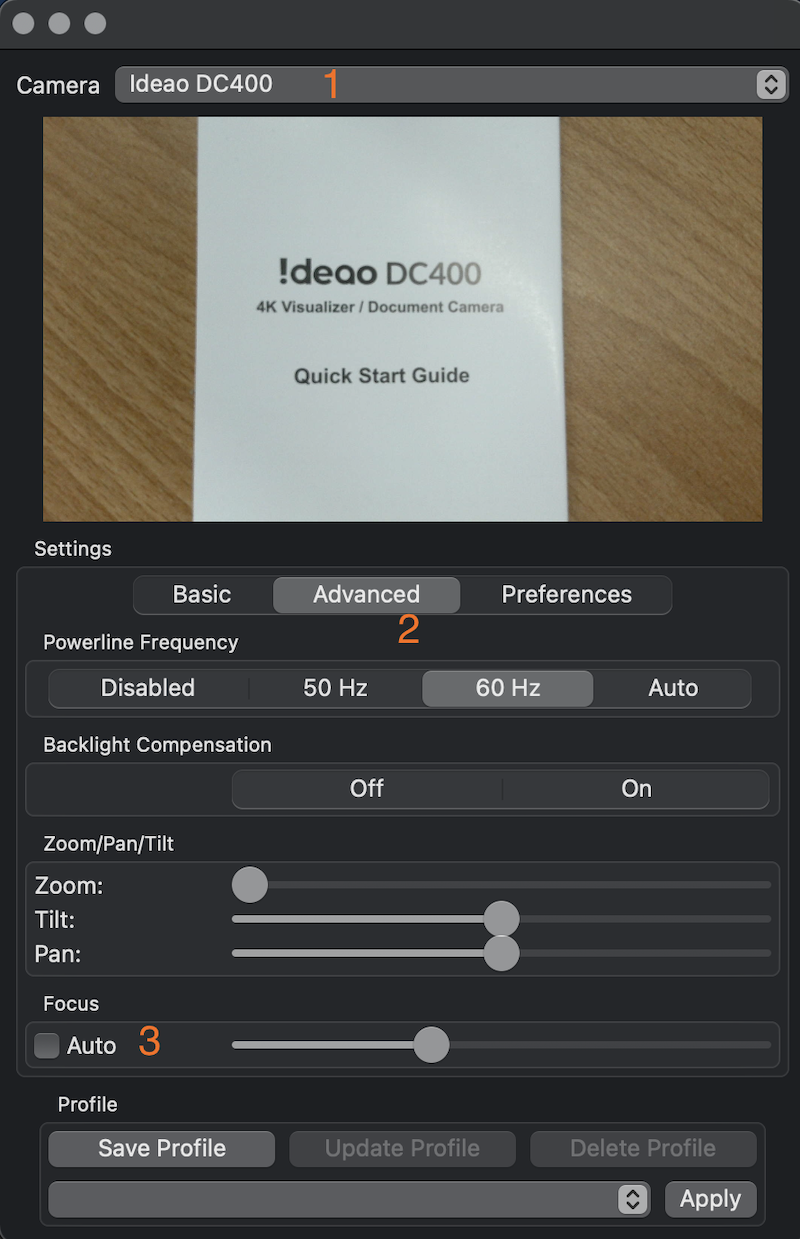
- 当你在Ideaocam或其他软体中开启DC400镜头,DC400仍然会在刚开机的情况下进行自动对焦-这是正常的。当DC400自动调整到适当的焦距,此焦距就会被固定住。当你再次移动镜头距离时,会因为DC400没有自动对焦而看到模糊画面。此时只要轻触DC400上的AF按键即可再次对焦。
* AMCap和Webcam Setting为第三方软体,非由FTI官方提供。我们仅做推荐使用,无法提供软体相关保障。
请依序确认以下事项
・请确保您的装置或操作系统支援此摄影机。支援的作业系统如下:
<DC400>
Windows 11、10
macOS 10.10 或更新版本
Chrome OS
<Ideao VisualCam>
Windows 11/10
macOS 10.15 或更新版本
<IdeaoCam (Chrome 扩充功能)>
Windows, macOS, Chrome OS
・请务必使用原厂传输线或同等规格的传输线。使用过长或未经认证的传输线,可能会导致您的装置无法辨识 DC400。
・请确认摄影机不是经由USB集线器与其他装置一同连接到您的装置,因为这样可能会导致电力不足,使您的装置无法侦测到DC400。建议拔除其他装置,或将DC400直接连接到您的装置,以检查是否可以被侦测到。
・将DC400连接到不同的USB接口,查看是否可以被辨识。
・损坏的传输线有时也可能会造成此问题。如有同等规格的传输线,请尝试使用这些传输线连接,检查装置是否能识别 DC400。
・ 如果尝试多条USB线后,DC400 仍然无法被您的装置辨识,请连接至其他装置 (如果您有的话),检查是否可以被辨识。
・ 开启 Windows 的「装置管理员」或 Mac 的「系统报告」,检查 DC400 是否被装置辨识为摄影机。对于执行 Chrome OS 的装置,请开启设定,选择「装置」或「蓝牙」,并检查 DC400 是否出现在清单中。如果已尝试以上所有方法,但您的装置仍无法辨识 DC400, 请与我们联系。
 当设备识别到摄影机但无法获取影像时,请参考「我的设备识别到DC400但无法在某些软体中获取DC400的影像。」
请依照以下步骤进行排查。
・ 确保在隐私权与安全性设定中,允许应用程式存取摄影机和麦克风。・ 确保防毒软体未阻挡Ideao VisualCam。您可以前往防毒软体的应用程式设定,允许Ideao VisualCam在您的电脑上执行。以下是一些范例:
Avast: https://support.avast.com/en-ph/article/Use-Antivirus-blocked-allowed-apps
Kaspersky: https://support.kaspersky.com/KART/3.0/en-US/130083.htm
确保除了您要用来撷取影像的应用程式外,没有其他应用程式正在使用摄影机。请关闭所有其他可能使用摄影机的软体进行故障排除。举例来说,如果Zoom正在使用Ideao VisualCam,那么无法开启摄影机是常见的问题。
如果您无法在视讯会议软体中取得摄影机的影像,请确认摄影机没有被关闭。通常,视讯图示位于左下角。如果图示被关闭,会有红色线条标示。请点击图示以开启摄影机。
如果您的装置连接了多台摄影机,而应用程式中显示的是另一台摄影机的影像,请依以下步骤操作:
使用Ideao VisualCam:
・点击萤幕左上角的功能表图示(圆圈内有三条水平线)。
・点击选单中的「装置」。
・选择 Ideao DC400。
 使用视讯会议软体:
・点击视讯图示旁的「^」图示(通常位于左下角),显示摄影机清单。
・选择 Ideao DC400。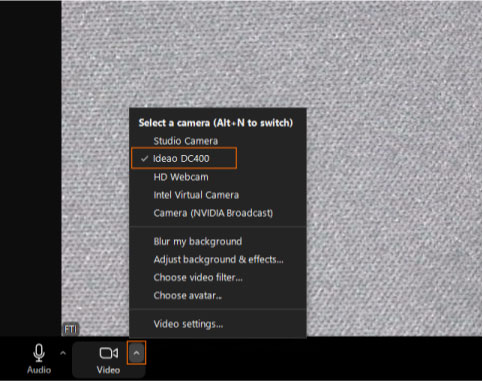
请按以下顺序检查
・前往「隐私权与安全性」设定,然后点选「麦克风」并确认应用程式已允许存取麦克风。・若您正在使用视讯会议软体,多数情况下,视讯和音讯来源是分开的。因此,即使影像已切换为 Ideao DC400,并不代表也选择了DC400为麦克风。请点击「音讯」图示旁的「^」图示,然后选择 Ideao DC400作为麦克风。 请检查 Windows 的音讯输入设定,或视讯会议软体中的麦克风设定,确认麦克风音量未设为零或过低。
・在 Windows 中开启「装置管理员」或在 Mac 上开启「系统报告」来确认装置是否识别 DC400 为 USB 音讯装置。对于使用 Chrome OS 的装置,开启设定,选择「装置」或「蓝牙」,并检查 DC400 是否出现在清单中。若以上方法皆无效,且您的装置仍无法识别 DC400, 请与我们联系。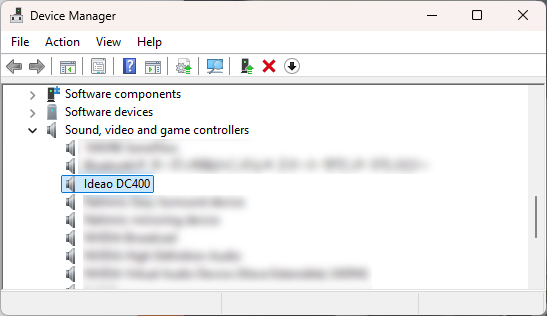

搭配 iPad 使用时需注意以下几点。
1. 不是所有iPad都支援外接相机,仅配备USB Type-C口的iPad相容。
2. iPadOS 版本需为17或更新版本。
3. 目前并非所有应用程式都支援外接相机。
4. 在iPad上使用摄影机的体验可能与PC或Mac会有所不同。
5. 解析度及帧率可能会根据 iPad 和应用程式而有所不同。
6. 有些应用程式可能没有切换相机的功能。当连接相机后,影像来源可能会自动切换至外接相机。如需切换回内建相机,可能需手动拔除外接相机。
7. 对于不支援外接相机输入的视讯会议应用程式,您可能需要使用第三方应用程式来显示相机影像,然后在视讯会议软体中分享您的画面。
影像的亮度会受到背景颜色的影响。例如,当背景为深色,而拍摄物体较亮时,摄影机会根据主要背景颜色来调整白平衡,导致影像可能看起会更亮。在 Ideao VisualCam 中,您可以点击「背光补偿」图示,使用滑杆调整白平衡。对于没有调整白平衡功能的软体,请确保背景和物体之间的对比度不要过大。
请按以下顺序检查:
・专属软体 Ideao VisualCam 支援4K解析度。然而,在某些软体中,特别是视讯会议软体中,最大解析度可能未支援 4K。请检查您使用的软体支援的最大解析度。
・某些软体的预设解析度可能不会是4K。请确认软体的解析度设定没有过低。
・数位变焦是透过剪裁原始影像的一部分并进行数位放大,因此容易使影像变得粗糙。我们建议您尽量将摄影机移近物体,这样可以保持影像清晰且不牺牲解析度。 (请确保镜头与物体之间的距离至少为10公分,使物体保持对焦)
请依序检查下列事项:
・请确保摄影机未放置于产生强磁场的设备附近。
・确认电源频率符合您所在区域的标准。请开启 Ideao VisualCam,于「装置选择」中检查或更改目前的电源频率。
- 完全展开 DC400/500 的支架。
- 确保相机镜头正对纸张的中心,并保持水平放置。
- 按下画面左侧的功能表按钮(三条横线的图示)。
- 在功能表中选择「解析度」,并将其设定为 3840 x 2880。
- 如果拍摄画面未完整覆盖 A3 纸张,请适当调整相机的角度与位置,直至 A3 纸张的完整内容出现在画面中。
为了确保当手在文件周围移动时,镜头不会自动对焦,避免画面闪烁。
Ideao DC400是一台自动对焦的实物摄影机,但可以透过软体将其切换为手动对焦。
Windows 电脑:
- 相机app:如果您正在使用 Windows 内建的相机应用程式拍摄或录影,可按以下步骤切换为手动对焦:
- 进到设定,开启「进阶控制」
- 点击圆圈图示,并稍微移动滑杆,即可切换为手动对焦,图示将从「Auto」变为「M」。
- 按下 DC400 顶部的 AF 按钮以触发一次自动对焦。
- 对焦距离将会被固定。当拍摄距离改变时,请按顶部的 AF 按钮重新对焦。
- 如需重新启用自动对焦,将滑杆移回「Auto」。
- 进到设定,开启「进阶控制」
- AMCap: 您也可以使用第三方软体 AMCap 关闭自动对焦。
- 从以下连结下载并安装 https://amcap.en.softonic.com/download
- 将 DC400 连接至电脑,并开启 AMCap。
- 在设备中选择 DC400。前往 视讯 > 属性 > 相机控制,取消勾选自动对焦(Autofocus)选项,然后点击「套用」。
4. 自动对焦功能现在已停用。
5. 当您在如 IdeaoCam 这类应用程式中开启摄影机时,仍会看到 DC400 自行调整焦点,这是正常现象。一旦焦距设定完成,直到您再次按下 AF 按钮前,焦距将不会再变动。
Mac 系统:
- Webcam Setting(付费App):前往 App Store 搜寻「Webcam Setting」,或点击连结下载
https://apps.apple.com/app/webcam-setting/id1610840452?mt=12
- 连接 Ideao DC400 并选择相机。
- 前往「进阶」标签页。
- 取消勾选自动对焦(Autofocus)。
- 当您第一次打开相机影像时,DC400 仍会自动调整焦点;一旦焦距设置完成,将不会再次调整,除非您按了AF 按钮。
* AMCap 和 Webcam Setting 并非由 FTI 开发,FTI 不负责维护这些软体或保证其功能与可用性。
大部分视讯会议软体(例如 Google Meet、Zoom、Microsoft Teams 和 Webex)会预设将您的相机影像镜射显示。不过,这不会影响对方观看的画面,对方看到的影像仍会是正常的非镜像版本。
如果您仍希望在自己端看到非镜像的画面,请依照以下步骤操作。
适用于所有视讯会议软体的通用解决方案
1. 启动 Ideao VisualCam,显示来自Ideao DC400 的影像。
2. 在视讯通话中,请确保不要选择 DC400。
3. 选择「分享萤幕」或「开始」(依软体而异),并分享 Ideao VisualCam 的萤幕。
Google Meet: (参见教学)
1.有几款 Google Chrome 扩充功能可以镜射您的影像。我们建议您下载「VideoMirror」。
2. 开始 Google Meet 通话并选择 IDEAO DC400 作为摄影机,点击扩充功能图示。视讯画面将被镜射。
*请注意,VideoMirror 是第三方应用程式,FTI 不提供该应用程式的支援服务。
Zoom: (参见教学) 或其他视讯会议软体
1.前往 Zoom 的「视讯设定」
2.取消勾选「镜射我的视讯」
在视讯会议软体中,可以通过以下几种方式同时显示多个摄影机的影像。
网路摄影机 + 分享画面:
1. 在视讯会议软体中选择网路摄影机以显示您的样貌。
2. 启动 Ideao VisualCam 并显示 DC400 的影像。
在视讯会议软体中点击「分享」
4. 选择「Ideao VisualCam」后点击「分享」以开始分享画面。
Ideao VisualCam 分割画面模式
1. 不要在视讯会议软体中开启相机。
2. 启动 Ideao VisualCam 并显示 DC400 的影像。
3. 点击萤幕左上角的「分屏」图示。
4. 点击萤幕右侧的任意部分以显示「选单」图示。
5. 点击选单图示后,再点击「切换相机」。
6. 点击「装置」,选择要显示影像的摄影机。
Ideao VisualCam 画中画 (PIP) 模式
1. 不要在视讯会议软体中开启相机。
2. 启动 Ideao VisualCam 并显示 DC400 的影像。
3. 点击左侧工具栏中的 PIP 图示显示来自摄影机的画面。
将 DC400 的即时影像嵌入到 PowerPoint 简报
1. 在制作简报内容时,从「插入」中点选「Cameo」。
2. 选择相机样式,点击「预览」,然后选择 DC400 作为影像来源。
3. 开始简报后,显示DC400即时影像的同时,您的样貌也会在视讯会议软体中呈现。
Manage app settings to allow Ideao VisualCam to run on your computer.
Avast: https://support.avast.com/en-ph/article/Use-Antivirus-blocked-allowed-apps
Kaspersky: https://support.kaspersky.com/KART/3.0/en-US/130083.htm
请根据以下步骤使Windows启动时能够自动运行软体。
- 点选启动按钮并下滑直至寻找到软体。
- 点击右键选择”更多”接着选择”开启档案位置”。此动作会开启此软体存储的档案夹。
- 在文件夹开启的情况下,按下Windows键+R,输入”Shell:startup”并选择确认。这动作将会开启”启动”档案夹。
- 从软体档案夹将此软体的捷径复制,并于”启动”档案夹内贴上。
- 前往设定>应用程式>启动
- 将开关点选至”开启”
- 重新启动电脑并确定软体于开机时自动运行。
使用电源线和 HDMI 线将 RX100 接收器连接到显示器。如果显示器没有支持超过 5V/2A 输出的 Type-C 接口,请使用随附的转换线,将其分成两个 USB-A 接头。其中一个 USB-A 接头必须为 USB 3.0,以为接收器提供足够电力。或者,您也可以将 Type-C 线连接到电源适配器(包装中不含)。
若要连接 USB 摄像头,请将摄像头的 USB 线插入接收器上的 USB-A 接口。
使用内置安装夹将 RX100 接收器固定在显示器上。请确保接收器朝向前方,以获得最佳无线信号传输。推荐的最佳无线传输范围为 5 米以内。
将显示器的输出源切换至已连接的 HDMI 接口。
将会议音箱 ST100 连接到笔记本电脑的全功能 Type-C 接口。等待投屏按键指示灯变为绿色后,按下按键即可开始投屏。再次按下按键即可暂停投屏。* 如果笔记本的 Type-C 接口不支持完整功能,请使用 USB-C to HDMI & USB-A 转接器。
要使用会议音箱 ST100 并无线访问摄像头时,请在视频会议软件中选择 “Connect” 作为您的麦克风、音箱和摄像头。
并非所有笔记本电脑的 Type-C 接口都支持视频信号输出。此外,不同厂商和型号之间可能存在兼容性问题,从而导致此类故障。作为替代方案,我们已为用户随附 Type-C 转 Type-A 和 HDMI 转换器。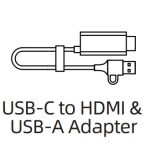
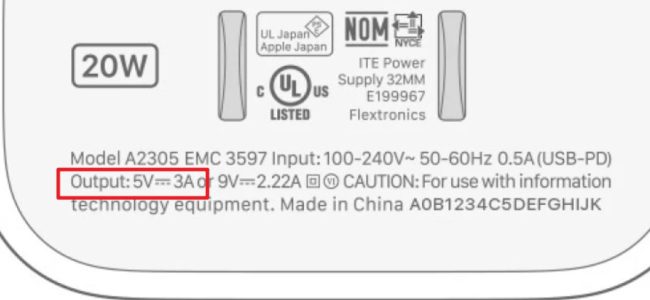
如果您的显示器没有支持超过 5V/2A 输出的 USB-C 接口,您可以将 USB-C 线连接到充电适配器(USB 充电器)作为替代方案。
请务必使用规格为 5V/2A 或更高 的充电适配器(通常充电器上配备的是 USB-C 接口,而非 USB-A),以确保为 RX100 接收器提供足够的电力。否则,RX100 接收器可能无法正常工作。
Connect 音箱 (ST100) 的音量键仅能调节 Windows 系统音量(目前不支持 macOS),在部分视频会议软件中无法直接改变音箱音量。请使用视频会议软件内置的音量控制来进行调整。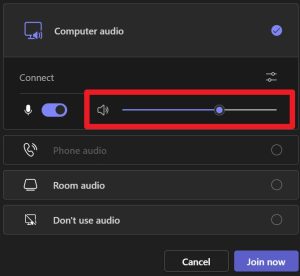
有时候当 Innex Connect 连接到您的设备时,音量设置可能无法正确同步,这会导致输出的声音比预期更小。
如果出现这种情况,请尝试按一到两次音量减小键。在某些情况下,这样做之后声音反而会变大。
If Reactiv SUITE crashes on Startup and fails to show a crash report, perform the following steps:
- Open Event Viewer in Windows

- Go to Windows Logs > Application. Look for the Error where the source is Application Error. The latest crash entry will be on the top

- Copy the contents of the General Tab and send it to techsupport@vizetto.com

Based on the content of these details we can determine the next course of action.
NOTE: Ensure that you have an updated version of Microsoft Office. Outdated versions may result in errors during startup.
Check to see if you are using the new Intel i10 Ice Lake or i11 Tiger Lake CPU. The new Intel CPU chips have an issue and will cause Reactiv SUITE to crash. A temporary workaround is listed below so you can continue to use Reactiv SUITE:
- Open “File Explorer” (Win+E), right-click on “This PC”, and select “Properties”

- Select “Advanced System Settings”

- Select “Environment Variables” in the “Advanced” tab

- Select “New…” under “System variables”

- Input the text below and select “OK”
Variable name: OPENSSL_ia32cap
Variable value: ~0x200000200000000

- Confirm that the variable has been added successfully, then select “OK”

- Start Reactiv SUITE
If you didn’t already purchase a key from one of our partners, simply fill the Free trial form when you launch Reactiv SUITE, and you will receive your Trial License Key by email.
- Check your Junk Email folder
- Wait a few minutes and refresh your email
- If you still don’t receive it, you can contact us
- Go to Settings

- In Product License, activate by entering your activation code

- Go to settings
- In Product License, enter your license
- Click on Deactivate

- If you bought your license from one of our partners, contact their customer support
- If not possible, contact our customer support
Once a license is deactivated, you can use the same key and activate it again on another PC.
- Connect up to 3 additional displays to the Reactiv SUITE PC
- In Reactiv SUITE settings > Device Manager > Display Layout, configure the position of your secondary displays. Just select the available display and drop it into the position on the layout for Reactiv SUITE to take control. The location of the display represents the ‘throw’ direction of the content. Just throw content right, left or up, and the content will appear on the appropriate display as per the layout map

- Verify Windows recognizes the secondary display. In Windows, right-click on your desktop, select “displays settings”, and confirm that the secondary display is detected
- If the secondary display is not detected by Windows, try to disconnect and reconnect the display, or change the cables
If your keyboard relies on a “Bluetooth USB dongle”, the IWB might block the Bluetooth signal, if possible, try to put the USB dongle on an available USB port on the side of the IWB instead of a behind the IWB.
- If your IWB has a ShadowSense touch screen
- Make sure that you are using the pen and eraser that was originally delivered
- Go in settings > devices manager > Touch Screen:
- Make sure your touch profile is set to “IWB”
- Make sure that the ShadowSense Firmware is R11.0 or higher, otherwise, update the firmware by clicking on “firmware update” and following the instructions
- In the Touch screen settings, if you see multiple choice for the Stylus (that option is only available for some specific IWB), select the one you are using
-

Reactiv SUITE requires Microsoft Office to be installed and activated on the computer running the software in order to open documents such as Word, PowerPoint, or Excel.
Ensure that you are not running a 30-day free trial and your license is valid and not expired.
- In Windows, open any Office app (Excel, PowerPoint, Word…)
- Go “Files” > “account” > and verify that the product is activated

- If the account is not activated, you will need to contact your IT department to activate it or to purchase a new license
Reactiv SUITE IWB is by default configured to be in full screen “Kiosk Mode” by your IT department.
Otherwise, go in Settings > User Interface > Additional Settings and click on toggle “Fullscreen mode”.
In Reactiv SUITE Settings > User Interface > Accent Color.

Yes, in the Settings > User Interface > Background Media.

No, but we are working on additional options to choose from which will be available soon.
Move any image into the presentation folder, and rename it “folder.jpg” – that picture will become the presentation thumbnail.
Any sub-folder, inside the presentation, can also be customized by placing a “folder.jpg” file within it.
Move any picture into the presentation folder and rename it “background.jpg”, that picture will become the presentation background in STAGE.
Any sub-folder, inside the presentation, can also be customized by placing a “background.jpg” file within it.
Go in Settings > System > Browser Settings to add or remove Quick Launch shortcuts. To change the shortcut Icon, click on the icon and locate on your PC the new icon you would like to replace it with.
- On the Home screen, select Reactiv STAGE or Reactiv SCRIBBLE

- From the Lobby (Public or Private Workspaces), you can start a presentation just by clicking on any of the icons

- On the Home screen, select Reactiv STAGE or Reactiv SCRIBBLE
- From the Lobby (Public or Private Workspaces), you can add new workspaces by clicking on the ‘+’ icon

- In Details:
- Enter a title and a description
- Add a folder with the desired files to use in the Workspace by clicking on the Folder button

- In Media:
- Add images as the preview and background media by clicking on +

- Add images as the preview and background media by clicking on +
- Click on Save. Select your Workspace on the Lobby screen and start presenting
- In Details:
- On the home screen, click on the help button, ‘?’ to see mini video-tutorials explaining the basic gestures and features

- In a presentation, click on the interrogation mark in the bottom right corner to see mini video-tutorials

- For more information on basic tools, refer to the Getting Started Guide
- Use your USB key to automatically start a project
- Prepare your files in a USB flash drive
- Plug your USB flash drive into the Interactive Whiteboard
- Ensure that USB drive is enabled in SETTINGS

- Start Reactiv STAGE or SCRIBBLE and go to the lobby
- Click on the USB Project icon to start presenting

- Now, all changes will be saved back into the same USB folder
-
Before your presentation/at your desk:
- Open your presentation folder
- If you are using Chrome, navigate to the webpage you would like to use in Reactiv SUITE, select the address in the address bar, click and drag it into your presentation folder, and create a URL file (shortcut to a webpage)
- If you are using another browser, in your presentation folder: Right-click > New > Shortcut > past your webpage address > next > name your shortcut and click finish
In Reactiv SUITE/during your presentation:
- Click on the browser icon

- Navigate to the webpage you would like to work on
- Click on the “add to presentation” button located on the browser floating toolbar

- The webpage will now be in your presentation folder so you can open it in STAGE and SCRIBBLE
Everything you present and save, during a session, will be saved back to the exact same folder as the originating file. On-premises or off-premises storage, Local drive, USB flash drive, network drive, or Cloud, data will only be saved to the location of your choice.