Se você consegue ver o nome da câmera aparecer no software de videoconferência, mas não consegue ver o vídeo da câmera, é provável que a câmera esteja ocupada por outro software (outro software de videoconferência, ferramenta de configuração da câmera, software de streaming como OBS, etc). Por favor, feche TODOS os outros softwares que possam estar ocupando a câmera para solucionar esse problema. Por exemplo, não é raro que alguém não consiga abrir a câmera no Zoom porque ela ainda está ocupada por uma reunião do MicroSoft Teams.
De acordo com as especificações da USB-IF, cada tipo de cabo USB não pode exceder um determinado comprimento, conforme mostrado abaixo. O sinal de vídeo pode diminuir se ultrapassar a especificação.
USB2.0 – Limite de comprimento do cabo 5M/16,4ft
USB3.0/3.1 Gen 1 – Limite de comprimento do cabo 2M/6,6ft
USB3.1 Gen 2 – Limite de comprimento do cabo 1M/3,3ft
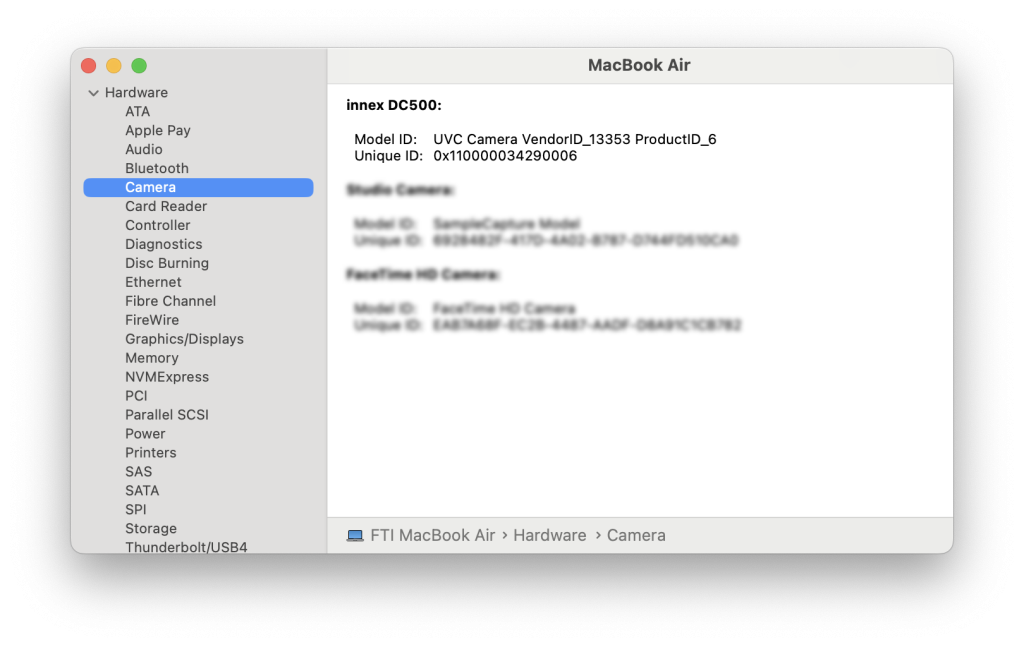
- Certifique-se de que seu Mac reconhece a câmera. Vá em “Sobre este Mac” > Relatório do Sistema
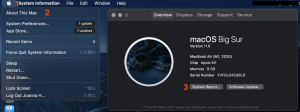
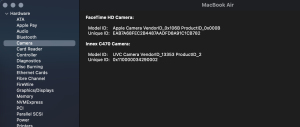
- Vá para Hardware > Câmera. Quando o Mac reconhecer a câmera, você verá o nome do modelo e as informações relacionadas. Se o Mac não reconhecer a câmera, reconecte novamente.
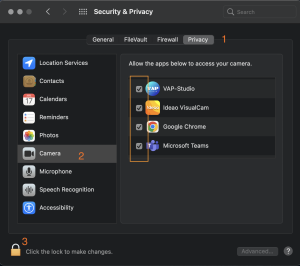
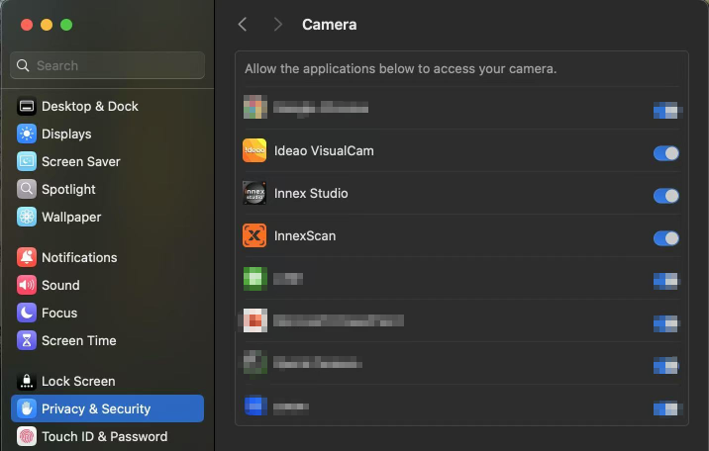
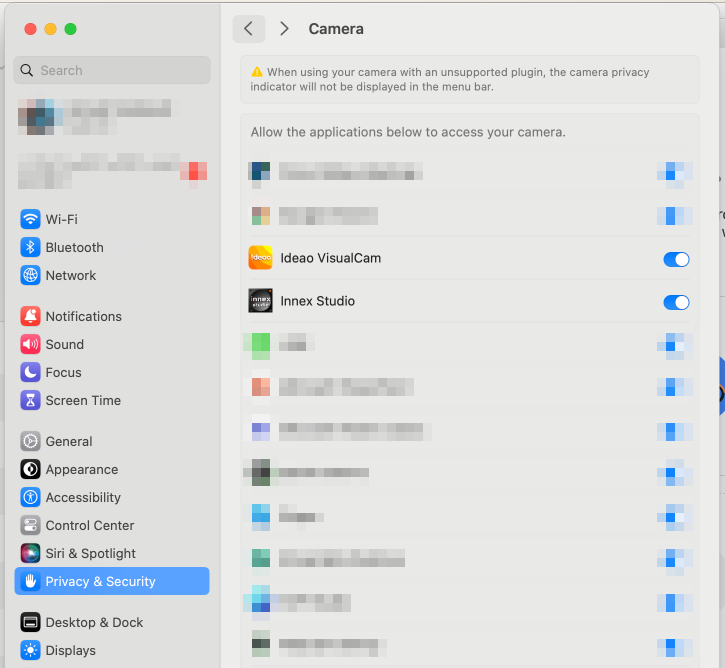
- Vá para “Preferências do Sistema” > “Segurança e Privacidade”, siga os passos abaixo e verifique se o software está na lista. Permita que o aplicativo acesse sua câmera.
Sim, a tecnologia de IA do Innex Cube é baseada na detecção de figuras humanas, então seu rastreamento de IA funciona em rostos com máscaras.
Innex Cube não requer nenhum software ou aplicativo adicional para usar o recurso de IA. Cada função pode ser operada pelo controle remoto.
Somente quando você quiser atualizar o Cube (atualizar o firmware), será necessário baixar o software Innex Studio para fazer isso.
Sim, há duas maneiras de ajudar.
1. Configurar uma área desativada de IA: Zona de Ignorar, para evitar distrações desnecessárias por pessoas passando pela porta da sala de reuniões. A zona de ignorar pode ser configurada no menu de configurações com o controle remoto.
2. Depois que todos os participantes estiverem sentados, entre no menu OSD e selecione “Track Once” para fixar a posição de gravação. No entanto, se alguém sair das janelas sob “Track Once”, a IA não irá redetectar a posição deles.
Até 8 pessoas podem ser rastreadas automaticamente ao mesmo tempo. Se duas pessoas estiverem sentadas próximas uma da outra, o Innex Cube pode mesclá-las para obter um resultado melhor.
Recomendamos sentar-se pelo menos 70cm (2,3 pés) longe da câmera para resultados ótimos de costura de imagem. Além dessa distância, a linha de costura é quase imperceptível. Se você observar uma costura de imagem incorreta, por favor, verifique três coisas:
1. Certifique-se de que não está sentado muito perto da câmera.
2. Confirme que a porta USB que você está usando é uma porta 3.0 para fornecer energia adequada ao Innex Cube.
3. Garanta que você atualize o Cube para o firmware mais recente.
Sim, você pode baixar nosso software Innex Studio para atualizar o firmware do Innex Cube.
Baixe o Innex Studio e instale no seu computador. O Innex Studio possui duas versões: para Windows e para Mac. https://funtechinnovation.com/pt-br/downloads/
2. Conecte o Innex Cube ao seu computador e inicie o Innex Studio. Por favor, certifique-se de que seu computador está conectado à Internet e que o Cube não está sendo usado em outros softwares, como Zoom ou Teams.
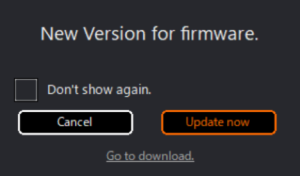
3. Se a atualização de firmware estiver disponível, uma janela pop-up “Nova versão para firmware” aparecerá na tela. Clique em “Atualizar agora”.
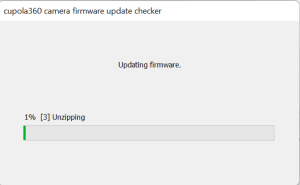
4. A atualização do firmware começará. Aguarde até que o status atinja 100% para concluir a atualização do firmware.
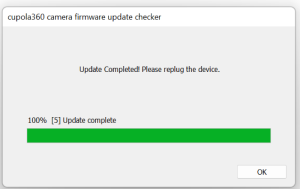
5. Após a atualização do firmware, clique em “OK”. Desconecte e reconecte o cabo USB do Innex Cube para reiniciar o Innex Cube.
Se o PC bloquear o acesso aos dispositivos de armazenamento em massa USB, a atualização do firmware, que requer a gravação do firmware na memória interna da câmera, também será bloqueada. Por favor, desbloqueie o acesso do computador aos dispositivos de armazenamento em massa USB ou entre em contato com o administrador de TI da sua empresa para que ele seja desbloqueado.
Sim, a detecção e rastreamento facial funcionam em rostos com máscaras.
Sim, a Innex Studio é necessária para liberar todas as capacidades de IA do C831. Pode ser baixada em http://funtechinnovation.com/pt-br/downloads/
Innex Studio é um software que funciona especificamente com o C831. Possui recursos avançados de IA, como rastreamento facial simultâneo (até 8 pessoas), auto-cadragem e modo estúdio de quadro branco. O software também realiza atualização de firmware para o C831. Innex Studio está disponível para Windows e Mac – pode ser baixado em http://funtechinnovation.com/pt-br/downloads/
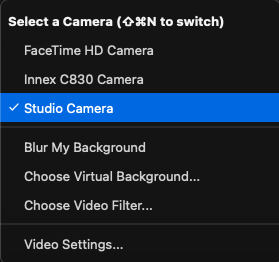
Por favor, mantenha o software Innex Studio ligado durante a chamada de vídeo. Nas configurações da câmera, selecione “Studio Camera” como sua câmera, em vez de selecionar “Innex C831 Camera”.

Selecione o modo de vídeo que deseja no Innex Studio, a pré-visualização que você vê no Innex Studio será compartilhada no software de videoconferência.
Para mais informações, assista ao nosso vídeo no YouTube aqui.
Esta situação deve acontecer apenas em computadores com Windows. Navegue até “Configurações” -> “Bluetooth e dispositivos”, depois encontre “Reprodução automática”, ou simplesmente digite “Reprodução automática” na barra de pesquisa. Desative “Usar Reprodução automática para todos os mídias e dispositivos”, ou selecione “Não fazer nada” no menu suspenso de “Unidade removível”.
Se o PC bloquear o acesso aos dispositivos de armazenamento em massa USB, a atualização do firmware, que requer a gravação do firmware na memória interna da câmera, também será bloqueada. Por favor, desbloqueie o acesso do computador aos dispositivos de armazenamento em massa USB ou entre em contato com o administrador de TI da sua empresa para que ele seja desbloqueado.
Se sua câmera Innex C570 estiver apresentando esses problemas, é provável que esteja relacionado à fonte de alimentação. A Innex C570 depende do USB 3.0 para energia. O USB 3.0 tem uma distância padrão de transmissão de sinal de aproximadamente 4 metros. Além dessa distância, a câmera pode não receber energia suficiente, levando a problemas como operação intermitente ou desligamento. Se sua configuração exigir um cabo mais longo, recomendamos o uso de um cabo USB 3.0 ativo. Esses cabos são projetados para melhorar tanto a transmissão de sinal quanto a entrega de energia. Um comprimento de 10 metros é compatível com a Innex C570.
Você pode desativar ou ativar o auto-enquadramento usando o controle remoto ou o botão no C570. Quando estiver no modo AI, pressione o botão “AI/M” no controle remoto ou o botão na câmera.
Se desejar desligar permanentemente o modo AI ao ligar a câmera, use o controle remoto, vá para “configurações” -> “Modo” -> “Autoenquadramento” e selecione “Manual”.
Sim. Se você não quiser que a câmera ajuste automaticamente o enquadramento para dentro e para fora, pode desativar o autoenquadramento. Ainda assim, o ângulo de visão de 120° é muito amplo, você pode ajustar manualmente o zoom digital com o controle remoto ou o botão na câmera. Selecione sua região de interesse com as teclas de seta no controle remoto.
A proporção de zoom de enquadramento automático depende da resolução de saída. A proporção de zoom é 3X se a resolução for igual ou inferior a 720p, ou 2X se a resolução for igual ou superior a 1080p. A maioria dos softwares de videoconferência solicitará que a câmera envie vídeo com resolução de 720p ou inferior, portanto, é provável que a proporção de zoom seja 3X durante a videoconferência.
Antes de realizar uma atualização de firmware, verifique o firmware atualmente instalado na sua câmera.
Para verificar a versão atual do firmware:
1. Abra Configurações usando o controle remoto.
2. Vá para Sistema no menu lateral.
3. Verifique a Versão do FW.: Se mostrar V672, você já possui a versão mais recente e não é necessária nenhuma atualização.
Para atualizar o firmware, siga estes passos:
1. Baixe o firmware mais recente desta linha.
2. Descompacte o arquivo baixado.
3. Conecte o C570 ao seu PC.
4. Clique duas vezes em USBDownloadToolV2.4.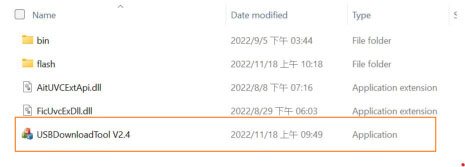
5. Na janela pop-up, certifique-se de que Innex C570 VID_3429&PID_0004 está selecionado.
6. Clique em Atualizar Firmware para iniciar a atualização.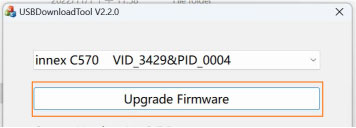
7. Aguarde até que a atualização seja concluída e uma mensagem de confirmação apareça.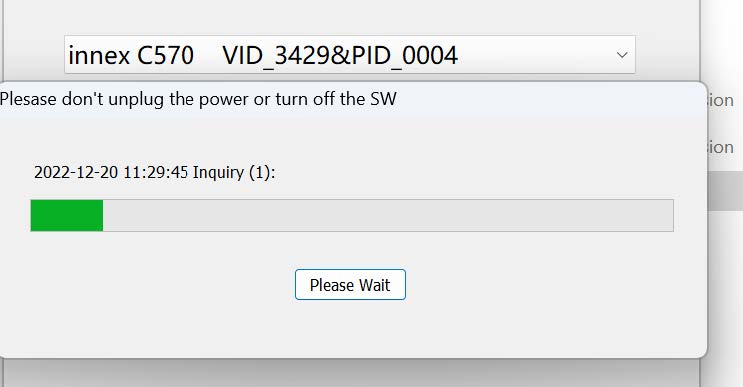
8. Clique em OK.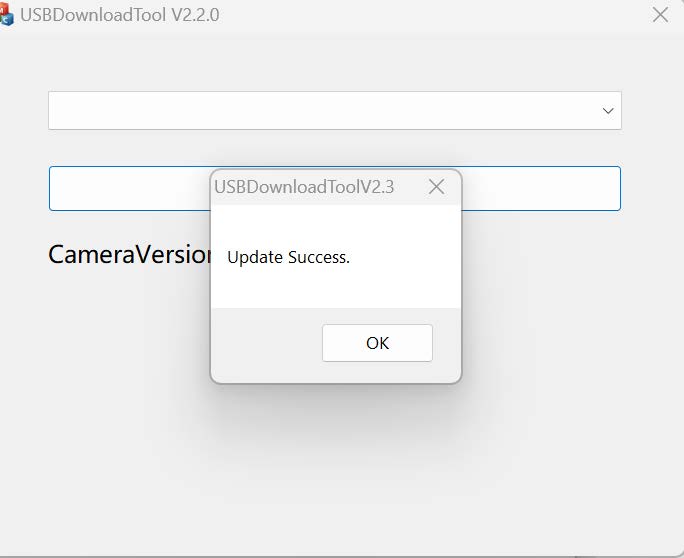
9. Volte para Configurações e confirme que a Versão do FW mostra a versão mais recente.
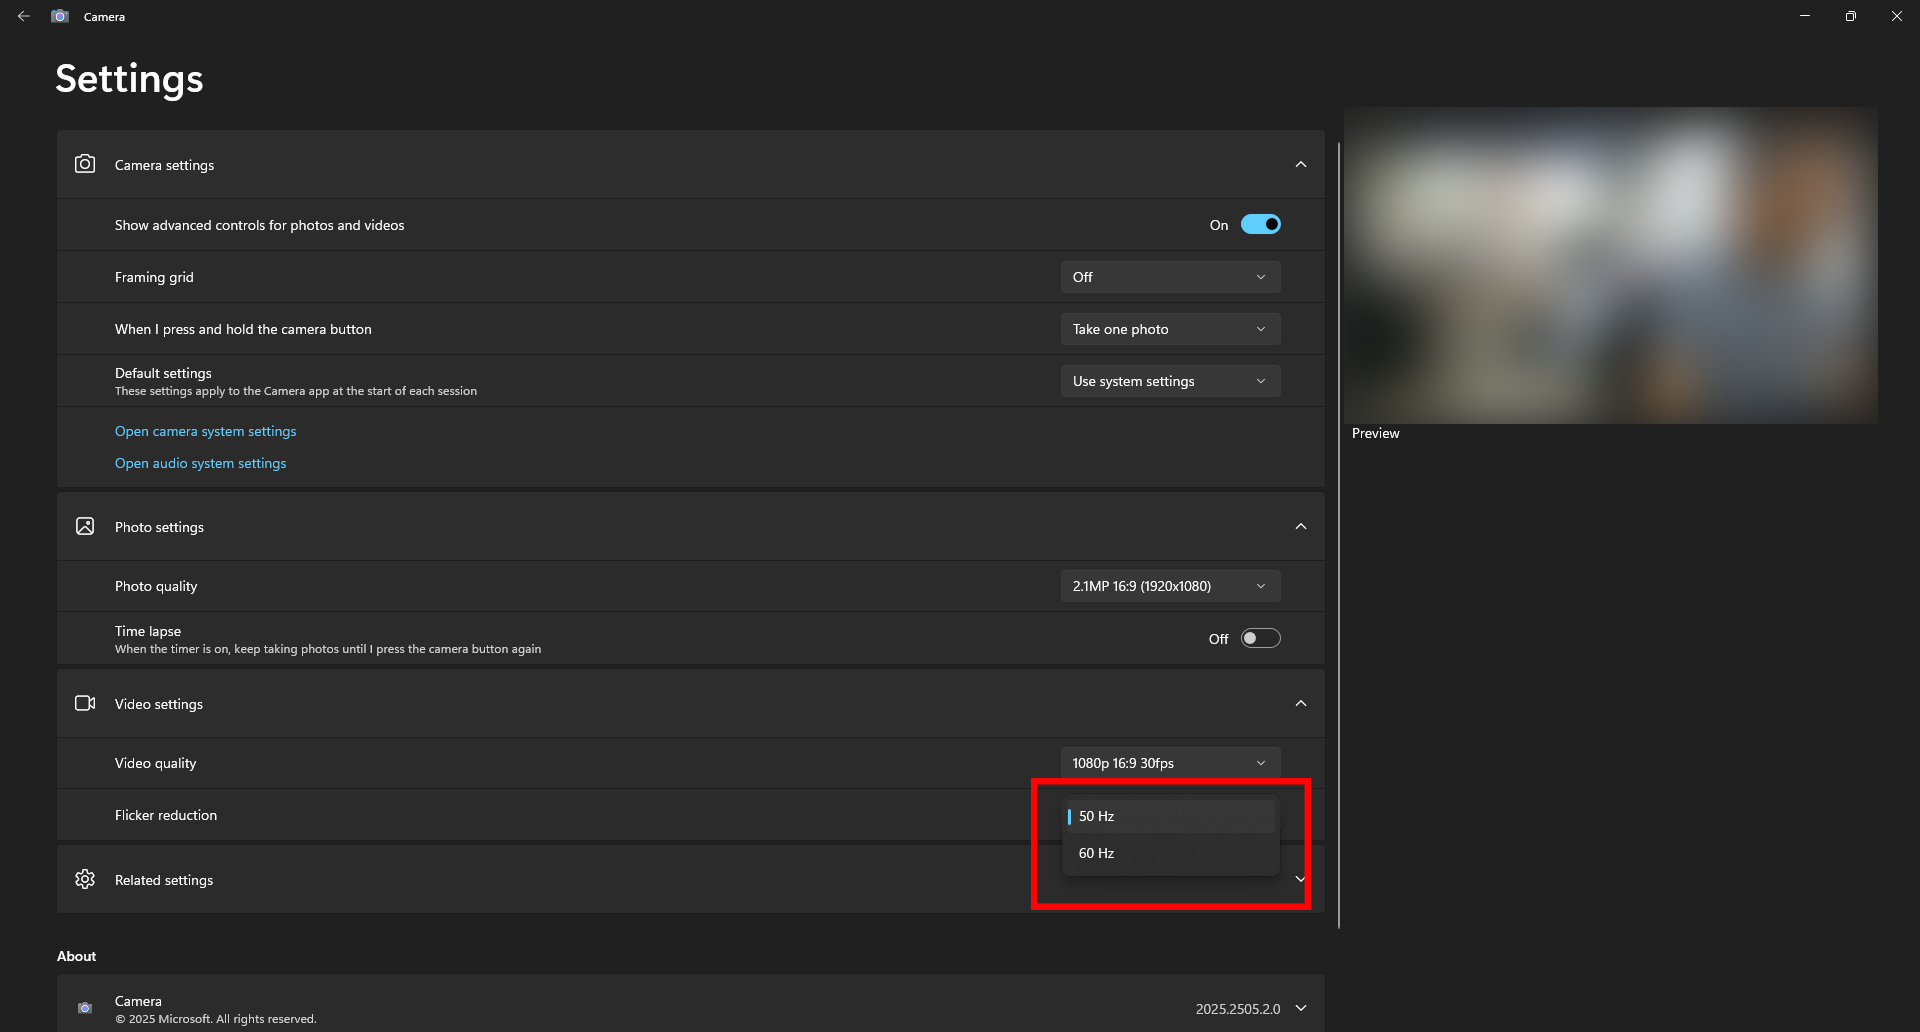
Se o sistema operacional não for Windows, o C570 mantém a configuração de cintilação. No entanto, no Windows, o aplicativo de Câmera padrão pode substituir as configurações da câmera.
Por exemplo, mesmo que você configure a Frequência de Linha de Energia do C570 para 50Hz, se o aplicativo de Câmera do Windows estiver definido para 60Hz, a configuração retornará para 60Hz toda vez que a câmera for reiniciada, mesmo ao usar a câmera com outros aplicativos.
Para manter a Frequência de Linha de Energia correta, atualize a configuração diretamente no aplicativo de Câmera do Windows.
Se você estiver usando o aplicativo de Câmera padrão do Windows, ele substitui as configurações da câmera e inicia com a visão padrão sem ePTZ. Você pode pressionar longamente o botão “OK” no controle remoto para pular para o Preset. Para outros aplicativos e sistemas operacionais, a câmera deve iniciar com a visão do Preset.
Se o áudio do microfone parecer distante ao usar o C570 com um dispositivo Android, o dispositivo pode não estar executando a versão mais recente do firmware.
Verifique se o seu C570 está atualizado para a versão mais recente do firmware. Você pode baixar o firmware mais recente aqui.
Para verificar a versão atual do firmware:
1. Abra Configurações usando o controle remoto.
2. Acesse Sistema no menu lateral.
3. Verifique FW Version. Se aparecer V684 ou posterior, seu dispositivo já está com a versão mais recente e não é necessário atualizar.
Para obter instruções detalhadas sobre como atualizar o firmware, consulte “Como atualizar o firmware?”.
Sim, a detecção e rastreamento facial funcionam em rostos com máscaras.
Sim, a Innex Studio é necessária para liberar todas as capacidades de IA do C831. Pode ser baixada em
funtechinnovation.com/pt-br/downloads/
Innex Studio é um software que funciona especificamente com o C831. Possui recursos avançados de IA, como rastreamento facial simultâneo (até 8 pessoas), auto-cadragem e modo estúdio de quadro branco. O software também realiza atualização de firmware para o C831. Innex Studio está disponível para Windows e Mac – pode ser baixado em funtechinnovation.com/pt-br/downloads/
Por favor, mantenha o software Innex Studio ligado durante a videochamada. Nas configurações da câmera, selecione “Studio Camera” como sua câmera, em vez de selecionar “Innex C831 Camera”.
Selecione o modo de vídeo que deseja no Innex Studio, a pré-visualização que você vê no Innex Studio será compartilhada no software de videoconferência.
Para mais informações, assista ao nosso vídeo no YouTube aqui..
Se a sua versão do software for 1.3515.1 ou mais antiga e você estiver usando Mac OS 14.1 ou posterior, a Studio Camera pode não aparecer na lista de câmeras. É necessário atualizar o Innex Studio primeiro.
Se o seu Mac estiver conectado à internet e você iniciar o Innex Studio, aparecerá a mensagem “Nova versão do Innex Studio”. Pressione “Atualizar agora”, siga as instruções e complete a atualização do software.

Você também pode baixar a versão mais recente do Innex Studio pelo link abaixo e atualizá-lo manualmente.
https://drive.google.com/drive/folders/1r7kUWcbT6G7Bhi94UZ1eXsRvgOL5udcN?usp=sharing
Após a atualização ser concluída, aparece uma caixa de diálogo dizendo “Extensão do Sistema Bloqueada”.

Pressione “Abrir Configurações do Sistema” e Permitir “O software do sistema do aplicativo ‘Innex Studio’ foi bloqueado para carregamento.”

Após Permitir, volte ao Innex Studio e a mensagem “Reinício do sistema necessário….” aparece. Pressione OK e reinicie o Innex Studio.

Se você não pressionar “OK” quando a mensagem for exibida, poderá alterar a configuração manualmente posteriormente. Vá para “Configurações” no macOS, selecione “Geral” > “Itens de Login e Extensões”, role para baixo, clique no “!” ao lado de “Extensões de Câmera” em “Extensões” e ative “Innex Studio”.
Após concluir esses processos, a Câmera do Studio deve aparecer na lista de câmeras. Se ainda não aparecer, reinicie o Mac.
Por favor, siga os passos abaixo para executar o software automaticamente na inicialização do Windows.
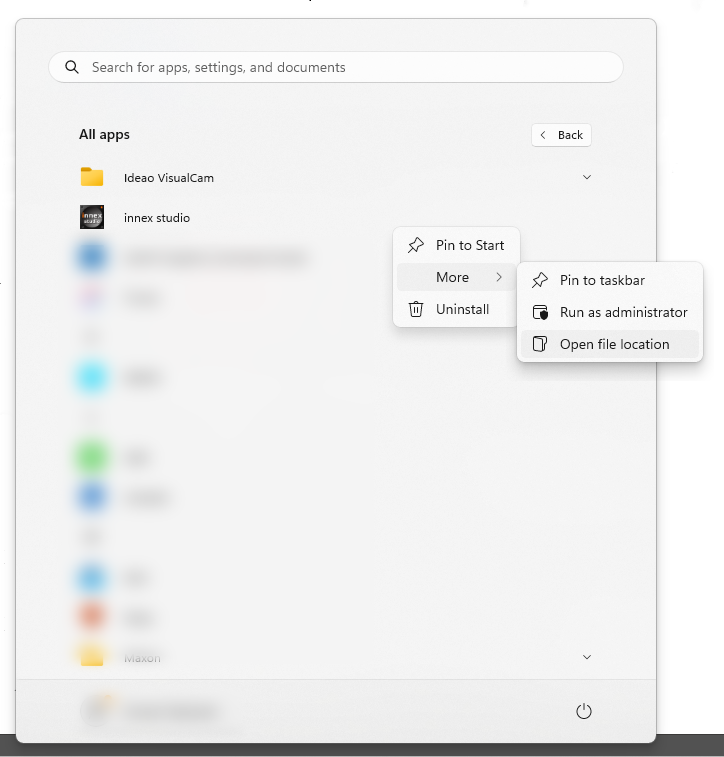
- Selecione o botão Iniciar e role para encontrar o aplicativo.
- Clique com o botão direito no aplicativo, selecione Mais e depois selecione Abrir local do arquivo. Isso abrirá o local onde o atalho do aplicativo está salvo.
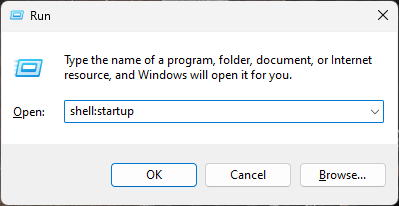
- Com o local do arquivo aberto, pressione a tecla do logotipo do Windows + R, digite shell:startup, e então selecione OK. Isso abre o Startup
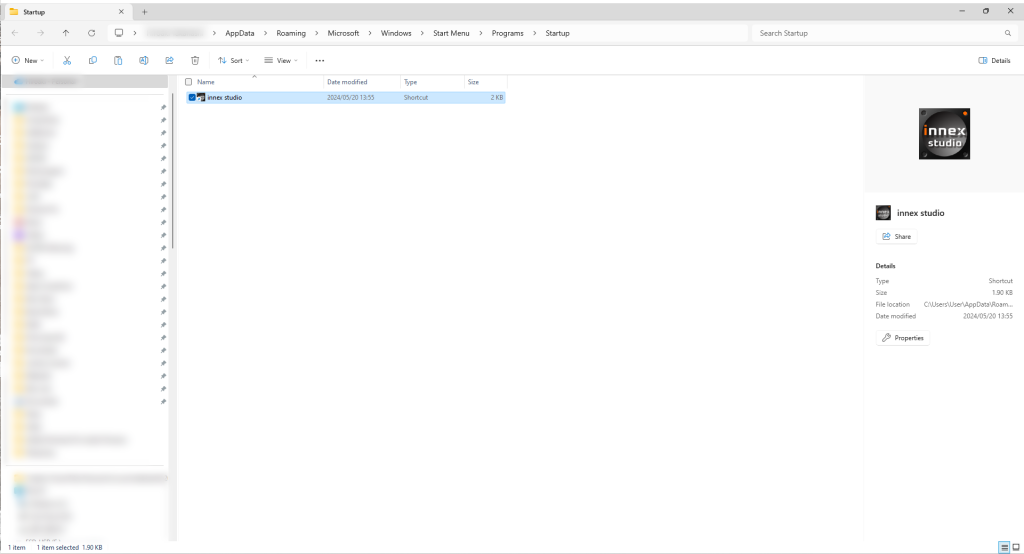
- Copie e cole o atalho do aplicativo do local do arquivo para a pasta de Inicialização.
- Vá para Configurações do Windows > Aplicativos > Inicializar.
- Selecione a chave para ativar.
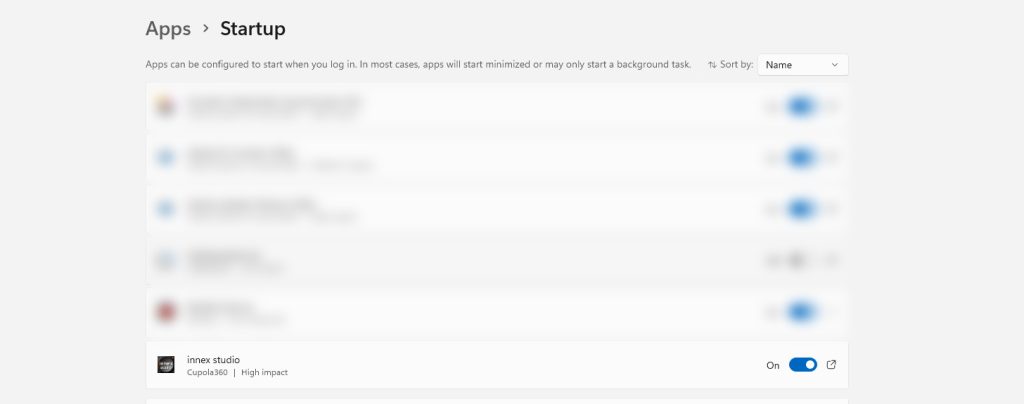
- Reinicie o PC e certifique-se de que o aplicativo seja iniciado automaticamente.
Se o seu Innex DS200 não estiver sendo reconhecido, tente os seguintes passos:
1. Verifique a compatibilidade do sistema. Certifique-se de que seu dispositivo e sistema operacional suportam o Innex DS200. Sistemas operacionais suportados:
.Microsoft Windows 10, 11
.MacOS 11 ou posterior”
2. Experimente uma porta USB diferente no computador.
3. Se a alimentação da porta USB não for suficiente, conecte o adaptador de energia incluso na porta DC-in do Innex DS200 e conecte-o a uma tomada.
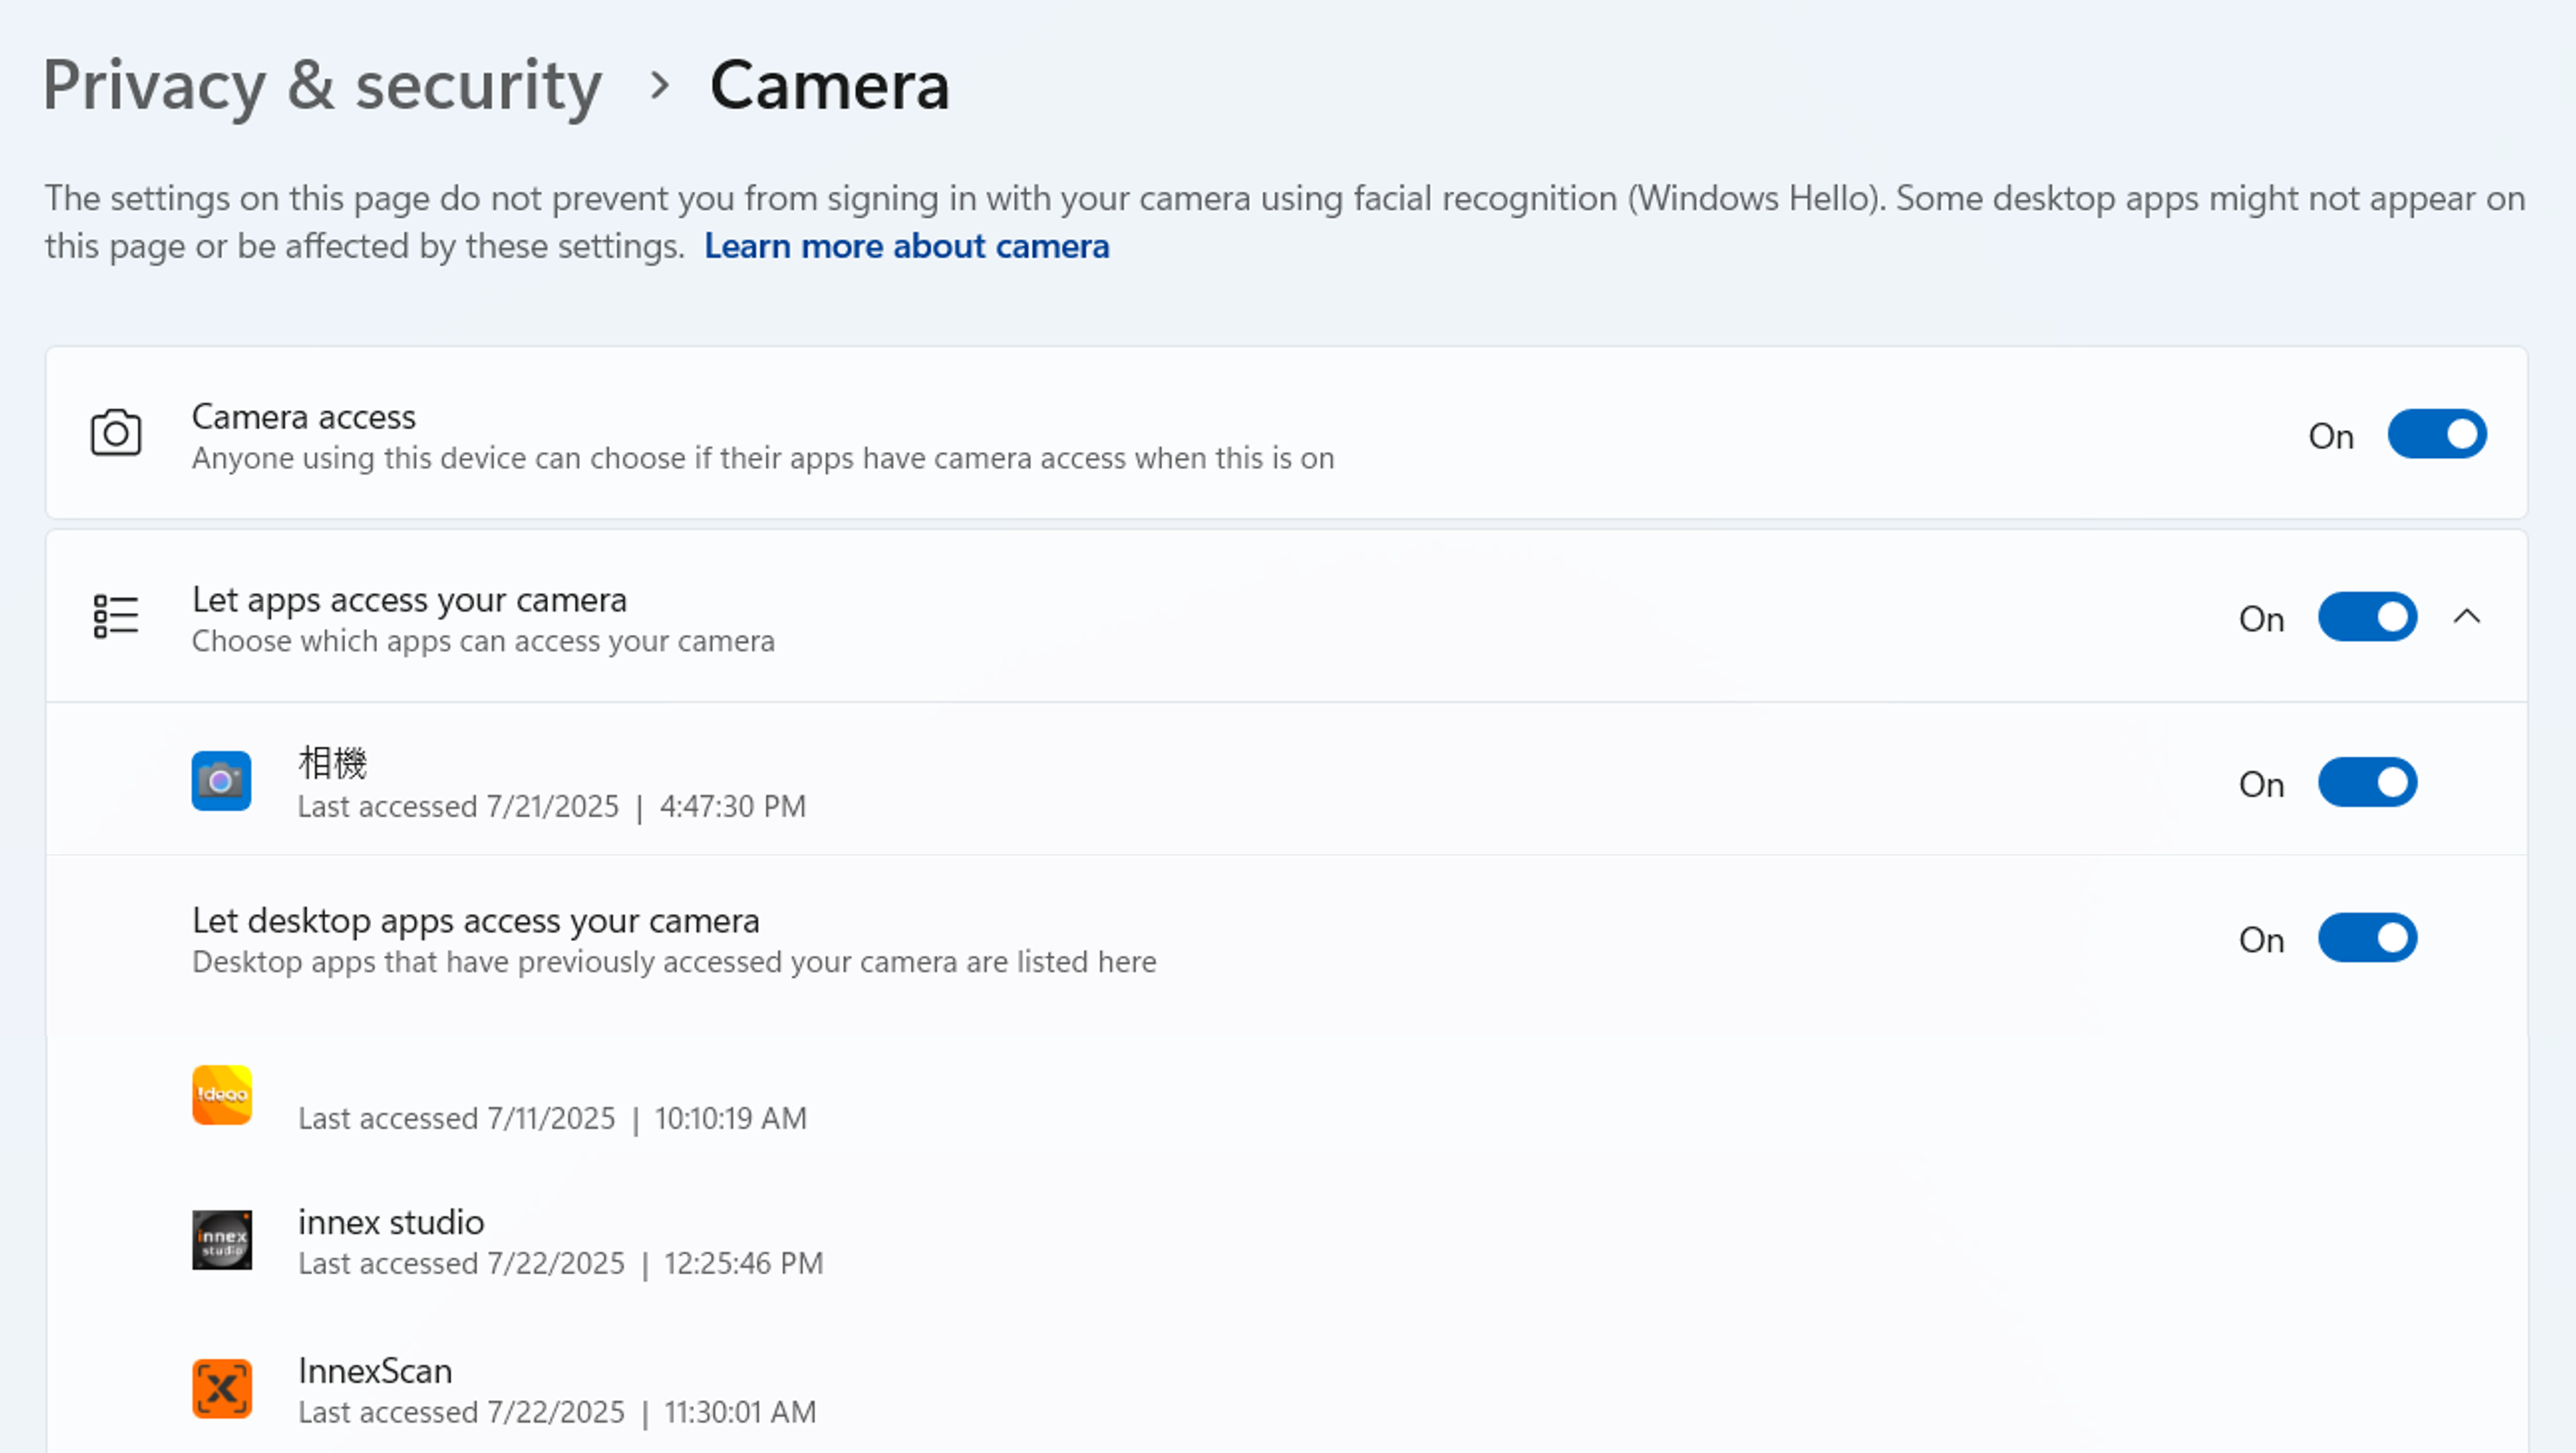
4. Certifique-se de que nas configurações de Privacidade & Segurança, o dispositivo permita que o aplicativo acesse a câmera e o microfone.
5. Certifique-se de que o software antivírus não esteja bloqueando o InnexScan. Você pode acessar as configurações de gerenciamento do aplicativo do software antivírus para permitir que o InnexScan seja executado no seu computador. Abaixo estão os exemplos.
Avast: https://support.avast.com/en-ph/article/Use-Antivirus-blocked-allowed-apps
Kaspersky: https://support.kaspersky.com/KART/3.0/en-US/130083.htm
6. Certifique-se de que nenhum outro aplicativo, além daquele que você deseja usar para capturar imagens da câmera, esteja ocupando a câmera. Por favor, desligue todos os outros softwares que possam estar usando a câmera para solucionar esse problema. Por exemplo, não é incomum ter dificuldades para abrir a câmera no Zoom se ela ainda estiver sendo usada pelo InnexScan.
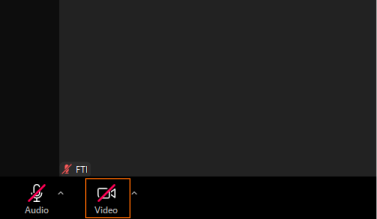
Se você estiver usando um software de videoconferência e não conseguir obter uma imagem da câmera, por favor, certifique-se de que a câmera não esteja silenciada. Normalmente, o ícone de vídeo está localizado no canto inferior esquerdo, e se estiver silenciado, o ícone será riscado com uma linha vermelha. Toque no ícone para desmutar a câmera.
7. Se várias câmeras estiverem conectadas ao seu dispositivo e a imagem de outra câmera for exibida no aplicativo, por favor, tome as seguintes ações:
No InnexScan
・Clique em Configuração do dispositivo no canto inferior esquerdo, depois selecione DS200.
Para software de videoconferência
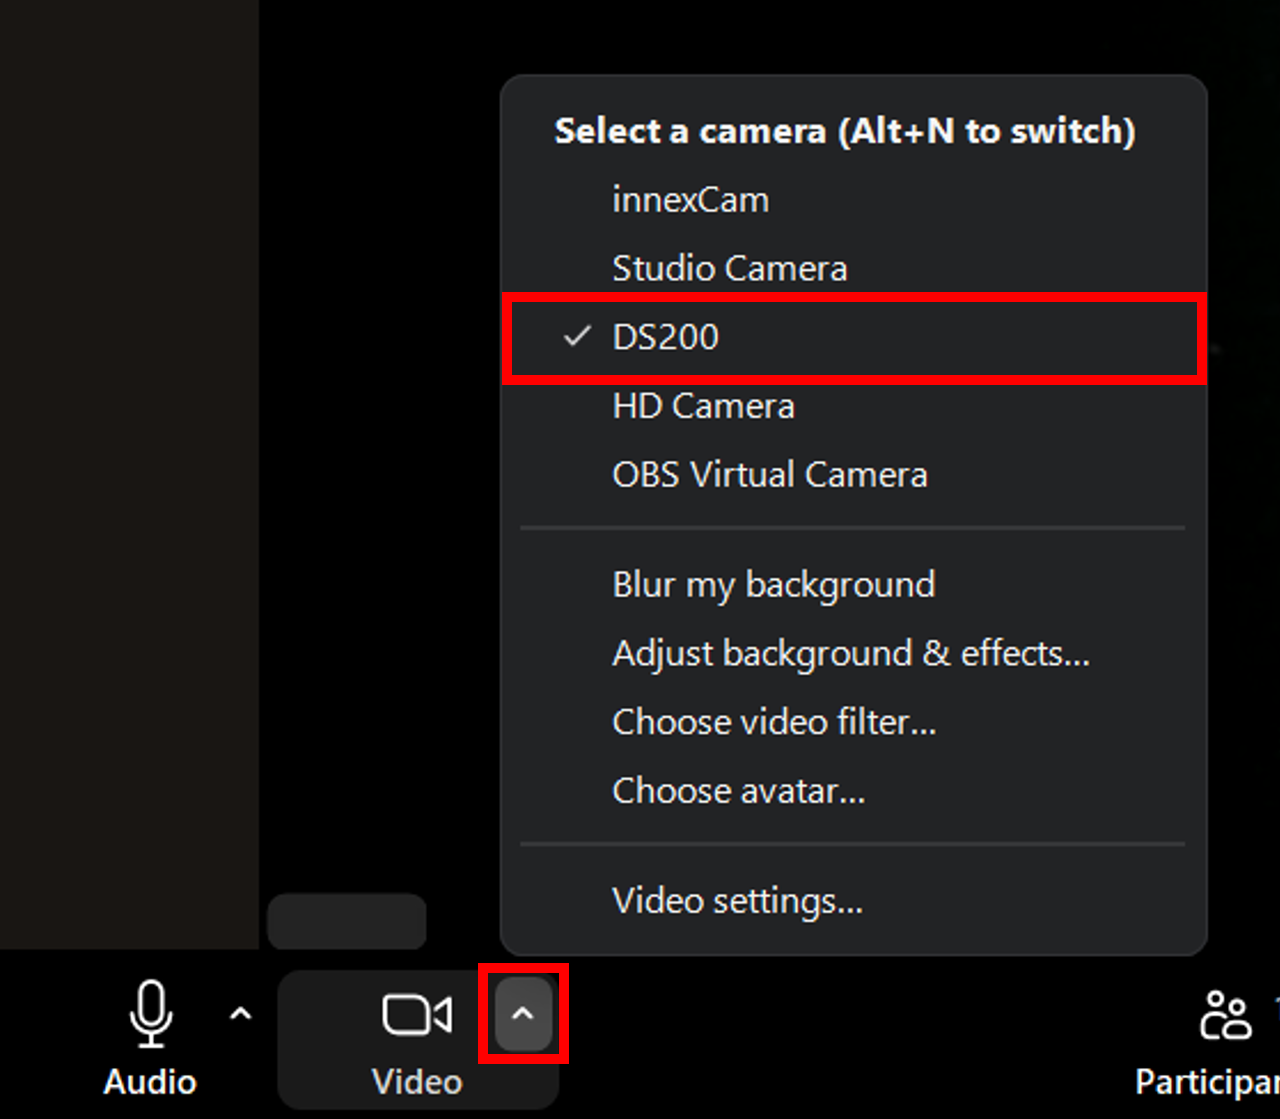
・Clique no ícone “^” ao lado do ícone de vídeo (normalmente o ícone fica no canto inferior esquerdo) e exiba a lista de câmeras.
・Escolha DS200
8. Se os passos acima não resolverem o problema, tente o seguinte:
.Conecte o Innex DS200 antes de iniciar o software.
.Use outro cabo equivalente para conectar o Innex DS200 ao seu dispositivo e verifique se ele pode ser reconhecido.
.Tente em outro computador e assegure-se de que o Innex DS200 possa ser detectado pelo dispositivo.
.Entre em contato com o suporte para mais assistência.
1. Certifique-se de que a opção “Múltiplas páginas” esteja selecionada no modo Documento.
2. Digitalize cada página e uma nova miniatura aparecerá no painel de visualização após cada digitalização.
3. Clique em “Exportar” assim que todas as páginas forem digitalizadas. O arquivo será salvo no painel da pasta de saída.
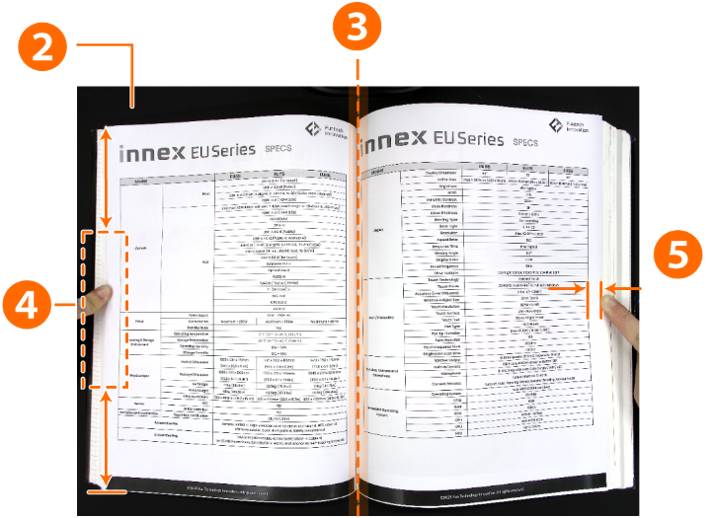
O Modo Livro no InnexScan permite capturar facilmente a capa dianteira e a capa traseira de um livro. Siga estes passos:
1. Certifique-se de que o Modo Livro está ativado no InnexScan.
2. Escaneie a capa dianteira
.No painel de miniaturas de visualização, clique na capa dianteira para selecioná-la.
.Coloque a capa dianteira do livro e clique em Escanear.
.A capa dianteira será capturada e exibida na visualização.
3. Escaneie a capa traseira
.No painel de miniaturas de visualização, clique na capa traseira para selecioná-la.
.Coloque a capa traseira e clique em Escanear.
.A capa traseira será capturada e adicionada à visualização.
4. Exporte o arquivo completo
Depois que ambas as capas e as páginas internas forem escaneadas, clique em Exportar para salvar o documento completo. O arquivo incluirá as capas dianteira e traseira juntamente com o conteúdo escaneado.
Nota: Enquanto a capa dianteira ou a capa traseira estiver selecionada, certas configurações da barra de ferramentas podem ser temporariamente desativadas.
Para exibir a imagem da segunda câmera na sua varredura:
Vá para Configurações > Configurações da Sub-Câmera, certifique-se de que “Mesclar” esteja selecionado e escolha a posição desejada para a imagem da segunda câmera.
Windows:
Certifique-se de que o modo Documento esteja selecionado e defina a opção de digitalização para “Página Única”.
Mac:
Suportado nos modos Documento de Identidade e Vídeo. Para o modo Documento de Identidade, defina o Corte para “Automático”.
Para digitalizar códigos de barras e gerar um arquivo Excel que contenha os dados digitalizados juntamente com as imagens JPG correspondentes, siga estes passos:
1. Abra o InnexScan e vá para a aba Código de Barras.
2. Selecione Excel + JPG para o Formato de Saída e configure outras opções de acordo com suas preferências.
3. Clique no botão Digitalizar; o software processará cada código de barras de acordo com as configurações que você definiu.
4. Após a digitalização:
.Cada código de barras será salvo como uma imagem JPG individual na Pasta de Saída.
.Um arquivo Excel será gerado, listando os valores dos códigos de barras digitalizados com links clicáveis para suas imagens correspondentes.
Preparando-se para a remoção dos dedos
1. Certifique-se de que a opção Esconder Dedos esteja selecionada no InnexScan.
2. Coloque um livro aberto com a página voltada para cima na esteira de escaneamento preta.
3. O centro do livro deve estar alinhado com a linha laranja vertical na tela.
4. Posicione seus dedos no meio das bordas do livro aberto para segurar as páginas firmemente.
5. Garanta uma distância mínima de 10 mm entre seus dedos e qualquer texto ou imagem.
Nota: Se os dedos estiverem muito próximos do texto ou imagens, o software pode não detectá-los e removê-los com precisão.

Diretrizes para posicionamento dos dedos
.Mantenha o dedo reto e centralizado ao longo da borda do livro aberto.
.Evite colocar os dedos perto do topo ou da parte inferior da página.
.Se usar mais de um dedo, mantenha-os próximos na borda central. Não espalhe os dedos, pois isso pode afetar a precisão da detecção.
Limitações conhecidas
1. Mantenha as bordas pretas ao redor do livro. Certifique-se de que áreas pretas visíveis cercam o livro na digitalização. Isso ajuda o software a distinguir as bordas do livro dos seus dedos.
2. Mantenha as bordas superior e inferior simétricas. Mantenha as bordas superior e inferior do livro niveladas e simétricas para melhorar a precisão da detecção dos dedos.
3. Garanta margens adequadas. Coloque os dedos em margens em branco, pelo menos 10 mm de qualquer texto ou imagem. Conteúdo sobreposto pode impedir a remoção adequada.
4. Evite páginas com desenhos ou ilustrações coloridas. O recurso de Ocultação de Dedos pode ter dificuldade em detectar dedos em páginas com desenhos coloridos ou ilustrações complexas. Para desempenho ideal, use esse recurso principalmente com páginas com muito texto ou em preto e branco.
Se você não vê a opção Modo Livro na interface do InnexScan, tente os seguintes passos:
1. Verifique a conexão do botão externo de obturador. O Modo Livro é ativado somente quando o software detecta que o botão manual externo ou o pedal de pé estão conectados.
2. Reinicie o Software. Se o Modo Livro ainda não aparecer, reinicie o InnexScan para atualizar a interface.
Os formatos suportados são os seguintes:
.Arquivos de Imagem: BMP, JPG, PNG, TIFF
.Arquivos PDF: PDF (Imagem), PDF (Pesquisável), PDF (Texto)
.Arquivos de Documento: Texto, Word, Excel, EPUB
.Arquivos de Áudio (Texto para Fala): MP3, WAV
*Disponível apenas na versão Windows.
.Arquivos de Vídeo: AVI (Windows); MP4, QuickTimeMovie (MacOS)
Nota: Os formatos de exportação disponíveis podem variar dependendo do modo de digitalização selecionado.
1. Clique na configuração do dispositivo no canto inferior esquerdo do software.
2. Selecione o dispositivo que deseja usar na lista.
Nota: InnexScan foi projetado especificamente para uso com o Innex DS200. Pode não funcionar corretamente com dispositivos de terceiros ou hardware não suportado.
O Innex DS200 está equipado com um guia a laser de Classe 2 para auxiliar no posicionamento preciso de documentos. Para sua segurança, por favor, evite olhar diretamente ou para o feixe refletido, pois pode causar lesões nos olhos.
Se você planeja exportar seu documento digitalizado para um formato baseado em texto, como PDF (Texto), PDF (Pesquisável) ou Word, certifique-se de selecionar o idioma que corresponde ao conteúdo antes de digitalizar.
Por favor, verifique o seguinte em sequência.
・Certifique-se de que o dispositivo/Sistema Operacional suporta a câmera. Os sistemas operacionais suportados estão listados abaixo.
<DC500>
Windows 11, 10
macOS 10.10 ou superior
Chrome OS
<Ideao VisualCam>
Windows 11/10
macOS 10.15 ou superior
<IdeaoCam (Chrome Extension)>
Windows, macOS, Chrome OS
・Certifique-se de usar o cabo original ou um cabo equivalente. Usar um cabo mais longo ou não certificado pode fazer com que o DC500 não seja reconhecido pelo seu dispositivo.
・Certifique-se de que a câmera não esteja conectada ao seu dispositivo via um hub USB com outros dispositivos, pois isso pode levar a uma alimentação insuficiente de energia e o DC500 não ser reconhecido pelo seu dispositivo. Tente desconectar outros dispositivos ou conectar o DC500 diretamente ao seu dispositivo para verificar se é reconhecido.
・Conecte o DC500 a uma porta USB diferente para verificar se é reconhecido.
・Às vezes, um cabo quebrado pode causar esse problema. Se você tiver cabos equivalentes, tente conectar usando esses cabos para ver se o dispositivo reconhece o DC500.
・Se o DC500 ainda não for reconhecido pelo seu dispositivo após testar vários cabos, conecte-o a outro dispositivo (se tiver algum) para verificar se é reconhecido.
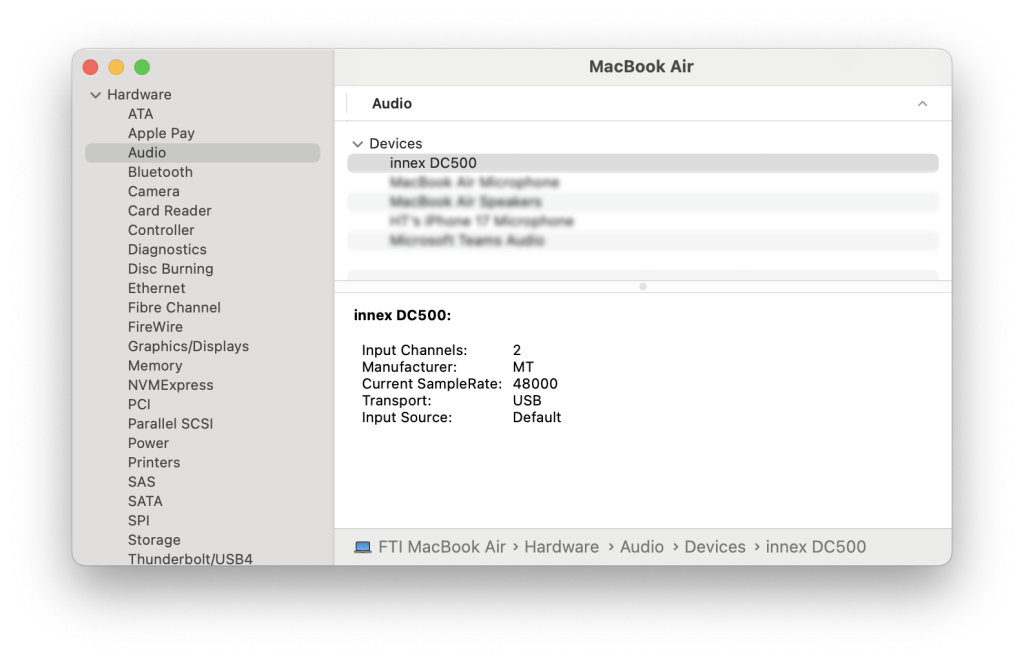
・Abra o Gerenciador de Dispositivos no Windows ou o Relatório do Sistema no Mac para verificar se o DC500 é reconhecido pelo dispositivo como uma câmera. Para dispositivos com Chrome OS, abra as configurações, selecione ‘Dispositivo’ ou ‘Bluetooth’ e verifique se o DC500 aparece na lista. Se já tentou tudo acima e seu dispositivo não reconhece o DC500, entre em contato com nosso suporte.

 Se o dispositivo reconhece a câmera, mas não consegue obter a imagem, por favor, veja “Meu dispositivo reconhece a câmera, mas não consegue obter a imagem do DC500 em alguns softwares.”
Por favor, verifique o seguinte em sequência.
・Certifique-se de que nas configurações de Privacidade e Segurança, o dispositivo permite que o aplicativo acesse a câmera e o microfone.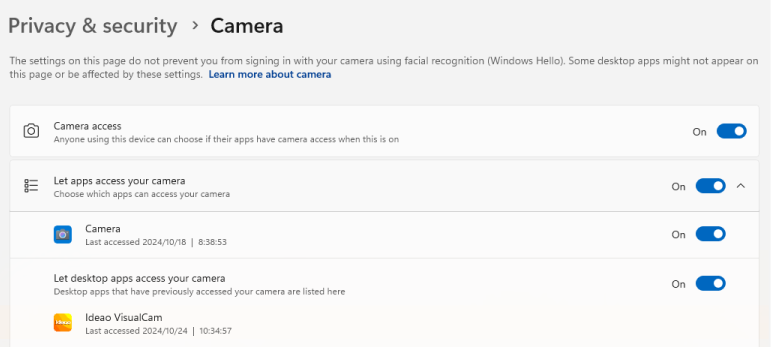
 ・Certifique-se de que o software antivírus não esteja bloqueando o Ideao VisualCam. Você pode acessar as configurações de gerenciamento de aplicativos do software antivírus para permitir que o Ideao VisualCam seja executado no seu computador. Abaixo estão os exemplos.
Avast: https://support.avast.com/en-ph/article/Use-Antivirus-blocked-allowed-apps
Kaspersky: https://support.kaspersky.com/KART/3.0/en-US/130083.htm
Certifique-se de que nenhum outro aplicativo, além daquele que você deseja usar para capturar imagens da câmera, esteja ocupando a câmera. Por favor, desligue todos os outros softwares que possam estar usando a câmera para solucionar esse problema. Por exemplo, não é incomum ter dificuldades para abrir a câmera no Zoom se ela ainda estiver sendo usada pelo Ideao VisualCam.
Se você estiver usando um software de videoconferência e não conseguir obter uma imagem da câmera, por favor, certifique-se de que a câmera não esteja silenciada. Normalmente, o ícone de vídeo está localizado no canto inferior esquerdo, e se estiver silenciado, o ícone será riscado com uma linha vermelha. Toque no ícone para desmutar a câmera.
Se várias câmeras estiverem conectadas ao seu dispositivo e a imagem de outra câmera for exibida no aplicativo, por favor, tome as seguintes ações:
Para Ideao VisualCam
・Clique no ícone de menu no canto superior esquerdo da tela (o ícone circular com três linhas horizontais).
・Clique em “Dispositivo” no menu
・Escolha Innex DC500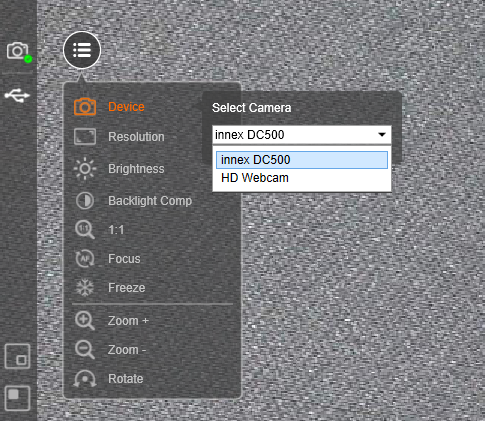 Para o software de videoconferência
・Clique no ícone “^” ao lado do ícone de vídeo (normalmente o ícone fica no canto inferior esquerdo) e exiba a lista de câmeras.
・Escolha Innex DC500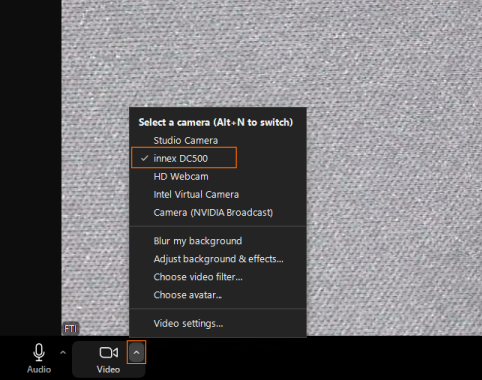
Por favor, verifique abaixo na sequência.
・Acesse as configurações de ‘Privacidade e Segurança’, depois clique em ‘Microfone’ e certifique-se de que o aplicativo tem permissão para acessar os microfones.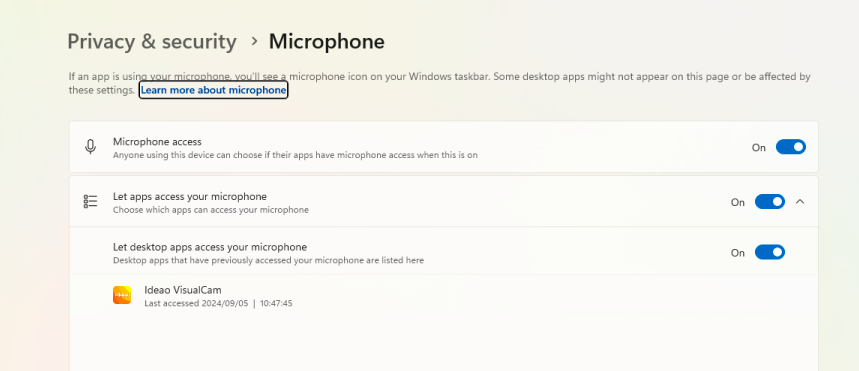
 ・Se você estiver usando o software de videoconferência, em muitos casos, a fonte de vídeo e a fonte de áudio são separadas. Portanto, mesmo que o vídeo seja trocado para Innex DC500, isso não significa que o DC500 também esteja selecionado como microfone. Clique no ícone “^” ao lado do ícone “Áudio” e escolha Innex DC500 como microfone.
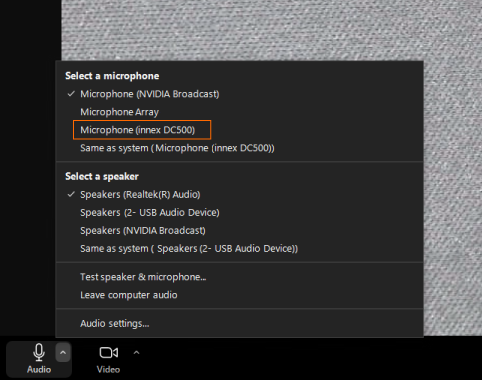 Por favor, verifique as configurações de entrada de som no Windows ou as configurações do microfone no software de videoconferência para garantir que o volume do microfone não esteja definido como zero ou significativamente baixo.
・Abra o Gerenciador de Dispositivos no Windows ou o Relatório do Sistema no Mac para verificar se o DC500 é reconhecido pelo dispositivo como um dispositivo de áudio USB. Para dispositivos que usam Chrome OS, abra as configurações, selecione ‘Dispositivo’ ou ‘Bluetooth’ e verifique se o DC500 aparece na lista. Se já tentou tudo acima e seu dispositivo não reconhece o DC500, por favor, entre em contato com nosso suporte.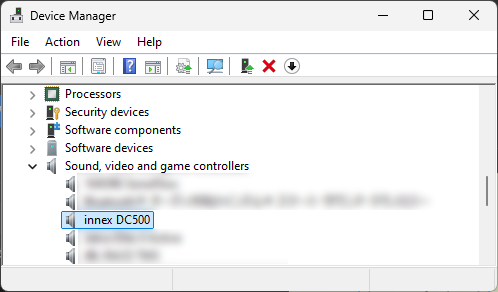
Para uso com iPad, por favor, esteja atento aos pontos abaixo.
1. Nem todos os iPads suportam câmeras externas. Apenas aqueles com uma porta USB Tipo-C são compatíveis.
2. A versão do iPadOS deve ser 17 ou superior.
3. Nem todos os aplicativos atualmente suportam câmeras externas.
4. A experiência do usuário pode variar ao usar a câmera com um iPad em comparação a um PC ou Mac.
5. A resolução e a taxa de quadros podem variar dependendo do iPad e do aplicativo.
6. Alguns aplicativos podem não ter uma função para trocar de câmeras. Quando uma câmera está conectada, a fonte de imagem pode trocar automaticamente para a câmera externa. Você pode precisar desconectar fisicamente a câmera para voltar a usar a câmera embutida.
7. Para aplicativos de videoconferência que não suportam entrada de câmera externa, pode ser necessário usar aplicativos de terceiros para exibir a imagem da câmera e, em seguida, compartilhar sua tela no aplicativo de videoconferência.
Por favor, verifique o seguinte em sequência:
・Certifique-se de que a tampa de plástico foi removida da lente.
・Certifique-se de que a distância entre a lente da câmera e o objeto seja de pelo menos 10 cm (3,9 polegadas). Caso contrário, a imagem não ficará devidamente focada.
・Pressione o botão ‘AF’ na parte superior para ativar o foco automático manualmente e verificar se a imagem fica devidamente focada. (Assistir tutorial)
O brilho da imagem é afetado pela cor de fundo. Por exemplo, se o fundo for escuro e o objeto que você está capturando for brilhante, a câmera tende a ajustar o equilíbrio de branco com base na cor dominante do fundo. Como resultado, a imagem pode parecer mais brilhante. No Ideao VisualCam, você pode clicar no ícone ‘Backlight’ para ajustar o equilíbrio de branco usando o controle deslizante. Para o software que não possui função de ajuste de equilíbrio de branco, certifique-se de que o contraste entre o fundo e o objeto não seja muito extremo.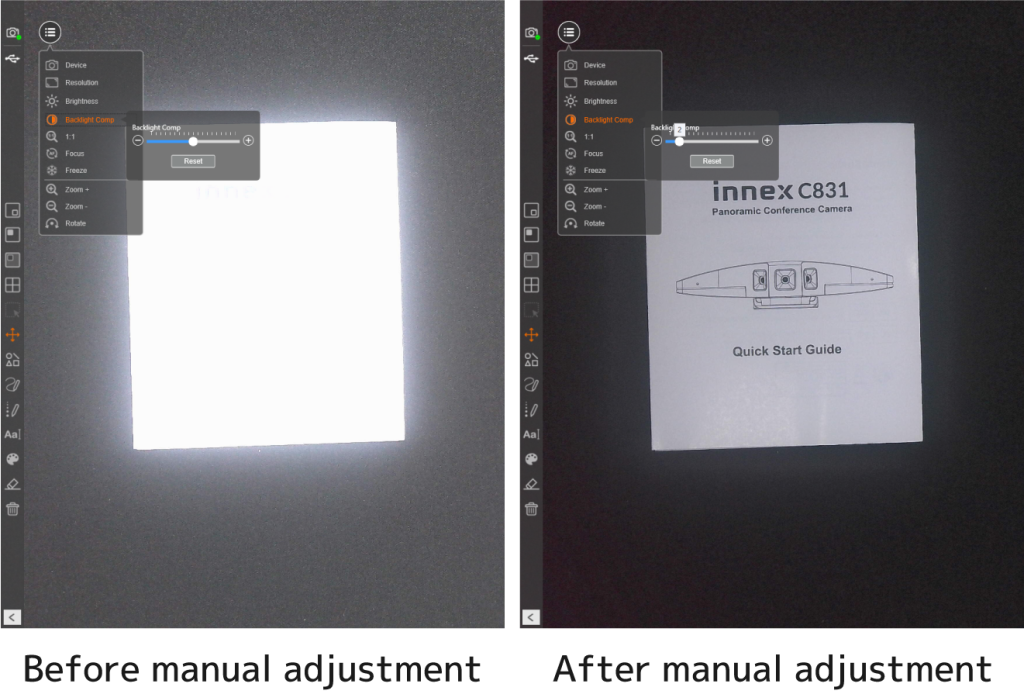
Por favor, verifique o seguinte em sequência:
・O software proprietário Ideao VisualCam suporta resolução 4K. No entanto, em alguns softwares, especialmente softwares de videoconferência, a resolução máxima pode não atingir 4K. Por favor, verifique a resolução máxima suportada pelo software que você está usando.
・A resolução padrão em alguns softwares pode não ser tão alta quanto 4K. Por favor, certifique-se de que a resolução não esteja configurada para um valor baixo no software. ・Usar zoom digital resulta em uma imagem borrada, pois recorta uma parte da imagem original e a amplia digitalmente. Em vez de usar o zoom digital, recomendamos colocar a câmera fisicamente mais perto do objeto, garantindo que a imagem permaneça clara sem sacrificar a resolução. (Por favor, certifique-se de que a distância entre a lente da câmera e o objeto seja de pelo menos 10cm/3,9 polegadas para que o objeto permaneça em foco)
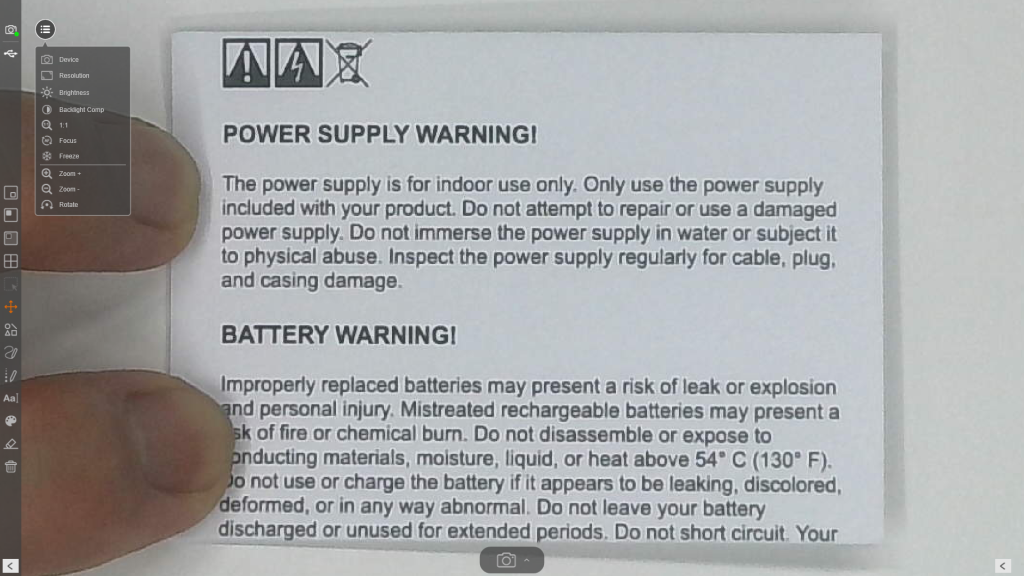
Por favor, verifique o seguinte em sequência:
・Por favor, certifique-se de que a câmera não está colocada perto de dispositivos que geram um campo magnético forte.
・Certifique-se de que a frequência de energia corresponde ao padrão da sua região. Para verificar ou alterar a frequência de energia atual, inicie o Ideao VisualCam e navegue até a seção ‘Dispositivo’.
・Estenda completamente o braço do DC400/500.
・Certifique-se de que a lente da câmera esteja posicionada diretamente acima do centro do papel e esteja colocada na horizontal.
・Pressione o botão de menu localizado no lado esquerdo da tela (o ícone com três linhas horizontais).
・Selecione “Resolução” e configure para 3840 x 2880.
・Se o papel A3 inteiro não estiver sendo capturado, ajuste a posição da câmera de acordo.
A maioria dos softwares de videoconferência, como Google Meet, Zoom, Microsoft Teams e Webex, espelha a sua transmissão de câmera por padrão. No entanto, isso não afeta a visão do receptor; quem estiver assistindo ao seu vídeo verá a versão não espelhada.
Se você ainda quiser visualizar uma imagem não espelhada do seu lado, siga os passos abaixo.
Solução comum para todos os softwares de videoconferência
1. Inicie o Ideao VisualCam, exibindo a imagem da câmera Innex DC500.
2. Durante a sua chamada de vídeo, não selecione DC500
3. Selecione “Compartilhar tela” / “Apresentar agora” (varia dependendo do software que você usa), e compartilhe a tela do seu Ideao VisualCam.
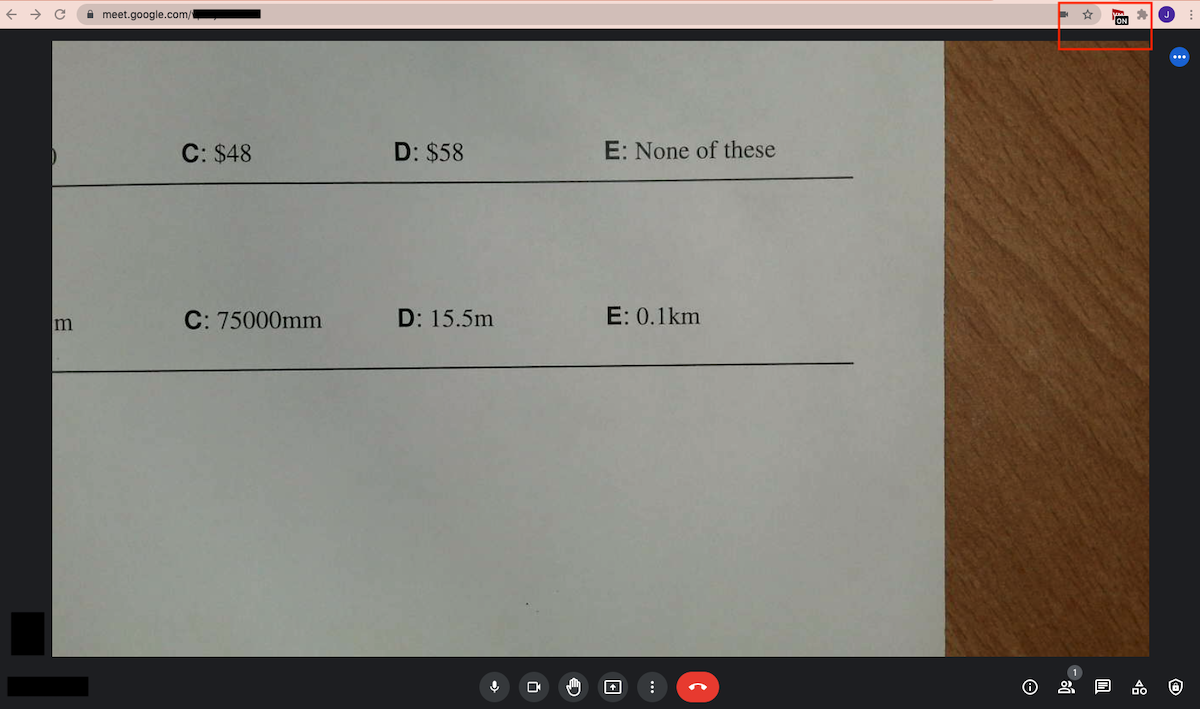
Google Meet: ( Assistir tutorial))
1.Existem várias extensões do Google Chrome para espelhar seu vídeo. Recomendamos que você baixe o “VideoMirror”.
2. Inicie uma chamada no Google Meet e selecione sua câmera Innex DC500, e então clique no ícone de extensão. Os vídeos serão espelhados.
* Por favor, note que o VideoMirror é um aplicativo de terceiros, a FTI não fornece suporte ao cliente para este aplicativo.
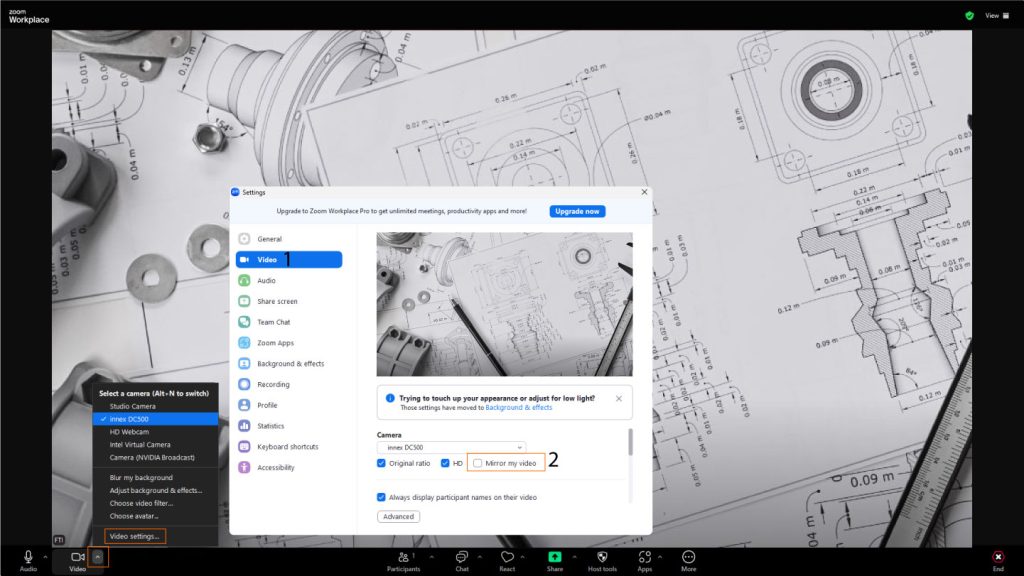
Zoom: (Assistir tutorial) ou outro software de videoconferência
1. Vá para “Configurações de Vídeo” no Zoom
2. Desmarque a caixa “Espelhar meu vídeo”
Existem várias maneiras de exibir imagens de várias câmeras em softwares de videoconferência, como abaixo.
Webcam + Compartilhar tela:
1. Selecione a webcam para mostrar seu rosto no software de videoconferência.
2. Inicie o Ideao VisualCam e exiba a imagem do DC500 lá.
3. Clique em “Compartilhar” no software de videoconferência
4. Selecione ‘Ideao VisualCam’ como a fonte e clique em ‘Compartilhar’ para começar a compartilhar.
Ideao VisualCam modo tela dividida
1. Não ligue a câmera no software de videoconferência
2. Inicie o Ideao VisualCam e exiba a imagem do DC500 lá
3. Clique em “Tela dividida” no canto superior esquerdo da tela
4. Clique em qualquer parte do lado direito da tela para mostrar o ícone “Menu”
5. Clique no ícone do menu e clique em “Alternar para câmera”
6. Clique em “Dispositivo” e selecione a câmera da qual deseja exibir a imagem
Ideao VisualCam modo PIP
1. Não ligue a câmera no software de videoconferência
2. Inicie o Ideao VisualCam e exiba a imagem do DC500 lá
3. Clique no ícone PIP na barra de ferramentas à esquerda para exibir a imagem da câmera.
Incorpore a imagem ao vivo do DC500 em uma apresentação do PowerPoint
1. Ao criar o conteúdo da apresentação, selecione “Cameo” na aba “Inserir”.
2. Escolha o estilo da câmera, clique em “Visualizar” e selecione o DC500 como fonte da câmera.
3. Inicie a apresentação, e a visualização ao vivo do DC500 aparecerá, exibindo também seu rosto no software de videoconferência.
Gerencie as configurações do aplicativo para permitir que o Ideao VisualCam seja executado no seu computador.
Avast: https://support.avast.com/en-ph/article/Use-Antivirus-blocked-allowed-apps
Kaspersky: https://support.kaspersky.com/KART/3.0/en-US/130083.htm
Por favor, siga os passos abaixo para executar o software automaticamente na inicialização do Windows.
- Selecione o botão Iniciar e role para encontrar o aplicativo.
- Clique com o botão direito no aplicativo, selecione Mais e depois selecione Abrir local do arquivo. Isso abre o local onde o atalho do aplicativo está salvo.
- Com o local do arquivo aberto, pressione a tecla do logotipo do Windows + R, digite shell:startup e selecione OK. Isso abre a pasta de Inicialização.
- Copie e cole o atalho do aplicativo do local do arquivo para a pasta de Inicialização.
- Vá para Configurações do Windows > Aplicativos > Inicialização.
- Selecione a chave para ativar.
- Reinicie o PC e verifique se o aplicativo é iniciado automaticamente.
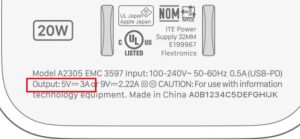
- Conecte o receptor RX100 ao display usando o cabo de energia e o cabo HDMI. Se o display não tiver uma porta Tipo-C para suportar energia superior a 5V/2A, use o cabo de switch incluído para convertê-lo em dois conectores USB-A. Um dos conectores USB-A deve ser USB 3.0, que pode fornecer energia para o receptor. Alternativamente, você pode conectar o cabo Tipo-C a um adaptador de energia (não incluído no pacote).
- Para conectar uma webcam USB, conecte o cabo USB da câmera na porta USB-A do receptor.
- Monte o receptor RX100 no display usando a presilha de montagem embutida. Certifique-se de que o receptor esteja posicionado na parte frontal para uma transmissão de sinal sem fio ideal. A faixa de transmissão sem fio ideal é de até 5 metros.
- Altere a fonte de saída do display para a porta HDMI conectada.
- Conecte o speakerphone ST100 a uma porta Tipo-C com recursos completos no seu laptop. Aguarde até que a luz do botão de transmissão de tela fique verde, então pressione o botão para começar a transmitir sua tela. Pressione o botão novamente para pausar a transmissão. * No caso de a porta Tipo-C do laptop não atender aos requisitos de recursos completos, use o adaptador USB-C para HDMI & USB-A.
- Para usar o speakerphone ST100 e acessar a câmera sem fio, no seu software de videoconferência, selecione “Conectar” como seu microfone, alto-falante e câmera.
Nem todas as portas Type C de laptops suportam sinal de exibição. Além disso, pode haver problemas de compatibilidade entre diferentes fabricantes e modelos, resultando nessa falha. Um conversor de Type C para A e HDMI está incluído para o usuário como alternativa.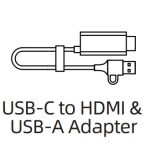
Se a sua tela não possui uma porta USB-C com saída superior a 5V/2A, você pode conectar o cabo USB-C a um adaptador de carregador (bloco de carregador USB) como alternativa.
Por favor, certifique-se de usar um adaptador com especificação de 5V/2A ou superior (normalmente, a porta USB-C estará no bloco de carregador em vez de USB A) para garantir uma alimentação adequada ao receptor RX100. Caso contrário, o receptor RX100 pode não funcionar corretamente. 
O botão de volume do alto-falante Connect (ST100) funciona apenas para ajustar o volume do sistema no Windows (atualmente não funciona com MAC), ele não altera o volume do alto-falante em alguns softwares de videoconferência. Por favor, use o controle de volume da videoconferência no aplicativo para ajustar o volume.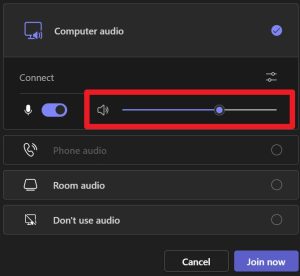
Às vezes, quando o Innex Connect está conectado ao seu dispositivo, as configurações de volume podem não sincronizar corretamente. Isso pode fazer com que o som de saída fique mais baixo do que o esperado. Se isso acontecer, tente pressionar o botão de Volume para Baixo uma ou duas vezes. Em alguns casos, o som pode ficar mais alto após fazer isso.
-
● Azul fixo – A alimentação está conectada e o dispositivo está ligado.
● Azul piscando – O dispositivo entrou no Modo de Suspensão. Toque na tela para reativá-lo.
● Luz azul fixa com a tela escura – O dispositivo está no modo “Som Apenas”. Pressione novamente o botão “Sound Only” no controle remoto para voltar ao modo normal.
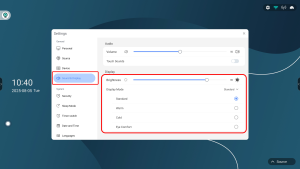
Você pode ajustar a temperatura de cor (Modo de exibição) e o brilho em: Configurações (Configurações principais) > Som e Tela > Tela.
O CM55 não oferece suporte para alterar a proporção (aspect ratio) da tela.
O OPS não ligará a menos que a fonte de entrada seja alterada para OPS.
Para ligar o OPS:
1. Altere a fonte de entrada para OPS.
2. Inicialmente, a tela poderá exibir “Sem sinal” — isso é normal. O sistema está aguardando que o OPS ligue completamente e inicialize. Aguarde alguns instantes e a tela do OPS deverá aparecer automaticamente assim que estiver pronta.
3. Ou, nas configurações principais, vá para Fonte e habilite “OPS iniciar automaticamente ao ligar” para permitir que o OPS inicie automaticamente com o sistema.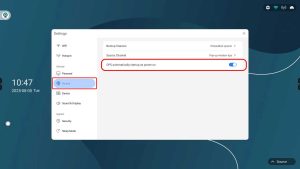
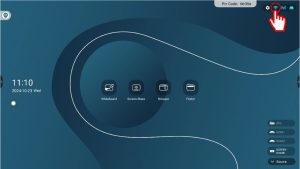
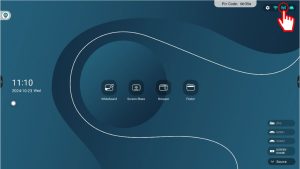
Toque no ícone de Wi-Fi no canto superior direito da tela para abrir as configurações de Wi-Fi.
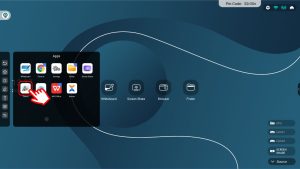
● Toque no ícone de Hotspot na interface principal para ativá-lo.
● Para alterar o nome da rede (SSID) ou a senha, vá em Configurações > Rede > Hotspot.
● Após editar os campos de SSID e Senha, toque em Salvar para aplicar as novas configurações.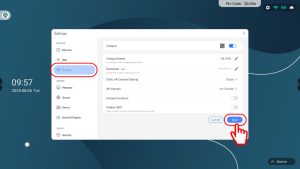
A senha padrão é 1234.
Você pode alterá-la em: Configurações > Segurança, e então inserir uma nova senha.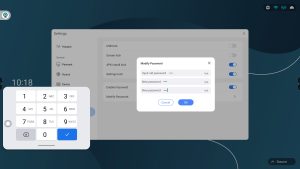
Se você esqueceu a senha das configurações do sistema do CM55, siga os passos abaixo:
- Senha padrão
● A senha padrão é 1234. - Redefinição de senha via restauração de fábrica
● Se você alterou a senha e esqueceu, será necessário realizar uma restauração de fábrica.
● Para restaurar: Pressione e segure o botão físico de reset na parte traseira do CM55 até a tela apagar.
● Após reiniciar, o sistema será restaurado para as configurações de fábrica e a senha voltará para 1234.
3. Atenção - Este procedimento redefine todas as configurações do sistema. Use com cautela se o dispositivo já estiver configurado para uso ou implantação.
Observação: Por razões de segurança, a página de Configurações é protegida por senha por padrão.
1. Toque no ícone “Finder” na área de trabalho.
2. Na barra lateral esquerda, localize e selecione o pendrive listado em Dispositivos.
3. Toque na unidade USB para visualizar e acessar seus arquivos.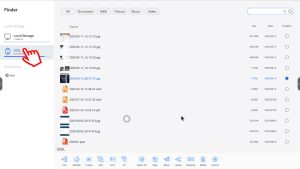
Você pode alterar a fonte de entrada das seguintes maneiras:
1. Use o controle remoto para mudar diretamente a fonte de entrada.
2. Toque no ícone de Fonte de Sinal no canto inferior direito e selecione a entrada desejada.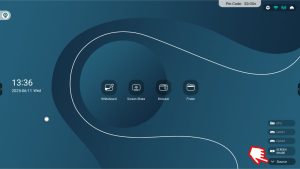
3. Toque no ícone de Menu na barra lateral e escolha a fonte de entrada.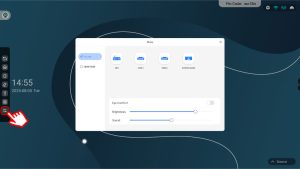
4. Em Configurações > Fonte > Canal de Fonte, se você ativar Troca Automática, o dispositivo alternará automaticamente para um novo sinal detectado.
Se a opção Aviso pop-up estiver ativada, uma mensagem aparecerá quando um novo sinal for detectado, pedindo confirmação para alternar a entrada.1. Verifique a conexão do cabo: Certifique-se de que o cabo HDMI está conectado corretamente e não está danificado.
2. Ajuste as configurações de EDID: Na tela da fonte de sinal, abra a barra lateral e toque no ícone de menu. Quando a janela da fonte de sinal aparecer, toque em HDMI EDID e alterne o modo EDID entre 1.4 e 2.0 para resolver problemas de compatibilidade com o dispositivo conectado.1. Abra o Toolbox na barra lateral.
2. Toque em “TouchLock” e defina uma senha temporária.
(Ou pressione o botão Touch Lock no controle remoto.)
3. A tela ficará levemente escura e um ícone de cadeado aparecerá no canto inferior esquerdo.
4. Para desbloquear, toque no cadeado e insira a senha definida.
Observação: Se esquecer a senha, será necessário reiniciar o CM55.
1. Dispositivo de saída de áudio não está definido como CM55: No dispositivo conectado (por exemplo, laptop), a saída de áudio pode ainda estar configurada para os alto-falantes internos. Vá para as configurações de som e selecione “CM55” ou “Áudio HDMI” como dispositivo de saída.
2. Cabo de áudio não conectado (se estiver usando HDMI + USB): Em alguns dispositivos, o HDMI transmite apenas vídeo e o áudio pode exigir uma conexão USB separada. Certifique-se de que os cabos HDMI e USB estejam conectados corretamente.
3. Volume do alto-falante CM55 muito baixo ou silenciado: Verifique as configurações de volume do CM55 e confirme que não esteja no modo silencioso.
4. Volume de som do dispositivo muito baixo ou silenciado: Verifique as configurações de volume do dispositivo conectado e confirme que não esteja no modo silencioso.
5. Conteúdo protegido ou restrito (DRM): Alguns conteúdos protegidos (como Netflix) podem bloquear a saída de áudio em determinadas configurações. Experimente outro conteúdo ou confirme a compatibilidade.
6. Problema no cabo ou na porta: Tente usar outro cabo HDMI ou outra porta.1. Verifique as pilhas: As pilhas podem estar descarregadas ou instaladas incorretamente. Substitua por pilhas novas e certifique-se de que a polaridade esteja correta.
2. Linha de visão bloqueada: O controle remoto utiliza infravermelho (IR), que requer uma linha de visão clara até o sensor. Certifique-se de que não haja nada obstruindo o caminho entre o controle remoto e o dispositivo.
3. Controle fora de alcance: Os controles remotos IR têm alcance limitado. Utilize o controle remoto a uma distância de 5 a 7 metros do dispositivo.
4. Receptor não responde: O dispositivo pode estar travado ou sem resposta. Reinicie o dispositivo e tente novamente.Os botões com etiquetas azuis no controle remoto são usados para operar as câmeras integradas. Eles só funcionam quando a câmera está ativa ou em uso.
Sim. Embora recomendemos usar o pedestal móvel incluído pela sua praticidade — permitindo mover o display facilmente e transformar qualquer espaço em uma área colaborativa — o CM55 também pode ser instalado na parede ou em um suporte de terceiros.
O CM55 é compatível com o padrão de montagem VESA
Tamanho VESA: 600 × 200 mmEste é um padrão amplamente adotado, compatível com muitos suportes comerciais de parede.
Observação: Certifique-se de que o suporte escolhido seja compatível com VESA 600×200 e suporte o peso de um display de 55 polegadas.Sim, você pode consultar o link a seguir.
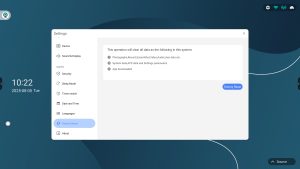
Este documento fornece instruções de instalação, especificações e dicas de solução de problemas para os dispositivos da Série CM.*Antes de atualizar, observe que este método restaurará o dispositivo para as configurações de fábrica e todos os dados do usuário serão apagados.
1. Prepare um pendrive formatado em FAT32.
2. Na pasta raiz do pendrive, crie uma pasta chamada “update”.
3. Extraia o pacote de firmware, copie o arquivo de firmware para o pendrive e renomeie-o para “YS-EMEETING-ES982.img”.
4. Insira o pendrive na porta USB 2.0 do CM55.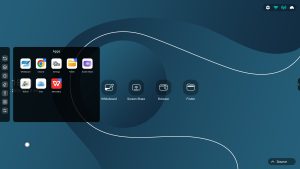
5. Abra a lista de aplicativos e execute o app OTA (Over-the-Air Update).
*Se você não encontrar o app OTA:
– Pressione e segure o título “Apps”.
– Uma tela de senha aparecerá.
– Insira sua senha ou a senha padrão 1234.
– Pressione OK e o app OTA oculto ficará visível.
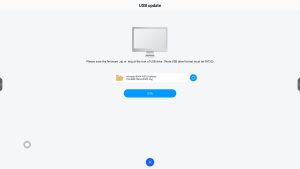
6. Selecione “USB Update”. Quando o arquivo de atualização aparecer na tela, pressione “OTA (Over-the-Air Update)” para iniciar o processo de atualização.
Algumas mudanças exigem reinicialização do sistema para serem aplicadas. Após mudar o idioma, reinicie o CM55 para garantir que todas as configurações de idioma sejam aplicadas corretamente.
● Vermelho piscando (devagar): Conectando
● Branco piscando (rápido): Conectado / Aguardando transmissão
● Branco fixo: Transmitindo
● Vermelho fixo: Funcionando de forma anormal
1. Toque no ícone Screen Sharing na tela inicial ou no menu de fontes.
2. Toque no ícone Configurações no canto superior direito da interface do Connect Pro.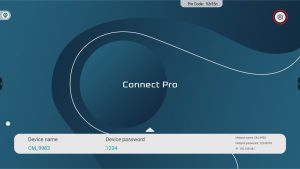
3. Acesse General > Dynamic device password. Duas opções estarão disponíveis:
● Static Password
– Quando selecionada, você pode alterar a senha em Device password e usá-la sempre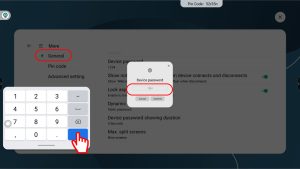
● Random Password with Timed Refresh
– O sistema gera uma senha aleatória que é atualizada automaticamente em intervalos regulares. Intervalos disponíveis: 10, 30, 45, 60 ou 120 minutos.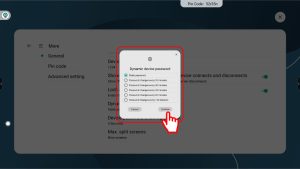
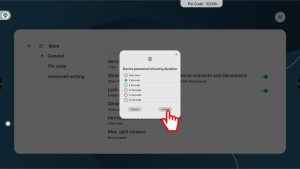
Sim. Você pode ajustar o tempo de exibição da notificação da senha em: Configurações de compartilhamento de tela > Geral > Device password showing duration.
No entanto, observe que a senha do dispositivo também aparece diretamente na tela inicial, permitindo consultá-la a qualquer momento sem esperar a notificação.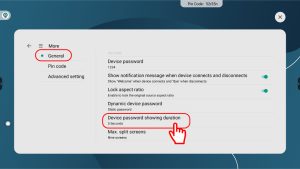
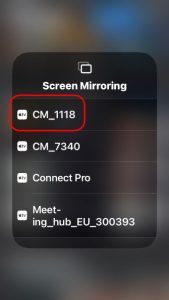
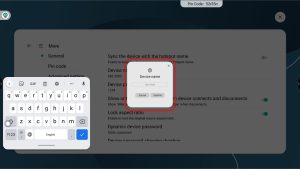
É o nome que identifica o dispositivo anfitrião, permitindo que outros dispositivos o encontrem e façam o espelhamento de tela. Por padrão, o nome do dispositivo para compartilhamento de tela é o mesmo nome do hotspot.

Você pode alterar o nome do dispositivo de forma independente do nome do ponto de acesso seguindo estas etapas.
● Acesse Configurações do Connect Pro > Mais (More) > Geral (General)
● Desative “Sync the device name with the hotspot name”
● Toque em “Device Name” para editar o novo nome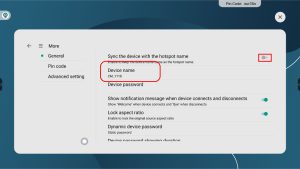
Este é um comportamento esperado ao conectar pela primeira vez ou ao usar um dispositivo novo. Veja o que esperar:
1. Após conectar o Connect Pro Button a um dispositivo, o LED começa a piscar em vermelho.
2. Leva aproximadamente 15 segundos para que o Connect Pro Button se comunique com o receptor e fique pronto para o compartilhamento de tela.
3. Quando conectado, o LED pisca em branco, indicando que o botão está pronto para compartilhamento de tela.
Ao pressionar o botão, o LED fica branco fixo, indicando que o compartilhamento de tela está ativo.Verifique se a porta USB Type-C do seu PC suporta Power Delivery (PD) e DisplayPort Alternate Mode (DP Alt Mode).
Se a porta não suportar DP Alt Mode ou Power Delivery, utilize outro método de compartilhamento de tela, como Connect Pro Software, Miracast ou Chromecast.O LED vermelho fixo indica erro de emparelhamento. Siga os passos abaixo para emparelhar novamente com o receptor:
1. Conecte o Connect Pro Button na porta USB Type-C na parte traseira do CM55.
2. A tela exibirá o status da conexão.
3. Quando o LED mudar de vermelho fixo para branco piscando, significa que o botão foi emparelhado com sucesso ao CM55.
4. Após o emparelhamento, você pode conectar o botão ao seu PC e iniciar o compartilhamento de tela.Para usar o Connect Pro Button:
1. Certifique-se de que o Connect Pro Button está emparelhado com o receptor. Se o LED permanecer vermelho fixo, realize o emparelhamento novamente.
2. Verifique se a porta USB Type-C do seu dispositivo suporta DP Alt Mode e Power Delivery.
3. Se o Connect Pro Button estiver conectado ao dispositivo através de um hub USB com outros acessórios, ele pode não receber energia suficiente para funcionar corretamente. Conecte diretamente ao dispositivo.Para usar o Connect Pro Software:
1. Certifique-se de que o software está na versão mais recente.
2. Garanta que o dispositivo e o receptor estejam conectados à mesma rede (e ao mesmo subnet se estiver usando VLANs).
3. Certifique-se de que roteadores ou redes corporativas não estão bloqueando mDNS.
4. Se mDNS estiver bloqueado, conecte seu dispositivo ao hotspot do receptor.
5. Conexão por endereço IP requer que o dispositivo esteja conectado ao hotspot do receptor.Para usar AirPlay:
1. Certifique-se de que o dispositivo e o receptor estão na mesma rede (e mesmo subnet se usar VLANs).
2. Verifique se roteadores ou redes corporativas não estão bloqueando mDNS.
3. Se mDNS estiver bloqueado, conecte o dispositivo ao hotspot do receptor.
4. Vídeos de plataformas como Netflix não podem ser transmitidos via AirPlay devido a políticas de proteção de conteúdo e DRM.
5. Às vezes, reiniciar ajuda. Reinicie seu iPhone e tente novamente.Para usar o Miracast:
1. Certifique-se de desligar a função hotspot do CM55. Para desligar o hotspot, vá em Configurações principais > Hotspot e desative o interruptor.
2. Certifique-se de que a função Miracast esteja ativada. Para ativar o Miracast, vá em Configurações do Connect Pro > Miracast e ative o interruptor.
3. Certifique-se de que o dispositivo esteja conectado à mesma rede.
4. Em alguns dispositivos Windows ou Android, a função Miracast deve ser habilitada manualmente. Certifique-se de que está ativada.
5. Certifique-se de que os drivers de gráficos e Wi-Fi do seu dispositivo estejam atualizados. Drivers desatualizados podem impedir o funcionamento do Miracast, especialmente em PCs com Windows.
6. Interferência de softwares antivírus ou firewall: Certas configurações de proteção de rede ou regras de firewall podem bloquear conexões de transmissão.
7. Certas configurações de proteção de rede ou regras de firewall podem bloquear conexões de transmissão. Distância física, paredes ou interferência de outros dispositivos podem enfraquecer o sinal do Miracast.
8. Após usar o Miracast para transmitir a tela, se você alterar o nome do dispositivo, o nome antigo ainda pode aparecer na lista de displays disponíveis na próxima vez que tentar se conectar. Selecionando o nome antigo e conectando, o nome atualizado será refletido. Alternativamente, vá em Configurações do Windows > Bluetooth e dispositivos > Monitores e docks sem fio, selecione o nome antigo e escolha “Remover este dispositivo”. Em seguida, realize a busca de dispositivos Miracast novamente e o novo nome será exibido.Para usar Chromecast:
1. Certifique-se de que o dispositivo e o receptor estão conectados à mesma rede (e mesmo subnet se usar VLANs).
2. Verifique se roteadores ou redes corporativas não estão bloqueando mDNS.
3. Se mDNS estiver bloqueado, conecte o dispositivo ao hotspot do receptor.
4. Vídeos de plataformas como Netflix não podem ser transmitidos via Chromecast devido a políticas de proteção de conteúdo e DRM.
5. Às vezes, reiniciar ajuda. Reinicie seu dispositivo e tente novamente.Durante a conexão, o LED do Connect Pro Button pisca vermelho. Uma vez estabelecida a conexão, o LED pisca branco, indicando que está pronto para compartilhamento de tela.
Se o LED continuar piscando vermelho por um longo período, verifique o seguinte:
1. Certifique-se de que o seu laptop detectou um novo dispositivo externo chamado “Connect Pro”. Uma janela pop-up aparecerá quando o dispositivo for reconhecido.
*Se o laptop não detectar o Connect Pro Button, tente conectá-lo a uma fonte de energia.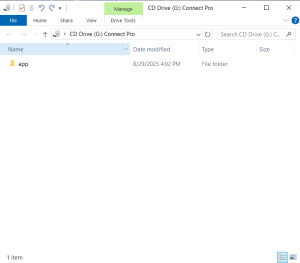
2. Após a detecção, o Connect Pro Button irá procurar automaticamente o receptor. Dependendo do ambiente de rede, esse processo pode levar mais de 30 segundos.
3. Se a luz vermelha continuar piscando, abra as configurações do hotspot e verifique o canal usado pelo CM55.
*Para melhor estabilidade, recomenda-se usar canais não-DFS, como 36, 40, 44, 48, 149, 153, 157 ou 165.
Para o primeiro uso, a stylus precisa ser carregada antes.
● A stylus é enviada em modo de transporte para evitar descarga excessiva da bateria.
● Carregar a stylus a tirará do modo de transporte e a deixará pronta para uso.Certifique-se de que a stylus está totalmente carregada
● Utilize um cabo USB-A para USB-C. Usar um cabo USB-C para USB-C pode impedir o carregamento correto.
● Durante o carregamento, a luz laranja permanece acesa.
● Quando totalmente carregada, a luz se apaga e a caneta estará pronta para uso.
● O carregamento completo leva cerca de 1 hora. Desconecte a caneta após o carregamento para preservar a vida útil da bateria.
● Uma carga completa permite até 50 horas de uso contínuo.
● Se não for usada, a stylus entra em modo de descanso para economizar energia.Ao usar uma caneta de terceiros, certifique-se de que ela seja compatível com MPP.
A stylus vem com duas pontas de reposição incluídas na embalagem. Se a ponta estiver desgastada ou danificada, substitua-a por uma das pontas incluídas.
Nota: O lado traseiro da stylus (cabo da caneta) não é substituível e não há peças de reposição fornecidas.Geral: Certifique-se de que o Touch Lock está desativado. Se estiver ativado, desbloqueie primeiro.

Conexão HDMI: Ao conectar um dispositivo via HDMI, também é necessário conectar um cabo USB-B para USB-A para que o CM55 suporte controle touch.
Usando Connect Pro:
● Dispositivos iOS não suportam touchback control devido a restrições do sistema.
● Compartilhamento de tela via AirPlay ou Chromecast não suporta touchback control.
● Certifique-se de que o Touchback Control está ativado em Connect Pro > Configurações Avançadas.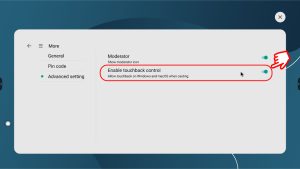
Por padrão, a ferramenta de quadro branco do CM55 só aceita entrada da stylus. Para escrever com o dedo, ative a opção “Touch as Pen” na barra inferior do aplicativo de quadro branco.

Abaixo estão os gestos com vários dedos disponíveis na ferramenta quadro branco CM55:
● Mover a tela: arraste com dois dedos para reposicionar a tela.
● Ampliar/reduzir: aperte com dois dedos para ampliar ou reduzir.O desempenho do quadro branco do CM55 pode ser afetado pelo conteúdo no canvas e pelo uso geral do sistema. Por exemplo, várias abas do navegador abertas ou vídeos em execução podem consumir CPU e memória, causando lentidão.
Para uma experiência mais suave, recomenda-se:
● Limitar tarefas em segundo plano durante o uso do quadro branco
● Usar o quadro branco como aplicativo independente sempre que possível
● Salvar regularmente o conteúdo com screenshots para evitar perda de dados devido à lentidão do sistema1. Certifique-se de que o dispositivo móvel está conectado ao hotspot.
2. Toque na função “Compartilhar” no CM55.
3. Um QR code aparecerá na tela.
4. Escaneie o QR code com o dispositivo móvel.
5. Uma página web exibirá o conteúdo atual do quadro branco.
6. Você pode tirar screenshots ou baixar o conteúdo diretamente da página para registrar a discussão.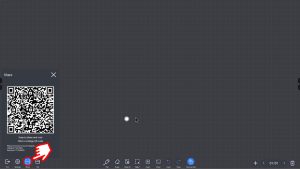
O desempenho do toque pode ser ocasionalmente afetado pela alimentação elétrica ou interferência de frequências próximas. Verifique o seguinte:
1. Certifique-se de que a energia do dispositivo e a tomada elétrica estejam devidamente aterradas. Use o cabo de alimentação original fornecido com o dispositivo.
2. Verifique se há motores, equipamentos elétricos ou outras fontes de interferência de baixa frequência próximas operando em frequências similares à da stylus. Se houver, desligue-os ou afaste o dispositivo da fonte de interferência.O Modo Galeria é um recurso que detecta automaticamente múltiplos participantes no campo de visão da câmera e exibe quadros individuais de cada pessoa simultaneamente na tela. Isso cria uma experiência de videoconferência mais focada e envolvente, destacando cada participante igualmente. No CM55, o Modo Galeria suporta até 5 pessoas ao mesmo tempo.
O Auto-framing é um recurso do CM55 que detecta automaticamente e ajusta o enquadramento da câmera para manter todos os participantes visíveis. À medida que as pessoas entram ou saem do espaço da reunião, a câmera faz zoom e panorâmica dinâmica para garantir que todos permaneçam enquadrados corretamente, sem necessidade de ajuste manual.
O Modo Rastreamento de Palestrante utiliza reconhecimento avançado de áudio para detectar e seguir automaticamente o palestrante ativo. A câmera ajusta o enquadramento em tempo real para focar na pessoa que está falando, tornando-o ideal para apresentações e discussões dinâmicas.
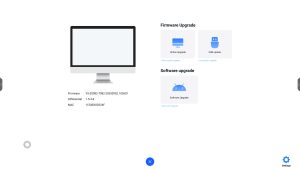
Verifique a versão do firmware do CM55.
● Se a versão for mais antiga que “YS-ES982-T982-20250804.095522”, atualize para a versão mais recente.
* Antes de atualizar, faça backup de quaisquer arquivos importantes. O processo de atualização via USB OTA pode redefinir suas configurações e dados.
● Se a versão do firmware for mais recente que “YS-ES982-T982-20250804.095522”, siga as etapas abaixo:
1. Abra Configurações em Connect Pro > Mais > Configuração Avançada > Moderado e desative a opção.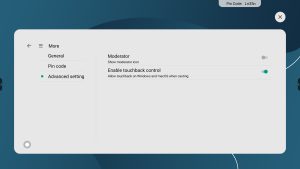
2. Vá para Configurações > Mais > Código PIN, e então desative o código PIN ou selecione a opção para não exibi-lo na tela.
3. Acesse ou atualize o site que requer acesso à câmera e ao microfone. O Chrome solicitará automaticamente a permissão — selecione Permitir para conceder acesso.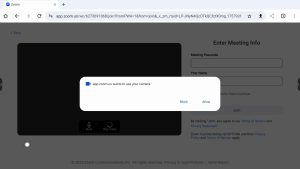
4. Se a câmera ou o microfone ainda não funcionarem, clique no ícone de cadeado no canto superior esquerdo da barra de endereços do navegador para abrir as configurações de permissão e verifique se o site possui as permissões adequadas de acesso.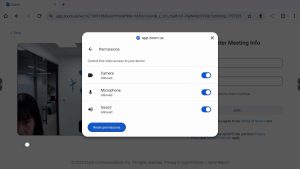
Para alterar o papel de parede da interface principal: Na barra lateral, toque no ícone “Apps” e abra “Tema”. Você pode escolher entre os temas pré-instalados ou enviar uma imagem personalizada para definir como papel de parede.

- Senha padrão
- Certifique-se de que os cabos estejam conectados firmemente ao PC e ao Ideao Hub.
- Certifique-se de que a fonte de sinal correta esteja selecionada. Deslize para baixo a partir da borda superior direita com dois dedos para abrir o menu OSD. No menu OSD, você pode trocar para a fonte correta.
- Experimente um cabo diferente e veja se a tela pode ser projetada no Ideao Hub.
- Certifique-se de que nas configurações do seu computador, a saída de som esteja definida como Ideao Hub.
- Certifique-se de que o Ideao Hub não esteja silenciado. Deslize para baixo a partir da borda superior direita com dois dedos para abrir o menu OSD. No OSD, verifique o volume de som atual e ative-o.
- Se você estiver conectando o Ideao Hub ao computador com DVI ou VGA (D-Sub), é necessário conectar um cabo de áudio para reproduzir o som pelos alto-falantes do Ideao Hub. (Se você estiver conectando com cabo USB tipo-C ou HDMI, um cabo de áudio extra não é necessário.)
Se conectar ao PC com um cabo diferente de USB Tipo C, como com cabo HDMI ou VGA D-sub, para ativar o controle de toque, também é necessário conectar com um cabo USB Tipo A-B. USB-B para toque na extremidade do Hub, e USB-A na extremidade do seu computador.
O toque de volta pode variar dependendo do modelo.
Para iPhone ou aqueles dispositivos que não suportam controle por toque com dispositivos externos, não é possível fazê-lo.
Sim. Para trocar as fontes de sinal, deslize para baixo a partir do canto superior direito com dois dedos para abrir o menu OSD. No menu OSD, você pode selecionar a fonte de sinal.
Nas Configurações de Exibição, defina o Ideao Hub como sua tela principal.
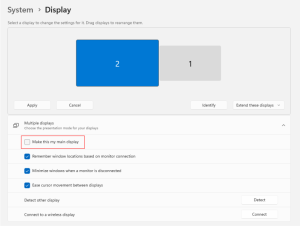
Se você não deseja definir o Hub como sua tela principal, siga os passos abaixo.
1. Clique no Menu Iniciar, digite [Painel de Controle] e clique em [Painel de Controle]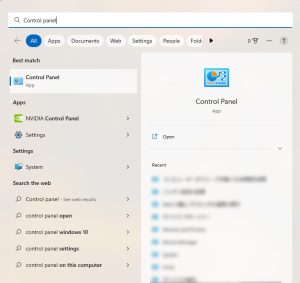
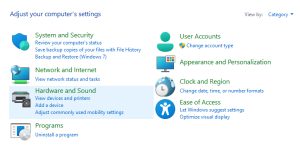
2. Dentro do Painel de Controle, selecione [Hardware e Som]
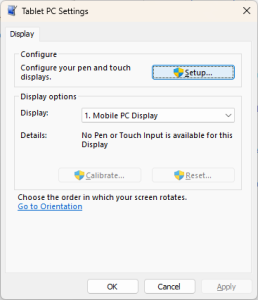
3. Dentro de Hardware e Som, selecione [Configurações do Tablet PC]
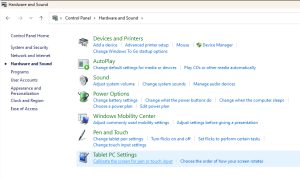
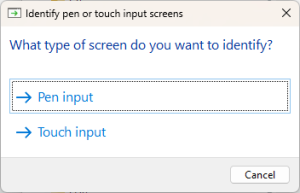
4. Clique em [Configuração] e selecione [Entrada de Toque]
5. A mensagem abaixo aparece em cada tela uma por uma. Se aparecer no Ideao Hub, toque na tela. Se aparecer em outras telas, pressione [Enter]
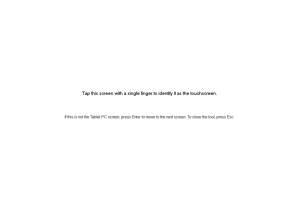
6. A configuração fecha automaticamente após a conclusão do processo.
7. Reinicie o computador e verifique se o toque funciona corretamente
First, try reconnecting all the cables and power cycle the Ideao Hub by turning it off and then on again. If the issue persists, directly unplug the power cable from the Ideao Hub while the screen is powered on, and then replug the power cable.
If Reactiv SUITE crashes on Startup and fails to show a crash report, perform the following steps:
- Open Event Viewer in Windows

- Go to Windows Logs > Application. Look for the Error where the source is Application Error. The latest crash entry will be on the top

- Copy the contents of the General Tab and send it to techsupport@vizetto.com

Based on the content of these details we can determine the next course of action.
NOTE: Ensure that you have an updated version of Microsoft Office. Outdated versions may result in errors during startup.
Check to see if you are using the new Intel i10 Ice Lake or i11 Tiger Lake CPU. The new Intel CPU chips have an issue and will cause Reactiv SUITE to crash. A temporary workaround is listed below so you can continue to use Reactiv SUITE:
- Open “File Explorer” (Win+E), right-click on “This PC”, and select “Properties”

- Select “Advanced System Settings”

- Select “Environment Variables” in the “Advanced” tab

- Select “New…” under “System variables”

- Input the text below and select “OK”
Variable name: OPENSSL_ia32cap
Variable value: ~0x200000200000000

- Confirm that the variable has been added successfully, then select “OK”

- Start Reactiv SUITE
If you didn’t already purchase a key from one of our partners, simply fill the Free trial form when you launch Reactiv SUITE, and you will receive your Trial License Key by email.
- Check your Junk Email folder
- Wait a few minutes and refresh your email
- If you still don’t receive it, you can contact us
- Go to Settings

- In Product License, activate by entering your activation code

- Go to settings
- In Product License, enter your license
- Click on Deactivate

- If you bought your license from one of our partners, contact their customer support
- If not possible, contact our customer support
Once a license is deactivated, you can use the same key and activate it again on another PC.
- Connect up to 3 additional displays to the Reactiv SUITE PC
- In Reactiv SUITE settings > Device Manager > Display Layout, configure the position of your secondary displays. Just select the available display and drop it into the position on the layout for Reactiv SUITE to take control. The location of the display represents the ‘throw’ direction of the content. Just throw content right, left or up, and the content will appear on the appropriate display as per the layout map

- Verify Windows recognizes the secondary display. In Windows, right-click on your desktop, select “displays settings”, and confirm that the secondary display is detected
- If the secondary display is not detected by Windows, try to disconnect and reconnect the display, or change the cables
If your keyboard relies on a “Bluetooth USB dongle”, the IWB might block the Bluetooth signal, if possible, try to put the USB dongle on an available USB port on the side of the IWB instead of a behind the IWB.
- If your IWB has a ShadowSense touch screen
- Make sure that you are using the pen and eraser that was originally delivered
- Go in settings > devices manager > Touch Screen:
- Make sure your touch profile is set to “IWB”
- Make sure that the ShadowSense Firmware is R11.0 or higher, otherwise, update the firmware by clicking on “firmware update” and following the instructions
- In the Touch screen settings, if you see multiple choice for the Stylus (that option is only available for some specific IWB), select the one you are using

Reactiv SUITE requires Microsoft Office to be installed and activated on the computer running the software in order to open documents such as Word, PowerPoint, or Excel.
Ensure that you are not running a 30-day free trial and your license is valid and not expired.
- In Windows, open any Office app (Excel, PowerPoint, Word…)
- Go “Files” > “account” > and verify that the product is activated

- If the account is not activated, you will need to contact your IT department to activate it or to purchase a new license
Reactiv SUITE IWB is by default configured to be in full screen “Kiosk Mode” by your IT department.
Otherwise, go in Settings > User Interface > Additional Settings and click on toggle “Fullscreen mode”.
In Reactiv SUITE Settings > User Interface > Accent Color.

Yes, in the Settings > User Interface > Background Media.

No, but we are working on additional options to choose from which will be available soon.
Move any image into the presentation folder, and rename it “folder.jpg” – that picture will become the presentation thumbnail.
Any sub-folder, inside the presentation, can also be customized by placing a “folder.jpg” file within it.
Move any picture into the presentation folder and rename it “background.jpg”, that picture will become the presentation background in STAGE.
Any sub-folder, inside the presentation, can also be customized by placing a “background.jpg” file within it.
Go in Settings > System > Browser Settings to add or remove Quick Launch shortcuts. To change the shortcut Icon, click on the icon and locate on your PC the new icon you would like to replace it with.
- On the Home screen, select Reactiv STAGE or Reactiv SCRIBBLE

- From the Lobby (Public or Private Workspaces), you can start a presentation just by clicking on any of the icons

- On the Home screen, select Reactiv STAGE or Reactiv SCRIBBLE
- From the Lobby (Public or Private Workspaces), you can add new workspaces by clicking on the ‘+’ icon

- In Details:
- Enter a title and a description
- Add a folder with the desired files to use in the Workspace by clicking on the Folder button

- In Media:
- Add images as the preview and background media by clicking on +

- Add images as the preview and background media by clicking on +
- Click on Save. Select your Workspace on the Lobby screen and start presenting
- In Details:
- On the home screen, click on the help button, ‘?’ to see mini video-tutorials explaining the basic gestures and features

- In a presentation, click on the interrogation mark in the bottom right corner to see mini video-tutorials

- For more information on basic tools, refer to the Getting Started Guide
- Use your USB key to automatically start a project
- Prepare your files in a USB flash drive
- Plug your USB flash drive into the Interactive Whiteboard
- Ensure that USB drive is enabled in SETTINGS

- Start Reactiv STAGE or SCRIBBLE and go to the lobby
- Click on the USB Project icon to start presenting

- Now, all changes will be saved back into the same USB folder
Before your presentation/at your desk:
- Open your presentation folder
- If you are using Chrome, navigate to the webpage you would like to use in Reactiv SUITE, select the address in the address bar, click and drag it into your presentation folder, and create a URL file (shortcut to a webpage)
- If you are using another browser, in your presentation folder: Right-click > New > Shortcut > past your webpage address > next > name your shortcut and click finish
In Reactiv SUITE/during your presentation:
- Click on the browser icon

- Navigate to the webpage you would like to work on
- Click on the “add to presentation” button located on the browser floating toolbar

- The webpage will now be in your presentation folder so you can open it in STAGE and SCRIBBLE
Everything you present and save, during a session, will be saved back to the exact same folder as the originating file. On-premises or off-premises storage, Local drive, USB flash drive, network drive, or Cloud, data will only be saved to the location of your choice.
Reactiv STAGE is a powerful non-linear storytelling tool that enables teams to shift focus from managing content to the narrative of a presentation. STAGE allows you to open, render, markup, and present content in any format that you routinely use. Dramatically improves the speed and accuracy of capturing audience feedback and meeting results.
At any time, click the “arrange” button at the bottom right corner of your screen to automatically arrange every object on the screen.

To clean your presentation screen, click the “remove all” button at the bottom right corner of your screen.

You can save documents, with your annotations, by clicking on the save button, located on the STAGE toolbar. Just click on any content and the toolbar will appear.

Reactiv SCRIBBLE is a breakthrough brainstorming and layout tool, that uses an infinite canvas, allowing you to sketch, write ideas, mark up pages and create dynamic layouts that accurately represent your vision.
SCRIBBLE simplifies complex ideas, visually communicates vision and intent and allows your team to capture decisions and reduce mistakes.
- Use the pagination tool to create page breaks from any part of the canvas that you would like to share. Then simply export these pages breaks into a PDF
- Once the PDF created, it will be in your presentation folder so you can share it easily

Once a page break is defined, you must click “create page” button again. Every time you want to add a new page, this button must be clicked again.

When using the smart feature, the insert path must cover the entire height/width of the objects/inking that you want to move, in order to select them. When selected properly, the content will be highlighted.

Using the Lasso tool, you can move and resize content on your canvas.
Double click on the canvas to activate the smart insert tool, and create a closed path to select everything inside the loop. Once the loop is closed, you can move the content around the canvas and resize it to re-organize the layout as you wish.

Reactiv SCRIBBLE allows users to mirror a paginated area, or the entire workspace into up to 3 secondary displays:
- To mirror a page, click & hold and throw it in the direction of the secondary display you want it to be mirrored in
- To mirror the entire workspace, click and hold the canvas, then throw it in the direction of the secondary screen
Reactiv SCRIBBLE is all about layout. It will allow you to mirror a specific layout defined by a page break. You cannot mirror just a single document – if you want to mirror a document, do that in STAGE.
To mirror the entire workspace, click and hold the background, then throw it in the direction of the secondary screen.
- Throw the same page again, in the same direction, to remove it from the secondary display
- Or throw a new document in the same direction to replace the first one
- Make sure that you are throwing in the right direction. You need to throw the content in a specific direction as each direction (left/right/up) are different displays
- Check Reactiv SUITE settings and make sure that the secondary displays are correctly configured
- Make sure that the object you are throwing is properly hitting the border of the screen and bounces back into position. If the object doesn’t properly hit the border of the screen it will not mirror
Reactiv SCRIBBLE
- Will auto-save your progress after every modification. You don’t have to worry about saving during your session, just focus on your work
- You can also paginate your canvas into individual pages, and export to PDF
Integrated services that seamlessly connect in-room devices into the Reactiv SUITE eco-system.
Remote CONNECT allows colleagues and attendees to interact with the Interactive White Board using their personal devices. They can share files with Reactiv SUITE, cast their device’s screen into it, or use their devices as keyboards for the IWB.
In-room compatible devices such as laptops, mobiles and tablets can be cast to Reactiv SUITE using build-in Airplay and Miracast capabilities.
- Which devices can I cast from?
Airplay: You can cast from iPhone, iPad, iPod Touch, MacBook, iMac, Mac mini, etc.
Miracast: You can cast from certain Android devices (Samsung and other phone/tablet which support Miracast) or Windows 10 PCs (using in-built Miracast capabilities).
Chromecast: You can cast from various Google Chromebooks and other Android devices that support Chromecast.
- In Reactiv SUITE
Ensure that Airplay, Miracast and/or Chromecast are enabled in Reactiv SUITE settings. Once a device is paired, it will appear in STAGE and SCRIBBLE in the library, under the “Devices” tab.
- On your device
Open the appropriate casting application on your device. Search for the Device Name in the list and connect to it. The Device Name is displayed in the top right-hand corner of Reactiv SUITE status bar.

Yes, Reactiv SUITE supports off-the-shelf video capture cards and USB video capture devices which convert HDMI\DP video inputs into a USB stream. These devices can be configured for use using the SETTINGS -> Device Manager -> AV Settings menu inside Reactiv SUITE. Using this menu, you can create an A/V source by combining video and audio inputs together into one stream.

There is no limit to the number of web cameras and A/V sources that can be managed by Reactiv SUITE.
Reactiv SUITE will process as many video capture devices as detected by the Operating System. It should be noted that the performance of the system is dependant on the system capabilities of the Reactiv SUITE PC. USB bus bandwidth, memory bandwidth and the ability for the CPU to process these streams will be the limiting factor.
Reactiv SUITE will detect all video input sources that are detected by the Windows OS. Check Device Manager to confirm that the device you are looking for is present. If not, re-install the device and confirm that Windows is able to detect it.


This can happen when Windows, or the installed anti-virus software on the computer, blocks access to the camera for certain desktop programs. To fix this, open Camera Privacy Settings and verify that the desktop apps have access to your camera.

Next if Anti-Virus programs (like Kaspersky) are installed, ensure that the Camera input to Reactiv SUITE application is enabled from the Kaspersky Application Control.

Kaspersky blocks both settings Access to webcam and Access to audio capturing devices for Reactiv SUITE.
Team members present in the room can wirelessly send any file to Reactiv SUITE by opening the URL displayed in the top left-hand corner of the Reactiv status bar, using any browser on their personal device. Follow the instructions on the browser to upload files directly into the active digital workspace.
For more information, refer to the Getting Started Guide – Remote Services.

Reactiv enables you to discreetly share text or complex weblinks from your remote device into the Reactiv Workspace. Just open the URL displayed in the top left corner of the Reactiv status bar on any in-room personal device. Follow the instruction to send text or URL links directly into Reactiv SUITE apps or the browser.
For more information, refer to the Advanced User Manual – Remote Keyboard (Link to file for download).
Using in-room devices as keyboard for the IWB is a feature only available for IWB using ShadowSense touchscreen technology, as Reactiv SUITE leverage specific internal connections only available with IWB powered by ShadowSense
- Open Reactiv SUITE settings > Device Manager > Touch Screen, if “ShadowSense not detected is displayed, then Remote Keyboard feature won’t work
- If the IWB is powered by ShadowSense, make sure that the ShadowSense Firmware is R11.0 or higher.
- If the Firmware is bellow r11.0, update it to the latest available firmware by clicking on “firmware update” and following the instructions

Yes, Airplay requires both the personal, in-room device and the Reactiv SUITE host PC to be on the same network for screen sharing to work.
- On iOS, open the control center and click on “Screen Mirroring”


- On macOS, click on the Airplay icon in the menu bar

- On macOS, verify that Airplay is enabled in System preference Displays “Show mirroring option in the menu bar”

- On iOS, verify that the OS is up to date
- Verify that your iPhone/iPad and the Reactiv SUITE device are on the same network
- Verify in Reactiv SUITE settings that Airplay is enabled
- On macOS, verify that incoming connections are not blocked
- Go to “System Preferences” > ”Security and Privacy”->Firewall > ”Firewall Options”, deselect “Block All incoming Connections”, and select “Automatically allow downloaded signed software to receive incoming connections” if it’s not already selected

- On the Reactiv SUITE PC, confirm that the Wi-Fi\Network connection is configured as a PRIVATE network. The PC must be discoverable for Airplay to work

- On the Reactiv SUITE PC, confirm that the firewall is configured to accept incoming connections
- On the Reactiv SUITE PC, confirm that the WiFi/Network connection is configured as a PRIVATE network. The PC must be discoverable in order for Airplay to work


- On the Reactiv SUITE PC, confirm that the firewall is configured to accept incoming connections
Please check the DNS setting (in network settings) of the PC running Reactiv SUITE. You can try using alternative DNS like Google’s free DNS 8.8.8.8 and 8.8.4.4.
Reactiv SUITE Airplay connectivity supports playback of videos using H.264 video codec and AAC audio codec. If the videos use any other format, they might not work.
If you are using a WiFi connection, the WiFi signal might be weak, or your network might be overloaded.
- Ensure a good signal between Reactiv SUITE host PC and the in-room device attempting to cast
- If possible, use a wired Ethernet cable instead of WiFi to connect the Reactiv SUITE host and macOS device to the network
- In some cases, switching off Bluetooth on in-room iOS devices can help to get a better connection
Once the screen is cast, the volume is controlled through Reactiv SUITE and not the in-room device.
- Reboot the PC running Reactiv and reboot the user’s personal devices and try again
- Refer to the IT Manual to ensure that the network configuration, ports and settings are configured correctly. Download IT Manual
- Confirm that your network supports mDNS protocol as this protocol cannot be blocked for Airplay to work correctly
- Install an off-the-shelf AppleTV device on your existing network and confirm that it works. If an off-the-shelf device works, Reactiv SUITE will also work
No, Miracast utilizes WiDi which doesn’t require the casting and receiving devices to be on the same network. As a result, any device in the room that supports Miracast will see the Reactiv SUITE Miracast server and can connect directly.
- On a Windows 10 device, click on the CONNECT icon and search for the Reactiv SUITE Device Name. Select this device and pick the projection mode

- On many Android and Samsung devices, in the Quick Settings menu open the Smart View app. Search for the Reactiv SUITE device name and follow instructions

- Not using a Samsung smartphone? See our detailed guide:
- Make sure that Reactiv SUITE PC has a valid WiFi adapter and it is turned on. Miracast requires WiFi connectivity with WiDi support. Airplane Mode must not be turned on
- On the Reactiv SUITE PC, go to “Projection Settings” and “Some Windows and Android devices can project to this PC when it is OK”, should be set to “Always Off” from the dropdown menu

- Confirm that the OS and WiDi adapter support Miracast
- On the Reactiv SUITE PC, type ‘dxdiag’ in the Windows search box
- Click ‘Save All Information’ and save the resulting file
- Open this DxDiag.txt file and confirm that Miracast is available


- On the Reactiv SUITE PC, confirm that the WiFi\Network connection is configured as a PRIVATE network. The PC must be discoverable in order for Miracast to work

- On the Reactiv SUITE PC, confirm that the firewall is configured to accept incoming connections

Refer to the IT Manual to ensure that the network configuration, ports and settings are properly configured. Download IT Manual
- On the Reactiv SUITE PC, configure ports:
- “Windows Defender Firewall” > “Advanced settings” > “Inbound Rules” > “New Rules”. Select “Port”,
- Click Next
- Now select “TCP” and “Specific Port numbers” set it to 7236
- Click Next and select “Allow the Connection”
- Click Next and select all 3 boxes “Domain”, Public” and “Private”. Click Next, give a name to the new rule
If Miracast still doesn’t work, try the Windows native Miracast app provided by Microsoft. Type ‘Connect’ in the search box.

Confirm if this app is able to connect to your mobile device. If this app also does not work, then the PC does not support Miracast.


That is to be expected, Miracast defaults to a 16:9 aspect ratio by default.
Yes, Chromecast requires both the personal, in-room device and the Reactiv SUITE host PC to be on the same network for screen sharing to work.
- Make sure your mobile phone or tablet is on the same Wi-Fi network as your Chromecast device
- Open the Google Home app

- Tap the device you want to cast your screen to
- Tap Cast my screen
 > Cast screen
- Make sure that both your in-room device and your Reactiv SUITE PC are on the same network
- On the Reactiv SUITE PC, confirm that the WiFi/Network connection is configured as a PRIVATE network. Reactiv SUITE PC IP must be discoverable

- On the Reactiv PC, open a browser and type: “Localhost\Reactiv” in the search bar to confirm that the Reactiv Webserver is working

- On the Reactiv PC, Reactiv webserver rely on port 80, and while it is normally open by default, you can create a new firewall rule to open it:
- “Windows Defender Firewall” > “Advanced settings” > “Inbound Rules” > “New Rules”. Select “Port”,
- click Next
- Now select “TCP” and “Specific Port numbers” set it to 80
- Click Next and select “Allow the Connection”
- Click Next and select all 3 boxes “Domain”, Public” and “Private”. Click Next, give a name to the new rule
- From a Windows device on the same network: Ping the Reactiv Webserver IP address to see if it is reachable:
- In windows, open Command Prompt by hitting Windows+R and typing “cmd” in the run bar, then hit enter
- In Command Prompt, type “ping reactiv_ip_address”

Reactiv SUITE creates a webserver on the PC in order for in-room devices to connect and transfer information. But the Reactiv SUITE PC could have multiple IP addresses due to multiple network adapters. An example is connecting WiFi and LAN cable to the PC, which will create two IP addresses for the same PC.
If the IP address displayed in the status bar is incorrect, you can use the Settings > System > Remote Connect > Text/File Sharing menu to pick the correct IP address.
